Showing posts with label heavyweight smoothy card. Show all posts

Monday, 19 May 2025

Mini album with Seth Apter Products {by Etsuko Noguchi}


Hi everyone, nice to be back with you again

Etsuko here with you today.

This year on the blog, we have free reign to do a deep dive into PaperArtsy product ranges of our choosing. For this post I have been exploring Seth Apter's products. Today I'm looking forward to sharing with you what I figured out when I made the mini album with Seth Apter's stamps.


In this post, my theme is how to create a mini album using Seth's stamps in a fun and effective way. Please take a look.


Before starting the project, I first prepared these Seth products. The stamps are the latest ones released earlier this year and the colors are Seth’s originals.  I used most of the colors for gel printing by Seth's colours. It seems to me that Seth weaves stories by making stamps from things that inspire him on his walks and travels. I share that feeling and wanted to enjoy creating my works using these stamps. The paints I used here were PaperArtsy Fresco Finish Chalk Acrylics - Glacier Ice, Niagara Falls, Fuzzy Cactus, Heavy Cream, Steel Grey, Rusty, Kiwi Gold, Tomato and some more. Fabulous stamps were Seth Apter's stamp sets 43, 44 and 45 (ESA43, ESA44 and ESA45).


First I used gel plates to make the base of the album and the collage papers. The first painting I did, that Seth showed in a video, was to use opaque colors and then lightly dab transparent colors on top of them. I used black and white papers and printed them alternately until I had a paper of a color I liked.


In addition to the two-colored paper, I also prepared some washi papers, added paints with  water and printed it using the same gel plates. I used these for thin tape and coloring points.


This time I decided to make a simple rectangular mini album in the √2 golden ratio, using a collage technique made from gel print papers I had made previously. The diagram above explains how to create the √2 golden ratio rectangle used here.


Draw the diagonal of the square, and use the diagonal as a radius to draw an arc that is tangent to the extension of the base of the square. Draw a rectangle that encloses the resulting figure. This is a √2 rectangle. Dividing it will create a smaller √2 rectangles (from book - Balance in Design). I tried to base the collage on this method, but I didn't use it for everything. When I overdid it a bit, or the colors didn't work out, I just relied on my usual eyeballing to fix it. Using this √2, the actual dimensions of the rectangular card are 3 inches high and 4 1/4 inches wide.


These six cards were my first attempts and after some trial and error I eventually created the following 12 pages of cards.


I created 12 rectangular cards, as described written above, 3 inches high and 4 1/4 inches wide using Smoothy (Heavyweight) A4 white stamping card and collaged the gel printing papers on them top. From the 12 collaged cards I chose this card as the cover of the album. I used 'CLASSIFILD' from ESA07 stamp set.


Now, let me give you a brief introduction to each page. The gel printing papers were used almost as is, and variations were added by stamping with ink or embossing powder. The technique and Seth's stamps used will be shown in the enlarged photos below.


On this page, I added some leftover pieces. The embroidered fabric, stamped paper, and textured wallpaper used for paint stamping. The metal 6 is made by embossing foil using a cutting die and then coloring it in a vintage style with alcohol ink to create numbers and letters, which I use whenever necessary.


The marks shown here are from stamps and Seth’s printed tissue paper, and I love the Damask pattern stamp on the right-hand page and I think it will come in very handy.


Here I printed the letter X onto fabric and stitched around it. Also I embossed it onto wax papers with embossing powder then I glued them over the collage.


The last page. The photo is a little dark and hard to see, but the grid on the left page is made of bronze powder. You can see it in the enlarged photo below. I used light pink gel print paper for this whole page.

For the spine, I chose a simple vintage-style card.


I mainly use Seth's new 3 set stamps here, but I chose this CLASSIFIED for the focal point because the words stand out. I used Seth Apter stamp set 07 and 44 (ESA07 and ESA44). Ranger Industries Archival Ink (ground espresso and jet black) with Distress embossing powder (Lost Shadow).


I used Seth Apter Mini stamp EM45 with Distress embossing powder (Lost Shadow). The green lines were made by painting Green Patina onto washi paper and ripping it into thin strips.


PaperArtsy's blank tissue is thin but strong enough that it doesn't wrinkle easily, making it a great product. It also goes great with stamps and Mattints, so I use it whenever I get the chance. Here I used the ESA35 stamp with white embossing powder on blank tissue paper. I took the photo with the light shining on it, so the tissue paper looks white, but you can't really tell from the outside. Satin Glaze seems to be good for adhesion.


From here on, I will introduce the products, which are made using the same techniques. I used stamps are ESA43 and ESA18The former used Archival Ink jet black with Lost Shadow embossing powder and the latter used mixed whitish powder.


Stamp is ESA34 with some Red Ink.


Stamped ESA43 with bronze powder on the Vellum paper.


Stamped ESA45 with Seth's Baked Texture the altered page.


Stamped ESA45 with Archival Ink jet black with Lost Shadow embossing powder. The photos below show the products used above.


I decided to make a fabric hinge to hold the 12 cards in the album. To match the colors of the album, I diluted Bougainvillea with water and dyed some off-white fabric, then dried it and it turned out a great color.


I stamped the EM69 stamp all over the dry cloth using Destress Ink Vintage Photo.


I rip a piece of hinge fabric to the width of the card, attached it between two cards with double-sided tape, and then joined two other cards together using a sewing machine.


I wanted to dangle something from the back of the album, so I tried out a lot of different things but nothing seemed right. I thought a simple thing like a branch would be good, so I bundled together some hemp string to make a branch, then wrapped embroidery thread around it and made it like this.


Since I made the width of the hinge fabric a little wider, the cards didn't hang loosely together, so I connected them tightly with backstitching like this. This completed the project.


In most cases, when I make an album, I emphasize unity and create one or two master boards, then insert photos and stamp images to create a flow. However, this time I wanted to try a √2 composition, so I made a collage using printed paper. There were some pages that were disjointed, but I enjoyed the process. I would like to use this experience to create more creative works. If you would like to create abstract works using Seth's stamps, please share them with us on Facebook, PaperArtsy people, or Instagram. We look forward to seeing you.


Thank you so much visiting.

Etsuko xx


Facebook: Etsuko Noguchi
Instagram: Pixienest
Pinterest: Etsuko N

Saturday, 5 September 2020

2020 #15 Little White Bird with Scrapcosy Stamps {by Jennie Atkinson}

 2020 Topic 15: Shades Of White


Creating using one main colour as a focus can take a little more planning and Jennie has helpfully shared her thought process with us. She is known for her subtle and serene vintage-styled projects and this lovely tag is certainly no exception. I'm looking forward to seeing what she does with her bedroom project!
~ Keren

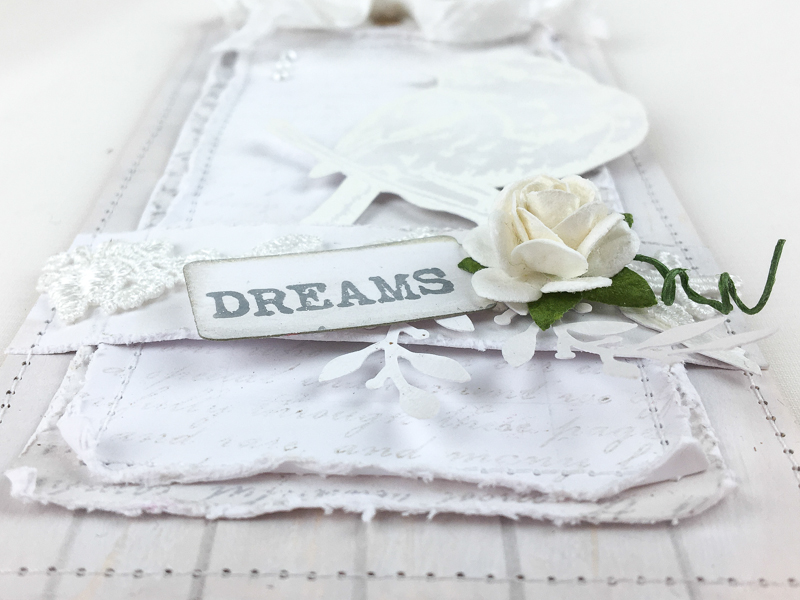
Hi everyone, it's Jennie (Live the Dream) here with you today, sharing a little layered tag. It will come as no surprise to any of you who know me that I have a huge selection of shades of white Fresco's, so our current challenge is just perfect for me.

I love the crispness of a white image or white embossing, or white lace in my work as a focus but when creating totally in shades of white, it is quite difficult to ensure that each white element manages to be seen, particularly as a camera will focus on a different hue to our eyes which adjust quite naturally. To try and get over this I have used different white coloured Frescos in my layers so that a lighter layer lies on a darker layer or vice versa. 
 

It is always a delight to use Scrapcosy stamps as the details always stamp so well, even with embossing powder. So I decided to use the lovely bird as my focus for the tag.


I thought the best place to start would be to use a brayer to get different shades onto a tag. I have used Snowflake, Cloud 9, and Eggshell. They all look pretty well the same here, but there are some very subtle differences in hue when you start layering them.


I then coloured some cardstock in the same way, being a little heavier with Eggshell on the large piece of Smoothy Cardstock and just sticking with Snowflake for the smaller piece. I am starting to get some differences now.


I managed to get a little more definition on my tag by scoring lines to look like a fence. I also wanted a couple of scruffy layers to sit on top of the tag and so the text stamp from ESC18 worked well with Grey Ink . 


I stamped off to get a lighter hue and adding the layers to the tag by white machine stitching added to both the texture and layers of colour.


Adding a strip across the lower part of the tag when I machine stitched the tag onto another (to give it some strength) gave me another layer of white which could then be decorated with white embellishments.


This also gave the embossed bird the chance to be tucked in underneath and so everything connects.


I tried to find a darker part of my brayered paper to stamp the bird so he was sitting on a lighter background. Raising him on foam pads helped too. 


It is very easy for all the individual white elements to get lost but by layering as much as possible this gave me the opportunity to layer lighter shades on darker shades and the added "shadow" of the raised elements added focus. I think the single "pop" of green works well too!


White is often seen as a tranquil colour but can also be very stark. We all know how a bride must often add more make up to counter a white wedding dress which can really wash out one's colour (the reason we never wear white on the stage!). But it can be fun to experiment with shades of white and just creating this tag has made me think about decorating one of our spare rooms using different shades on the walls, curtains and furnishings. If I could get it right, it would be a lovely fresh but tranquil space to disappear to. Who knows where this little white bird might lead me .......

As always thank you for joining me.
Jennie x

PaperArtsy Relocation News
 
We are in the throes of relocating our business from England to France. Please be aware from August 10 through October 1st, both the PaperArtsy retail and wholesale websites are in hibernation mode while we pack, move and unpack. This means you can view our websites, but you cannot proceed through checkout.
 
As always, we ask that you support our stockists (listed below) if you need to get your hands on supplies. They are well stocked and prepared for this period. If you are not sure where to start, join our facebook Group, PaperArtsy People where a stockist will link you to their store for any given product.
 
PaperArtsy Retailers - I recently created a private Facebook group just for you so we can communicate to you with ease until we have email, internet etc up and running in France, so make sure to PM me for an invite.

Australia
Bella Paperie, Brendale, Queensland, www.bellapaperie.net.au
Bev's Cross Crafts, Spreyton, Tasmania https://www.bevscrosscrafts.com.au/
Crafters Cupboard, Berwick, Victoria www.crafterscupboard.com.au
Memories on the Murray, Murray Bridge, SA  https://www.memoriesonthemurray.net/
Scrap Matrix, Port Elliot, South Australia http://scrapmatrix.com/
Scrapbook Superstore & More South Penrith, NSW https://www.scrapbooksuperstore.com.au/
The Scrapbooker's Confetti Box, Swansea,NSW https://thescrapbookersconfettibox.com/
The Thread Studio, 6 Smith Street, Perth http://www.thethreadstudio.com/
The Scrapbook Store, North Perth,WA http://thescrapbookstore.com.au/ 
Time To Create, Modanville, NSW www.timetocreate.com.au

Belgium
Cart N Scrap Art, Antwerp, cartnscrap@gmail.com
Cotrain, Kontich, www.cotrain.be
Expression Hobby, Marcinelle www.expressionhobby.be

Canada
Clipper Street Scrapbook Company, Langley, BC. www.clipperstreet.com
Paper Art Creations Inc, Leduc, Alberta, http://www.paperartcreations.com/
Scrapbook Centrale, Dollard Des Ormeaux, Quebec www.scrapbookcentrale.ca
Simply Scrapbooking, Prince George, BC https://www.facebook.com/simplyscrapbooking/
Scrap Addicts, Edmonton, Alberta https://www.scrapaddicts.ca/
Scrap and Bean, Edmonton, Alberta http://scrapandbean.com/ 
Scrapbooking Fairies, Drayton Valley, Alberta https://www.scrapbookingfairies.com/
The Paper & ink Boutique, Calgary, Alberta https://www.paperandinkboutique.com/
The Scrap Yard, Calgary, Alberta, https://www.thescrapyardcalgary.com/ 

Denmark
Hobbyboden Scrapworld Samso www.hobbyboden.dk

France
Eirl Bancon Cartoscrap, Midi Pyrenees, https://www.cartoscrap.com/blog/
Horizon Creatif, Ste Jalle h.creatif@gmail.com
Katzelkraft, Ingwiller http://www.katzelkraft.fr/en/
Kerglaz, Basse Goulaine, https://www.kerglaz.com/  
Kerudoc Creation, St Yvi www.kerudoccreation.com
Quartier Serre Teston, Ste Jalle, hcreatif@gmail.com
Scrap by Nini,  Uzerche, Limousin https://scrapbynini.fr/ 
Scrapo'naturel, Tourville La Riviere, www.scraponaturel.fr/livraison 
Toutencolle, Dun sur Avon www.toutencolle.fr

Germany
Paperbasics, Hessen, www.paperbasics.de
Stempelbar, Berlin, www.stempelbar.de
Stempeloase Munich, Munich www.stempeloase.de
Stempelfee Shop, Hilden www.stempelfee-shop.de
Stempellaedle, Stuttgart, www.stempellaedle.de/shop

Greece
Scraps N Pieces, Kallithea www.scrapsnpieces.gr

Italy
Immagine SAS di Rapaccini, Rome, www.immaginelab.com
Il Negozio Della Mamma Di Cle, Torino, clelia27@liberio.it
L'artistica Glo, Cinisello B (Mi), www.artisticaglo.it
Marte Savona, Savona, www.martesavona.it
Pezze E Colori, Lissone, http://www.pezzeecolori.it/
Piccole Passioni, Siena, www.piccolepassioni.it
Scrap it Easy, Rome, https://www.scrapiteasy.com/it/

Japan
Tiny Dots, Funabashi-shi, Chiba www.facebook.com/TinyDots

Netherlands
Doe@ding,Spijkenisse https://doeading.nl/
Hobbycompleet de Duif, Leeuwarden www.hobbycompleet.nl
Stampingcorner, Capelle Aan Den Ijssel www.stampingcorner.nl

Norway
Hobbygarasjen, Kopervik, www.Hobbygarasjen.no
Hobbykunst, Rasta, www.hobbykunst-norge.no
Scrapbookengros AS, Kleppe www.hobbylageret.no

Spain
Arts & Crafts, Barcelona, pebdesign@hotmail.es
Cien por Cien Manualidades, S.L., Bizkaia, Catalunya,  www.100x100manualidades.es
Endulze & Crista S.L, Pampalona, Navarra,  www.endulze.com
Ideas 10 Manualidades Y Scrapbook, Bilbao https://ideas10manualidades.com/
Marakiscrap, Tarragona, www.marakiscrap.com
MundoMint, Sabadell, Barcelona, www.mundomint.es
Scrap & Papers Experiences, Barcelona, Info@casonadequintana.com
Scraphouse S.L. Barcelona www.scraphouseshop.es
The Paradise Corner, Barcelona, www.facebook.com/theparadisecorner 

South Africa
Kcraft Imports Ltd, Centurion, www.kcraft.co.za
Stencil Art, Gauteng, www.stencil-art.co.za 

Sweden
Butik Elva, Staffanstorp, https://www.butikelva.se/
HC Design, Svedala, www.hcdesign.nu

Taiwan
Mandy's Cards, Taipei www.facebook.com/mandy.card

United Kingdom
A Trip Down Memory Lane, Ipswich, Suffolk, http://www.atripdownmemorylane.co.uk
Aldridge Crafts, Attleborough, Norfolk www.aldridgecrafts.co.uk
Amelia's Creative Crafts, Studley, Warwickshire  www.ameliascreativecrafts.co.uk
Art from the Heart, Harrogate, Yorkshire www.afth.co.uk
Blade Rubber Stamps, London www.bladerubberstamps.co.uk
Countryview Crafts, Potton, Bedfordshire www.countryviewcrafts.co.uk
Crafts at The Malthouse, Herstmonceux,  East Sussex, http://www.themalthouse.co.uk/
Craftrange, Burnley, Lancs, https://www.craftrange.com/
Fave Rave, Stourbridge, West Midlands www.shabbychicstencils.co.uk
Handmade at Helen's, Dumfries, Scotland, https://www.handmadeathelens.co.uk/
Hixxysoft, Frome, Somerset, https://www.hixxysoft.com/
Loobi Crafts, Leighton Buzzard, Bedfordshire, www.loobicrafts.co.uk
Papermaze, Ipswich, Suffolk www.papermaze.co.uk
Stampers Grove, Springbank, Lilliesleaf, Melrose,Scotland www.stampersgrove.co.uk
That's Crafty
, Romford, essex www.thatscrafty.co.uk
The Artistic Stamper Craft Store, Faversham, Kent www.theartisticstamper.com
The Crafty Cafe,
Rolleston-on-Dove, Staffs,
http://www.thecraftycafe.co.uk/
The Craft Room, Newcastle-Under-Lyme, Staffs https://www.garnersgardencentre.co.uk/crafts/
The Craft Studio, St Austell, Cornwall https://www.facebook.com/thecraftstudio/
The Forget me not Kraft Kabin www.TheForgetMeNotKraftKabin.co.uk


USA
Annie G Studio, Chula Vista, CA https://www.anniegstudio.com/
Art Anthology, Huntington Beach, CA http://artanthologyinc.com/
Artistic Artifacts, Alexandria, VA https://www.artisticartifacts.com/
Artistic Studio Creations, Fayetteville, Georgia www.facebook.com/ASCbyCrystal
Artistree Workshops, Fulton, New York, www.facebook.com/artistreeworkshops
Big Mouth Scrappers, Forney, Texas, https://www.bigmouthscrapperstx.com/ 
Craftiness, Chatsworth, CA, https://www.craftinessonline.com/
Creative Inkling, Hatnboro, PA https://www.creativeinkling.com/
Ephemera Paducah, Paducah, Kentucky www.ephemerapaducah.com
Everything Scrapbook & Stamps, Lake Worth, Florida www.everythingscrapbook.com
Frantic Stamper, Oregon www.franticstamper.com
Free Heart LLC, Denver, Colarado, http://www.freeheartllc.com/
Golden Hills PaperCrafts, Fairfax Station, Virginia, https://www.goldenshillpapercrafts.com/
Guadalupe's Fun Rubber Stamps, Santa Fe, New Mexico www.santafe.com
Joggles, West Warwick, Rhode Island, www.joggles.com
PaperCraft Clubhouse, Westbrook, Connecticut, http://papercraftclubhouse.com/
Paper Parachute Art Design Co., Beaverton, Oregon www.paperparachute.com
Runaway, Art & Craft Studio, NE Salem, Oregon http://www.runawayart.com/
Scrapbook N Memories, Harrisonville, Missouri, https://www.scrapbooknmemories.net/
Simon Says Stamp, Columbus, Ohio www. simonsaysstamp.com
The Artistic Palette Studio, Eugene, OR, http://www.artistspalette.com/studio/
The Crafty Scrapper, Waxahachie, TX http://www.thecraftyscrapper.com/
The Doodlebug Inc, Jasper, IN, https://www.thedoodlebuginc.com/
The Ink Pad, New York, www.theinkpadnyc.com
The Queen's Ink Savage, Maryland www.queensink.com
Topflight Stamps, Irmo, South Carolina https://topflightstamps.com/
Stamp Fever, Orange, California www.stpstamp.com
Valley Stamp & Scrap LLC, Neenah, Wisconsin, https://www.valleystampandscrap.com/

Our brand is only available from established stockists who are VAT/ GST/ sales tax registered and for whom product education is a core principle. We would rather supply a few hand selected stockists, than the greater masses. If you would like to apply to be a stockist, you can find our more about our supply criteria here

PaperArtsy Links
Facebook Group PaperArtsy People
Facebook Page PaperArtsy