Showing posts with label Lin Brown. Show all posts

Monday, 8 September 2025

Sept 2025 - With 3 Things - Dreams Card {by Liesbeth Fidder-de Vos}


Hi friends, 

It's Liesbeth here with you, welcome to this new round of 'With Three Things´!

Every time, three members of our PaperArtsy Blogging team receive the exact same set of supplies. This time: a stamp set, a stencil and some Fresco Paint. Exiting!

We have no clue what PaperArtsy HQ is going to send, the whole idea of this challenge is to do something crafty in our personal style with these 3 items. We can incorporate other PA products into the mix if we feel it is necessary.

So let's take a look at what I received from PA HQ :


When I opened my package I was very happy to find this beautiful combination: PaperArtsy stamp set ELB34 and stencil PS002, both designed by Lin Brown. The two PaperArtsy Fresco paints are Rusty and Kiwi Gold. So nice! I immediately started thinking of possibilities....
And I came up with this big (A5) card ....let's take a closer look.


To create the card, I started with a piece of PaperArtsy Smoothy Heavyweight cardstock (almost A5: 14,4 x 20,5 cm) I tore a strip of masking paper in two pieces and masked the upper piece of the card with one of them, as shown here. I used the two paints the way they are and for a bit more contrast I also mixed both of them with a few drops of black and white ( PaperArtsy Fresco paints Little Black Dress and Snowflake) so I ended up with 4 colours.


Using small sponges I painted the first strip with the 4 paints. The mix with the black paint became very dark green, so I used that one in moderation. With one of the stamps I built up the background. I used Tsukineko StazOn - Saddle Brown, Mustard and Olive Green.

I removed the masking paper and covered the painted strip with the other half of the masking paper, and another torn masking paper a bit lower...to make the second area. 

I hope the picture below makes sense:


And so on.. Painting and stamping strip by strip, every time another stamp...I used them all!
Sometimes some white remained visible...I like it!


When al the painting and stamping was done I connected everything by using the stencil PS002  and the two Fresco paints Kiwi Gold and Rusty.


Using the white PaperArtsy Fresco paint Snowflake and the stencil, I sponged the large branch.


Onto a separate piece of paper I stamped the text and the hinges with dark brown StazOn ink (Timber brown), cut them out and sponged them a bit with Saddle brown (StazOn).


I glued the card onto an A5 white cardstock (a double A4)

I punched holes in the hinges, added some small brads and glued the hinges and text onto the card. I also outlined the white branch with a black fineliner.


This was so much fun! I love the images and the warm feel of the colour combination! And of course, I can´t wait to see what the others come up with! I will be fun to see how different three projects with the same Three Things can be!

Hope we inspired you with this!
Have a wonderful, creative time!

LiesbethXX
 
Instagram: liesbeth_fidder
Sunday, 22 August 2021

2021 Topic 10: My Favourite Colour Xmas Cards with ELB {by Lynn Good}

   2021 Topic 10: My Favourite Colour


Wow! Lynn has been a busy bee getting a head start on her Christmas cards. Her trick has been to come up with a fast background idea onto which she has overstamped in black a range of Lin Brown Christmas images. These will work for tags, cards and even wrapping paper!
~ Leandra

Hi everyone, it's Lynn Good (Memories on the page) with you today, and I'm here to share with you a sample of Christmas cards that I have made - Too early for Christmas you say??????? I find the closer to December it gets, the busier I get, so if I can get a chance to make them now why not!!!

This topic - my favourite colour - speaks Christmas to me.  I love bright colours and red, yellow and green go well with Christmas!


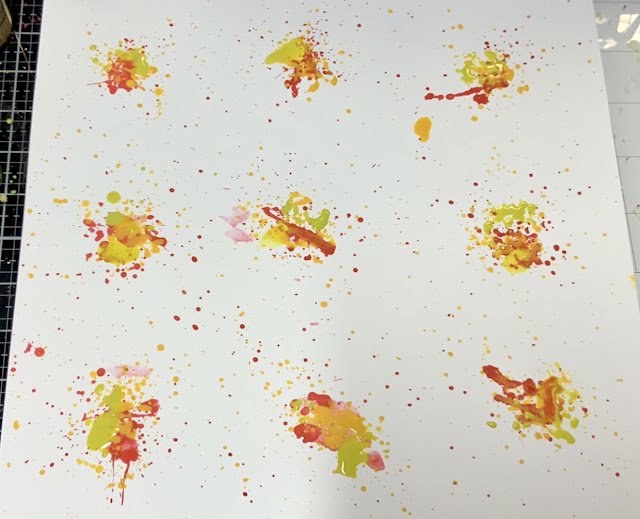
I began with a piece of heavy smoothy cardstock and added colour one by one.  The first colour I put down was London Bus - I have done this by adding the colour to my glass mat and then spritzing with water.  I have used a large round brush, filling it up with the paint and then splatting it in 9 areas which will form the centre of my card (splats).


I did this on a second piece of cardstock but with a smaller brush to get a more overall wash of dots (splatter).


Once the paint was dry I have done the same procedure using Banana and Dirty Lime.  I have added a touch of Cerise into the splatter page.  Make sure each layer of paint is dry before adding the next one.  I haven't worried about the wayward splotches as they all add to the effect.


I have then stamped the images onto the paper using the stamp set from Lin Brown Eclectica 11


I have used permanent black ink for the splatter page


I have embossed with a black sparkle embossing powder on the big splat page


I have cut each image out and edged with ink - I have used elements inks but any matching permanent ink will work


I have then backed each card with matching cardstock and added some stickles and liquid pearls.  Before the liquid pearls dried I have sprinkled with some glitter - nothing like some christmas sparkle!!!!!


I have then added adhered this to a folded card and all is done.


I hope this has inspired you to create some Christmas cards in your favourite colour before the silly season is here and time has run out.

Lynn xxxxxx

Saturday, 15 April 2017

ICE Resin® Vs UTEE {by Lin Brown}

2017 Topic 6: Resin

Lin Brown has always been a dab hand with UTEE and used to teach amazing classes in her shop where UTEE focal points were incorporated into her amazing metal work pieces. Tonight you get a taste of that! What a treat! And not one, but 2 resins!
 
Hello....Lin Brown from Yoursartfully here. It's always an absolute pleasure to have a guest spot on the PaperArtsy blog and tonight I'd like to share a little experiment I did to see whether  ICE Resin® or UTEE would be the best product for the project I had in mind.

I had two things on my "To Do" list recently, one of these was to create a project for this blog post and the second was to make a gift for a dear friend of mine. I decided it might be fun to combine both and check them both off my list in one go!! I am pleased to say that my friend has already received her gift, so it's perfectly OK for me to share it here with you lovely creative folks.


Many of you may remember that I used to use a lot of copper in my artwork and one of the techniques I cooked up way back then, was combining my metalwork and UTEE (click here to see the original blog post). The original post shows a more in depth, step-by-step project, the purpose of my post this evening was to establish which product would give me the best results for the project I have in mind.

ICE Resin® is a two part, jewellers grade, epoxy resin. It is self levelling and after curing, it is crystal clear.

UTEE stands for Ultra Thick Embossing Enamel and the name is pretty self explanatory, It melts just like regular embossing powder but the crystals look more like chunky sugar crystals.This can be melted in a Melt Pot and poured into moulds to create 3D embellishments.


I knew that I wanted to incorporate some of Seth Apter's fabulous wood chips and stamps but I didn't really know if I wanted them covered in either ICE Resin® or UTEE or if indeed they should remain as stamped, raw wood. 


Having made a few samples, I tested the tag shaped Wood Chip with a covering of UTEE and immediately knew that I preferred it without any products on it at all. The image beneath the UTEE appeared blurry and I felt that the matt finish of the Wood Chip was a good contrast against the other shiny embellishments I had made.


The sample on the left is a bezel filled with ICE Resin®, the one on the right is UTEE. I know that the ICE Resin® sample is a more interesting one as it has other embellishments embedded in it (I totally forgot to put them in the UTEE sample!!!)  but I think you will agree that the ICE Resin® one shows the detail of my skeleton leaf stamp from ELB31 so beautifully, that ICE Resin® wins hands down on that score. Having said that, I do love the amber glow that can be achieved with UTEE. If I were to create projects like this again and used images with less detail, i would seriously consider using UTEE as it really does look like amber. This is achieved by leaving the clear UTEE in the Melt Pot for a while, it develops the most gorgeous amber glow.


Above are a couple of close up shots so that you can compare the two samples. My lovely friend Sally received the top sample which is the ICE Resin® one, I just love the way you can see every teeny tiny detail of everything inside the bezel....perfect for this small wall hanging. 

The last thing that I would like to point out is in favour of UTEE. If you look closely at the UTEE sample, you may just be able to see that it has a slight domed effect to it which is totally different from ICE Resin®.

In conclusion, which product do I prefer? For this project, definitely ICE Resin® but I do actually love both of these awesome products.

Thank you for joining me this evening, I'd love to hear your thoughts on both of these amazing products.

Lin

I bet Sally was beyond excited to receive that gorgeous piece!! And i agree the wood makes a fantastic contrast! Thanks for sharing these wonderful ideas Lin, I'm sure these products are going to stay around for a long time, they are so versatile and useful for crafting. ~Leandra


We always hope that you  learn something interesting from our blog. Our bloggers deeply appreciate your comments so much, so please take time to let them know you've been inspired! Why not join our challenge by blogging your interpretation of the current topic and link it here?

The current topic link (Resin) will close 17:00 (London Time) Sunday, April 23rd 2017, and the winner will be announced 2 hours later at 19:00.

All links go in the draw to win a £50 voucher to spend on products of your choice from the PaperArtsy online store.

Monday, 20 March 2017

2017 #4 Through The Arched Window {by Lin Brown}

2017 Topic 4: Doors, Windows, Architecture

It's been a while since we've had a post from Lin using stamps other than her own. She'll be the first to admit she's a massive Lynne Perrella fan, and when we demo together, Lynne P's stamps are often what she grabs first when she's working in the 'vintage' genre.
Before Lin starts, this is probably a good time to share some ink pad tests I did recently with Lynne Perrella stamps to find out which achieved the most detail for stamps with super-fine detail such as these.


My conclusion is, if it's new or juicy, use a brayer to apply ink to your stamp, otherwise if your ink is too wet or too liberally applied you will simply lose all the detail in the stamped image. The best performing ink (directly applied to stamp from the pad) for me was an old Versafine (Onyx Black) - Picture B. You can see the notes above for more info.
Don't forget, smooth card-stock is also vital. ~ Leandra
I'll hand over to Lin with her gorgeous, and very clever project...enjoy!


Hi everyone Lin Brown from Yoursartfully here.

It's so nice to be back here on the PA blog tonight sharing my take on the current theme of Doors, Windows and Architecture. I decided to alter a book which I purchased from a charity shop a while ago. I fell in love with this book as it is about Samuel Pepys and is not only an interesting book about the man himself, it is jam packed with illustrations of buildings and maps.......perfect for this theme!

I knew that this topic would suit me down to the ground as I have a bit of a passion for arches so let me take you through my arched window to my project (if anyone remembers watching "Play School" when they were growing up, that phrase will mean more to you than anyone else). 


When I started this project I had the idea in my head that it would feature an arch as the focal point to the front cover but I also wanted to try to create a brick wall effect for the background.


Grunge Paste is my go to product for texture, I was able to stamp into it with a brickwork style stamp from one of my new stamp sets ELB31 to create this effect. I also love how with the addition of a little water, I was able to smooth out some of the texture as I knew I wanted to stamp some fine script on my faux wall for added interest.


I am still amazed after all this time that Grunge Paste texture is not  affected by adding a few drops of paint to tint it and I was thrilled with pop of colour achieved by adding a couple of drops of Turquoise Fresco Finish Paint.

You may notice that I covered my arch with fabric. I always use Egyptian cotton for this and although it has a very fine weave, you can see how well a spot of dry brushed paint can highlight the texture of the fabric.


There were so many fabulous Lynne Perrella stamps that feature buildings, I was spoilt for choice but this one from LPC015 happened to be the perfect size for my arch....


The inside of the book wasn't the easiest thing to photograph but I hope that you can see that there are actually four layers to create my landscaped effect.


For me, layers are important. Usually I'm talking about layers of paint but this time it's layers of pages which vary in height. I was particularly pleased with how this came together but it really was luck more than anything as the book already had a map of the river Thames in it, so that enabled me to place buildings both in front and above the river.


Originally, my idea was to completely cover the adjoining page with with bricks (I used the Verdant Moon stencil from Stencil Girl) but when I started to re-position the stencil, it dawned on me that this was definitely a case of less is more. By leaving this empty space, it will allow me to add some journaling which I think will enhance this page.


My final photograph is a close up shot of all the things I love. Contrast of colour and contrast of texture. Notice how the addition of a little bit of Archival ink applied to the Grunge Paste really enhances the texture.

I thoroughly enjoyed the process of altering this book and am looking forward to continuing to work in it. It's been a while since I altered a book and I do love to have what I call an "on going" project. Something that I can just pick up and spend ten minutes on if I want to or if the mood takes me, I could spend all day adding to it. I think my next addition to this book will be to add some fold out pages featuring more buildings. Maybe my Altered Book will inspire you to alter one for yourself.....I look forward to seeing what you all come up with.

Thank you for joining me this evening.

Lin
Blog: Yoursartfully
Twitter: @Yoursartfully

Flipping amazing how you made the texture look like bricks with that stamp and the GP!!It worked a treat! I can see that as my first experiment to try on the back of this post! You are just too clever ! ~ Leandra


We always hope that you  learn something interesting from our blog. Our bloggers deeply appreciate your comments so much, so please take time to let them know you've been inspired! Why not join our challenge by blogging your interpretation of the current topic and link it here?

The current topic link will close 17:00 (London Time) Sunday, March 26th 2017, and the winner will be announced 2 hours later at 19:00.

All links go in the draw to win a £50 voucher to spend on products of your choice from the PaperArtsy online store.

Wednesday, 18 January 2017

NEW from PaperArtsy {Eclectica³ Lin Brown} Jan 2017

NEW: Eclectica³ Lin Brown

Last year we gave you a teeny taste of what was to come from Lin with this new style of stamps. You might remember these 2 beauties, a totally new direction from all of her previous designs.


Those of you who know Lin from waaay back will remember she used to design and sell her own stamps via her then-shop LB Crafts available as wood-mounted red rubber. Skeleton leaves were huge at the time. Well this is a nod back to that era, but she has added a load of mark-making elements that are ever so popular in journalling circles.
Her idea was that you could use the elements alone or combined to great effect.

ELB31
ELB32
ELB33
ELB34
But of course, there is always more from Lin, and this time we also have some large format stencils (6.25" x 9.5"). If you work big in big journals, then these are for you! But it is interesting to see how the samples below also show that they work for cards and plenty more besides!

PS043 large stencil (6.25" x 9.5")

PS044 large stencil (6.25" x 9.5")

PS045 large stencil (6.25" x 9.5")


As ever, we always have some super talented crafters who volunteer to help us work with our newest stamps. I'll hand over now to Lin Brown who will introduce her support crew tonight, and has some of her own work with these new stamps to show you too.

You are in for a treat!

~ Leandra

Hi everyone, Lin Brown from Yoursartfully here to show you my newest stamps designed for PaperArtsy.

Back in August 2016, we released the first two sets of stamps which are totally different from any of my previous stamp sets. Yes, I loved using and teaching with all of my previous releases.......those hand drawn flowers, quirky houses and funky birds, but I was feeling the need to get back to images that would create a more artsy style. For me, this means layers.

Whether it's stamps or stencils, I love to layer images to create interesting artwork, so I'm thrilled to announce that not only are there new stamps, there are new stencils too! The stencils are bigger than normal at 16 x 24cm so in addition to all the ways you would normally use your stencils, they are going to be fabulous for use in large journals and for creating home decor pieces.


Tonight I invited Ruth Mescall and Kath Stewart to help make samples with these new products. Please go and check out their blogs where you will find more detailed information about these stunning samples and the techniques they used to create them. Well worth a visit!

Let's start with Ruth MescallRuth loves to experiment with all sorts of styles and new products. She's a very clever lady and can create the most beautiful and elegant clean and simple style artwork (something I am totally unable to achieve....white space is definitely not my best friend) but on the other hand, she can create some stunning mixed media pieces so I knew she would be the perfect fit for this new release.

'Live Today' using ELB31 by Ruth Mescall


The large texture stamp is just perfect for creating a backdrop for these gorgeous easy to trim skeleton leaves, add a little home made washi tape and it's complete. The quotes also fit into the frames perfectly. 

'Inspire' using ELB32 by Ruth Mescall


I wanted to focus on the smaller background stamps in this set and show how they can layer up, build a 'scaffold', perfect for those pretty butterflies to sit on. 

'Miracles' using ELB33 by Ruth Mescall


Great handwritten font on the quotes and just love this leaf stamp, a perfect mix of light and shade, next step a wreath using all the different leaves? 

'Imagine' using ELB34 by Ruth Mescall


Well it's all about the layers, I love a bit of grunge and the texture stamps and stencils layer up brilliantly with the quick drying fresco paints. The circle mesh stamp takes centre stage but I can't wait to use that hinge again...on fabric this time. 

Next up we have Kath Stewart. Kath is a super talented lady who's work I have admired for many years. I love reading Kath's brilliant blog, her stories and escapades with her gorgeous doggie Buddy will have you laughing out loud. Not only is she a brilliant writer, her talents as an artist are second to none so it was an exciting moment for me when she kindly accepted my invitation to join me and create some samples for the launch of these new products.

'Trio of Leaves' using ELB31 & PS043 by Kath Stewart

Kath says: Perfect stamp set for building up background layers on a card or mixed media project but that beautiful skeleton leaf image would make a beautiful flower on a clean and simple card. Beautiful sentiments in two different fonts...I love how you can use the sentiment as is or cut out the words to use individually.


'Live' using ELB32 & PS045 by Kath Stewart

Kath Says: I love the texture stamp which is great for creating interest on backgrounds and the distressed corner and border stamps for framing a card. The detail on the leaf stamps is amazing and this stamp set would make a beautiful framed home decor project.


'I Believe in Miracles' using ELB33 & PS044 by Kath Stewart


Kath: Another stamp set that is perfect for a clean and simple card or lots of layering on a mixed media project. Love the grass image, the dots icons and the beautiful distressed look of the leaves. Images that can be used with inks or stamped with PaperArtsy Chalk Paints

'Follow Your Dreams' using ELB34 & PS044 by Kath Stewart

Kath: Lots of fun images in this stamp set to create a card or mixed media project.  Love the mesh background for creating texture and the circle image would look great as a flower coloured in with PaperArtsy Chalk Paints for an ombre effect.


So now it's time to show you what I've made with these new stamps...I've got a few step-outs for these items incorporating all my brand new products

Project One
'Cherish Yesterday' using ELB31, ELB33 & PS044 by Lin Brown

First I've made a card using the skeleton leaf from ELB31to create an acetate flower as the focal point.


Step One: Having glued some scrap-booking paper to a square piece of mountboard with Matte Medium, using the medium both underneath and on top of the paper, I blended Granny Smith and Tango Fresco Finish paints to make a colourful background. I always use a baby wipe to blend paint in this way, it creates a much softer look. I then started to create some interesting background images by stamping them with Snowflake paint.


Step Two: Layer number two was created with Sepia Archival ink using the hand written words from ELB31 and the sequin waste edge stamp from ELB33. When everything was thoroughly dry, I used a tiny amount of South Pacific on a baby wipe to tint the Snowflake paint. I then got to use my new stencil for the first time......I love this stencil, it is big but it's quite delicate.


Step Three: I stamped my leaves on acetate using Stazon ink and painted the back of the acetate with Tango Fresco. I did need to use 2-3 coats of Tango to build up a solid colour as this is a translucent paint.


Step Four: Now for the finishing touches. After arranging the leaves to create a flower, I realised i didn't leave enough room for the quote, I decided to stamp it on a separate card so that I could cut it up and place the words in available spaces.


Project Two
'Inspire' using  ELB32 by Lin Brown

For my second project, I made another card, this time incorporating cork and fabric. Having said that it's a card, this piece would actually look quite cool in a frame.


Step One: The first thing I did was to grab my pokey tool and attack the edges of the cork to give it a worn and weathered look. The cork crumbled away very easily. Once I was happy with it, I took a wide, flat paintbrush to add a haphazard layer on Antarctic paint and then stamped the hessian background with Lake Wanaka.


Step Two: This is where the fun started. I love blending paints together on my stamps. In this instance, I used Granny Smith and Toffee together.


Step Three: As you can see, these colours together create an autumnal look to the leaves and border stamp which work really well with the colour of the cork.


Step Four: I used the same method for my butterfly but added some tiny dots of Gold Fresco using my trusty pokey tool again, then a touch of Classic Treasure Gold for the finishing touches on the cork.


Project Three
'Canvas Collage' using ELB31, ELB33, ELB34 & PS043 by Lin Brown

For my third project, I decided to make a mini canvas, it's a five inch square canvas, a very manageable size. I challenged myself to see if I could create something I liked using just two colours of paint.

Step One: Layer number one was simply Snowflake Fresco stamped onto a canvas painted with Granny Smith that had been mixed with some Snowflake to lighten it.


Step Two: I used Granny Smith for layer number two with the circle mesh and sequin waste from ELB34.


Step Three: I love how much darker the Granny Smith paint looks when used through my new stencil PS043. It's simply an optical illusion as it is a bigger area of colour compared to the stamped images. It was quite a lot of green so some tiny dots with a white Sharpie marker toned it down a touch.


Step Four: With a mix of Snowflake and Granny Smith, I was able to create another shade of green for the mesh image in this background.


Step Five: I used Fern Archival ink to stamp the grasses on my tag and edged both the tag and the canvas with Watering Can Archival ink before assembling everything together..


Project Four
'Live, Laugh Love' using ELB33, ELB34 & PS045 by Lin Brown

For my fourth and final project this evening, I used a larger canvas, an eight inch square which is the perfect size for my new stencils.


Step One: I decided that it would be fun to create a crackled background for this project as well as using Grunge Paste through my stencil to add dimension to the canvas. This is the list of steps to get the project to how it looks in the photo below. Please note that it is important for each of the following layers to be completely dry before applying the next one.

a. Paint the canvas with Toffee Fresco Finish paint. I used two coats to get a good depth of colour.
b. Using a palette knife, I applied a layer of Grunge Paste through the stencil.
c. I applied a very thin layer of Crackle Glaze around the Grunge Paste, trying to leave some areas free for a contrast.
d. I then painted the whole thing with Antarctic and watched the magic of the cracks appearing.


Step Two: I started to build up images on the background with Lake Wanaka, Snowflake, South Pacific and Gold, using the same technique as my first project.

 
Step Three: When I was happy with all the stamped images, I tinted the canvas with South Pacific and Granny Smith, using a baby wipe for a subtle look. I then added my stencilled words in Gold. Look how luscious the Gold paint is!


Step Four: I replaced the stencil over the Grunge Paste to allow me to colour and decorate it without spoiling my background.


Step Five: I love how the top of this stencil makes fabulous grass, perfect for creating a garden. A few buttons and fabric flowers created the perfect finishing touches for this canvas.


Phew, this has been a bit of an epic blog post, so thank you for sticking with me to the very end. I hope our projects this evening have inspired you. My head is still buzzing with ideas, I really can't wait to use them more on fabric, I feel a little fabric journal could be in the pipeline!!

I would like to take this opportunity to say a massive thank to Kath and Ruth for helping me this evening by sharing their talents to show how versatile these new stamps and stencils are. We all have different approaches to the way we work and I hope we have created something that will appeal to every one's taste. 

Last but not least, I would like to say a humongous thank you to Mark and Leandra, also fondly known as Mr & Mrs PaperArtsy. Being part of the PaperArtsy team is truly a special thing, they are both  so supportive and work harder than you will ever know, but most of all they believe in the talents of each and every one of the designers, so thank you guys, you are the best.

Lin
Yoursartfully - blog
@yoursartfully - Twitter

The vision the Lin has, to pull things together in so many gorgeous layers is beyond fantastic! I'm so glad that we can share this with you, so you too can create your own magic with these stamps!
 
You can go direct to Lin, Kath and Ruth's individual blog posts from these links for more details! They have been amazing support for this release!

Don't forget to leave your feedback for Lin below in the comments. It's so exciting for them to hear your thoughts on the new products! Congratulations Lin, we are thrilled with these!

~ Leandra and Mark
 
Below is a list of the retailers who have already got these new releases in stock ready for you to buy NOW! How can you resist!

Canada
Scrapbook Centrale, Dollard Des Ormeaux, Quebec www.scrapbookcentrale.ca
(Zinski, JoFY, ESC, EKC, EKD, EEG, ETS, LPC, Infusions, Frescos)


Treasured Memories Scrapbooking, Duncan, BC www.treasuredmemoriesscrapbooking.ca

(Frescos, Infusions, EKC, EEG, ESC)

USA
Artistic Studio Creations, Fayetteville, Georgia www.facebook.com/ASCbyCrystal
(ETS, Infusions)


Artistree Workshops, Fulton, New York, www.facebook.com/artistreeworkshops

(Zinski, EKD, EKC, EEG, ELB, ETS, ESC, Ink and the Dog)


Clay with Me, Colorado www.facebook.com/Claywithmestudio

(ELB, LPC, ESA, JOFY, Infusions, Frescos, EKD, EKC, ESC, EEG)


Creek Bank Creations, Indiana www.creekbankcreations.com

(MN, Zinski, Jofy)


Ephemera Paducah, Paducah, Kentucky www.ephemerapaducah.com 

(Fresco Chalks, Lynne Perrella, Seth Apter)


Frantic Stamper, Oregon www.franticstamper.com 
(Zinski, LPC, JoFY, ELB, EEA, EEG, ESC, EKD, EKC, ETS, ESA, Frescos, Infusions)


Guadalupe's Fun Rubber Stamps, Roswell, New Mexico www.santafe.com

( Frescos, Infusions, LPC, ESA, EEA, Zinski, MN, ETS, HP, Treasure Gold)


Simon Says Stamp, columbus, Ohio www. simonsaysstamp.com 
(Zinski, JoFY, ETS, EEA, EEG, EKC, ELB, ESA, Frescos, Infusions)


Stamplistic, Cleveland, Ohio www.stamplistic.com(Hot Picks, LPC, JoFY, ELB, Squiggly Ink) 


The Queen's Ink Savage, Maryland www.queensink.com

(Infusions, ESA, LPC)


Seth Apter, New York www.sethapter.com
(ESA, Frescos)


Stamp Fever, Orange, California www.stpstamp.com

(Frescos, Jofy, Infusions)


UK
Aldridge Crafts, Attleborough, Norfolk www.aldridgecrafts.co.uk
(Zinski, Jofy, EEA, EKD, EKC, EEG, ESA, Frescos)


Art from the Heart, Harrogate, Yorkshire www.afth.co.uk

(EEA, ETS, ESA,Infusions)


Birds in the Barn, Marks Tey, Essex www.birdsinthebarn.blogspot.co.uk
(Zinski, Jofy, EEG, EKC, EKD, ESC, ETS, ETS, ESA, Frescos, Infusions)


Blade Rubber Stamps, London www.bladerubberstamps.co.uk
(JoFY, LPC, Frescos)


Countryview Crafts, Potton, Bedfordshire www.countryviewcrafts.co.uk 
(Zinski, Jofy, ELB, EEA, EEG, EKC, EKD, ESC, ETS, ESA, Frescos, Infusions)

Craft World Scotland, Glasgow www.craftworldonline.co.uk
(EKD, EKC, JoFY, ETS, Zinski, ESA, ELB)


Crafty Snippets, Billingshurst West Sussex www.craftysnippets.co.uk

(EKC)


Craftylicious, Mildenhall, Suffolk www.craftylicious.co.uk
(Zinski, Jofy, EEG, ETS, ESA, ELB)


Dandie Crafts, Caerphilly,www.dandiecrafts.co.uk/

(Fresco Chalks, Kay Carley, Tracy Scott)


Everything Art, Powys, Wales www.artisttradingpost.com 
(EEA, Frescos, Infusions)


Keep on Crafting, Burt St Edmunds, Suffolk www.keeponcrafting.co.uk
(Zinski, Jofy, ELB, ESC, ELB, EKD, ETS, ESA, Frescos, Infusions)

Loobie Crafts, Leighton Buzzard, Bedfordshire, www.loobicrafts.co.uk 
(Zinski, JoFY, ETS, ESA, ELB, Frescos)


LouLouPurple, Gwynedd, Wales www.louloupurple.co.uk
(ETS, JOFY)

Papermaze, Ipswich, Suffolk www.papermaze.co.uk 
(JoFY, EKC, ESA, ELB, Zinski, Infusions)


Paper Story, Norfolk www.paperstory.bigcartel.com

(Infusions, Treasure Gold)


Rowan Tree Crafts, Carnforth, Lancashire www.rowantreecrafts.co.uk

(Zinski, stencils, ETS)


ShabbyChic Stencils Ltd, Stourbridge, West Midlands www.shabbychicstencils.co.uk
(Jofy, EEA, Zinski, ELB, Frescos)


Simply Crafts, Cardiff, www.simplycraft.com

(EEG, ETS, ESA, JoFY, Frescos, Infusions)


(Zinski, EKD, EKC, JoFY)


Stampers Grove, Edinburgh, Scotland www.stampersgrove.co.uk 
(Zinski, JOFY, ELB, EEA, EEG, EKD, EKC, ETS, ESA, Frescos, Infusions)


Swanstitch, Deal, Kent www.facebook.com/swanstitch

(JoFY, EKC)


That's Crafty, Romford, essex www.thatscrafty.co.uk 
(Zinski, Jofy, LPC, EEG, EKD, EKC, ELB, EEA, ETS, ESA, Frescos, Infusions)


The Artistic Stamper Craft Store, Faversham, Kent www.theartisticstamper.com 
(Zinski, EKD, EKC, ESC, ETS, Frescos, Infusions) 


The Craft Barn, Merstham, Surrey www.thecraftbarn.com 
(Zinski, Jofy, ETS, EKC, EKD, EEA, ESA, ELB, Fresco Chalks, Infusions)


The Craft Box, Barnsley, South Yorkshire www.thecraftbox.biz
(Zinski, Jofy, ELB, ETS, ESA, Fresco Chalks)


The Craft Den, Wisbech, Cambridgeshire www.thecraftden.co.uk
(Zinski, EKC, EEG, EKD Jofy, ETS, Frescos)


The Forget me not Kraft Kabin www.facebook.com/TheForgetMeNotKraftKabin
(Zinski, JoFY, ELB, ETS, EEG, EKD, Fresco Chalks)

Whichcraft, Wallasey, Merseyside 
(Zinski, JoFY, Fresos, ELB)


Belgium

Expression Hobby, Marcinelle www.expressionhobby.be
(Frecos, Infusions, Zinskis, EDY, EEG, Jofy)

Denmark
Hobbyboden Scrapworld Samso www.hobbyboden.dk

(ESA, Fresco Chalks)


France
Kerudoc Creation, St Yvi www.kerudoccreation.com
(Zinski, JoFY, ELB, EEA, EEG, EKD, ETS, ESA)

Toutencolle, Dun sur Avon www.toutencolle.fr
(JoFY, Infusions)


Germany
Stempeloase Munich www.stempeloase.de 
(Zinski, JoFY, ELB, ETS, ESA, ESC, EKD, EKC, LPC Frescos)


Stempelfee Shop www.stempelfee-shop.de
(Zinski, EEA, EEG, EKC, EKD, ETS, ESA, Infusions, Frescos)


Netherlands
Creafine, Papendrecht www.creafine.nl 
(JoFY, ETS, Infusions)

Hobbycompleet de Duif, Leeuwarden www.hobbycompleet.nl 
(Zinski, EKD, EEG, EKC, JoFY, ELB, ETS, ESA, Infusions)


Papillon Hobby, Hendrik Ido Ambacht www.papillon-hobby.nl

(Zinski, Jofy, ELB, EEA, ETS, Infusions)


Scrap & Co, Klarenbeek www.scrap-co.nl

(JoFY, EKC, ELB, EDY)

Stampingcorner, Capelle Aan Den Ijssel www.stampingcorner.nl 
(Zinski, Jofy, ETS, ESA, Lynne Perrella, Frescos)


The Stamping Cottage, Schaijk www.thestmpingcottage.nl

(Fresco Chalks, LPC, ESA,  Zinski, Hot Picks, ETS, JoFY, ELB, Infusions)


Australia
Art and Soul Studio, Burrum Heads, Queensland www.artandsoulstudio.com.au
(Zinski, Jofy, LPC, EKD, EEG,  ELB, EEA, ETS, ESA)


Crafters Cupboard, Berwick, Victoria www.crafterscupboard.com.au
(JoFY, ELB, ETS, ESA, Frescos, Infusions)


Time To Create, Modanville, NSW www.timetocreate.com.au
(Zinski, ESA, ETS, EKD, EEG, ELB, ESA, Infusions, Frescos)


Taiwan
Mandy's Card, Taipei www.facebook.com/mandy.card
(Zinski, JoFY, ETS, ESA, ELB, EEA, Frescos, Infusions)


Japan
TIny Dots, Funabashi-shi, Chiba www.facebook.com/TinyDots

(JoFY, Frescos, Infusion)

More Posts to Enjoy