Showing posts with label metal working. Show all posts

Monday, 15 May 2017

2017 #8 In The Garden {by Carol Fox}

2017 Topic 8: Assemblage


A whiff of summer arrives up here in the Northern hemisphere, and Carol is putting out a cheerful sign in her garden, just as everything starts to bloom....Perfect!


Hi everyone Carol here.

Lovely to be here on the PA blog tonight. I've chosen to share with you a garden sign I made for my front door in the summer, using an arrow that a neighbour made for me from wood I found on the beach and some soft drink cans. I spend a lot of time in the garden in the summer and I usually have a post it note stuck on my front door to direct people to the side gate when they call, this year I will be posh and have a sign pointing them in the right direction. Of course given the Chez Fox look with Fresco paints and lovely Zinski stamps to give it a bright garden feel.


Metal is a great way to add 3D to projects and metal cans are great to use, you can hand cut them as I have here, or die cut them and best of all they are free.


I love how my basic crackle using Fresco Finish Paints in Zucchini and Antarctic, gives a lovely back ground to my Stenciling done with Emma Godfrey's mini PM008 


and Bougainvillea. Sealed with a coat of Satin Glaze before I stenciled onto it.

When I stenciled my words using Little Black Dress I put a piece of masking tape along the arrow to keep my words straight, but when I pulled it off it took quite a bit of my crackle with it, but I just redid the crackle on the ruined bit, patched the stenciling and it looks ok, phew project saved; the wonder of crackle paint cannot be underestimated !!


I stamped all my images from Zinski Art 10 onto a piece of flattened drink can which I painted with Snowflake paint prior to stamping on, as you can see I taped this to the desk with masking tape to stop it curling up.


I now gave my images colour using various Fresco Paints and anything else bright laying around my desk, Gel Pens, pencils anything works on Fresco paints. I cut them out using a pair of small metal shears but do be careful of the sharp edges on the tin when you cut them out.


I just wanted to show this photo of them all sunbathing on my sunny window sill getting nice and dry before I assemble my item. As you can see I have added a couple of quotes from Zinski Art Set 08 onto my arrow. I sealed the quotes and words with glossy accents to make them pop off the arrow a little bit.


I assembled my sign using a hot glue gun as I wanted instant grab to get the look I wanted with my metal parts. I wanted to use the natural spring of the metal to add a 3D element to my item, which is why I choose to use metal and not card. I was very torn with the project between making this or some small metal lanterns from the drink cans, but I decided that these particular stamps were too large to work well on the cans as lanterns, that is a project for different stamps on a different day.

Carol x

Blog
Facebook
YouTube
Twitter
Instagram

You have really pulled a lot of recent blog topics together perfectly Carol, re-purposing, found objects and re-configuring them to make something totally new. Thanks for showing us how to stamp onto the metal, and as Frescos are a UV stable outdoor paint, I am sure this item will look bright and cheerful for many summers to come! ~ Leandra


We always hope that you  learn something interesting from our blog. Our bloggers deeply appreciate your comments so much, so please take time to let them know you've been inspired! Why not join our challenge by blogging your interpretation of the current topic and link it here?

The current topic link Topic 8 (Assemblage/ 3D Crafting) will close 17:00 (London Time) Sunday, May 21st 2017, and the winner will be announced 2 hours later at 19:00.

All links go in the draw to win a £50 voucher to spend on products of your choice from the PaperArtsy online store.

Saturday, 27 September 2014

Metal Flower {with ELB Stencil by Designer Lin Brown}

Hi, Lin here today to share one of my metal techniques with you. I have a passion for working with metal and it's been on the back burner for a couple of years. I re-kindled my interest recently when I started to use metal in conjunction with stencils again. In the past I had always used brass stencils as they have a bit of depth to them, then my curiosity kicked in and I wondered if I would get good results using the stencils that I designed for PaperArtsy...... I am very happy to say that the answer is yes!!!


I started with a little wooden frame and a 10cm canvas.


I painted the frame with Marlin which is one of the new paint colours from my latest Limited Edition set of paints. When the paint was completely dry, I used a stiff brush to dry brush a small amount of Little Black Dress Fresco around the edges.


Now to start work on the metal flower. You will need a foam mat, an acrylic mat (one of your large acrylic blocks will do the trick), some masking tape, stencil PS005, a stylus, a paper stump and some aluminium (about 2cm larger than your canvas), Grunge Paste and a palette knife.

Start by taping the stencil to the aluminium with some masking tape.


Leaning on the foam mat, with the stencil facing down, use a paper stump to rub over the back of the metal ( a bit like brass rubbing) to highlight the design of the stencil.


Using a stylus (I used a tool by Mercart but Ten Seconds Studio also have these although you can improvise with a small embossing tool), I carefully traced around the edges of the design.


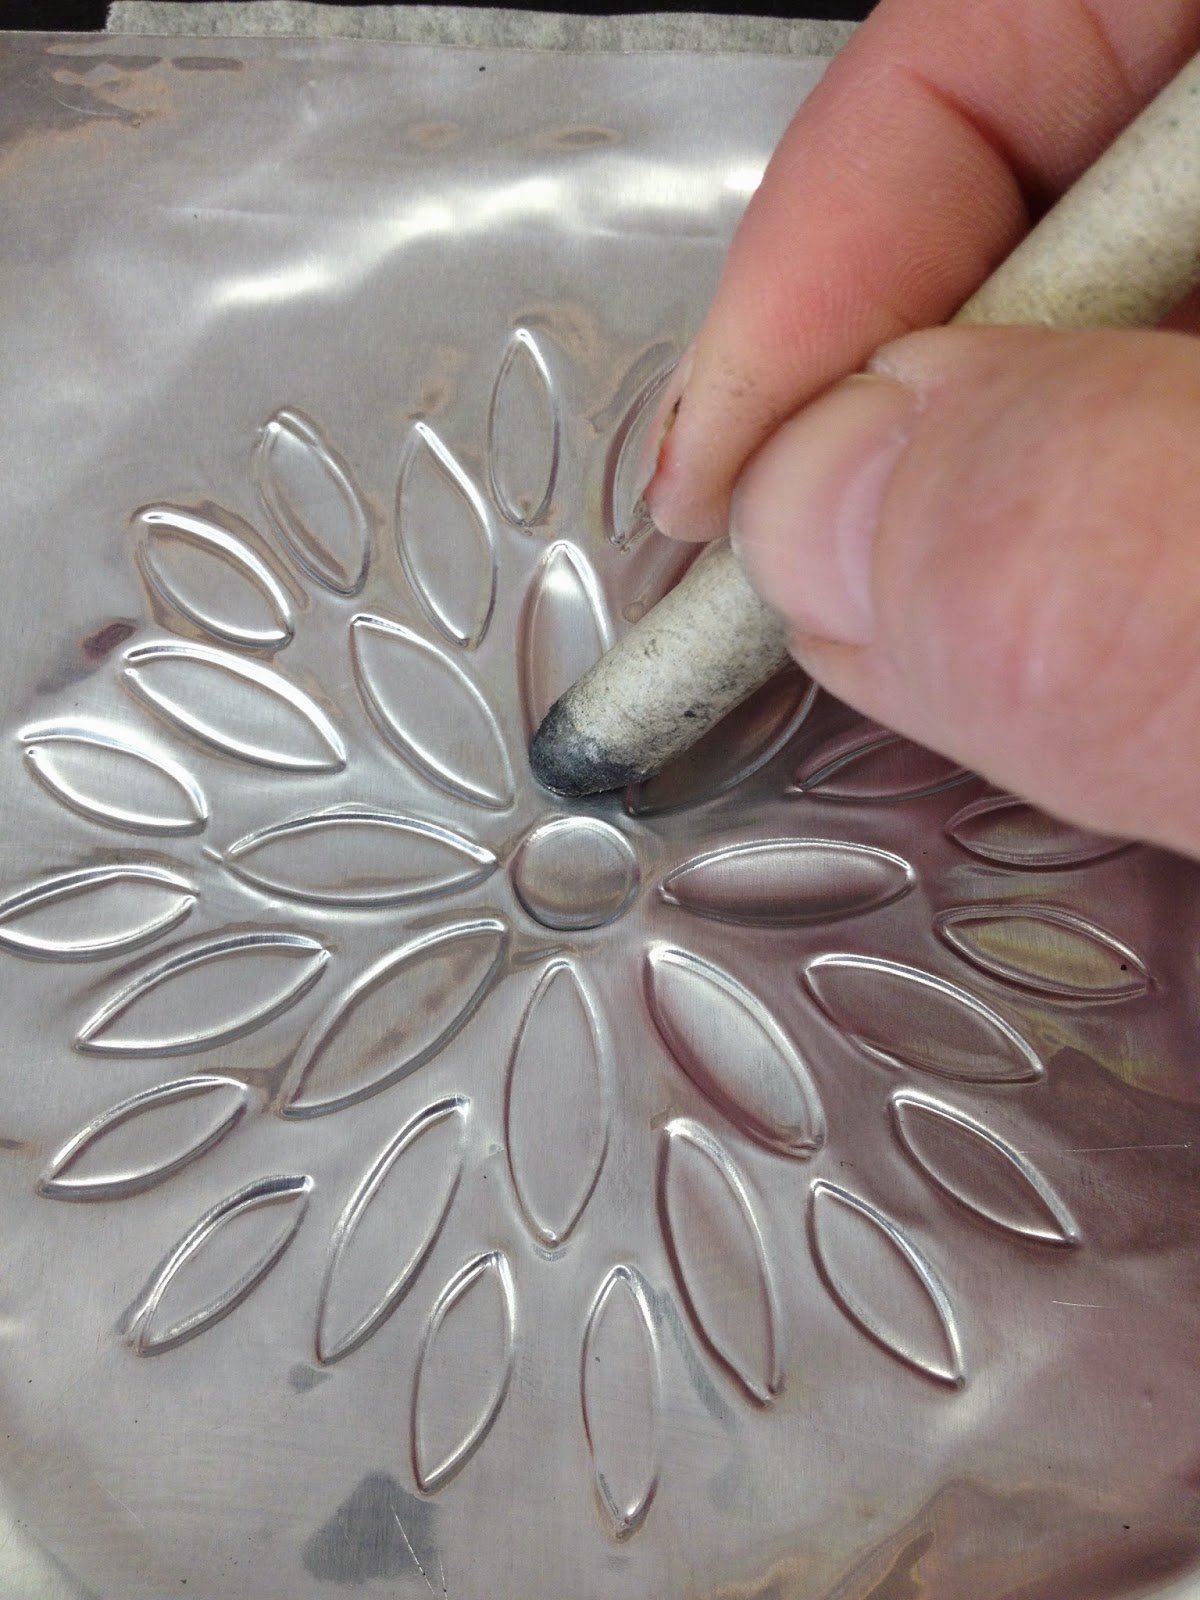
Working with my paper stump again and still leaning on the foam mat, I gently stretched the metal inside each of the small petals using a sweeping, back and forth motion.


You may find that the metal has become distorted during the embossing process but this is simple to fix. Working from the front of the metal and leaning on the acrylic block, use the paper stump to smooth out and creases or lumpy bits. It is important to start in the centre and work out towards the edges.


Once the metal is nice and flat again, take the stylus and draw around the embossed areas to define the image. This should also be done whilst leaning on the acrylic mat.


Stippling is a great way to add texture to the background. Simply add a whole load of dots while leaning on the foam mat and you will notice that the flower image really pops.


I also added dots around each of the petals, this helped to disguise a few wayward background dots....I got a bit carried away with the stippling!!!!!! 

                                                
Now to protect your hard work. It is important to fill the back of the embossed metal with something that will set hard to help prevent the embossed areas getting squashed. I used Grunge Paste to do this. I used a palette knife to apply the Grunge Paste in just the same way as applying it through a stencil. I would recommend you lean on you foam mat to do this.


Once the embossed areas are filled, use a babywipe to wipe away any excess paste and leave to dry.


I cut some acetate the same size as my canvas to help me position the metal correctly as this is tricky to do because you can't see through the canvas. Lay the acetate over the embossed design and mark the four corners.


I applied a sheet of double sided adhesive to the canvas and after removing the backing sheet, I was able to lower the canvas to the metal, lining up the corners with the corner marks. I was then able to fold the excess metal to the back of the canvas.


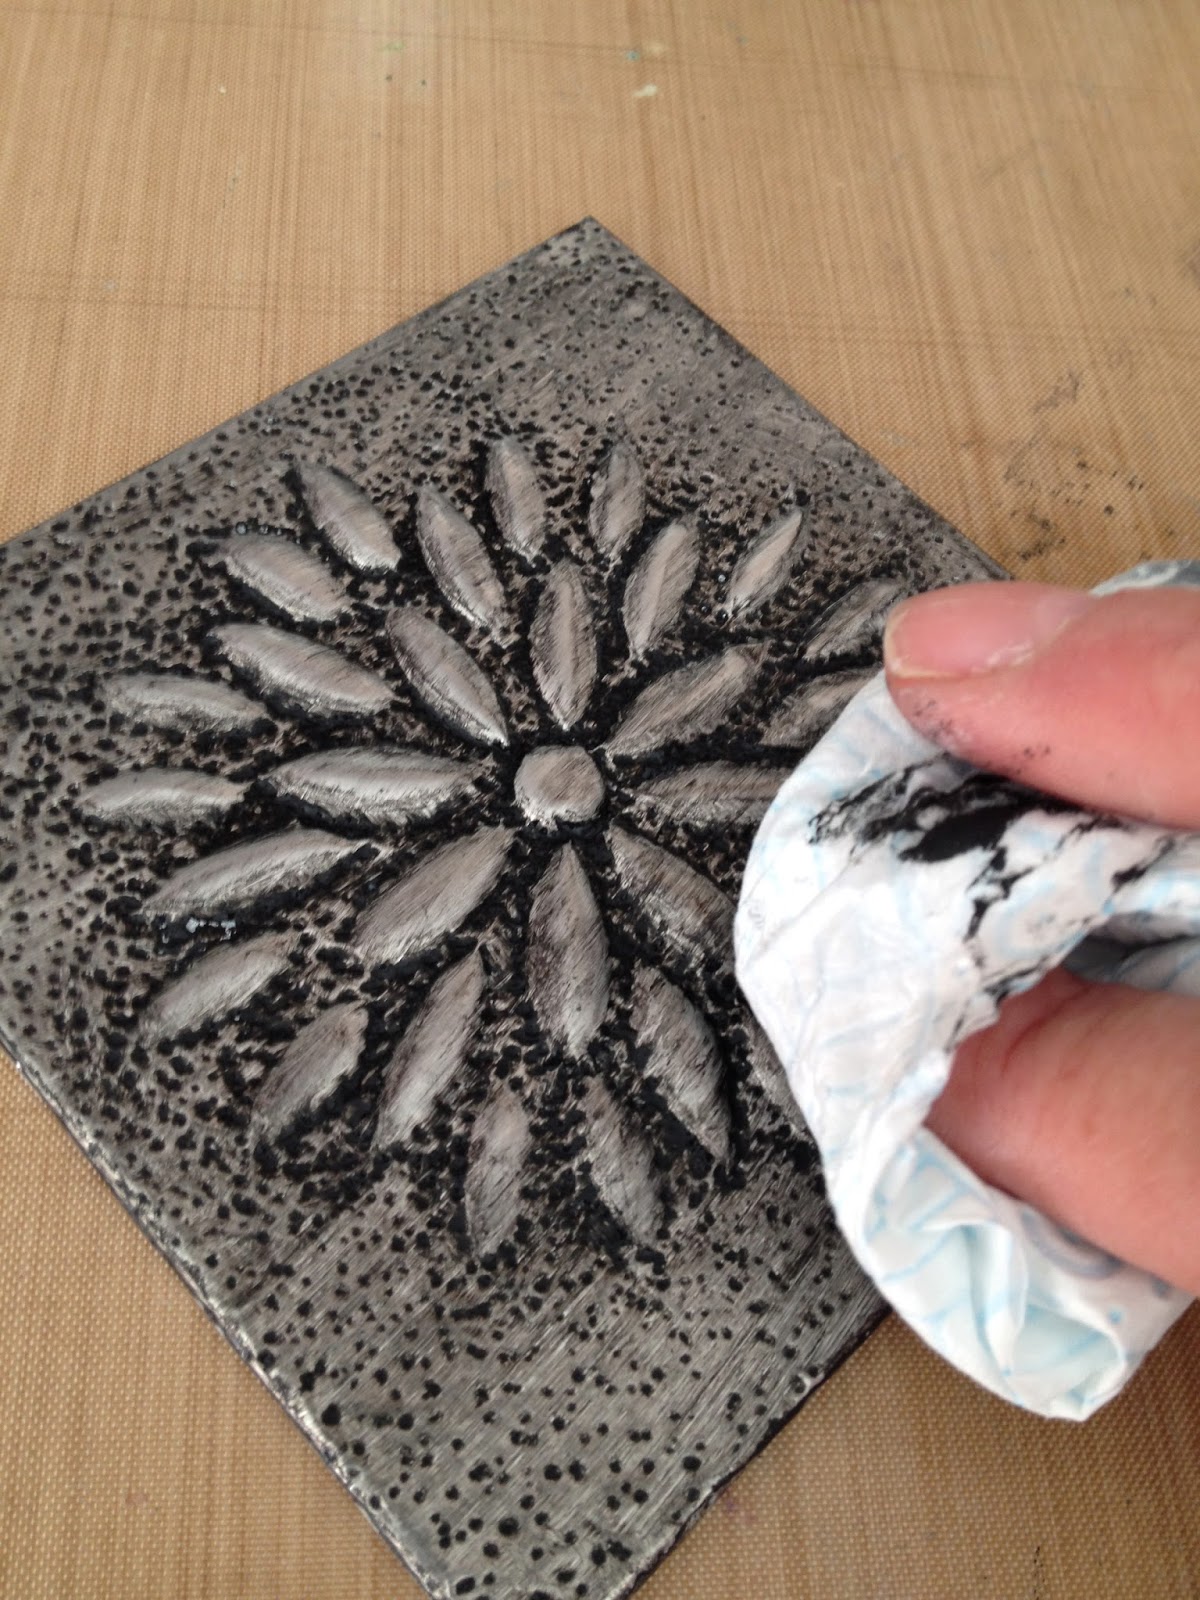
I painted the metal with a layer of Little Back Dress Fresco, using a small piece of Cut'N'Dry so that I could work the paint down into all the textured areas.


Having painted it, I'm now wiping it off!!! Don't wipe all of it off though. Leaving the metal like this is an option and is one of my favourite looks. It looks simple, striking and in my opinion, very elegant but for this project, I wanted to experiment with layers of Treasure Gold and I knew that it would need a light layer of paint for the Treasure Gold to grab on to.


I used a small brush to apply Indigo Treasure Gold to the background (this photo doesn't do justice to the colour I'm afraid, it's not easy photographing metal!) followed by Classic around the edges and on the flower.


I painted four Tim Holtz metal corners with Marlin and added some Classic Treasure Gold to the embossed areas to highlight the design, these along with a touch of Treasure Gold on the painted frame added the finishing touches. I think the colours are much better in this final photograph.


I hope this little project has inspired you to look at your stencils with a different eye. You can use them in so many different ways......I'm really looking forward to seeing what you come up with.
Lin. 

A huge thanks to Lin from all at PaperArtsy HQ. Metal working is so fascinating, the way the metal stretches is like magic. The end results look stunning but for the uninitiated can seem complicated, you have shown here how easy it is to achieve a fantastic and detailed piece. Thankyou for such a great tutorial. 

We would love you to join in with our monthly challenge. If you are inspired by any of this month's guests who have blogged between Sept 1st 2014 and Sept 30th 2014 then join in and link up your creativity HERE. You will go in the draw to win a voucher to spend on products of your choice from the PaperArtsy online store. You need to add your link by 19:00 (London time) Sept 30th 2014


Sunday, 14 September 2014

Patchwork Money Box { with Eclectica³ Darcy Stamps by Designer Darcy Wilkinson}

Good evening everyone, Darcy here.  This month I wanted to do a relatively laid back project, so I turned to my box of 'things to alter/decorate' and pulled out an MDF money box. A girl always needs somewhere pretty to save up the pennies for the next craft show right?

My first job was to seal the whole thing with 2 coats of watered down PVA glue, I always do this with MDF items so that the loose fibres are sealed in. Next I gave it a coat of black gesso. Not much of this will show in the end, but some will , and it is easier to paint it now than later. 


Next I cut some heavy weight smoothy that would fit the 4 sides and the 2 halves of the roof. I then cut each panel into random sized sections. 


Each piece was coated with Chocolate Pudding, this is to give a little consistency over the whole project. 


Now the fun bit, paint each piece a different colour, but not just one coat. Add at least 4 coats of paint on each piece, using a range of shades within that colour. So one piece has 4 coats of different pinks, one has 4 coats of different blues, one has 4 coats of different greens etc. 

As each piece dries, pop it under a stencil with a small pattern, and then rub away through the stencil to reveal the layers of colour. if your paint is too well dried then dip your brush into rubbing alcohol, that will help strip back the layers of paint quickly. 


I used a different stencil on each colour, and ended up with lots of colourful patchwork pieces with subtle patterning. 


I then dry brushed on a little Chalk, this knocks them back very slightly. I inked the edges with a brown ink pad and glued them to the money box using matte gel. 


To complete the patchwork effect I doodled on some different stitches around the squares, using a waterproof black pen. 


You could leave it like this, but I felt it needed a little something to focus the eye on the front. 

I stamped the heart flowers and leaves  from EDY10 onto thin metal. 


I cut them all out and worked into the back of them using a paper stump and a teflon stylus. Once they were all puffed up I  painted them. The flowers are a mix of Pea Coat and Eggplant and the leaves are Hyde Park and Sage. The paint is partly wiped back off to reveal the silver. 


These can now be attached to the box. To prevent them collapsing they are filled with either grunge paste or matte gel.  I also rubbed on a little White fire Treasure gold. 


As a finishing touch I filled up this mould with matte gel , then left them to dry overnight. 


They are not fully opaque but not fully transparent either, if you hold them up to the light you can see light through them. I first coated the large one with Eggplant, and then Metallic glaze.  I love it. 


It just finished the money box off nicely.. 


Here is the finished box, flowers just on the front and going around the left side. 


Now, what should I save up for?

Hope this has inspired you, until next time.. 

Darcy x

We would love you to join in with our monthly challenge. If you are inspired by any of this month's guests who have blogged between Sept 1st 2014 and Sept 30th 2014 then join in and link up your creativity HERE. You will go in the draw to win a voucher to spend on products of your choice from the PaperArtsy online store. You need to add your link by 19:00 (London time) Sept 30th 2014

Thursday, 27 May 2010

May 2010 {ArtsyCrafts} Action


Yes another 2 fabulous weekends are over. It's so hard for us and the peeps attending to keep quiet about what we actually made until both events are over, but I am sure you will see from the following pics what a fantastic time was had by all! 
 Linda (LB Crafts) is my partner in crime and the other half of ArtsyCrafts, together we develop these wonderful weekend retreats so we can share with you our ideas with Ten Seconds Studio Metal, PaperArtsy Stamps, and all our other most favourite brands and hottest new products out there. Can you believe these weekend were our 7th and 8th events! We have been doing this for a few years now.
Here is the team, from left Jo, Lynne H, Linda B, Karen and me, Leandra owner of PaperArtsy. This is a pic from last year, we added Linda E to the lineup this year as Lynne H snuck off to New York for a surprise weekend with her hubby.
We tend to be so focussed on the classes, that we always underestimate how long it takes us to set up the shop, but Lynne Howe (when she retires we will have to get her blogging!), Jo Firth-Young and Linda Elbourne set about developing their own unique style of merchandising on the Fri evening set-up, and then Karen had the job of trying to find where everything was Saturday morning. It always looks scrummy by the time everyone arrives though.
 The theme was Flights of Fancy, and we made 3 fantastic items, one was a quicksie, and the other 2 projects were more in depth and took several session to complete. Overall, our weekends are all about techniques that you may apply to many situations, and learning how to use new colour combinations. When participants book, they get an opportunity to indicate their preference, but usually when you see the item samples in real life, you inevitably wish you'd picked something more adventurous! No fear, there are chances for free choice, so over the weekend you get to try one or two things that might be way out of your comfort zone if you wish.
We started out clean and tidy, 
 but boy those girls can craft up a storm! 
Oh look, there's Linda E, bet she led those Shabby Blue girl's astray...have you seen her desk lately?? Well no need to be too tidy when you are on a mission to enjoy yourself is there?
One of my fave technique of the weekend was using a new spray from Crafty Notions on top of Distress Ink. Instant softness, mottled-ness and loveliness! And no hard work at all, just a squirt here and there, hey presto. This (sample above) was created by the hilarious Rita from Spain. She gave everyone the warm fuzzies on Weekend 1, and we learned how to communicate in a mix of Spanish, French and English. Very entertaining.
And how beautiful those BG's looked with a bit of stamping on top using HP1004 and HP1005. Love how the Pink and orange, sunrise people made samples ranging from vivid and bright, to soft and subtle.
Or how about a tissue flower, die cut (grunge flower die), stamped (HP1004) distress-inked and sprayed with sparkles. Love the crumply texture from this technique too. Oh there was soooo much to loooove!!
How coould I forget the ohhhs when we demoed this bit. Ferro paste and stencils work really well together. Who knew? We did of course! another of those.."I wonder...." discoveries. Add some colour and spray and you get yourself one wicked tree. Soft and pale, or bright and colourful, the choice is yours.
So that was the first half of day one, and we had loads more to come!! We really do work hard to give you lots of new fun ideas to enjoy at these retreats!


The main project this time was a sampler board with 9 different techniques with metal, terra texture and ink techniques onto a smooth polyester adhesive fabric. Onto that we added metal embellishments, and under we made a canvas as the support.
The different colour combinations and choices everyone made along the way gave each participant a totally unique finished project. 
Hairy terra caused a few eeuughhh ohhh ahhhh's, and when the colour went on top with the magic spray it was a winner technique (below).
And of course we had the new and wonderful 'goop' (aka Inka Gold) to play with. Look at how metallic it can be on black backgrounds, but we also coloured in with it on pearl metal too...yes it sticks to metal, yet rubs off if you get it in the wrong place, so mistakes just don't happen with this stuff! Check it out on black painted terra!
'But the metal is always a new thing for many people at these events, and they did beautiful work, both new and experienced crafters!
This was a really clever idea for a freestyle design with a pointy tool!
And I'm pretty sure this is Sue C's sample..who'd have thought slate metal would look so fab with Mocha kaiserpaint on top?? Love that Kabuka mould! One of my faves.
But when you stamp an image like the bird from SIFF4, and puff the metal, then colour with Inka Gold, you really start to bring metal to life! The depth you can add working metal this way is always stunning for any project.
Evenings are fun too at ArtsyCrafts, and we got our resident comedian Linda Elbourne to show us her special way to make a metal rose using the PaperArtsy dies (stamped Grunge Flower or embossed Scallop flower). 
Here she is doing her thing. Some people stamped theirs with the grunge collage stamp that fits perfectly on top of the die cut. (Tip match the notch in the die with the roman numeral clock petal) and others embossed their metal die cuts with an embossing folder, but everyone ended up with a fab bellie for their sampler board.
So once laid up on their canvases and with the metal bellies made on the Sunday, it all started to come together. The songbird die makes another lovely metal bellie that would be useful on cards or scrapping layouts too.
The hardest part was deciding how to lay out all the elements, but once in place each person created their own masterpiece which doubles as a great reference point.
Now this piece above is one of the Pink and Orange ladies starting work on the canvas backing board. Look how scrumptious those colours of Inka Gold looks through a stencil! I was soooo excited by this!
Bonnie on week 1 got the 'teachers pet' award for this discovery. She die cut the song bird, embossed on the dot folder, then she stamped over the top of that the image from HP1005 and sanded off the black from the spots. We were 'well impressed' as we say here in Essex!
And the birdcage was a fun embellishment idea too, the card and acetate were die cut together with the birdcage die, then overstamped with the image from HP1004. We had a trick for painting that that got a few ohhs. Love those ooooo's when you demo! LOL


To finish the weekend we did a new project that is actually made from these picture frames. You can find them here in the webshop.
 
They were painted, and decorated with frames cut from the largest of the square pointy dies. We also ran a size smaller frame die thru the bigshot with metal and an embossing mat on a kabuka or big daddy mould. This method of speed embossing opens up a whole new level of speedy metal crafting when you have one of those big-shot guys to play with!

Here is Karen's birdhouse in sunrise colours (BTW she stayed at the camp-site down the road which we keep hearing great things about. it's only a tenner a night!)
Here's one made by one of our younger attendees Bethany. She was brand new to this whole caper and made great stuff all weekend!

So if you want to come to the next round of ArtsyCrafts we have 2 more events planned for autumn. The Newport Pagnell venue (near Milton Keynes) is booked for October 23/24th, and the Warrington venue is booked for October 30/31. Mark your diary now! Booking opens on Monday June 7th, and you can't book without sending a booking form with payment. Please note, for security reasons we cannot take credit card payment over the phone without a booking form in our hands, so you must send your form in first, and then phone to make payment the next day. We expect both events to sell out fast, so please follow this procedure. Both booking forms will be available online in the next week to download from the ArtsyCrafts link here.