It
just goes to show 'more can be more' when it comes to layers! Miriam
has added so many stunning layers to her tissue paper to create such a
soft dreamy combination of colours. From this she has conjured up 3
pretty projects in this soft, delicate colour scheme with our new designer, Gwen Lafleur's stamps !! What a treat!
~ Leandra
Hi everyone, it's Miriamwith
you today, and I'd like to share with you a coordinating card, tag and
gift box that I created using one sheet of masterboard.
When
I was looking at ideas for my projects, and looking at my drawer full
of gorgeous Fresco Acrylic paints, I was drawn to using blues with the
coral shades. I had an idea to create a master-board and knew that the
new Gwen Lafleur stamps would be ideal because they are bold and yet
very patterned. My ideas then expanded to creating a card along with a
coordinating tag and gift box.
My
finished projects don't show just how many layers I added to the
master-board. I think I counted in excess of 15. This was so easy to
do with colours that worked so well together.
I chose to use Tissue Stock as a base as I wanted quite a muted and subtle colour, almost a dreamy effect.
Had
I used Smoothy card stock the colours will have 'popped' more. There is
something quite satisfying and relaxing about creating a master-board.
I found myself getting lost in layering colours and stamps.
The stamps were so wonderful to use that I just couldn't get enough of them.
I
made a card as my first project, mounting the section of master-board
onto coordinating card stock. I chose to use the large medallion stamp
as my focal point and teamed this with a quote from a set of Alison
Bomber stamps.
I
love this little box. It is the perfect size for a piece of jewellery
or even a couple of chocolates. The bold designs from Gwen's stamps
really worked well.
I
kept the tag simple. I thought that it could be used as a book mark. I
wanted the stamping to stand out. I really loved how the coral shades
stood out among the grey archival ink stamping.
I
am hoping that my projects have shown you, not only how wonderful and
versatile Coral is, but also that the new stamps from Gwen Lafleur can
be used in both background stamping and as focal points. I had so many
more ideas from this - I could layer the medallion more and paper piece
it.
I
really hope that I have encouraged you to have a go yourselves.
Creating a master-board is so much fun. And, even better, I still have
some left over to create another card or a couple of ATC's.
Thanks
for joining me this evening. I hope that you are enjoying the projects
for this fortnight. I was so enthused by how versatile Coral was! Happy crafting!
Hi everyone Sue here, joining you this evening with a post about Masterboards. I love making backgrounds and Masterboards are just another way of doing this. They also come in really handy when you need to create multiple items, such as Christmas cards.
Step One:For my masterboard I decided to use a 12 x 12 piece of tissue paper. Using Granny Smith Fresco Finish from the limited edition set I brushed on the paint in a zig zag pattern.
Step Two:I then started to add to the design using Green Olives Fresco Finish with a smaller paint brush.
Step Three:I carried on adding more paint to the tissue paper using some sequin waste and the edge of a plastic card. Then I stamped the butterflies from Hotpick 1506 using Leaf Green and Forget me Not Archival ink and the text from the same set using black Archival ink.
Step Four:To use the masterboard on my journal page I tore it into strips and glued it onto the page that I'd blended Granny Smith and Captain Peacock over.
Step Six:The leaves were stencilled using ELB 002andGranny Smith then I drew around them using a Stabilo pencil and then with a damp paint brush went over the pencil lines. Using the same stencil I used ArtBasics White Crackle. I then created a glaze using Captain Peacockand brushed it all over the page except over the Stabilo pencil and after a couple of minutes wiped it back using a baby wipe.
Step Seven: I used the panel stamp from HotPick 1506 with Versamark ink then white embossed it. To create the white lines I used the edge of Flexi Block dipped in Snowflake Fresco Finish. I stamped more butterflies from the HotPick 1506 set onto some scraps of the tissue Masterboard, cut them out and glued them on to the page. The sentiment from HotPick 1506 was stamped onto the journal page using black Archival ink.
I've included one last close up shot to show the crackle of the leaves and the fabulous detail of the butterfly stamps.
Masterboards are so enjoyable to make and can be created so quickly, you then have plenty of your own handmade paper or card to use in future projects. Hope you feel inspired to have a go !
Fabulous use of the new paint colours Sue . the torn strips are a brilliant base layer for a journal page; immediate dimension that can be built upon. Lots going on here but the complimentary colours keep it all consistent, as do the stencilled shapes, one echoing the other. ~Darcy
We would love you to join in with challenge #22: Masterboards If you are inspired by any of our guests who blog with us over the fortnight, then please join in and link up your creativity HERE.
All links go in the draw to win a voucher to spend on products of your choice from the PaperArtsy online store. The Masterboards link will close 17:00 (London Time) Sunday, Dec 6th winner will be announced 2 hours later at 19:00.
It only seems like yesterday that we launched the blog with a fortnightly topic focus, and here we are at the end of the year with the final topic!
I have got to say, that after many years of blogging, this past year has been my favourite -hands down! We have built up a group of over 30 different blog contributors. This allows us to bring to you so many styles, talents and skills for you to enjoy and reflect upon.
The topics have alternated from products to concepts and techniques which seems to also suit you to opt in or out depending on what tickles your fancy.
Before we start, let's see who won the Topic 21: Abstract Art Challenge...
Hi, Darcy here. Some very inspiring entries for the last theme, abstract can be very freeing, but that in itself can be difficult for a lot of people. As always you rose to the challenge and really pushed yourselves to explore the theme.
The winner of Abstract Art is: Helen from Stamping by H
Email Darcy to claim your prize. Darcydotneedles@hotmail.com
Leandra back with you...
So just one more challenge remains before we take a break over the Christmas/ New Year period. The Masterboards Topic will be open until Dec 6th, and winner announced as usual on that same Sunday evening.
As we near Christmas, 'Masterboards' is a topic that works well if you are in desperate need to embark upon a Xmas card-making frenzy. I know a lot of you like to get your cards sent by Dec 1st (showing the rest of us up!), so there is still time to use this technique for those of you who fly by the seat of your pants!
I've even knocked up a video showing you how super quick it can be to do a masterboard using my brayer technique and some gorgeous colours, here is the finished card below. I didn't finish it properly in the video, so take a good look!...
...actually I made 7 cards - WOW!!
As JOFY stamps are hand-drawn and quite finely detailed, they struggled to 'pop' off the bright background.o make them 'pop' I did really like using the white paint mixed with Satin Glaze on top of the stamped area, then additional touches of Bougainvillea or Tango as you can see in the samples. As you can tell from the video, a masterboard takes me about 10 mins, and then adding them to cards took me about another hour behind the scenes. But that included the white painting/ coloured accents. All good fun!
Here is the video showing how I made the masterboard...
Jo herself did a similar thing in summer , read about it here. Yes, she used YELLOW! Just like i never make Christmas cards, she NEVER uses yellow! Masterboards are empowering things! LOL
You can see lots of the cards up close on her blog post or on my Pinterest page for masterboards. How deliciously simple is this!
Jo is really good at masterboards, in this post she turned this amazing board (from PaperArtsy Blog post here)...
...into this... so gorgeous how the grid squares have been perfectly arranged. There are additional samples on Jo's blog here ....
and here she has made some stunning tags with the remnants...
But upon further inspections it is easy to see how addicted Jo is to this way of creating! Here is another that got chopped up see details here... and another gilded version here.
Next up Anneke, she also is great with bright colours. In the video I showed you a journal she sent us, and here is another done in a masterboard style with a gelli plate. Details here...
And here is the finished cover with additional stamping details added.
Ellen Vargo's stamps are perfect for masterboards. See her post here on how these came about...
I was chuckling this week as Chris Cresswell posted a series of photos showing how a masterboard she was working on developed. You can see the progression below and more on her blog here. She starts with papers, paints, paint-sprays and brusho glazes...
and has added some gorgeous top layers in different ways...collages...
and 'blocking out' images traced from stencils using different colours to block.
I also spied on her blog this journal page which is a stunning creation that could be called a masterboard too! I think this was made in a Tracy Scott class she attended...
And this year Chris has organised a circle journal for a few ladies this year, and this was Chris's page in Gabrielle's journal. She started with a masterboard and then blocked. Read about the process here...
It takes some willpower to turn a background like the above into the below, but I think this blocking concept is one of my favourite techniques at the moment. You can use stamps on the top and block around those too.
Masterboards are often flat to touch, but they look awesome with texture too, check out this post by Brenda for Countryview Crafts using Frescos and Grunge Paste. Love the effect!
I think you are really going to enjoy this topic, it is so broad, and you can use the colours, stamps, gels and mediums of your choice. It pull a lot of recent topics together. Have fun! Don't forget to follow my Masterboards pinterest board if this topic pushes your buttons, you will see plenty more examples to whet your appetite there!
I am really looking forward to seeing what you create over the next 2 weeks! Leandra
Topic 22: Masterboards PaperArtsy Blog Challenge (Final challenge of 2015)
We'd love you to share your ideas and link up your creativity to this page. Please familiarise yourself with the challenge guidelines below before entering.
All links go in the draw to win a voucher to spend on products of your choice from the PaperArtsy online store. The Masterboards link will close 17:00 (London Time) Sunday, Dec 6th, winner will be announced 2 hours later at 19:00.
1. The challenge is a chance for you to show how you have been inspired by a particular technique of the fortnight. Your entry should contain:
- a mention of which post inspired you and why, and
- a link in your blog post to that original post on the PA blog.
The whole concept of this challenge is 'play along with us'. You are encouraged to put your own twist on ideas you see on our blog. We love to see how you are inspired and your twist!
2. The link you put on our linky page must lead directly to the specific post on your blog where you have explored the technique/ idea mentioned in point 1 above. Don't link to the home page of your blog, or we will be unable to find the post to leave you comments.
3. Spam links will be deleted.
4. We prefer your challenge post is created exclusive to our challenge, but if our topic fits perfectly with another challenge, then of course your post may link to both if you feel it is appropriate.
5. You are most welcome to use stamps/ products/ substrates you have to hand from a variety of companies, we do not expect you to exclusively use PA products - it's lovely when you do though!
6. You can enter as many times as you like in the fortnight. We don't want to restrict your creativity or participation! Link closes at 17:00 Sunday Dec 6th (London Time)
7. The winner of the random draw will receive a £50 credit to be redeemed on the PaperArtsy Website, the credit includes VAT and postage. We request that one of your purchases is an A5 rubber stamp. You can add any other items to your basket, but the final total should not exceed £50
8. Each Sunday fortnight the winner will be announced at 19:00, also, in the same post, the link for the next fortnight will be posted. It's your responsibility to claim your prize coupon from Darcy: email her darcydotneedles@hotmail.com
Good Luck! If you have any questions, don't hesitate to ask!
Hi everyone Leandra here, it's Christmas eve, but we are squeezing in a few more #3UP posts.
3UP is a feature we run at the conclusion of each semester. We highlight the creativity of our followers.They contributors volunteer blind, are given a brief, and this time they were asked to show us their favourite techniques.
Tonight is all about masterboards. The concept is perfect for backgrounds, and can be interpreted a myriad of ways. Layers of collage, stamps, colours create one big interesting background. This is then often cut up into smaller sections, and can be used as a mosaic, or independent sections on their own. Endless combinations, methods and options. Tonight we have 3 of those to share with you.
First up it's Margaret Brackenbury. (@brackmarg) Margaret is an awesome PaperArtsy stamper, she's not been as active as she would like this year, so it is fabulous that she volunteered to be a contributor this round of #3UP. We really love seeing Margaret at shows. On her blog you can see she uses so many of our different stamp collections and successfully incorporates a wide variety of styles and techniques in her crafting.
Hi everyone, Margaret here. This is one of my favourite techniques at the moment, as it
is so versatile, you can use so many different mediums. I have stamped and used coloured pencils,
painted.
For this board I used Fresco paint and the brayer. Using Lin Brown’s Limited Edition Paints I
dotted stamping card with paint and spread it out with the brayer.The next stage was
to add some stamping using JOFYs Christmas stamps some from this year and some
from last year until I got the background I wanted.
I then set about cutting the board up using as backgrounds
and tops and adding more stamping etc for the following cards.
It's amazing how the same background can be used in so many different ways
Thanks Margaret
Next up we have another long term supporter, Helen Lindfield. (@stampingbyh) None of us quite understand how Helen manages to craft so competently on the floor. This year our ears have pricked up at her more frequent mentions of a bit of a clear out, maybe we could dangle a desk as the reward at the end of the sorting process if she does! Mind you clearing up is always more complicated than you anticipate, my studio-shed is yet again in dire need of another JOFY makeover....Let's take a look at Helen's masterboard shall we...
Hi everyone. My
favourite technique using PaperArtsy Fresco Paints is to make masterboards. I
think it was Jo Firth-Young I first saw using this technique but since then I
have been well and truly hooked and have used it for most of my 2014 Christmas
cards!
Step One:
For
my 3UP project I took a piece of copy paper and a selection of Fresco paints
in shades of blue – Antarctic, Ice Blue, Bora Bora
and Pea Coat (the old, translucent version). Starting
with the lightest, Antarctic, I spread a small drip on a spare piece of craft
mat and brayered it on my paper...
Step Two: Repeating
with each colour in turn, to nearly fill the paper, I added a little South Pacific (a
translucent) for a bit of brightness, and then repeated the process with
Antarctic and Ice Blue to knock back some of the darker areas.
Step Three: Now
for the stamping! I used Ellen Vargo’s
sets EEV02 and EEV07, the scratchy circle and diamonds, using South Pacific and
Antarctic respectively, applying to the stamp with my brayer for a light touch.
I randomly stamped these over the page. That completed the background.
Step 4: For
my main stamped images, I used the new Lin Brown Christmas set, ELB10. First I took the Tree Branch and Watering Can archival ink by Ranger; which I
stamped across the paper, then the small bauble and the robin, in Black Archival and again stamped them randomly over the paper. I coloured these with Inktense watercolour
pencils in yellow and red, blending with a paintbrush.
You
can do so much with your masterboard – journal backgrounds, bookmarks, you name
it – this year as I mentioned, I’ve made Christmas cards.
Thanks to you all
Helen
Our final contributor tonight is Jules Bell. (@pinkjules50) Jules has been playing along with us of late, and you can see the results on her blog. Take a look at this amazing canvas project she made using Finnabair techniques with Lynne Perella Stamps. Its a stunner! Tonight shes a masterboard genius....
Hi Everyone So after to speaking
to my follow masterboard enthusiast's, I settled on a Christmas theme,
my desk was already filled with Christmas goodies so I was already in
the mode.
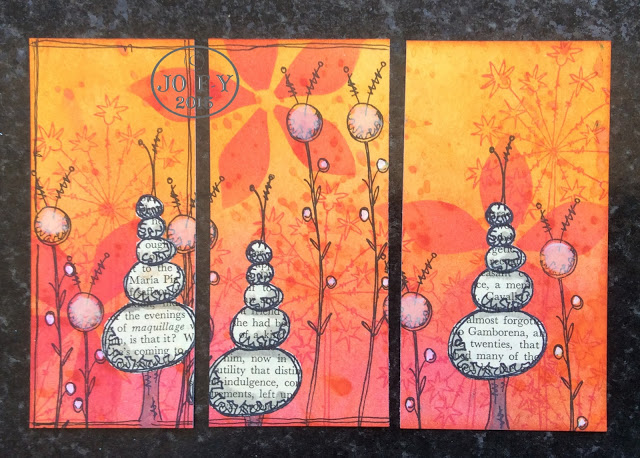
Step One: I
choose the JOFY28 set, grabbed a piece of white card and started
randomly stamping.
Step Two I overlapped the baubles and then filled in all the gaps with the lovey star/snowflake stamp in the set. I use the word joy in the longer baubles for extra impact.
Step Three:
Next
I choose a traditional red and green colour scheme and using a range
Promarker pens started to colour. Its such a wonderfully peaceful and
relaxing thing to do. If you haven't tried this technique before please
give it a go. Its not anywhere near are hard as it may look and it only
took me and hour and a half to finish the board. you can choose any PA
stamp theme for any occasion.
I
was very pleased with how vibrant this turned out, and decided to carry
on and make some cards from it. I added an green and a red mat as a
base and then a couple of embellishments to finish off.
From one plain piece of white card stock I end up with 3 beautiful 6x6 cards to add to my Christmas card collection.
I thoroughly enjoyed this project and taking part in another 3up challenge. I hope you enjoy, and Merry Christmas :) Jules
What a lovely way to spend Christmas Eve. We hope you have a fabulous day with friends and family tomorrow if you are able to. If not and its a quiet one for you, then get crafting while there is some peace and quiet. We'll be back to resume this round of #3UP on boxing day (26th), or we'll chat on twitter I'm sure!
Wishing you all a very, very, Merry Christmas ! Ho ho ho .....
Leandra
We would love you to go in our challenge draw for a prize from PaperArtsy, a voucher to spend in our online shop. Link up your creativity HERE. All links go in the draw to win a voucher to spend on products of your choice from the PaperArtsy online store. This link will close 17:00 (London Time) December 31st 2014, the winner will be announced 2 hours later at 19:00, Dec 31st, 2014.


.png)

