Showing posts with label 2015 Topic 22. Show all posts

Friday, 14 April 2017

2017 #6 Squiggly Ink with UTEE {by Ingrid Vichova}

2017 Topic 6: Resin/UTEE


Hi everyone, Ingrid here!

Lovely to be here on the PA blog tonight sharing a few ideas on how to use UTEE (Ultra-thick Embossing Enamel). 

Originally, I was going to use resin, but it turned out to be a disaster. More practice mixing, me thinks :) I went back to my trusted embossing enamel and had a great fun playing. Take a peek at what I've been up to... 


The overall idea behind this was to create a dimensional and cheerful art that would brighten my craft room and my mood at the same time. I also believe that there are no ordinary moments in life so this stamp set was my immediate choice! I used the Bricks & Mortar 1 A6 stamp set (Squiggly Ink).


The process is rather simple, but there are a few things I have learned (the hard way) and decided to share a few tips with you. So hopefully the below photos will give you a better idea...


Gelatos are perfect for adding a bit of colour to your UTEE. They have plenty of pigment so you only need a few shavings to add to your pot. 


Let's get cooking! Melting the 'ingredients' doesn't take long at all. It is a good idea to heat from the bottom first to prevent hot pieces flying around and also to prevent overheating it. 


UTEE = plastic. Make sure you sit in a ventilated room when heating it up and use tweezers to hold the pot so that you don't burn your fingers. Once melted you can pour onto your non-stick craft sheet. 


You need to work at the speed of light at this point and pop your stamp on top of the melted UTEE whilst still hot. I like to use a large acrylic block for this as it also presses onto the stamp evenly and weighs it down a bit. 


You're going to be left with something like this. I decided to trim the heart completely. I have a bright spark for you: You can also pour the hot UTEE into the centre of the stamp and let it cool down. You could also use metal cookie cutters for this. I also have a warning for you: It's addictive!!! :) 


It's a good idea to test your base inks with UTEE first. I experimented with a couple of type of black inks, one of which was VersaFine Onyx Back, but found Stazon to be working well with embossed tissue paper. No smudging. However, later on I found out that the Stazon can smudge a bit once embossed over the paint so try to minimise the heating time once working over stamped paint. You'll see what I mean in a bit. 


Now comes the fun bit! Isn't this the most amazing colour combination ever? I LOVE Tracy Scott's new paint set! I embossed the little house twice only on the front side and let it cool down under my heavy acrylic block to keep it flat. The clear embossing powder makes the tissue completely see-through and the idea was to add the paints on the back of the embossed tissue paper. I also used  a dash of Snowflake here. 


I didn't spend too much time on the background, but absolutely had to use the new paints! So yummy! 


How adorable are these little stamps. The size of these stamps is perfect for cardmaking. How did I not know about them sooner? I was as pink as that prawn paint when Leandra told me what Squiggly Ink were when I asked. I had a good browse soon after and bought a whole batch of Squiggly Ink stamps so don't be surprised when you see them used in a magazine soon. 


Embossing is like magic. Don't you just love when the granules start turning all shiny? So imagine the feeling when the Stazon started to 'leak' a bit in the corner! Nooooo! The plan was to stamp onto the first layer of embossing and then emboss again so this was suddenly a big no no! But fear not! I sorted it out... 


I figured that embedding a stamped tissue was a better idea overall. I knew that the Stazon ink wouldn't get smudged/melted this way. 


The painted house is perfectly bright once embedded, but the tissue paper itself disappears within the melted UTEE. I hope this sparks some ideas for you. A few photos of the completed project for you below... 

*****


One final tip: If you are going to try this technique then make sure you work on a greyboard or similar substrate to withstand the heat! Have fun!


I had a great time playing with the gorgeous paints and loved making my own embellishments using the heart stamp from the set. Thank you for stopping by today. I hope you enjoyed reading about my creative journey. I'd be happy to hear your thoughts and if you want to get in touch, my links are for you below. I shall look forward to it! 

Blog: Ingrid Kristina V Designs
Facebook: Ingrid Kristina V
Twitter: Ingrid Kristina V
Instgram: Ingrid Kristina V 
Pinterest: ...and you guessed it... Ingrid Kristina V :) 

All the best, 

Ingrid xxx

Oh my goodness, what a beautiful post Ingrid!! It's so lovely to see the Squiggly Ink stamps out! ~Leandra


We always hope that you  learn something interesting from our blog. Our bloggers deeply appreciate your comments so much, so please take time to let them know you've been inspired! Why not join our challenge by blogging your interpretation of the current topic and link it here?

The current topic link (Resin) will close 17:00 (London Time) Sunday, April 23rd 2017, and the winner will be announced 2 hours later at 19:00.

All links go in the draw to win a £50 voucher to spend on products of your choice from the PaperArtsy online store.

Saturday, 5 December 2015

2015 #22 Let us Read {by Emma Godfrey}

 2015 Topic 22: Masterboards

Hi everyone Leandra here with a sneaky treat for you. Think of it as an early Christmas present!

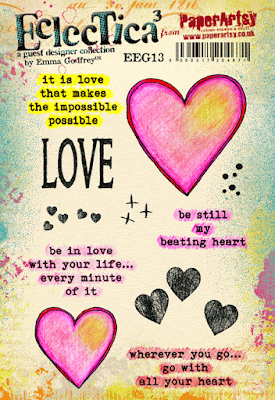
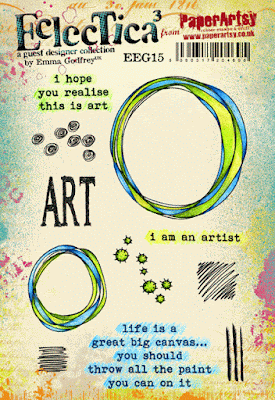
Emma Godfrey has designed some new stamps which we have released last week to retailers. Perfect for journalling, cards, mixed media and scrap-booking, these stamps are sure to impress!

Emma has been hooked on bright colours, and doing journal pages that 'pop' all year, so she decided to increase the size of her stamps to suit what she is doing right now, and we think they are awesome! We hope you do too, these would make a great stocking filler!

 EEG13

EEG15

So Congratulations Emma, and I'll hand over to Em so she can show you a masterboard idea with these new beauties...

Hi Everyone Emma here, joining you this evening with a post about turning a masterboard into bookmarks (a great idea if you want to give a small handmade Christmas present). 

I love masterboards, but I usually cut them up to use on cards, and for this blog post I thought it would be fun to try something different. The only thing you need to remember is that you want to keep your masterboard flat (if you add texture then your laminator might not like you very much!) ... but that doesn't mean you can't have plenty of painty layers!


Step One:
I covered a sheet of A4 Heavy Smoothy with Gesso, then applied Pumpkin Soup, Beach Hut, Eggplant and Bougainvillea Fresco Finish paints with a big wet paint brush. These translucent paints produce lovely bright layers.


You need to be aware you will create new colours where the translucents meet each other...for example, where Pumpkin crosses Beach Hut you will get green, Beach Hut and Bougainvillea will create a plum purple, and you get a blue purple where the Eggplant and Beach Hut mix.


Step Two: Cover the A4 sheet with some Snowflake Fresco Finish mixed with a little bit of water. Make the paint thinner and thicker in some areas - you want it to look messy.


Step Three: Now to start stamping and stenciling. I randomly stamped the large circle from my brand new set EEG15 ...


and MN18...


I then stenciled Archival Ink Magenta Hue

through The Crafters Workshop Mini Circle Grid stencil ...


and this is how it ends up once all of that was done!


Step Four: More layers ... I stenciled through The Crafters Workshop Mini Chevron Arrows

and stamped the paintbrush strokes from EEG15 using Snowflake Fresco Finish


I stamped MN72...
... in Archival Ink Jet Black, and added some lines with the edge of a credit card using a mixture of Pumpkin Soup and Haystack Fresco Finish (Pumpkin Soup is a translucent paint, so adding Haystack makes it more opaque without losing the colour).


Step Five: I stamped the spiky dots from EEG15 using Archival Ink Jet Black, and coloured the centers in with a White Sharpie Extra Fine Paint pen.  I then put some Snowflake Fresco Finish into a small bottle with a micro nozzle and drew squiggly circles and some swirly lines with it. (I love how the lines came out with a stitching texture ... I didn't want to take a chance that I'd get a big blob of paint, so I wasn't squeezing the bottle very hard).


Step Six: Once everything was dry, I cut the sheet into seven strips - each 4.2cm wide. and then cut the strips down to 15cm (choosing the area I liked best from each strip). 


I'd printed some quotes earlier onto some white paper, which I cut up and stuck on, before outlining them with a black pen. To add a bit of sparkle I used a Tombow glue stick to add some...
 (also available in blues) to the edges.


Step Seven: I laminated the bookmarks (leaving plenty of room at the top of each one). I trimmed around each one leaving a small border on three sides and an extra 3/4 inch piece at the top. I rounded the top corners and set an eyelet in each one. To finish I just added some string through the eyelet.


Here's a close up of my favourite...


And all seven finished...


I was so pleased with how these came out ... except for one thing. On turning them over to admire my handy work I realised all my bookmarks had very messy backs! Next time I make some, I will try to remember to either paint, or cover, the back of each one.

I hope you enjoyed this project ... and that it's inspired you to have a go. If you want to see more of my ideas, you can find me on my blog, facebook and twitter.

Wow, not only functional, but very pretty too! These are awesome to pop in with Christmas cards as a cute gift too. That foil on the upper and lower edges looks amazing! ~Leandra

We would love you to join in with challenge #22: Masterboards If you are inspired by any of our guests who blog with us over the fortnight, then please join in and link up your creativity HERE

All links go in the draw to win a voucher to spend on products of your choice from the PaperArtsy online store. The Masterboards link will close 17:00 (London Time) Sunday, Dec 6th winner will be announced 2 hours later at 19:00.

Friday, 4 December 2015

2015 #22 Counting Down to Christmas {By Bracken Sparkes}


2015 Topic 22: Masterboards

Hi guys, Bracken here again. This time showing you what I can do using masterboards. I really enjoy using masterboards in my work because there's so much you can do with them...and it's fun to play about intertwining stamps. December is my favourite month as Christmas makes me spin round the ceiling with excitement and it's my birthday sooo...yeah!..This gave me more drive to making this project full of fun and FOOD!


Print all required stamps around the page using no specific order what so ever. stamp in Jet Black Archial ink in first and second generation stamping.

The main stamps I used were those from EDY 16 but did use some of JOFY's (JM 07, an ivy leaf from JM 28, stars fromJOFY 18, and the little flurry of stars and dots from JOFY 19.)


Now for the fun part, and somewhat time consuming part...getting in a painty mess.

Paints used...Guacamole, Smoked Paprika (unfortunately discontinued), Cherry Red and Candy Floss (Limited editions out of stock), Sage, Hyde Park, Toffee, Chocolate Pudding, Pewter, Irish Cream (discontinued) , Blue Oyster, Toad Hall, Bora Bora, London Bus, Holly, and Brown Shed.) 


Also a cosmic shimmer paint in Gold.

To add a little bit of sparkle and interest I added some Stickles in Crystal, Holly, Frosted lace, Silver, Xmas Red, Starry Night. Dovecraft-Gold and Ranger liquid pearls- Silver Pearls. 

Once FULLY dried, it is time to get the main structure ready.

I painted the majority of the 'frame' in Slate first and once dry, went over the front in Chalk to add a little rustic feel.


I painted the sides of the inner frames in colours I had previously used. Those were, Bora Bora, Sage, Gold, Candy Floss, Blue Oyster, Pewter and a random red paint from The Range only because it was a little more opaque for what I wanted it for.

Then I cut the masterboard and other sheets of paper to the size of the frames and stuck them in with double sided red tape.


I then sprinkled the bases with 'snow' found in the Crimbo section of a local garden centre. I stuck it all on with Cosmic Shimmer PVA glue and let dry completely.


As the last stage of this advent callendar, I added small Christmassy bits and bobs to almost every box, including 7 decorated trees, a stocking and holly, Santa's hat, a MERRY CHRISTMAS, numbers on the backs of scrabble pieces and a cute vial filled with Reindeer food. Then stuck multiple cuts of the Sizzix On The Edge Snow Flurries Die with double sided red tape to the top and covered the joins with cotton wool. To finish the whole thing off, I, (with a little help from Grandad) screwed in 28 little screws (found at Tiptree Cheap shop) and wound a length of bakers twine (found at The Range) round them and attached small pegs to the twine. 


I really enjoyed making this for you all and if I were to do another one I'd paint the 'ground floors' of each box with Chalk before adding the snow so you don't see the natural wood showing through. I had to do SOOO much touching up of the snow it was painful!!lol I'd also change the way the sweets were going to be displayed. instead of having them suspended from the twine, I'd probably just have them in the box so they don't look so messy and I could use bigger sweets.

Anyways...I hope you like this and if you wanna see what else I've been up to just head on over to my blog or even follow me on Pinterest. I mainly just fangirl over products I love and Harry Potter but there's a lot of arty stuff too.


Blog- ArtymeB
Pinterest- Bracken Sparkes

I hope you have a safe, magical Christmas filled with FOOD (sprouts...ugh) and Crimbo jumpers and have a very happy new year.
See ya,
ArtymeB Xxx.


Wow Bracken, this turned out just wondereful, so bright and cheery, just as it should be. What a fantastic way to use your masterboard. All the little finishing tuches are wonderful and the snow is magical. Thankyou for all your hard work on this project and thanks to Grandad too! ~Darcy

We would love you to join in with challenge #22: Masterboards If you are inspired by any of our guests who blog with us over the fortnight, then please join in and link up your creativity HERE

All links go in the draw to win a voucher to spend on products of your choice from the PaperArtsy online store. The Masterboards link will close 17:00 (London Time) Sunday, Dec 6th winner will be announced 2 hours later at 19:00.