Showing posts with label Peach Nectar. Show all posts

Friday, 1 November 2024

2024 Topic 9 : Alison Bomber {by Victoria Wilding)


Hi everyone

Victoria here with you today.

It’s that rusty time of year, when all of the autumn colours are in their full glory and naturally spill over into our makes. And no-one does rust better than Alison Bomber, so taking a leaf from her book (see what I did there!), I was inspired to do my own paired back take on combining some of the stamps from her collection with some rusty autumn colours.

Embracing nature in words and pictures, lies at the very heart of Alison’s creative practice and forms the basis for her stamp collections. So it wasn’t too big of a stretch to incorporate this quarter’s theme of nature into my project. I decided to create a set of notelets, which can be bundled together to gift a friend. Combined with a few other elements, this handmade gift will be a one-of-a-kind package, crafted with love.


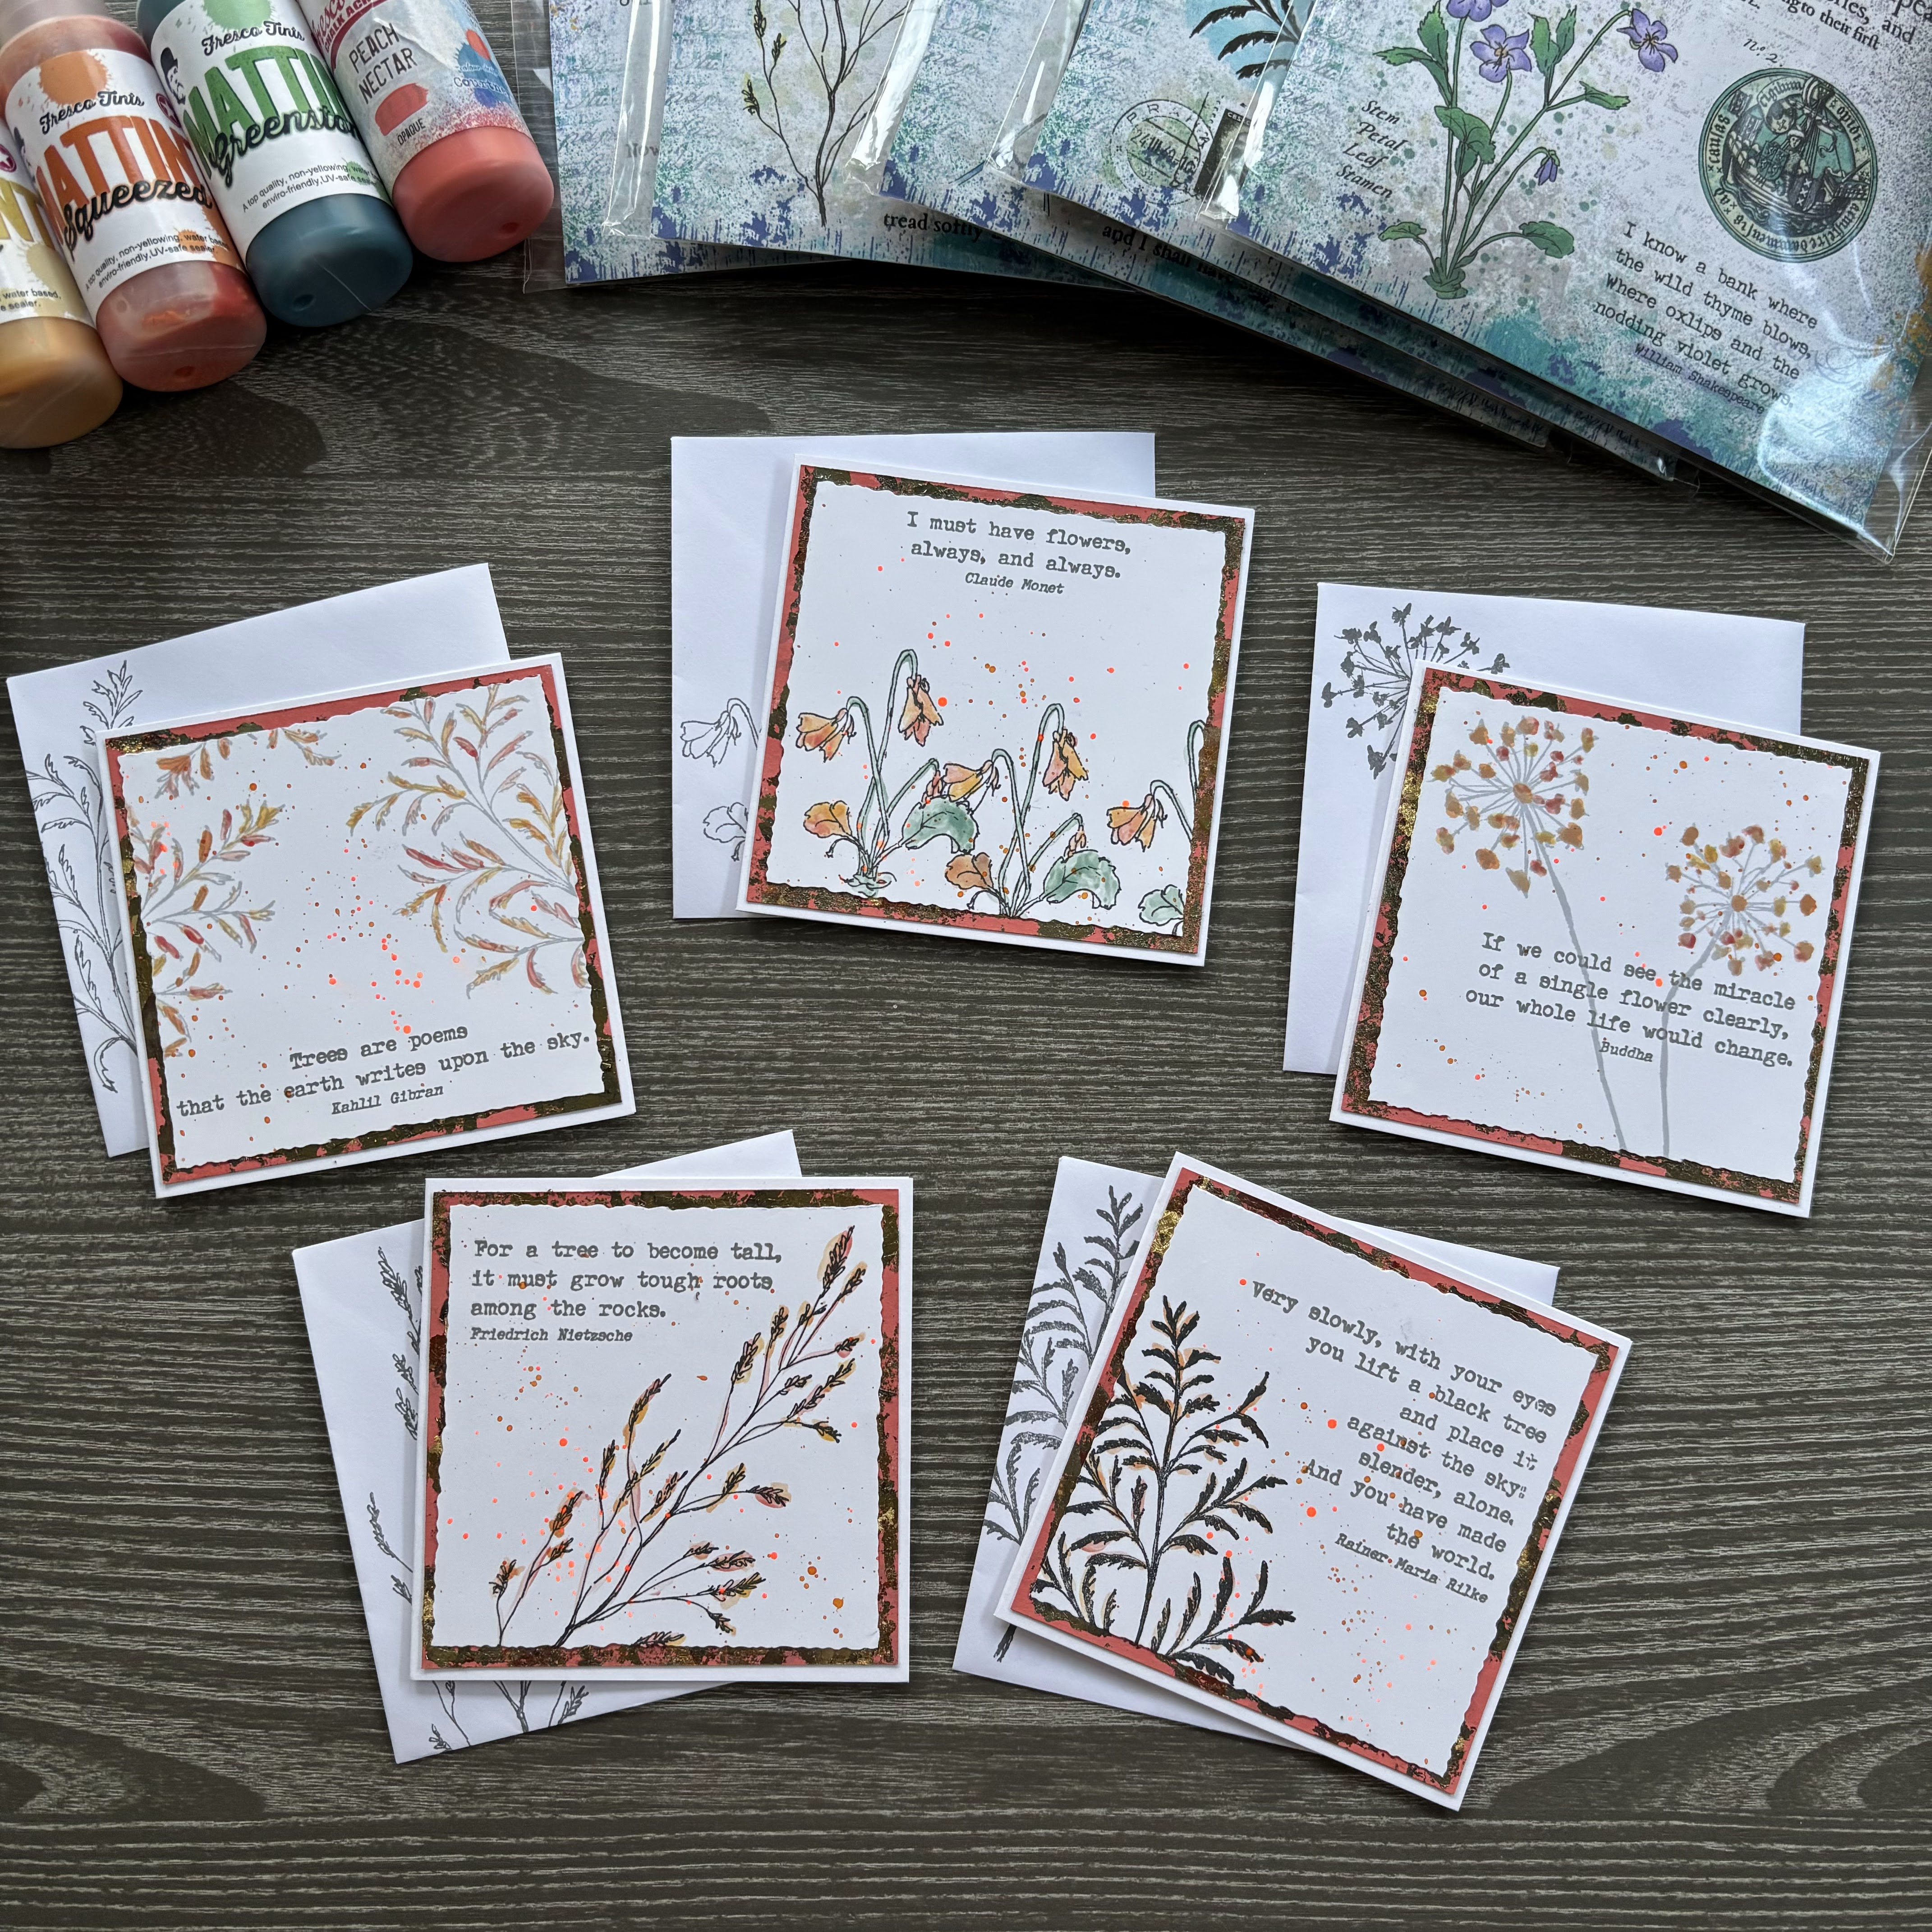
I’m not usually a hot colour fan, so lots of white space in the finished project, balances the strong colours which I used sparingly. This really helps to lead the eye to the details, whilst also giving space to rest whilst looking.


I started off by gathering my supplies. Firstly I selected some Alison Bomber stamp sets for my imagery. I knew I wanted words to be a particular focus on the notelets, so I went right back to the beginning and chose EAB01 Trees and Flowers, as the nature theme would tie in with the floral images. I am lucky to have a collection of Alison’s stamp sets, so I also chose EAB30 Violets Edition, EAB39 Pressed Foliage Edition, EAB40 Pressed Grasses Edition, EAB41 Pressed Umbels Edition, to use for the floral images, giving me a different floral for each notelet. If you don’t have as many sets, you could easily use just one set and have matching images on all the notelets.


I also selected some autumn colours from the Mattints range, picking out Ladybug, Greenstone Glow (MT01) and Squeezed (MT06). I also selected a Fresco Finish Chalk Acrylic in Peach Nectar (FF144).


I picked out five, 4” square card blanks and envelopes, and cut five, 3.5” squares from Smoothy Card (SCA4) using my deckle edge trimmer for an uneven edge.


Then I started to create the main focal points for the notelets, stamping out quotes from EAB01 Trees and Flowers.


Next I stamped a floral on each of the cards.


Using a mix of black and grey Archival Ink, to create the illusion of depth between the images and words.


With the stamping complete, it was time to add some colour to the project.


I put out a small blob of each of the Mattints onto my craft mat, and using a small paint brush started to roughly apply the colour, not bothering to stay too closely in the lines.


This allowed me to create a halo of colour around the solid stamp designs, creating unity in all the cards as a collection.


Then I added some orange watercolour splatters and set aside to dry.


Next I created the base layers, to put the focal points on. Using scrap card, I cut five 3.75” squares and applied Fresco Finish Chalk Acrylic in Peach Nectar (FF144around the edge using a sponge. This is a great way to use up patterned card from your stash that you might not like that much.


Once dry I applied a rough, thin coat of glue on top of the paint.


And applied guilding flakes on top, removing the excess with a brush.


With the main elements for the notelets complete, it was time to start building the layers, using double sided tape.


Including attaching them to card blanks.


The patchy metallic highlight, look really effective against the bright peach of the paint, creating a real burst of autumn colour behind the main focal point.


To finish I stamped matching florals on the envelopes for the notelets, before bundling them all together with twine.


The finished notelets have a flush of autumn rust, that isn’t too overpowering and they look really great together as a set.


With five unique designs in the finished set, these will make a great gift for the recipient to use for sending handwritten messages or greetings, or for journaling/reflective writing.


I hope you feel inspired to make your own set of nature inspired notelets.

.
Until next time, wishing you a happy creative week!

Victoria 

Friday, 16 August 2024

2024 Topic 6 : Scrapcosy {by Riikka Kovasin}


Moikka everyone! It's Riikka Kovasin (@paperiliitin) here today with you to share my take on the Scrapcosy topic. While I love all things vintage, this time I went with an explosion of color and combined the detailed stamps to magazine cut-outs.

I haven't gone through my Instagram feed or used any other source to verify this, but I think every now and then I get an urge for color. My go-to color palette usually consists of blues and greens or even more likely rust tones, but every once in a while I start craving for all things rainbow. That was the case with this project. The moment I pitched for this idea, I already saw the pages in vibrant tones - quite contrasting to the vintage feel of the stamps!

What I really like about these pages, is the fact that they are so easy to replicate! You just need some paints, a bit of cardstock and magazines along with nice stamps and you are good to go! These pages hold two hidden features, though. Follow along the steps and find out what they are!


I picked two Scrapcosy stamp sets for this project. I picked the vegetable set (ESC02) as I saw the possibilities the pumpkin and onion had as really voluminous skirts. The other set (ESC24) I chose because of the owl as I saw how his head could be used to make different characters.

When it came to choosing colours, I limited myself to only three. This was because I wanted the project to be easy to do even with a limited stash. If you own a huge selection of colours, by all means use them, but you can get a lot done with a limited palette, too. 

I usually pick neighbouring colours on the colour wheel, i.e. I use an analogous colour scheme. The beauty of that is that all the colours go nicely together and it's almost impossible to create mud even though you combine all of the hues. But this time I didn't want to play it safe! I wanted as wide a range of colours as possible and instead of the usual neighbouring colours I chose a pale blue Summer Sky (FF150), peachy red Peach Nectar (FF144) and a fresh green Granny Smith (FF108). Having opposite colours like green and red in the palette had all the ingredients of a catastrophe in the air, but I think I pulled it off! See for yourself in the step by step photos underneath.  


The paints in the step photo below probably look familiar, but the cards might cause you to scroll back. They are the first hidden element of this project. They are hidden in plain sight, but just under a bit of paint! 

These cards have a little story of their own. I picked them from an antique market at Tallinn with this project in mind. I think one of them was in Estonian, one in German and rest in Russian, but as I don't really read any, I could be totally wrong! The point was not to be able to read the text, and personally I find it even easier to craft the background with a language I don't understand, but instead to have a handwritten surface to create upon. 

To add the paint touches on top of the cards, I added some dots of colour to each and then sandwiched the cards with the paints inside. A little squeeze and wiggle then got rid of the blank page dread and I finished the colouring with palette knife. 

With palette knife there was a bit of mixing involved, so there's a touch of brown tones here and there, but I didn't mind. If you, however, don't want any mud in your project, add the colours one by one and let each one dry before adding the following one. Or if you're using a palette like mine - two neighbouring colours and a contrasting one - use the opposite colour on its own layer and the two neighbouring on their own. 


Next step is optional in a way. Let me explain. I love to work in my journal but I hardly ever work directly on it but instead start with an extra piece of cardstock and then adhere the page in. The cards were too small on their own, so I needed to create a background for them. Depending how you work, you could just add the stamping directly to your journal or just skip it all together, if you are making loose pages. 

I used the same colours I used to add colour to the cards, but this time brayered them one by one to my gel printing plate. I then used the moon stamp from the Scrapcosy set (ESC24) to add a pattern to a piece of cardstock the plate acting as my ink pad of sorts. 

When stamping with acrylic paint, don't let the paint dry to your stamp but wipe it clean after stamping. 


Now that I had a couple of sheets all patterned with paint and the cards coloured, it was time to combine the two. While reaching for double sided tape and a paper trimmer, I realized I could make a pocket to my page! But before I could do that I trimmed the A4 sized sheet into two smaller bits that fitted inside my art journal. I saved the trimmings. I usually do that at least as long as I'm working with the project as those little strips might come handy in a later stage.

When the sheets were cut, it was time to combine the stamped piece with the post card. I used double sided tape to mount the piece in place. I think the idea of the pocket popped into my head because I had just seen the fabulous card project by Claudia Neubacher (link). So instead of adhering the card to the base from all four edges, I secured three with the double sided tape and left the fourth open to slide a tag inside. 

One of the cards was smaller than the three others and for that one I needed to trim the tag smaller. This way it could slide nicely inside the pocket. The others, however, were just fine the way they were. 


I had created a burst of colour like I wanted to, but now some contrast was needed for the background. There was a bit of the handwriting showing here and there and some postal stamps, but I felt that the background still required more visual texture. I used stamps from both Scrapcosy sets to add patterning to the background. I could have introduced another colour into the mix, but I felt that black would be the way to go, thus adding contrast to the mix. 

As you can see from the step picture below, I used one of the sentiment stamps repeatedly to create texture. You can make out some of the words, but more over I wanted that to represent a script texture in the background. I also used the stamps in clusters combining the different motifs to make bigger segments while leaving other places without any added patterns. 


Now I had the backgrounds ready for the focal points on top. I was pleased about the splashes of colour I had created but at the same time I lost a bit more of the handwriting in the cards that I may have wanted. That was due to the method I added the colours and also the colours I chose. If I had chosen a trio of translucent or semi-opaque colours, the outlook would have been different.
 

Focal point time meant cutting, stamping and more cutting! 

I had received a pile of magazines from my mom and I started by cutting loose body parts. That sounds so weird, but as you can see, that's what I really did! I tried to pick interesting poses, but also kept in mind the size of the owl. When I had a small stash created, it was time to make the stamped elements.


I could have chosen to stamp the elements on top of white cardstock and then added colour, but I wanted the character to have the same feel throughout. So, instead of cardstock I stamped the elements to magazine pages. I picked an interesting colour or pattern, stamped the image on top and then used a heat tool to dry the ink as I was using an ink that's suitable for non-porous surfaces with heat setting. After drying I then cut the stamped element out. 


This was the most fun part of the whole process - making the characters! As you can see, I used the owl head on each one and added a pumpkin or an onion skirt or bottom to every character. If you like, you can add more variety by using different stamped heads or animals. You can also go more surreal and create your own fantasy mixes. 

If you want more inspiration to character building than these four, Siiri (link) creates fabulous animal stories and Riikka (link) has an unique way of collaging vintage images. I follow them both and I'm sure this project was inspired by what they do! 


Now that I had my characters ready, it was time to insert them into the backgrounds. I didn't want them floating around the picture plain but instead to sit or stand upon something. For that I used those thin strips I trimmed away in earlier stage (remember I said they might come handy?) but also made some decorative tape of my own. 

I put a length of masking tape to my craft mat, inked the border-like stamp from the Scrapcosy set (ESC24) and stamped the pattern on top. After heat-setting the motif I then used the tape in small pieces on all of the four pages. On top I then adhered the character using double sided tape. 

A tip - if you want the character to be secured smoothly, put a piece of double-sided adhesive sheet to the back before cutting the element loose. That turns the character elements into a stickers! Or if you have a "sticker maker" machine, even better. 


Backgrounds - check. Characters - check. Embellishments - let's tackle those! As the pages had quite a lot going on already, I decided to use similar elements to those I already had in the pages. I rummaged around the magazines again and cut some embellishment elements out but also used the label stamp from Scrapcosy set (ESC02) to make colorful labels. For those I used the same idea as with the other stamped elements - I picked a nice colorful surface from the magazine, stamped the label on top, heat-set the ink and then cut the label loose. I added these additional little elements to the pages using double-sided tape as well.


I was a bit torn when it came to journaling. The biggest question mark was the language. I had these magazines and keeping with the idea of not adding any more different elements I could use those, but they were in Finnish. As this blog post is in English I was thinking if the journaling should be in English, too. But in the end I decided it was more important to share the idea of using the magazine in a various ways than that the journaling was readable - I could always add translations! 

So, next I turned my attention to the words on the pages of the magazines rather than images. I cut sayings and words from here and there also trying to add different fonts to my journaling. To keep the pages coherent, I chose to go with black text on top of white surface. I used again double-sided tape for adhering the pieces in place. 


As a finishing touch I added some doodling to the pages. I added a bit of white to the eyes of the owls if they were stamped on top of a dark surface and then added a faux stitch line running around each page.


After the last little doodles, the pages were done! I took individual photos of them, but then added them to two journals as spreads. Often my spreads have an element running from page to page, tricking the eye and keeping the spread coherent. These didn't have that as such, but as they have the same colour scheme and style, they go nicely together.


Ta-dah, here the pages are! Colourful, paint-blotted backgrounds and collage characters on top. I'm happy how these turned out! The character with the stripy shirt and jeans is my favourite of the four. I really like the posture, how her hand leans against her feathery cheek! Although the character with ballet shoes is also intriguing as I feel the pumpkin skirt really makes a nice style detail there.

I've included a translation of the journaling underneath each page. The two first make up a spread as well as the two latter ones. Especially in the first two the journaling has a nice common theme in the both pages!

"Dear reader, to do or not to do? Use your experience"

Like I said earlier, I used the same head in each character, but you could do a mash up with different sets. Like try mixing character stamps by Darcy or Clare Lloyd in the mix! If you have room to store elements, cut out interesting poses each time you see those in magazines and create a stash of character elements! 

I hope these pages inspire you to try mixing different things and adding colour to vintage elements! Thank you so much for your time!


"Everything can be done as with mother's instructions"

"Trips to the ends of the world but everything nice happens at home"

"This is something I'd like to say to my former self: Get inspired!"


Instagram: Paperiliitin
YouTube: Riikka Kovasin
Facebook: Paperiliitin