Showing posts with label ZN25. Show all posts

Thursday, 8 February 2024

2024 Topic 1: Miniature {by Renata Peley} on the PaperArtsy Blog

Hi everyone! It is Peley Renata here with you today and the first thing that I must say is that the topic “miniature” is really something that draws my attention. I always enjoyed tiny things and admired the artists who have that amazing hand control and can work within small formats. Sadly, I find my skill somewhat lacking, but that is not the only problem. The bigger issue for me is the shortage of patience that I generally suffer from. But I found a little workaround for my issue. What if I work within the usual size that I am comfortable with and then shrink my project? I bet a lot of you already know where I am going with this.


If you thought of shrink plastic, you guessed well. A couple of years ago I decided to give it a try as I thought: how hard could it be? But apparently it was a bit trickier than I thought as my first attempt wasn’t all that great. So now with this PaperArtsy topic, I decided to give the shrink film another chance, but this time I would approach the whole project with a little bit more care. So let me share with you what I learned so you can avoid some common mistakes and annoyances.


Ok, so the obvious necessary product for this project is the shrink film. Some of you might be more familiar with the name Shrinky Dink, but regardless of how you call it, it is a type of thermoplastic called polystyrene. It can be purchased as colored, white, clear, printed, frosted and sanded. For my project, I managed to acquire three types: clear, sanded and white. I will use all three just for the purpose of demonstration and testing, but honestly the differences weren’t all that big.

You can print on your shrink plastic, but then be sure to use only inkjet printer. I decided to go a bit more manual and do some stamping instead. All the stamps that I have chosen to work with are from PaperArtsy and designed by Elena Zinski (ZinskiArt). Here is the list of all the stamps that I have used: ZA37, ZN49, ZN51, ZN25, ZN07, ZN11 and ZN40.

When you look at my choice of the stamps, you can notice that I went for more quirky and cheerful designs as I thought to involve my kids in the making of this project. And honestly, I do recommend that you do this type of project with your kids or grandkids as I can tell you that my kids were overjoyed to make little charms colored with their own little hands.


Let’s start with the obvious: the ink pad. The best type of inks to use are pigment inks and permanent inks such as Stazon, however, be aware that not all inks perform the same on all brands of shrink plastic. Some of the problems that may occur are the ink not setting in, even after shrinking, ink smudging or sliding over the surface of the shrink film. In this case, I will be using Stazon ink in Jet Black color. But first, let me give you one extra tip. Depending on the medium that you planned to use for coloring, it can be really helpful to sand your shrink film before you start working on it. This step is not necessary if you buy sanded or frosted shrink plastic. The sandpaper that you use should be neither too fine nor too rough. Also be sure to go in all directions when sanding. This will help with both the ink not sliding and getting more crisp image, but also with certain coloring mediums, but I will mention that in a minute. First, I would like to show you on the following image how my clear shrink film looks when one half of it has been sanded while the other one hasn’t.


There is one more recommended step before you proceed with stamping or coloring and it is to clean your shrink film using rubbing alcohol, to remove any oils and dirt. Once the surface is dry, start stamping! And as you can see, I stamped a lot of images on all three types of shrink plastic (pre-sanded one, the clear one that I sanded and the white).


Of course, stamping or printing isn’t the only option that you have. You can also draw and make your own designs of charms. I mostly used stamps, but I did draw a couple of hearts and stars. If you wonder what I used for drawing - those are the same mediums that you can use for coloring. But let me elaborate on that.

First, I would like to mention mediums that are not giving the best results when working on shrink film, such as crayons, water and oil-based markers and tempera. A little disclaimer here – I have not tested any of these, and this info is based on the research that I did previous to attempting this project.

The mediums that I did test are Posca markers, alcohol markers (Spectrum Noir), soft pastels (Sennelier) and Prismacolor colored pencils. Keep in mind that regardless of which color or medium you choose, the color will intensify once shrank. Also, while working with Posca’s or alcohol markers doesn’t require sanding the plastic film, if you want to work with soft pastels or colored pencils, sanding is a must. Still, I must say my favorite was coloring with colored pencils. Why? Because most of the stamps that I chose have tiny details, so coloring with pencils is easy in this case, also because once shrank, the image is opaque enough, the strokes of coloring can’t be seen and besides, I simply enjoy coloring with pencils the most. On the image below, you can see how the houses look on the shrink plastic, colored with pencils before the shrinking.
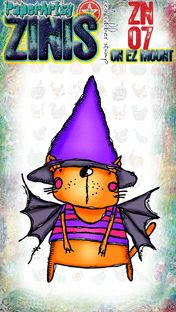
For a comparison, I will show you an image where I used four different mediums. The houses were colored with Prismacolor pencils, the bat-cat with alcohol markers, the chef chicken with soft pastels and the crazy looking rabbit with posca markers.

And yes, I did tell you I enjoyed working with the colored pencils the most, but to be honest, all four mediums have their own advantages. Probably I would have used more Posca markers, but I own only a couple of them so that wasn’t the best choice even though the coloring that way was way faster compared to colored pencils. Also, I very much enjoyed working with the soft pastels. It is super-fast and gives those wonderful, smooth color transitions. But it is not great for coloring images with tiny details.

And of course, as you can see on the picture, I fussy cut my images with leaving a bit of a frame and I also pierced a hole with a Crop-a-Dile so I can hang my future charms. Oh, and I also colored on the white shrink plastic. That had a very funny and unexpected twist, but I will talk more about that soon. 

Once again, here are my images, stamped on three different types of shrink plastic, colored with four different types of mediums, cut out and ready for baking.

Most of the shrink plastics have an instruction on how to bake them, and so did the ones that I had from Stamperia. However, the third type (the sanded one) that I had, came without any packaging so I went with the same temperatures for all of them. But one thing is important, and that is to use preheated oven. On the packaging, it was written to heat the oven to 140°C and bake it for 3 minutes. But in general, you don’t need a stopwatch. It is enough if you look inside your oven and when the pieces are lying flat, they are ready to be taken out. So, I followed these instructions and here are the results.

{Edit: If you are using your household oven for this process, please check carefully the product instructions that the plastic is safe to use in your oven. Some people use dedicated small ovens for crafting (clay/ shrink etc) in a well ventilated space. 

If the instructions do not specifically state that the product is safe for oven use, then assume not, and you can use a heat tool. The ranger heat tool is more gentle than an embossing heat tool, and allows more control during the shrink if you keep the heat tool moving, and flip the item over if it starts to curl. A wooden skewer is useful to hold across the piece of plastic to stop it blowing away, and to stop it folding over on itself. Tweezers also can be helpful to flip over and shrink from both sides. When the item has shrunk, immediately place a wood block on top and press for 5 seconds, this helps ensure it cools flat. This process generally takes about 40-60 seconds depending on how large your item is}


So, yeah a bit funny. All the charms turned out gorgeous except the mama elephant. Now, what happened there is that the image is a bit longer, so when it started baking, curling and shrinking, the two ends touched and stuck together. A work-around that is to put a baking paper over your charm so the longer ends won’t touch directly. Also, some other conclusions are that the images colored with Posca markers and Prismacolor pencils turned out more vivid in color and the most opaque. The one colored with soft pastels was pretty too, but what I didn’t like about the bat-cat which was colored with alcohol markers is that you can see the marker strokes.

If translucency is your issue, you can always choose to use white shrink plastic or go over the colored side with a white acrylic paint. I didn’t do that but don’t forget it as a good option.

Anyway, as it was expected, I got warmed up and I wasn’t going to let this be my only batch of charms, so I went onto coloring some more. A little fun trick: if you wish to add more dimension to your charms, you can add a bit of color on the other side of the shrink film. That is what I did with the little blue elephant here. I colored it on one side completely and then flipped it over and colored only that heart so once it is baked, that detail looks more dimensional and it stands out. As the other side wasn’t sanded, I used Posca on it, while the rest of the elephant was colored with pencils. Sadly, this tiny detail is really hard to catch on camera but it is really fun in live.

On the white shrink plastic, I used only colored pencils. I did like how the colors were vivid on it, but it’s as if it bakes a bit differently…I am not really sure. With it, I got uneven charms more often than with clear film. Also, once it is shrunk, it is a bit thicker than transparent foil. Perhaps I am not objective, but personally I enjoyed working on clear plastic more.

Anyway, I didn’t forget to involve my kids. They were very excited to help me with my craft project but also to make some charms for themselves. And here you can see my two craft assistants.

For the charms to be more durable, I do recommend to seal the colored surface. There are many ways, such as using sealer spray, embossing powder, Mod-Podge seal, glass resin and of course glaze. I went with the PaperArtsy glaze. Sadly, I own only two of them and that is something I have to correct as soon as possible. The ones I have and that I used are PaperArtsy Fresco Finish Acrylic Glaze Matte (FF52) and Metallic (FF24). On the image below, I tried to catch for you the shimmer of the metallic glaze that I used.


Once the glaze was dry, the charms were ready to be put for use.

There are just so many ways to use these charms, and I have only scratched the surface with the examples that I will show you.
First, I went and created some jewellery and keychain decorations.


But mostly I was inspired to create some charms that I can use to decorate my journals, zippers, or just hang on my wallet or bag.


And let’s not forget using all those pretty threads that I am sure most of us have in our craft closets.


This was so much fun both for me and my kids. They are already making me promise to do this again next weekend. And there are so many ways you can use these charms. Next time I will make some charm bracelets for my daughter. My son wishes to make pins for his backpack. Also, I will try to seal the color with embossing powder, just to see how it looks. Probably the overall look is even more professional looking with glass resign, but I had a little accident with it that left me a bit traumatized, though I will leave this story for some other blog topic. 😊

Renata 💜


For those of you who are more visual, I have prepared a YouTube video as well.

Sunday, 16 May 2021

2021 Topic 5 Find Your Vibe with ZA {by Tracey Springer}

  2021 Topic 5: Find Your Vibe


If finding your vibe is this much fun, then we should all join in with Tracey! With possibly the most creative use of Infusions and Grunge Paste ever, Tracey has cooked up a very creative and unique way to send a greeting.
~ Keren
 
Hi everyone, its Tracey Springer with you today. This topic really suited me creatively as I could just run wild with my crazy! I started off by rummaging through my stamps with no general idea until I pulled out Elena's Zinski ZA13. The saying really spoke to me as well as the characters. As I sat and coloured my first stamped images I started to imagine the character with the spotty skirt being a crazy cake maker (I have no idea where that idea even came from lol! … but I ran with it). I found Zini 25 had a bakers hat which I used and really loved. 


I envisioned a card where I somehow used the ‘I don’t need therapy I need cake’ from ZA13, and I started creating a scene. I spent an afternoon using my Gel Plate and PA Fresco Finish Paints to play with some backgrounds – I made a lot of mess and had a lot of fun. My favourite colours were ‘Mouse Ears’, ‘Bougainvillea’ and ‘Weathered copper’. 


I decided in the end to use a background that used those colours but also had Azure and Banana in it. Once I cut it to size I added a stamp from my favourite Jofy set JOFY 89 over part of it. I coloured some houses from  Zinski ZA40 and started piecing the scene together. 


I really loved the versatility of the small flower strip in ZA13 as the grass came in handy to use separately as little tufts.


The chef's hat from ZN25 certainly topped off her outfit perfectly!


A heavy layer of gesso finished off the card front (I always border things this way as it seems to ground the images). 
 

Bizarrely I then had the idea to make it into an exploding box cake card (I have made quite a few and really enjoy the process). So then I brayered some more very basic backgrounds as possibilities for my ‘cake’.


I always wanted to use this really cool patterned Seth Apter Stamp EM55 and it lent itself to cake icing (I would be a very outrageous cake maker if I baked!). I brayered a light coat of Pixie Dust and Candyfloss and then used Cerise Fresco Finish and stamped a heavy coat of paint on the card – I loved the outcome. 


I repeated the process and used Banana.


I then built my cake structures by making two cylinders of different sizes and glued them together. I then got the idea to use a mixture of grunge paste + Magenta Infusions to pipe onto the cake. I was incredibly surprised by how easy it was! 


I used JOFY 34 the two smaller flowers and the two little butterflies from EEG24 which I heat embossed in copper as decorations on the cake. I made it look like the flowers were cascading down the side – it took a while and is a little fiddly but well worth the effort. I decided to use Tracy Scott’s TS024 scribble type flowers as very simple, but very effective, white embossed on black outsides for the box.


This then gave me the idea to do a similar thing on the inside of the box but just black stamped on white. It looked good but me being me I decided it needed more and decided to watercolour the inside flowers. I built up the colours with Pixie Dust and Bougainvillea with splatterings of Banana as well. 


I assembled the box lid so that the card front was secured to one side so it lifted off with the lid.


I really hope you enjoy my project as much as I did creating it! Run with your crazy ideas and have fun along the way!

Tracey.

Instagram: @tracey_springer