Showing posts with label PS461. Show all posts

Friday, 5 September 2025

Pop-Up Card with JoFY products Halloween {by Etsuko Noguchi}

Hi everyone, nice to be back with you again
Etsuko My favorite things here with you today.

This year on the blog, we have free rein to do a deep dive into a PaperArtsy product ranges of our choosing. For this post I have been exploring JOFY's products.

Today I'm looking forward to sharing with you what I figured out when working out how to combine her cute Halloween design using 'Pop-Up Card' techniques.


For this project, I decided to use Mattints for the characters, and I added highlights with coloured pencils.

I'm sure you're all looking forward to JOFY's wonderful Christmas stamps and stencils, which are released every year. However, this time I decided to use the Halloween stamp set that I had been interested in for a while, thinking that combining its cute characters, tools, and words with the recently released monster series would create a new kind of fun, so I used it for this project. Since this project focuses on characters,  These stamp set are JOFY stamp set 141 and 83 (JOFY141 and JOFY83). and PaperArtsy Stencil by JoFY (PS461, PS410 and PS309). I used Mattints for colouring. From the left edge of the photo - PaperArtsy Mattints- Ash, River Deep, Greenstone, Bellflower, Glow, Hight Viz and Ladybug. Also I used PaperArtsy Fresco Finish Chalk Acrylic - Turquoise (Seth Apter), Steel Grey (Seth Apter), Little Black Dress. For the papers Smoothy (Heavyweight) A4 white stamping card. And highlighted with coloured pencils. (I'm sorry that the lower part of JOFY83 is not visible. I will upload the entire image in the photo below.)


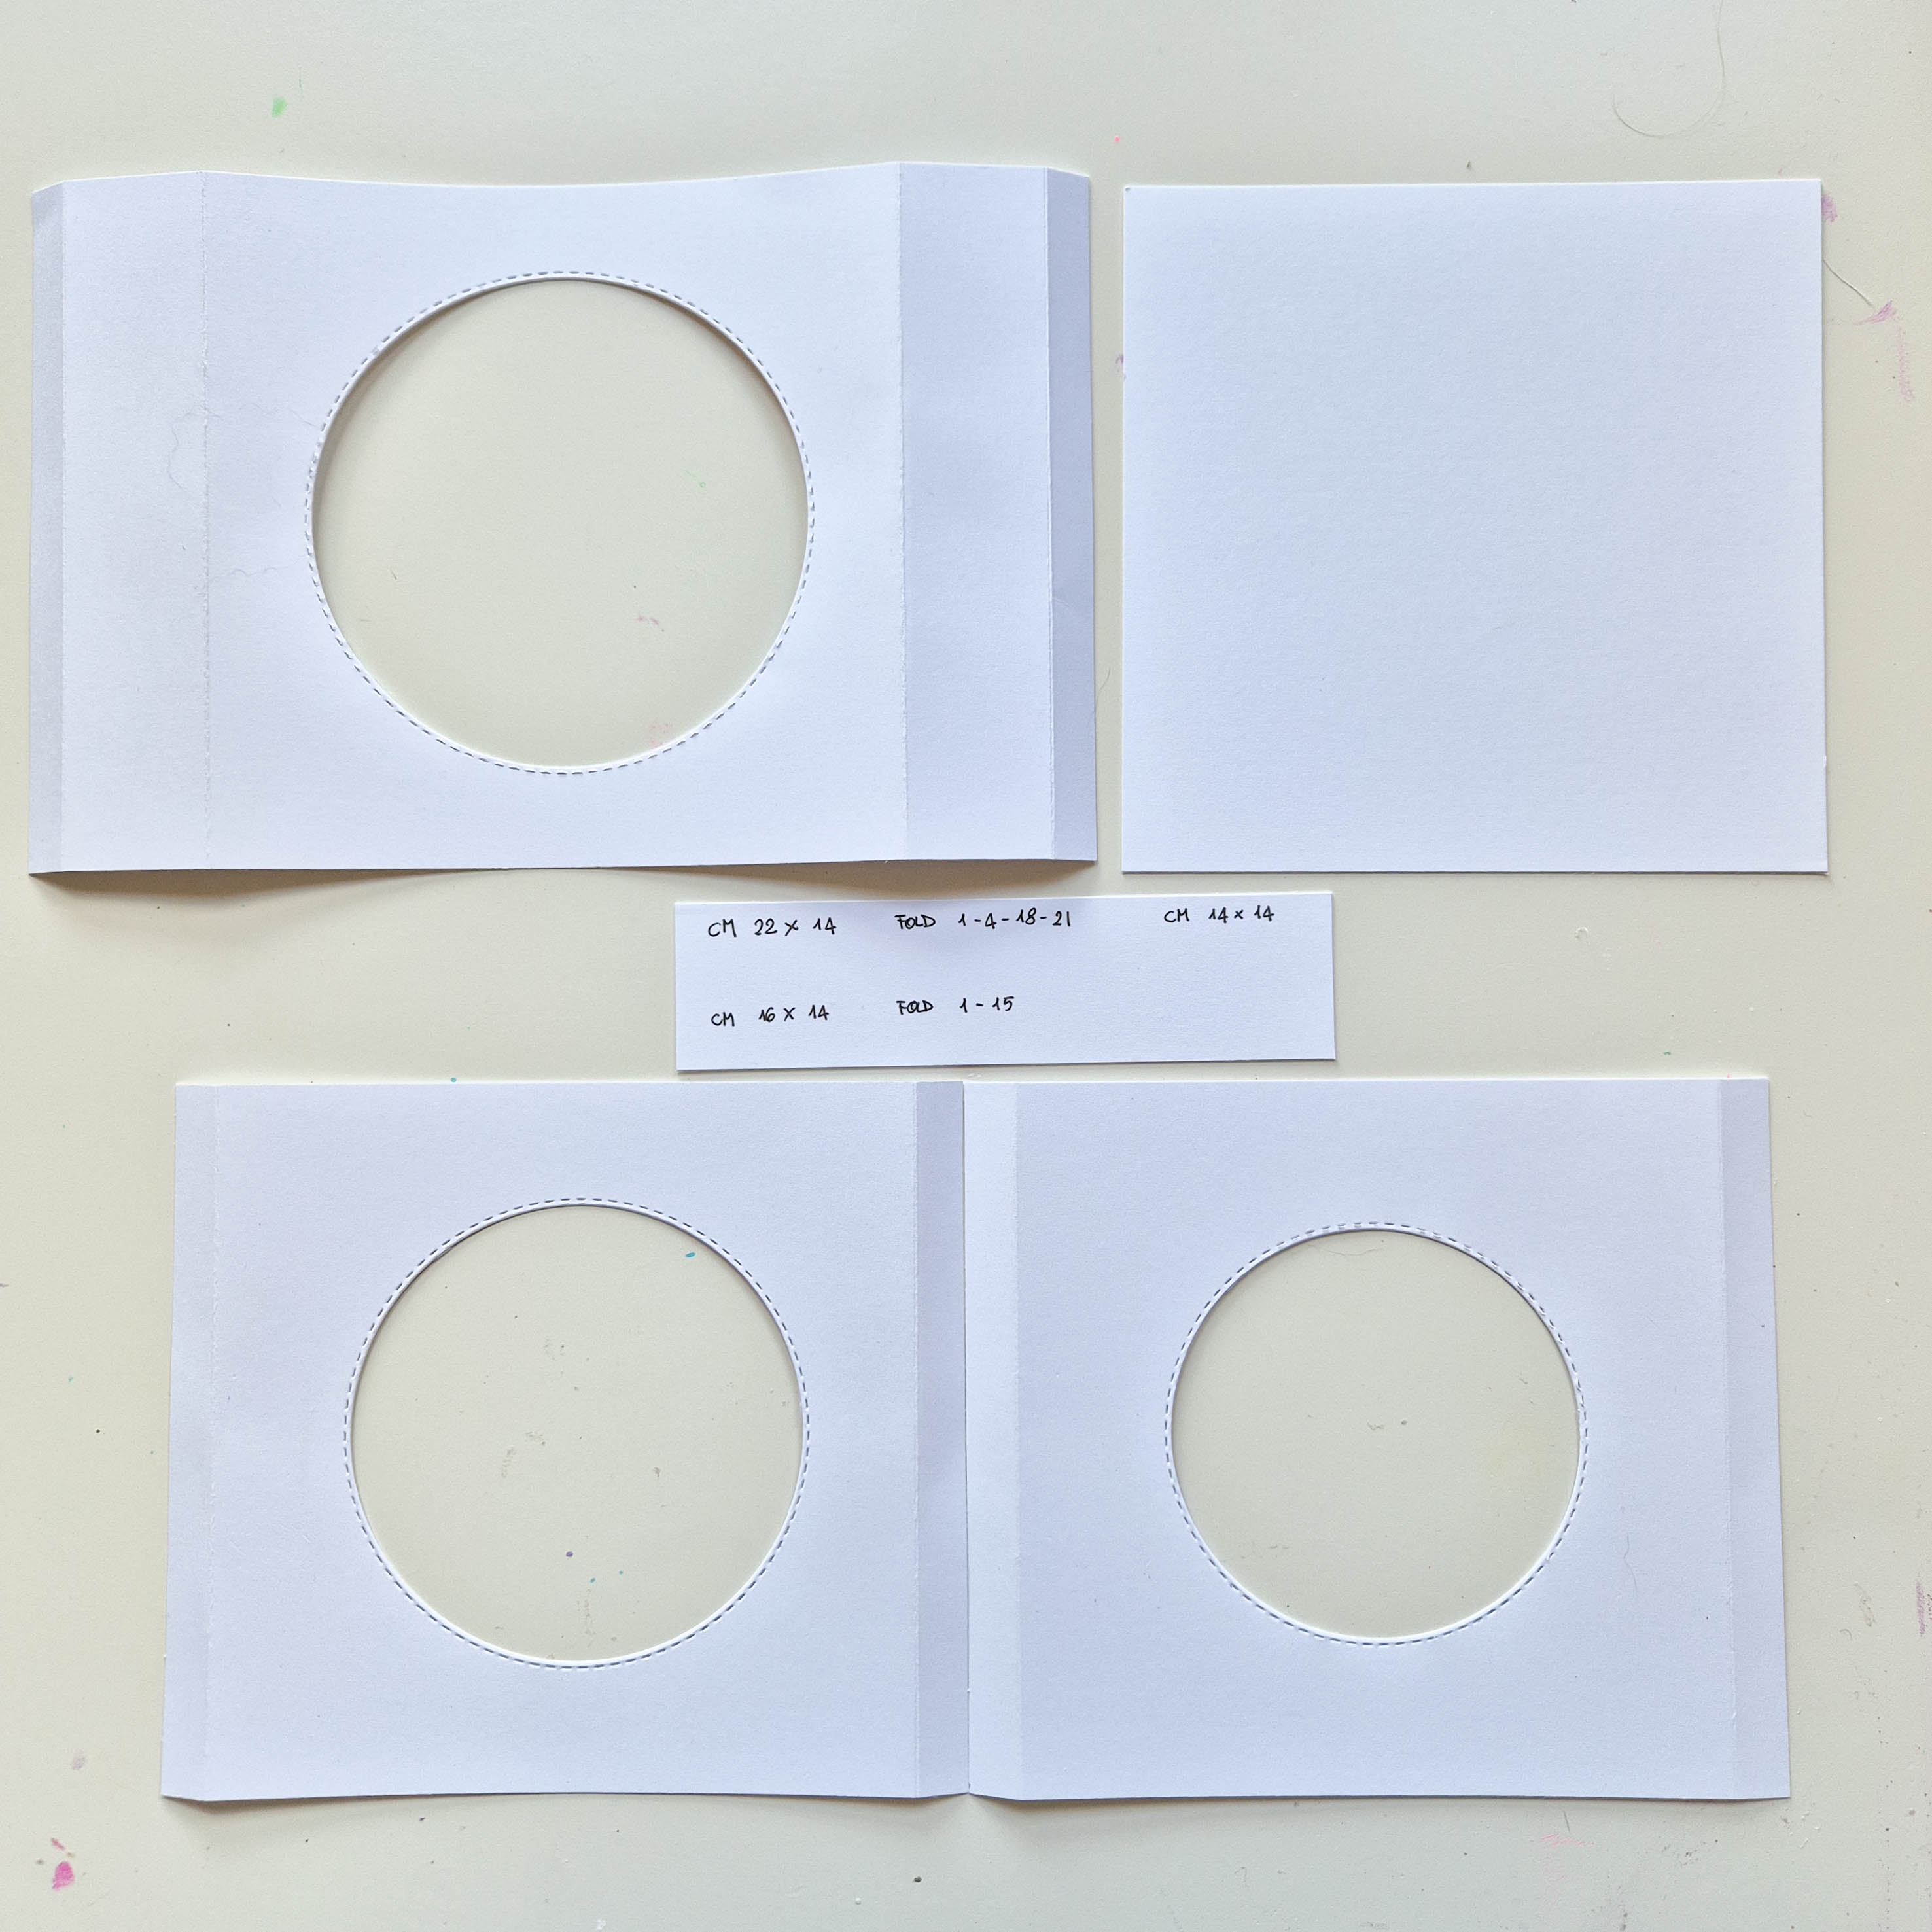
First, create the main pop-up base, prepare three pieces of paper as shown in the photo. The thick brown craft paper at the bottom is a 16 cm square. The second (white paper) and third (Black) papers  are the same 13 cm squares size, , with 2 cm left on the top, bottom, left and right sides, and cut out a 9 cm square in the centre of the paper.


Next, I will make a pop-up stand to display the doll and other items. First, cut out three pieces as shown on the white paper on the left. I painted mine Little Black Dress, but you can use any colour you like. An enlarged view of the white paper is shown in the figure below.


This is the zoomed photo of the pop-up stand dimensions, the red lines indicate cutting and the dotted lines indicate folding.

After cutting the red line, fold both ends as shown in this photo. I coloured the adhesive parts that in red and blue for clarity.

From here on, my explanation may not be sufficient, so I will provide the URL of the original site. https://www.youtube.com/watch?v=VPIwatzqCyo Pop Up-Tutorial by Duncan Birmingham


Attach the pink part of the pop-up stand to the back of the 13 cm square white frame. (In this photo, there are two pop-up stands, but in reality, all three are glued together.)


Next, the white frame upside down and only glue the blue parts to the craft paper base. When doing so, place the white frame in the centre of the craft paper, leaving a 1.5 cm margin on all sides.


Seen from the side.


Align the base of each ornament with the base of the stand and glue them together. If the base protrudes, it will hit the craft paper and not stand up properly.

Pull the white paper forward and the ornament will rise up. Success!


The main characters of the ornament are three characters, one of whom is Dracula. I used the JM52 boy mini stamp for him and added hair and a cape. I used Mattints - Hight VizLadybugRiver Deep, and Ash for colouring and added coloured pencils for highlights.


When creating the latter two characters, I made some changes to their specifications. At this point, the pop-up panel was already complete and the photos had been taken. While editing, I noticed a mistake in the photos and was surprised to find that the two characters had become twins with the same face... Sorry, I'll continue as is.


I lightly painted the pages of the book with a mixture of Seth Apter's new colours, PaperArtsy Fresco Finish Chalk Acrylic - Pumice and Snowflake, to create a worn-out base, and then added two or three items.


I stamped images of JOFY83's large pot, the cross grave marker, and the gravestone behind the girl onto book pages, coloured them with Mattints Ash, Shadow and Glow, attached card stock to the back, and cut them out.


Pumpkins are essential, so I searched for JOFY stamps to see if there was anything good, and I found this JOFY37. What do you think? I think they're great! Apply Tango and Nougat to the Stamp Heavy Card and to create the face by a black gel pen. So I placed them around the large pot.


I doodled ghosts and bats and arranged all the ornaments on three stands each. I tried several times to create a cool layout when they were raised.


I stamped three kind of the stamps Seth Apter mini stamp - EM54 and EM40 and JOFY83 onto 16cm square the craft paper. Also I make two 3 cm wide strips of the craft paper, stamp them with the same stamp, glue them to the front and back of the white frame, and pull the stand.

As shown in the photo, glue the strips to the front and back of the white frame, and attach a slightly larger black piece of paper to the back of the 16 cm square craft card.


Finally, I made a decorative frame to hide the strips. At first, I planned to use a turquoise blue frame and made a few, but when I assembled the whole thing, it didn't quite fit. So, I created a pattern on the Little Black Dress using PaperArtsy Stencil by JoFY (PS410) star stencil in Steel Grey (Seth Apter), and added Turquoise (Seth Apter) to the outside of the frame. The result was very satisfying.


The first two photos show the finished product before and after pulling the strip. Even a pop-up card with just one character is sure to be enjoyed by families with small children, so please give it a try. I had so much fun using JOFY stamps that I decided to make tags using the same characters for Halloween. I hope you enjoy today's project.


I used PaperArtsy Stencil by JoFY - PS329 to gel-printed gradient dots in Turquoise, Purple Wine  (Tracy Scott), Cerise (Tracy Scott), and Lemon Meringue on black paper for the background of the cards and tags. I used JOFY83, JOFY141, Jofy Mini Stamp JM85, JM86, and PS461 stencils for each card and tag layer. I used the same Mattints as for the pop-up card to colours the characters.


Thank you so much for stopping by.
Etsuko xxx


Facebook: Etsuko Noguchi
Instagram: Pixienest
Pinterest: Etsuko N

Wednesday, 2 April 2025

Tunnel Box Card with NEW JoFY products {by Martha Ponsanesi}


Hi everyone, it's Martha (@CraftingMarthawith you today.

Have you seen the new release of stamps and stencils by JOFY? I’ve fallen in love with them, those little monsters are adorable, and the Minis are each more beautiful than the last.
If you want to purchase any of these beauties, you can find a PaperArtsy Stockist here.


Since there are some birthday-themed stamps, I thought I’d create a tunnel box card, which gave me the opportunity to use several elements. Choosing from all these stamps wasn’t easy at all :) -  since it’s structured on multiple layers.


I got a bit carried away, taking stamps from one set and some from another, and also using different Minis and stencils... I really loved the new release! :)
I couldn’t resist using a lot of different colours of Fresco Chalk Acrylics for the backgrounds and going on you'll see also several Mattints used to colour the elements, both stamped on PaperArtsy Cardstock and... you’ll see later.


First, I cut 4 pieces from PaperArtsy Smoothy Card (SCA4) with the following measurements:
1pc 22 x 14 cm, 2pcs 16 x 14 cm, and 1pc 14 x 14 cm.
In the photo, you can also see where to make the folds. I then die-cut three concentric circles.


On each of the three cardstock pieces with the round opening, I blended a couple of Fresco Finish paints through the Stencils. For the first one (with the smallest hole) I blended with a sponge Fresco Chalk Acrylics in Parakeet (FF225) and South Pacific (FF45) through Stencil (PS461).


For the second one, I used Fresco Chalk Acrylics in Mustard Pickle (FF148) and Scottish Salmon (FF158) through Stencil (PS459).


For the last one, I used Fresco Chalk Acrylics in Berry Nice (FF216), Bubble Gum (FF116) and Ice Berg (FF165) through Stencils (PS459) and (PS461).


These are the three stenciled panels.


To finish the background, I also used some stamps (JOFY140) and (JM88).
Now that I have decorated the structure, I can assemble the various pieces to create my tunnel box card and focus on the embellishments.

To assemble the card, you simply need to glue the flaps onto the inner spine as shown in the pictures.

Now it's time to "populate" these layers with some monsters :).


First I stamped these delicious little monsters on some scraps of PaperArtsy Smoothy Card and embossed with Clear Embossing Powder...


...and then I roughly coloured with a little brush and some Mattints in Glow (MT01), Jam (MT05), Dragonfly (MT07), The Pink (MT08), Ladybug (MT12), Mojito (MT13), Acid (MT14), High Viz (MT15). I like using Mattints because, even though I'm not very skilled at coloring, when I use them, the results I achieve are satisfying to me.


However, my preferred colouring technique remains applying the cardstock directly onto the drops of colour: easy and always quite unpredictable :).


JOFY's monsters in the regular stamping set are quite big, so I was inspired to use one of them with Polyshrink.


I blended some Mattints with a sponge over the stamped image, and set aside to dry. The colours looks very pale, but when it gets shrinked, they'll look more vibrant.


I cut it with scissors, living space to make a little hole and transform it into a charm.


Using the embosser to create a charm with polyshrink is always a lot of fun.


I had tried coloring Polyshrink with Fresco Finish Acrylics too, which provide more coverage compared to Mattints. However, in this case, I preferred using the little monster colored with Mattints.


Now that I have enough cardstock and polyshrink embellishments, I can complete my card.


Here is the finished card, with all the layers, monsters and colours.


These adorable monsters along with the sentiments, other coordinated elements and stencils are the perfect companions if you are in the mood to party.
Maybe I'll try to make an happy birthday banner in the same mood of the card.

Have fun.
Martha xxx