Showing posts with label 2017 Topic 6. Show all posts

Tuesday, 26 December 2017

PA 2017: Blog Year in review: Topics 5-8


Good Evening again from PaperArtsy HQ,

Over the next few days we are taking a look back at some of the magnificent posts we featured over the Spring period of 2017 on the PaperArtsy blog. 

Tonight I'm sharing some highlights from Topics 5-8. Grab some Xmas foodie leftovers and a cuppa, and lets take a look!

Leandra 

Topic 5: Blue and Ochre

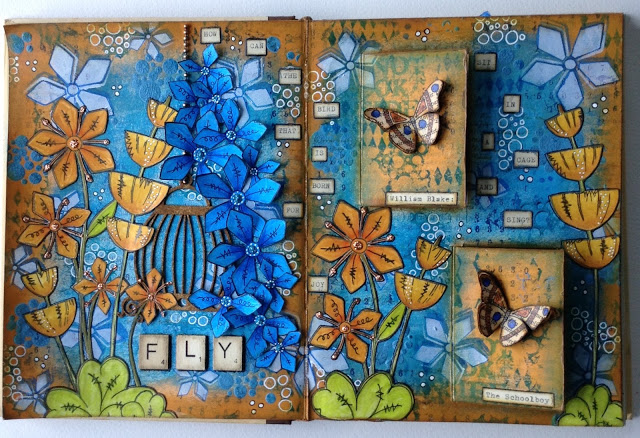
As I explained yesterday, every round in 2017 we kicked off with a 'colour combo', as featured in Stampington's True Colours publication. Another combo in there which I use time and time again is blue and ochre.  It does take some care, because mix those 2, and you create a lovely green, which is fine if you want green, but if you perfer the contrast these 2 colours offer, then you do need to work with dry layers to maintain each colour's integrity. Let's see what some of the bloggers got up to...

My first pick is this incredibly detailed journal spread by Chris Cresswell. I could stare at it for an absolute age! Interactive doors, beautifully layered flowers, and all the colours pop and contrast so well!. Caramel and Toffee are 2 of our paint colours that often get overlooked, but those with Pumpkin Soup, and tadaaa....Chris has created a range of ochre  tones so perfectly!


And I hope you didn't miss this booklet by Claire Snowdon. She brayered her backgrounds, used masks with Distress Inks for added depth.


You can see the contrasting shades just sit together  so well. At the end of the day we are talking blue and orange, but if you take orange into the rustic ochre direction, you can also change your blues too, creating a softer contrast.


So are you ready for a Lauren doozy? One of her weird and whacky zinski-world creations?


Well we were so busy with Ally Pally when this published, that it really did not get the attention it deserved! A 3 dimensional, interactive Zinski zone!


Her flower-puffing technique fascinated people, but can you see how she does it to the Zinski birds too! She even has roof shingles and stained glass windows!


Topic 6: Resin and UTEE

For many people, melting embossing powders is thier first 'wow' crafty experience. When you see the powder melt, perhaps it's a shiny raised pop, or a molten metallic medallion, but it just is super-cool when you start to learn the myriad of techniques this product offers. Then, when you get hold of the larger UTEE crystals, OMG, the things you can do!!
Resin is a pretty broad term, and at the other end of the scale we have those 2 part mixes that set up hard, and are wonderful for jewellery, small niches, and even seal floors , canvases or tables!

My first pick is this striking panel of tiles by Nikki Acton. Not only is the colour contrasting, but that tile is very clever in the way she floats a stampled image in the top layer so delicately.


Not everything went exactly to plan for Jennie, but she always pulls it together so perfectly, that in the end you can't imagine it any other way. See here for more.


I don't think I have ever seen anyone master UTEE so elegantly as Lin Brown. In this post she shares a few samples, here is just one of those, where she buries embossed metal into her UTEE. Her finishing touches are always so well executed. How dare she retire! We still crave to see more of her creative exploits!


And it must be in the genes of Lin's/ Lynne's - are all L's this good at UTEE exploration! Lynne Moncrieff is well know for her use of resin papers, and here she shares one such trinket composed to perfection!


Topic 7 : Found Objects

Well I'm pretty good at losing things, it has to be said, and how frustrating is that! THe number of times i take off my glasses before after showering, and cannot see them to find them again!! Finding things is so much more fun! This topic sent our designers into a spin of activity.

Kim Dellow contrasted the delicacy of acetate, with some rusty washers in this post
 

And we all loved Ellie's forest walk which turned up a range of items that she re-purposed into a forest floor canvas so beautifully.


And Raquel re-purposed all sorts of items to create this coffee puck dispenser for her kitchen!


Jennie altered a tin to create a new home for a little found boy! He looks very happy! 


Topic 8 : Assemblage
Assemblage. It's an artsy kind of word, but isn't that what we do no matter what we create?? We are basically assembling layers, textures, colours, embellishments until they are arranged in a way to suit our personal taste. I guess 'assemblage' could infer more of a 3D composition, but lets see what everyone got up to for this one!
First up check out this lovely piece that Autumn Clark entered in the challenge for this topic. I love the minimal use of colour, yet there is so much to see. She always gets that light-dark balance just right! Go to her post and check out the textures in her base layer. Beautiful!


And this by Alison took my breath away. 


It has to be one of my favourite pieces of the year! It was this piece that inspired me to make 'shades of white' a colour option later in the year! She started with a base layer of tags!! Just go and look again here, it is beautiful!!


I really liked this from Alison Hall too. Such a great idea to use a piece of slate stone this way as her substrate.


Carol Fox created this Zinski inspired garden sign


And Keren decorated a violin - as you do!! Yes you do get spoiled people!!


I hope you have enjoyed this trip down our memory lane of 2017 with me. I'll be back tomorrow with some more treat and reminders of how clever and creative our talented bloggers are! Don't forget to save the posts that float your boat on pinterest. No excuse now, you'll hit the New Year with a dozen ideas to crack on with!

Leandra 

Saturday, 22 April 2017

2017 #6 Resin and UTEE Notebook {by Darcy Wilkinson}

2017 Topic 6: Resin/UTEE


Good evening everyone, Darcy here with a quick and easy notebook cover. I love UTEE, but I am sure like many of you, my tubs have sat neglected in a drawer for years. This was a great excuse to dig them out, I also wanted to try resin again, having only played with it once before. 

I began by stamping all over some white tissue using various EDY stamps, I wasn't sure which to use, not how much resin I had left, so I stamped a few pieces so they were ready should I need them. 


In the end I only had enough resin for one, this one features the stamps from EDY19.

EDY19.
I mixed up the resin and scraped it all over the tissue, making sure it was well covered, this was then put aside to dry for a couple of hours. 

In the meantime I made these corner embellishments using UTEE and a silicone mould. I used 2 colours, Mermaid and Pewter, and did not mix them much as I wanted a random effect. 


Once the resin covered tissue was fully dry it was mush stronger with an almost plastic type coating, though the back was still fragile. To fully sandwich the tissue, and to add more interest I used Glossy accents to stick the resin piece onto a sheet of Prima Salvage scrapbook paper. 

I love how the pattern of the scrapbook paper shows through the tissue and resin. 


Now all I had to do was assemble some pages into the cover and add the corner embellishments. 

I stitched some sketchbook paper into the cover using black crochet cotton. 


Finally glueing on the corner using Glossy Accents. 


They turned out really well, and look super metallic. 


If I had used metal corner they would have been too heavy for the notebook, making the covers bend over, but these are really light and as you can see the book stands just find without collapsing under their weight. 


It was so quick to make, the drying time of the resin and the heating of the UTEE were the only time consuming elements. I will definitely try this again, perhaps with coloured card or patterned paper underneath the tissue/resin layer. 

Hope that has inspired you to have a go and paint some resin onto tissue paper. 

Darcy 


We always hope that you  learn something interesting from our blog. Our bloggers deeply appreciate your comments so much, so please take time to let them know you've been inspired! Why not join our challenge by blogging your interpretation of the current topic and link it here?

The current topic link (Resin) will close 17:00 (London Time) Sunday, April 23rd 2017, and the winner will be announced 2 hours later at 19:00.

All links go in the draw to win a £50 voucher to spend on products of your choice from the PaperArtsy online store.

Friday, 21 April 2017

2017 #6 Timeworn necklace {by Etusko Noguchi}

2017 Topic 6: Resin

Tonight we have the wonderful Etsuko from Japan. She is so brave blogging for us in English, and she does a wonderful job of explaining everything for us as well as she can. She seems to be able to craft successfully with so many different products. In this post she has tried a couple of different resin products to make a necklace.

Hi everyone Etsuko 'My favorite things' here.

It's wonderful to be back here on the PA blog tonight. I've chosen to share with you a Timeworn Necklace project.

I wanted to make an accessories using Seth's new stamps and wood chips with resin.
Seth is showing off his wonderful ideas and techniques around the world at his workshops, of which twice was a workshop organized by PA. His blog -the altered page- contains an introduction of his fabulous works and artists active in the world. I am always inspired by his creations.


I thought about how to configure them for the necklace top before I tried to use the Seth's wood-chips and the Relics & Artifacts Tribe.


After that I used Seth's technique to paint by Seth set-2 and Blood Orange, Caribbean Sea and Pumpkin Soup Fresco paints. Once them dried I did embossing ivory and copper enamels on each wood-chips with Seth ESA03 stamps.


Add the same amount of AB resin solution to be used to the cup, add 2 drops of the tint color and gently mix it. Leave it for about 5 minutes until the bubbles disappear.


A brush with the resin solution on the Relics & Artifacts Tribe and leave it for about a whole day and night until it is completely dry.


Embossing the Relics & Artifacts Tribe cameo for the focal point by Ice Resin enamels. I planed to make it the same color as the previous two R & A T, but as the whole got little dark then I decided to use on the ivory embossing powder that was not pure white.


I layered the lace colored with Infusion Terracotta and Magenta on the tag and joined all the other items.


Next step is the chain making, I was planning the necklace string which a silk fabric dyed with Infusions, and I wanted to make it as natural as possible to entwine the chain. However there was no hand-held chains to fit with fabric, so I changed my mind and I made it to the handmade chain only.


I made the charms to be attached to the chain using bezels, I painted Fresco Smoked Paprika and Green Patina on the white smoothy card and stamped Seth ESA03 stamp by Potting Soil Archival ink pad. Apply paper sealer so that liquid dose not soak into paper before applying resin.


This time I applied infrared rays using UV resin, the time to dry only 5 minutes. The finish looks like a rusty charm.


This is the finish of the chain by connecting beads and charms.


And here it is all put together.


I tried making the bracelet with a dyed silk fabric when I could not make. 
The project to play with Seth's items was a great fun, I was absorbed in making and almost forget to take photos. I'm not fully give up to make the fabric accessories and I'll try again.
Thank you so much joining me and hope you like it. I look forward to meeting you soon!! 

Etsuko xxx
Blog: My favorite things
Facebook
Pinterest:

Well I think your fabric version looks wonderful Etusko! And it was interesting to see the different results with different resin products. What an amazing result, I bet Seth never imagined the possibilities in this direction with his products! Brilliant!! ~Leandra


We always hope that you  learn something interesting from our blog. Our bloggers deeply appreciate your comments so much, so please take time to let them know you've been inspired! Why not join our challenge by blogging your interpretation of the current topic and link it here?

The current topic link (Resin) will close 17:00 (London Time) Sunday, April 23rd 2017, and the winner will be announced 2 hours later at 19:00.

All links go in the draw to win a £50 voucher to spend on products of your choice from the PaperArtsy online store.

Wednesday, 19 April 2017

2017 #6 Flutter {by Miriam Grazier}

2017 Topic 6: Resin

In this post, Miriam brings a simple stamped butterfly to life with a glossing of UTEE, while also giving it shape and movement...find out how below...

Hi everyone Miriam here.

Lovely to be here on the PA blog tonight. I've chosen to share with you a 6x6 wall hanging that I have created using the fabulous Hot Picks collection of stamps. For my project I wanted to create a vintage effect and lots of texture but I wanted my resin butterfly to stand out and shine.

I chose to create a resin butterfly using UTEE as it is such a simple technique but so effective and looks very 'glass' like.  The resin flowers are form my stash but finished my hanging off as well as fitted in with the resin challenge.


I used my melt pot to create the resin butterfly.  I had forgotten how much I enjoyed using UTEE embellishments.  The resin effect alters the image in such a way that you cannot see that it started out as a stamped image on card.  I really loved trialling this.  I created an embellishment with resin on one side only and also on both sides - when I covered both sides the embellishment completely changed to look like a beautiful piece of glass art.


You can see the gloss on the butterfly - it really makes it 'pop'.


These are the same stamp.  The image on the left is the painted and stamped butterfly and the image on the right is after the butterfly was dipped into UTEE. 

 The stamp is from Hot Picks HP1506


The canvas colour changed twice.  I originally set out to use my 'go to' colours of blues and greens - but part way through I changed my mind.  What this proved is just how amazing Fresco Finish paints are as I only needed one coat over the original grey board and one coat over the green coat that I had originally painted.  


I added to the background by randomly stamping the gorgeous script from HP1304


I really enjoyed creating this project.  I loved the layers and the textures that you can see and it draws the eye in so many places.  

I really hope that I have helped to inspire you to dust off your UTEE or resin to create your own 'glass-like' embellishments.  It was a 'wow' moment when I took the stamped image out of the UTEE and saw the gloss that it created.  In fact, I am going to make smome more and add a brooch back to them to create a wearable piece of art.  

Thanks for joining me tonight.  I look forward to blog hopping to see your resin creations.

Miriam
Blog: MiriamGrazier@Blogspot.com
Twitter: @MiriamGrazier

Awesome layers of texture, and IO adore how that butterfly turned out! THis is such a great way to create a focal point! Thanks Miriam! ~Leandra


We always hope that you  learn something interesting from our blog. Our bloggers deeply appreciate your comments so much, so please take time to let them know you've been inspired! Why not join our challenge by blogging your interpretation of the current topic and link it here?

The current topic link (Resin) will close 17:00 (London Time) Sunday, April 23rd 2017, and the winner will be announced 2 hours later at 19:00.

All links go in the draw to win a £50 voucher to spend on products of your choice from the PaperArtsy online store.