Showing posts with label ESN05. Show all posts

Saturday, 12 June 2021

2021 Topic 7: Stamp Mash Up JOFY, EEG, ESN, I&D minis {by Ellie Knol}

2021 Topic 7: Stamp Mash Up


With some intriguing watercolour techniques using a glass, and real standout texture thanks to texture paste, this is a bold art journal cover. It's easy to pigeonhole watercolours as not having as much impact as other paints, but as Ellie cleverly upped the levels of white on the page, the subdued colours still take centre stage.
~ Keren

Hi everyone, it's  Ellie Knol with you today, and I'm here to share with you the making of a cover for an art journal, of course with product from four designers! I chose to use at least one stamp set from each and also a stencil. 

In order to mash up stamps and stencils from four designers, I chose to use most of them in the background, and only one for the focal point; the easy way I suppose.


I started creating a colorful background; it's basically watercolor added around three glasses onto watercolor paper. This way creates circles onto the background. The water will carry the color pigment around the edge of the glasses. After it had dried I chose to wet the white areas and let the color run into it a little. This is a technique I learned from a live from Ilse Hoekstra.


I LOVE how this creates color blooms, and also color mixing on the paper. By adding more, or less, water it will create beautiful unsuspected backgrounds, with basically room for three focal points.Having a colorful background as the start of a project gives a lot of possibilities, as it's not a blank page anymore; which can sometimes be a bit scary.


Using stencils in the background will add a useful layer. Choosing white is always a good choice, as far as I am concerned, because it will add a basic layer to which you can still add anything. Choosing structure paste adds so much interest.

 
The PaperArtsy stencil PS218 designed by Sara Naumann has been used as the main stencil. I applied structure paste through it, except for the bottom left section. 


I also added structure paste through parts of PaperArtsy stencil PS140 designed by Jo Firth-Young to fill the background even more.


While the structure paste was still wet I stamped into the structure paste of both the above stencils with the circles from EM60. LOVE this mini by Tracy Scott.. 


Next stencil I added structure paste through is the PaperArtsy stencil PS015 designed by Emma Godfrey.... 


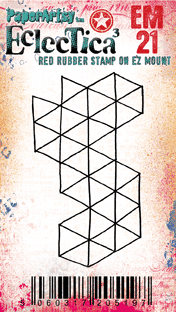
... and, yes, you might have guessed it, I stamped into it while wet also, with the stamp EM21 also from Emma Godfrey. 


Last, but not least (as this is such a beautiful and versatile stencil) I filled the last gaps on the background with PaperArtsy stencil PS204 designed by Sarah Naumann.


NOW, for the focal image...
I had some decisions to make: what ink color to stamp it with? On what substrate?
I stamped and fussy cut quite a few of these butterflies, lol...

These are the three that made the short-list, one in a dark brown, the other two with StazOn ink (Rusty Brown) on vellum, and on white cardstock. 


The butterfly and sentiment stamps are from PaperArtsy stamp set JOFY79 from Jo Firth-Young.
 
 
For the final steps I chose to stamp (with StazOn ink (Rusty Brown)) with quite a few stamps from various designers onto the background, also the ones I mentioned above. The scripts and postal images from Sara Nauman's stamp set ESN05 are so useful on any background. 


The alphabet from MN18 is like the cherry on the cake here.


I assembled it to the cover of an art journal... one that has to be filled yet. It's one of four inserts from the lovely art journal set from Julia Woning.


Enjoy looking at the pictures of the finished project... 


I mentioned that I had to fill the journal, still.. I did some cleanups of the stencils on three of the pages... a happy start.. 


As you can see it's quite fun to mash up stamps from different designers. 


Remember when creating: there should be a balance in any project as far as light and darks, white space and colored space is concerned. The focal point is always the most important part of it.
That is my goal, always, in whatever I create. It can be quite challenging sometimes, but the key word is to just try... and get experience. 


Tuesday, 27 April 2021

2021 Topic 5 Find Your Vibe with ESN {by Ellie Knol}

2021 Topic 5: Find Your Vibe


Taking the humble piece of paper and transforming it into something completely more than the sum of its parts is part of what inspires Ellie's vibe. Add in some nature themed images and her gel prints wonderfully morph into books.
~ Keren
 
Hi everyone,
i
t's Ellie Knol with you today, and I'd like to share with you the process of making 3 books using 3 gelliprints for the front cover.
I first struggled to start on this theme... but after making notes I came to a point where I realized what gets me going: the vibes that inspire every time I start a project. 


The text on stamp set ESN47 from Sara Naumann gave me the final push in the direction I took. 


Making books and gel-printed papers, using Scripts and postal themed (ESN05!) product. Nature... that's what I love, that's what I do (did), over and over again... My vibe... 


The first book: heat embossing (Seafoam White Embossing Powder from Ranger) in a collage style onto the colorful gel print. That's all. Really. Nice? 


The second book: just as for the first book.. the stamps from Sara are so beautiful.. less is more... 


Oops.. the third book is a tiny one (ATC size). Why ? Read on and you'll find out. 


Three spiral bound books: two A5's and one tiny one. 


Let's start from the beginning.. I've made three A5 size gel prints; monoprints to be precise... they were one of the 'vibes' that led me to making these books. Aren't they pretty? 

These are the stencils I've used to make the monoprints: PS051PS074 and PS136


The first two gel prints: front cover for two books. What about the third gelliprint?
To start off I heat embossed the main image from ESN47 with a chunky embossing powder... the script was really a mess
I knew it, but wanted to use it because of it's color.. can you relate?
 ... toss it? No.. 
I saved part of it by making the tiny book. 


Some more pictures of the books.As there is a green-yellow color on them, it's quite a challenge to catch the in-real-life colors. Changing the daylight lamps giving indirect light helped a little but gave more 'darkness' on the pictures also.   
Enjoy... 


I've used three stamps sets from Sara Naumann: ESN46, ESN47 and ESN05.


I stamped the sentiment from ESN47 on the inside cover of the two bigger books with brown ink, and on the front cover of the tiny book with heat embossing seafoam white powder. 


Have you ever made a book? It is such fun!! Especially when you combine it with unique gelliprints, they are your very own and very personalized; gorgeous to give as a present. The beauty of what we love to do : creating with the use of beautiful art materials. 
As far as I am concerned the stamps and stencils I've played with are so beautiful, useful, and very versatile. Eclectic, authentic and unique. 
Inspirational, just as they are... nature themed is a plus, and combining all of the stamps and stencils is just amazing. 

Go do what you love to do... and see the beauty of what you did... 

Ellie Knol

Instagram: https://www.instagram.com/ellie.knol/  

Saturday, 13 June 2020

2020 #10 Postcards with ESN {by Carol Fox}

2020 Topic 10: Recycled Packaging


Intro
There is something super appealing about white, black and a splash of blue on kraft card. The white space is less 'white' when you work with kraft (duh) and somehow that adds a warm balance which I find super-appealing! Carol works her magic utilising many of Sara Naumann's stamps, and there are always a load of interesting elements within them to suit the painted layers perfectly!
~ Leandra

Hi everyone, it's Carol with you today, and I'd like to share with you some postcards made with my favorite packaging to recycle those lovely Amazon Kraft Coloured envelopes.

I have made some 6 x 4 postcards to send in the place of Cards, either for birthdays or just a random "miss you card". I do usually send these naked through the post so I make them flat. Here I have simply stenciled and then added stamping over the top with paints and inks. I used a combination of paints and inks as this adds more layers and I was also introduced to my new must have background stamp, and yes I do admit to being a little bit in love with it.


My finished postcards. I usually send them naked through the post like this, but due to the present circumstances I have added an envelope and this is shown in the last photo.


Background stencil with PS046 and Chalk fresco Paint. I went for a softer white as I thought this looked nicer against the Kraft coloured card.


My new favourite background stamp set ESN09 stamped using Marbles Fresco Paint. I pounced my paint gently onto the stamp with a bit of cut and dry to avoid to much paint and a smudgy image.


The words from ESN05 stamped in black archival in. 


Using sets ESN21 and ESN28 I stamped an image on each card using black archival ink.


I added the same splatter image I used before from ESN09 but this time I stamped it in black archival ink. I like how the same image stamped in different mediums adds depth to my postcard.


I didn't like the way the quote had covered my 'Carte Postal' on one of my cards, so I decided to colour in the words on each card and this helped to lift the words in front of the circle stamp. I also ran my ink pad around the edge of the cards to frame them a little bit.


On my envelope I simply repeated what I did for the cards, but I masked off a bit in the middle with a post it note to give a space for the address.

These are very quick to make and are handy for a last minute Birthday card and I like them in preference to a proper card as they remind me of when I was little and we always seemed to get loads of postcards in the summer from Holidays, a bit of the lost past now with all the social media sites and everything being so instant...grief showing my age here!! But I suppose they appeal to the retro chick in me and I love writing my message on the back. My family did think I was either weird or to mean to give them an envelope at first but I think they get it now. Also if anyone still reads proper books they make great bookmarks. 

Have a lovely Day and I can be found at the following places.

Carol x