Showing posts with label 2018 Topic 8. Show all posts

Monday, 24 December 2018

PA Blog 2018 year in review: Topics 5-8 with Leandra Franich

 PaperArtsy Blog year in Review (Topics 5-8)


Good Evening from PaperArtsy HQ,

It's Leandra here with you tonight to curate tonight's post, and boy did I struggle as every single post of the 4 topics I am revisiting were amazing! You know, when you get a spare half hour,  you really need to use the search function on the blog, or even just go back for a random mooch around, the talented people who blog for us are fabulous! Thanks to each and every one of them!

Well I know it has been a crazy year on lots of levels for lots of countries...I have a vague recollection of saying that last year too, but sheesh is it hard to discern truth from fiction. I know I am not the only person out there who is finding the surreal global politics hard to stomach right now, so at least we have crafting activities (and blissful blogs) as our escape right!?

I am sure you are all settling in with your Turkey prepped ready for the oven tomorrow, and wrapping the last of those pressies.

So, why not grab a mulled wine or a sloe gin....or my gin tip of the season, gin with ginger ale, and a fantastic garnish: star anise, a couple of cardamon pods and maybe an clove or 2 stabbed into a slice of orange. Delicious. Warm gin is a thing too BTW! Yup, you know what a gin-geek I am. I'm even adding a home-made Xmas spice sugar syrup to my Xmas G&T's.

Tonight I'm sharing my picks from Topics 5-8: Nautical Colours, Banners and Bunting, Kraft Card and Boxes. Enjoy!

Leandra 

Topic 5: Nautical Colours
In my head, I guess red white and blue are the first colours that come to mind: crisp, white sailor suits with a touch of gold cord, or maybe striped French attire, but a softer nautical vibe might be home decor like soft sky blues and beige. So, what did our bloggers get up to? It's always good to see other people's ideas with a theme colour palette.

Well let me say, Miriam kicked it out of the park when she turned a cobblestone stamp into this mosaic inspired piece. Very fitting that Emma Godfrey's 2018 stamps were Portugal inspired, and mosaic art is a common phenomena on the continent! So 10/10 for this interpretation! You can see the full post here.


And I hope you didn't miss Nikki Acton... (here)

Mini Book using PaperArtsy Fresco Chalk Paints and Alison Bomber EAB08 stamp set by Nikki Acton

I adored how Autumn Clark with Seth's stamps....  (here)


Look at the stunning papers she created.


Additionally we saw a gorgeous striped canvas by Corrie using Clare Lloyd's stamps and a monotone cream and navy mini house-collage by Jennie Atkinson a whimsical post from Ellie with Darcy's stamps. Wow, One topic in and already I cannot choose what to highlight!

Topic 6: Banners and Bunting
Say the word 'bunting' and the first thing that comes to my mind is a Royal Wedding and British street party to celebrate with bunting strewn across streets, shops fronts and the village pub! But our designers are sure to have plenty of other ideas for this topic, lets take a look!!!

My first pick is this amazing beauty by Jo. A lovely summery banner (link)


I love the rectangular shaped bunting, and the pop of colour from the flower stamps!


And I hope you didn't miss Helen Chilton's teeeny tiny bunting... (link to original blog post)


Raquel (aka Scrapcosy) created, this really interesting bunting that has a bunch of great techniques. In the link there is also the project explained in one of her videos. (link to original blog post)

Keren started with a wood frame and using Tracy Scott's stamp made this delicate flower embellished bunting. I love how she made this and I think it has to be one of my favourite posts of the year!! (link)


Jennie surprised herself with the bold use of colour (for her) in this post. I love how she explains how she softens out the infusions with lots of white paint, which creates the gorgeous backgrounds.


And something completely different from Nikki. The textures and colours on her bunting are phenomenal! A marvellously bold use of infusions totally contrasting to Jennies soft approach above.

Grunge Paste and Infusions Textured Hanging - by Nikki Acton

Topic 7 : Kraft Card
Kraft card has been a huge trend the past couple of years, it always adds a nice contrast, with the added bonus that its a super cheap surface to work on and seems to accept pencils, paints and more with ease!

I loved this from Chris Dark where she coloured Kay's stamps on kraft to create a fabulous bouquet, her shading and use of the white pencil is superb! (link to original blog post)


And I hope you didn't miss Dounia's underwater adventure! She is super explorative when she plays, and this post shares a whole bunch of ways with kraft! (link)


I adored how Clare Snowdon has a kraft-page journal. It adds such a warmth  (link)


Additionally we saw all sort of vintage layers using gorgeous Hot Picks stamps by Florence .


Topic 8 : Boxes
I knew this topic was going to be a pleaser! Boxes can be use in all manner of ways, we can hide stuff in them or use them as a fantastic gift holder, plus they come in all shapes and sizes!

My first pick is by Sue Carrington, a book-box with Darcy's stamps. (link)

And I hope you didn't miss Anneke's dinky matchbox, a gorgeous mini flower bunting is hidden within (link)


I adored how Etsuko decorated this box for her fab Zinski Art tags (link)


Additionally we saw all sort of floral elements in this beautifully decorated display box by Liz Borer. I love how she kept the background soft so the flowers pop perfectly.


Using Seth's stamps Jennie has decorated the front of this memory box beautifully, 


It didn't end there, we also had Helen's deconstructed box, A stunning fold out from Debs Wainwright and and Corrie had a gorgeously colourful

It is fun to look back on what our genius bloggers have shared with us over the course of a year. This year seems to have zapped by in a blink, but at least the blog remains as the perfect reference tool Don't forget to save the posts that float your boat on Pinterest. No excuse now, you'll hit the New Year with a dozen ideas to crack on with!

Wishing you all a very Merry Christmas

Leandra


Saturday, 12 May 2018

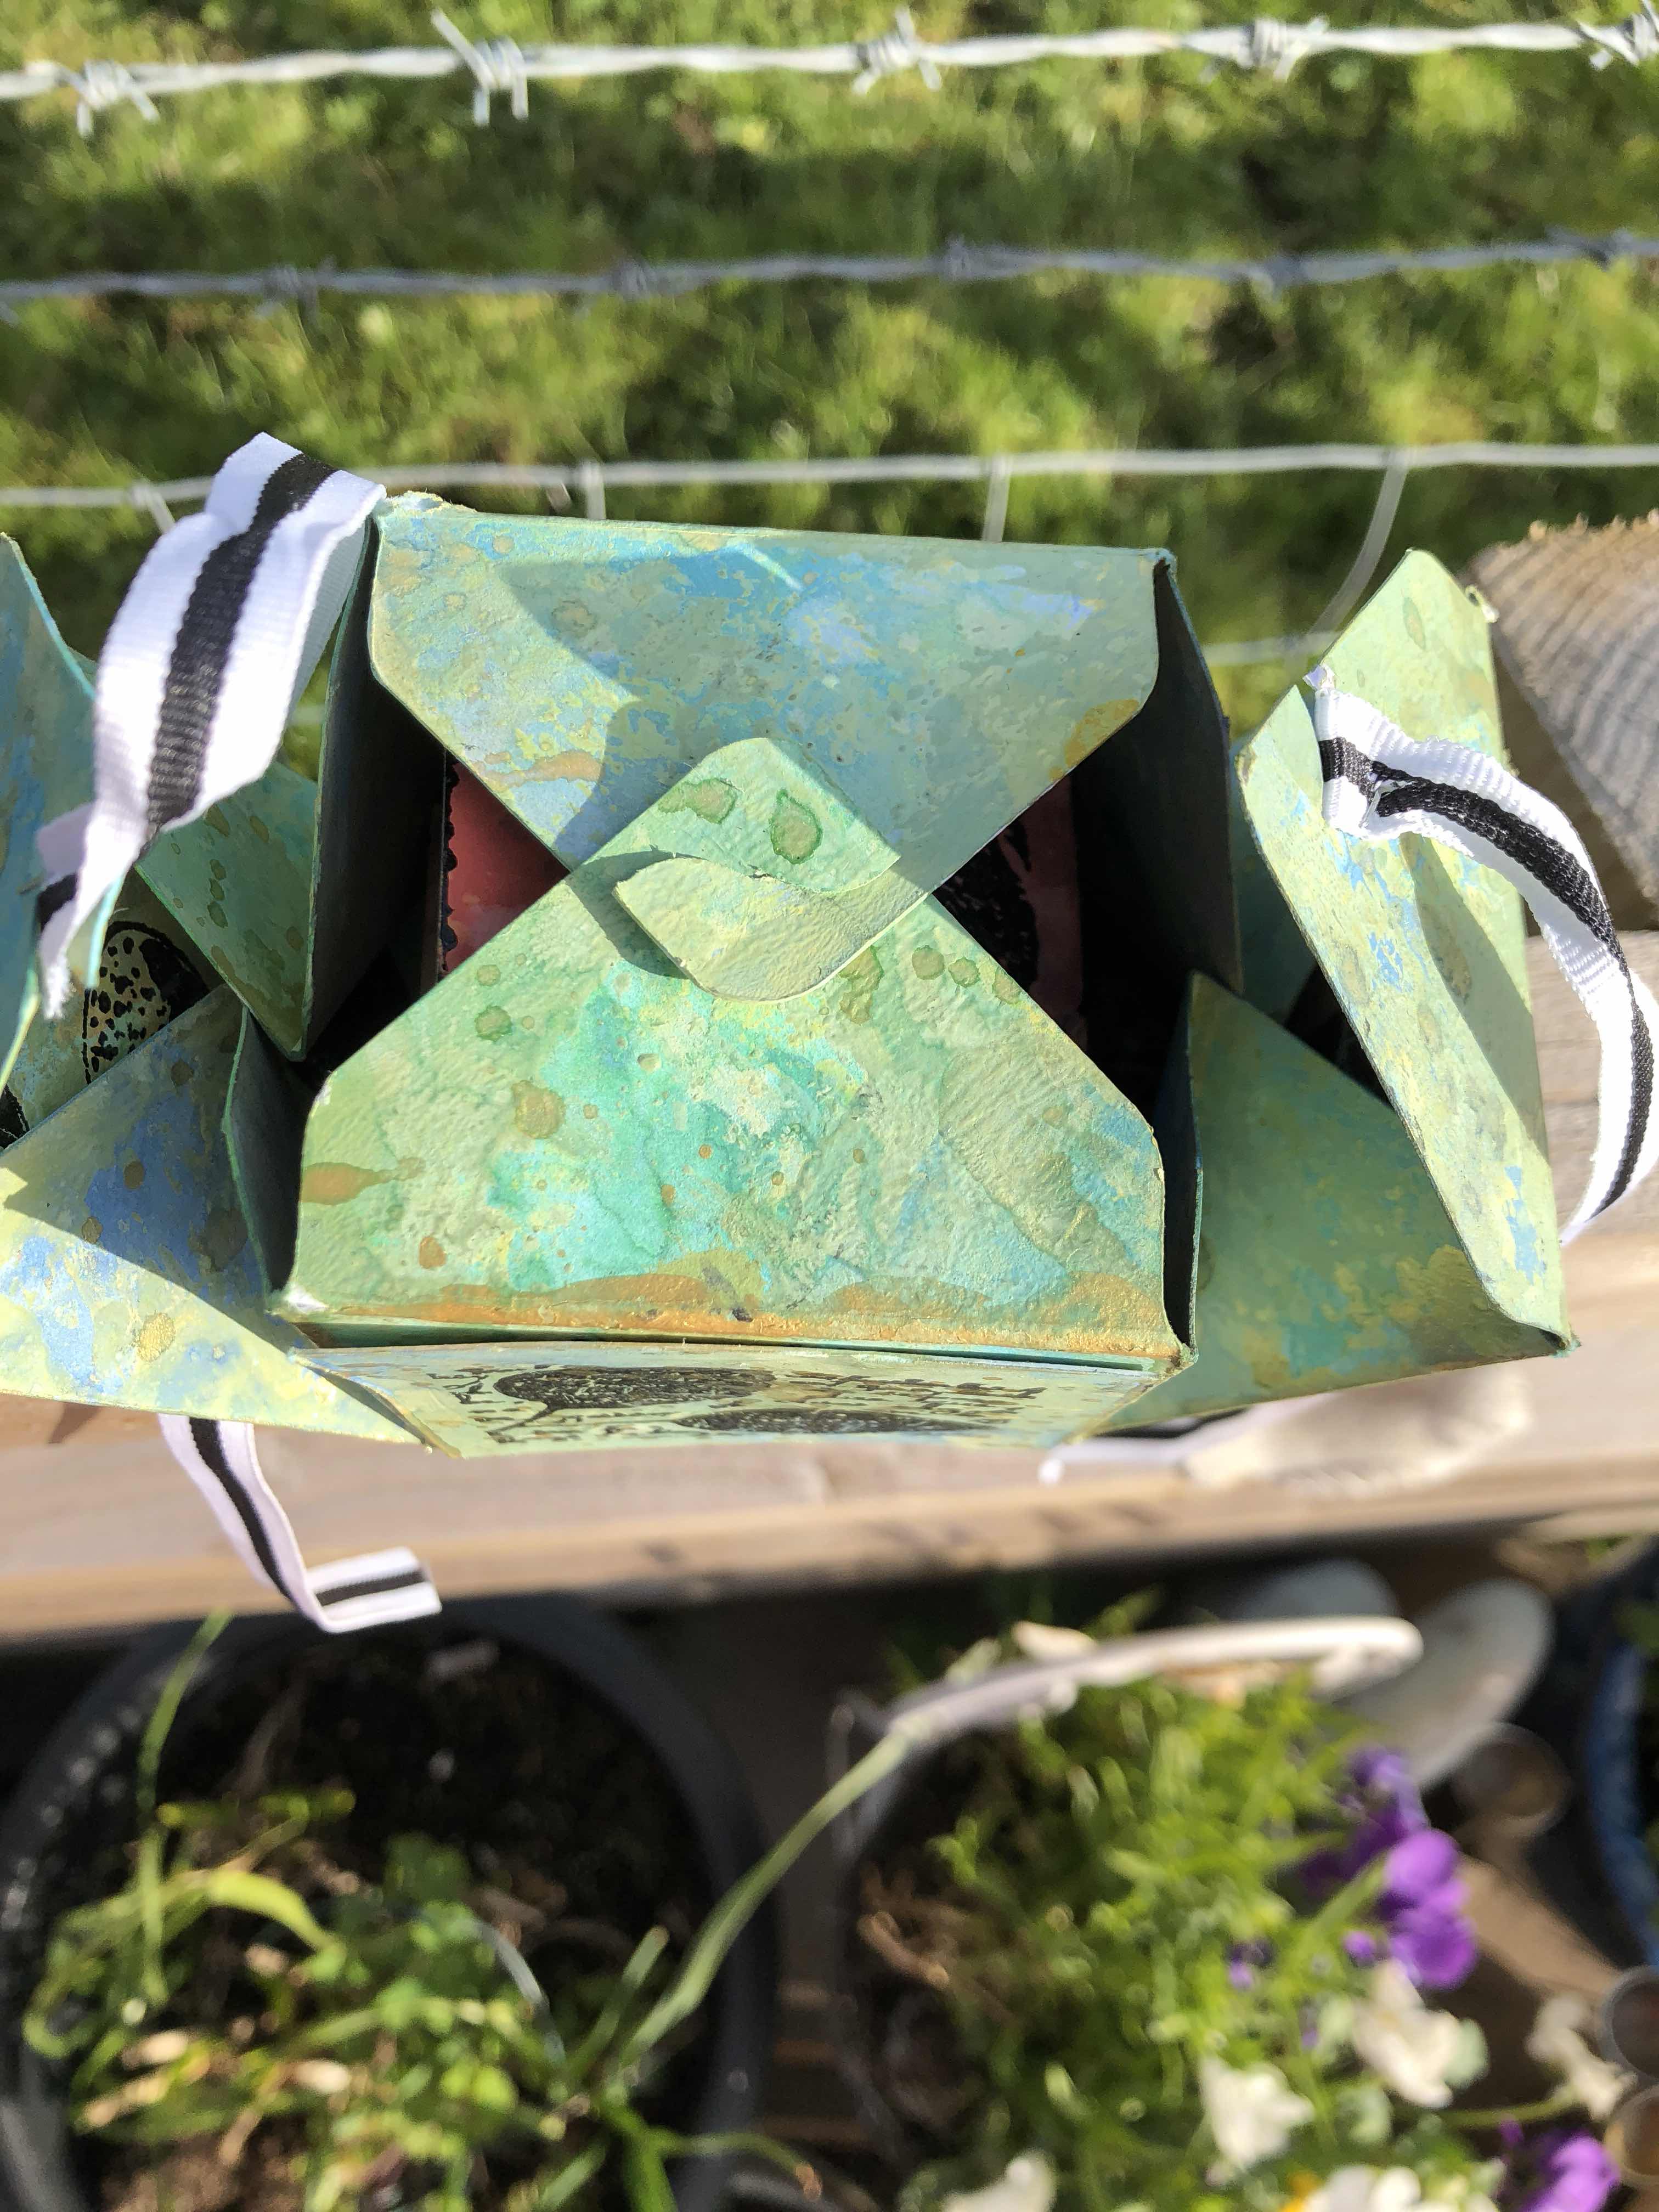
2018 #8 Boxes Photobox with the Urban Snapshots Collection {by Debs Wainwright}

2018 Topic 8: Boxes


This painterly box by Debs oozes that spring time vibe, when you can feel warmer days are just around the corner! We have had some amazing Spring weather here in the UK in recent weeks...lets hope it continue for that Royal wedding which isn't too far away! Meantime, enjoy a throwback to the mid 2000's with our Urban Snapshots stamps ~ Leandra


Hi everyone, it's Debs with you tonight with a photo box inspired by Keren Baker. I thought it would make a great project to share the versatility of boxes. I’ve changed it a little to fit with our theme, and showcase the lovely stamps I used. However, you can make it your own by changing all the elements I used, or follow along to make your own little box of treasures.


I chose the stamps I used Urban Snapshots Nature Plates 2, 3 and 4 . These are all A6 (quarter) plates, and available unmounted or EZ mounted.


I chose these specifically because I knew they would work in the different panels of the box, their sizes were just perfect for it, but you could easily stamp them onto larger panels if you wanted to use them on a bigger box and then add a border around the panel before attaching to the box panel. The possibilities are really endless.


The box fastened with first two flaps attaching  to each other and I added ribbon to the remaining two as I wanted to fasten it with a bow. However the second fastenings if used in the directed way make the box particularly sturdy, so would make great gift boxes.


This particular box was cut using a Memory Keepers punch board, and I chose a 4x4 box setting, but you can make much smaller ones if you wish. You could make several that will all fit inside each other, which can then be stacked up on each other creating a pyramid. I wanted the largest size as I wanted to fit the concertinaed photo strip inside as I wanted to ensure it was sized big enough to take  real photos if you wished to use them. 


I chose the colours, I did to represent Spring, as the stamps were nature themed, I thought they would work well together. I added gold flicks of paint to add the sun. The red gold and oranges of the concertina were the colours of the flowers again stamped with the additions of nature. You can add the colours of your choice, to your box of photos, stamp illustrations or even hand painted pictures. You can personalise it anyway that suits you.


These stamps were perfect for stamping straight onto the painted surface, as they were more silhouette in style which gives a great contrast to your project, I added more with black paint to compliment the images.


The great thing about this box with the concertina inside is it pops up/out when you open the box, and this was what inspired me with Keren’s box. You could add confetti pieces or flowers too which would shoot out when the recipient opens the box which creates even more fun in giving a present to someone.


Boxes are a treat to make, as well as to give, whether in this style or any other, so why not give it a go. Show us your individuality by styling up a box(s) your way, through what colours and embellishments you use. 

Take Care everyone 
Hugs
Debs xxx


We always hope that you  learn something interesting from our blog. 

Our creative team love to read your comments so much, so please take time to let them know you've been inspired!  

You must complete step 1 AND 2 to be entered into the draw. 

To join our challenge:
1. Leave a comment on the Topic Introduction Post and go in the draw to win a PaperArtsy Apron. 
2. Make something arty relevant to the topic, and link your creation from any social URL (eg. Instagram, Pinterest, Blog Post etc) sharing your original make to this challenge page.

The current topic link Topic 8: Boxes will close 17:00 (London Time) Sunday, May 13th 2018, and the winner will be announced 2 hours later at 19:00.

Friday, 11 May 2018

2018 #8 Boxes: 'collect beautiful moments' with EKD {by Corrie Herriman}

2018 Topic 8: Boxes


A brightly decorated box from Corrie in this post! If you are a copic fan she shows beautiful colouring skills, and I love how they show off Kim Dellows stamps perfectly! ~Leandra 

Hi everyone, it's Corrie from MadeByCHook here with you today, and I'd like to show you what I have made for the 'boxes' topic. I had a heart shaped box in my stash for ages and this seemed to be the perfect moment to use it. I chose to paint and stencil the box and to keep it relatively simple because I wanted to make the flowers stand out. 


I enjoyed this little project because I used all my favourite materials ie. PaperArtsy paints and a stencil, lovely rubber stamps and my Copic Markers. I coloured a lot more stamped images than I used and learned that sometimes less is more ! 


I started off with taking off the hinges and painting the box with two layers of gesso. You don't really need gesso with the Fresco Finish Chalk Acrylics but I like to start this way. 


Next I painted the box with Fresco Finish Chalk Acrylics in the colours {Antarctic}, {Mermaid} and {Bora Bora}. I used these colours because they are amongst my favourite colours from the range. Also, I knew I wanted to used yellows, oranges and reds for my flowers and the cool turquoise and warm oranges go so well together. 


Next I used a stencil by Kim Dellow {PS034} with Fresco Finish Chalk Acrylic in {Snowflake}. Stencilling adds lots of interest to your project. It doesn't matter if it is a box or an art journal page or a card. 


For the embellishment on the top I stamped out lots of flowers from Kim's fantastic stamp sets {EKD05} and {EKD06}. I decided on colouring them with my Copic Markers because they are my favourite way of colouring !


This is the result of a few hours of colouring and cutting out the images. I like to add some white accents because that gives your colouring work that little extra sparkle !  


Here's the finished article. I kept the lower part of the box lighter than the lid to add some more interest. I stencilled this bit with {Bora Bora}. After colouring the flowers and the butterfly I shaped them a little by bending the paper here and there. By doing that and using dimensional adhesive the flowers make a bigger impact then when you would adhere them flat onto the box.


I like how it turned out; I really love these colours together. I did add a sentiment, a small talk sticker by Tim Holtz. I chose this one because I can imagine this box being used for keeping photos and little mementos in.


I hope you enjoyed my post and that you will have a go at decorating a box yourself. If you don't like colouring images like I do, you could use pretty pattern papers to stamp the images on or you could use gel printed papers in colours that go well together. I am sure that would look fabulous too; in fact I might just have to try this myself ! These clusters of images work well on cards and art journals too. 

I'd like to say thank you for visiting today and I hope I have given you some inspiration ! You can visit me here too: 


We always hope that you  learn something interesting from our blog. 

Our creative team love to read your comments so much, so please take time to let them know you've been inspired!  

You must complete step 1 AND 2 to be entered into the draw. 

To join our challenge:
1. Leave a comment on the Topic Introduction Post and go in the draw to win a PaperArtsy Apron. 
2. Make something arty relevant to the topic, and link your creation from any social URL (eg. Instagram, Pinterest, Blog Post etc) sharing your original make to this challenge page.

The current topic link Topic 8: Boxes will close 17:00 (London Time) Sunday, May 13th 2018, and the winner will be announced 2 hours later at 19:00.