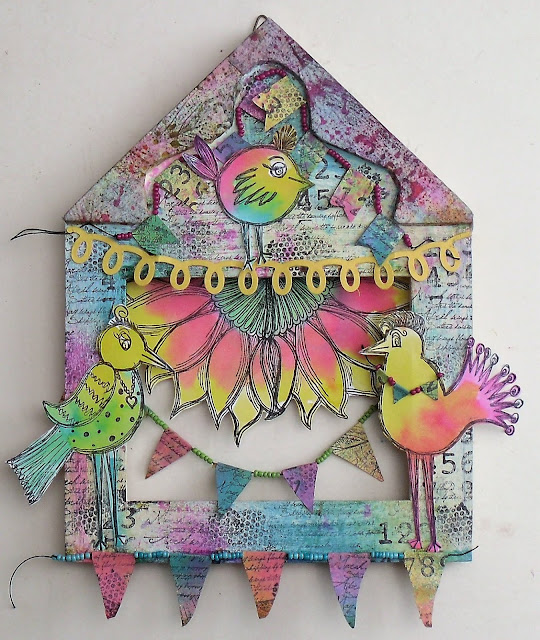
2018 Topic 6: Banners & Bunting

Helen
has gone all miniature on us in this post, but as per usual, its a
genius idea for those who might want some quick and easy, super fun
baby-banners as an embellishment ! ~ Leandra
Hi everyone, it's Helen with
you today, and I'd like to share with you a really easy way to make
mini no stitch bunting out of address labels. As they're already sticky
it's easy to fold them over the thread and stick the other side. I did
start by using micropore tape for this but the colours didn't come out
as brightly as I wanted. The labels provided a white background from the
get go, much easier to work on. As you're putting the bunting together
yourself you can add the beads in between for an extra decorative
element.
Lin's
stamps are brilliant for this project as they're open designs so lots
of room for colour, and also have a great sense of fun.

I stuck the labels different ways - if you've got bigger labels, even better, and started by stamping all over them with ELB30.

Then
I got out some Dylusion sprays - really vivid colours which I love. I
like to see how all the colours run together to create new ones.

Then cut into strips. Get the beads ready - this is a bit fiddly but worth it.

Stick the strip over the thread, beads to the left...

fold over...

...and
trim as you like. Word of advice - cut away from the thread as
otherwise it's all too easy to snip it and the beads fall off and you
have to start again!
And there you have it, lots of different sizes and shapes of bunting.
So, a bit fiddly, but worth it - I always love anything that's in miniature as I'm keen on adding tiny details to my projects. Instead
of beads, you could thread buttons or bows, whatever you like.
Colouring
all the labels at once is very quick and easy, and the fact that
they're sticky means you don't have to stitch. Spray
inks are a quick way to colour anything - I also used them on the
gessoed house frame here. Don't forget, you can also make up sprays from
your Fresco paints for a different, softer effect.
So, I hope this project inspires you and brightens up your day!
Helen
Blog:http://helenchilton.blogspot.co.uk/
We always hope that you learn something interesting from our blog.
Our creative team love to read your comments so much, so please take time to let them know you've been inspired!
You must complete step 1 AND 2 to be entered into the draw.
To join our challenge:
1. Leave a comment on the Topic Introduction Post and go in the draw to win a PaperArtsy Apron.
2. Make something arty relevant to the topic, and link your creation from any social URL (eg. Instagram, Pinterest, Blog Post etc) sharing your original make to this challenge page.
The current topic link Topic 6: Banners & Bunting will close 17:00 (London Time) Sunday, April 15th 2018, and the winner
will be announced 2 hours later at 19:00.
All
links go in the draw to win a PaperArtsy creative apron. Please make
sure we can contact you as a prize winner - it helps if you share your
contact info from the platform you opt to use.
Good Luck! If you have any questions, don't hesitate to ask!


14 comments:
Wow, thus it seems stunning. Fiddly but stunning!
Sorry about the predictive text! It is stunning.
Stunning project Helen.... I wish I was as brave with colour as you! Love this project
Gorgeous vibrant colours and a good idea to use labels for a no fuss bunting! Fab ideas, Helen!
I love it! The colours are gorgeous.
This is a great project with super colours and useful ideas - thanks so much.
Such a fun post. Loving the bright colors and really enjoyed the step by step. It's been cold, and dreary here so this made my day,
absolutely adore this - so colourful and so much work! Fabulous xx
A fun and brilliant project, very clever and inspiring!
As usual with Helen Chilton!!! :) x
Love the mini bunting and such a clever idea with the stickers!
Upbeat and adorable. You really put some time in this and it shows! Way to go.
What a brilliant hanger art Helen. Lovely work with Linda's images. xx
Love this ! So fantastic !
Corrie x
Gorgeous! x
Post a Comment