Showing posts with label 2018 Topic 7. Show all posts

Monday, 24 December 2018

PA Blog 2018 year in review: Topics 5-8 with Leandra Franich

 PaperArtsy Blog year in Review (Topics 5-8)


Good Evening from PaperArtsy HQ,

It's Leandra here with you tonight to curate tonight's post, and boy did I struggle as every single post of the 4 topics I am revisiting were amazing! You know, when you get a spare half hour,  you really need to use the search function on the blog, or even just go back for a random mooch around, the talented people who blog for us are fabulous! Thanks to each and every one of them!

Well I know it has been a crazy year on lots of levels for lots of countries...I have a vague recollection of saying that last year too, but sheesh is it hard to discern truth from fiction. I know I am not the only person out there who is finding the surreal global politics hard to stomach right now, so at least we have crafting activities (and blissful blogs) as our escape right!?

I am sure you are all settling in with your Turkey prepped ready for the oven tomorrow, and wrapping the last of those pressies.

So, why not grab a mulled wine or a sloe gin....or my gin tip of the season, gin with ginger ale, and a fantastic garnish: star anise, a couple of cardamon pods and maybe an clove or 2 stabbed into a slice of orange. Delicious. Warm gin is a thing too BTW! Yup, you know what a gin-geek I am. I'm even adding a home-made Xmas spice sugar syrup to my Xmas G&T's.

Tonight I'm sharing my picks from Topics 5-8: Nautical Colours, Banners and Bunting, Kraft Card and Boxes. Enjoy!

Leandra 

Topic 5: Nautical Colours
In my head, I guess red white and blue are the first colours that come to mind: crisp, white sailor suits with a touch of gold cord, or maybe striped French attire, but a softer nautical vibe might be home decor like soft sky blues and beige. So, what did our bloggers get up to? It's always good to see other people's ideas with a theme colour palette.

Well let me say, Miriam kicked it out of the park when she turned a cobblestone stamp into this mosaic inspired piece. Very fitting that Emma Godfrey's 2018 stamps were Portugal inspired, and mosaic art is a common phenomena on the continent! So 10/10 for this interpretation! You can see the full post here.


And I hope you didn't miss Nikki Acton... (here)

Mini Book using PaperArtsy Fresco Chalk Paints and Alison Bomber EAB08 stamp set by Nikki Acton

I adored how Autumn Clark with Seth's stamps....  (here)


Look at the stunning papers she created.


Additionally we saw a gorgeous striped canvas by Corrie using Clare Lloyd's stamps and a monotone cream and navy mini house-collage by Jennie Atkinson a whimsical post from Ellie with Darcy's stamps. Wow, One topic in and already I cannot choose what to highlight!

Topic 6: Banners and Bunting
Say the word 'bunting' and the first thing that comes to my mind is a Royal Wedding and British street party to celebrate with bunting strewn across streets, shops fronts and the village pub! But our designers are sure to have plenty of other ideas for this topic, lets take a look!!!

My first pick is this amazing beauty by Jo. A lovely summery banner (link)


I love the rectangular shaped bunting, and the pop of colour from the flower stamps!


And I hope you didn't miss Helen Chilton's teeeny tiny bunting... (link to original blog post)


Raquel (aka Scrapcosy) created, this really interesting bunting that has a bunch of great techniques. In the link there is also the project explained in one of her videos. (link to original blog post)

Keren started with a wood frame and using Tracy Scott's stamp made this delicate flower embellished bunting. I love how she made this and I think it has to be one of my favourite posts of the year!! (link)


Jennie surprised herself with the bold use of colour (for her) in this post. I love how she explains how she softens out the infusions with lots of white paint, which creates the gorgeous backgrounds.


And something completely different from Nikki. The textures and colours on her bunting are phenomenal! A marvellously bold use of infusions totally contrasting to Jennies soft approach above.

Grunge Paste and Infusions Textured Hanging - by Nikki Acton

Topic 7 : Kraft Card
Kraft card has been a huge trend the past couple of years, it always adds a nice contrast, with the added bonus that its a super cheap surface to work on and seems to accept pencils, paints and more with ease!

I loved this from Chris Dark where she coloured Kay's stamps on kraft to create a fabulous bouquet, her shading and use of the white pencil is superb! (link to original blog post)


And I hope you didn't miss Dounia's underwater adventure! She is super explorative when she plays, and this post shares a whole bunch of ways with kraft! (link)


I adored how Clare Snowdon has a kraft-page journal. It adds such a warmth  (link)


Additionally we saw all sort of vintage layers using gorgeous Hot Picks stamps by Florence .


Topic 8 : Boxes
I knew this topic was going to be a pleaser! Boxes can be use in all manner of ways, we can hide stuff in them or use them as a fantastic gift holder, plus they come in all shapes and sizes!

My first pick is by Sue Carrington, a book-box with Darcy's stamps. (link)

And I hope you didn't miss Anneke's dinky matchbox, a gorgeous mini flower bunting is hidden within (link)


I adored how Etsuko decorated this box for her fab Zinski Art tags (link)


Additionally we saw all sort of floral elements in this beautifully decorated display box by Liz Borer. I love how she kept the background soft so the flowers pop perfectly.


Using Seth's stamps Jennie has decorated the front of this memory box beautifully, 


It didn't end there, we also had Helen's deconstructed box, A stunning fold out from Debs Wainwright and and Corrie had a gorgeously colourful

It is fun to look back on what our genius bloggers have shared with us over the course of a year. This year seems to have zapped by in a blink, but at least the blog remains as the perfect reference tool Don't forget to save the posts that float your boat on Pinterest. No excuse now, you'll hit the New Year with a dozen ideas to crack on with!

Wishing you all a very Merry Christmas

Leandra


Sunday, 29 April 2018

2018 Topic 8: Boxes {Intro and Challenge Links}

 2018 Topic 8: Boxes


Well hello everyone, Darcy here bringing you our new blog topic. This time we are looking at making and decorating boxes. whether you use them as ornaments, storage or for giving gifts, we can all agree that we couldn't manage without boxes. There are so many on our homes, so why not make them beautiful to look at. 

Before we start, let's see who won the Topic 7: Kraft card...

The winner is: Monika from Mistletoe Home Designs


Email Darcy to claim your prize. Darcydotneedles@gmail.com


Boxes, chests, caskets, trunks; they have been around for centuries. Used for storage and made from wood or metal, they have been large and heavy, some plain and some statement pieces. Modern boxes are generally made from cardboard, and we don't display them in our homes. Think about when people had 'hope chests'  and 'trunks' for travelling. They were dedicated boxes, and a lot of thought when into their construction, but also into how they looked. Jewellery boxes were another stunning piece of art in their own right. It is time to get back to making storage pretty, perhaps not as large as a hope chest though!

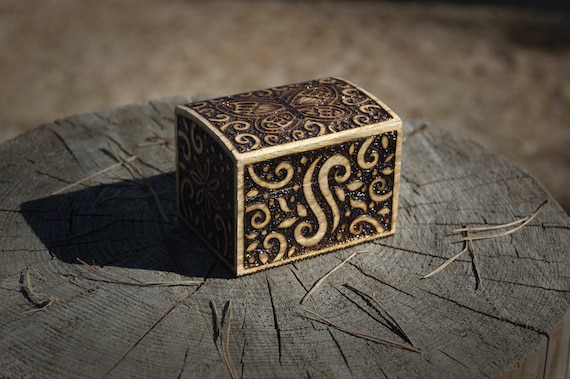
Here is a modern take on a jewellery box. 


Stewart Jones
Cardboard of course is a go-to substrate, whether that is thin card, mount board or heavy duty card with a corrugated centre, there are lots of opportunities to recycle with this topic. Look in your recycling box; amazon boxes, cereal boxes, backboards from sketchbooks, shoe boxes, etc, they can all be reused. Of course there are also some plain wooden boxes available in hobby shops, ready for you to decorate, these can be painted, stamped, decoupaged or like the example above they can have designs burnt into them using a pyrography tool. 

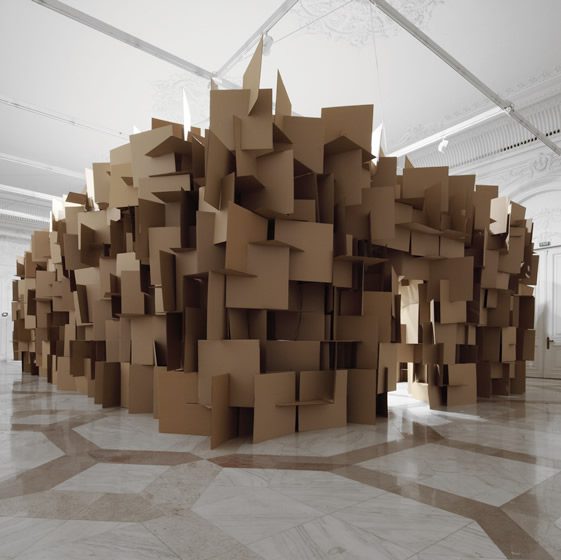
You could of course not decorate at all, just go big! really big! This giant box installation is by Zimoun, in Bucharest. It is made from 2000 pieces of cardboard. 

Zimoun + Hannes Zweifel at Mnac, Bucharest
Zimoun
Another installation here, this one could be done on a much smaller scale, and would be so much fun to do with children. I see summer holiday fun in these. I quite fancy making some myself and I don't even have the excuse of having children around!


Cartons, cardboard cutout installation Musee d’art Moderne de Ceret © Julien Gardair 2002
Julien Gardair
If faces aren't your thing, how about houses, again I think this would be a great project for children to let their imaginations run wild and get them off their electronic devices. 


branca rotelli: Favela chic
Annalise Rees
Switching to wood for a moment, these seem to be old packing crates or wine boxes, though this is quite large, it would make a stunning feature against one wall. As they are individual dioramas you could always just have one as a statement piece. 


Artist: Allison May Kiphuth                                                                                                                                                     More
Allison May Kiphuth
Back to cardboard, you can make a much smaller version of the above installation. You can buy configuration boxes, or better still make your own. Fill them with oddities, or pop them into a draw and use them as storage. Wouldn't this make a great drawer tidy, for stationery, or jewellery! Follow the link to see how this drawer divider set was made from cereal boxes. 


IHeart Organizing: DIY Cereal Box Drawer Dividers
Jennifer Jones
What can you display on a box? well it seems, anything and everything! A veritable feast of oddities can be crammed into tiny spaces. It probably doesn't come much smaller than matchbox art. 


By cocostyle blog
Cocostyle
Of course all kinds of strange little oddities can be displayed in boxes. 


Mano Kellner


These matchbox dolls are some of the cutest things I have ever seen, how much fun! Just look at their little stick legs!

Merve Gizem Sincik
Books and boxes are a great combination, how about a teeny, tiny accordion book in a box!


accordion box photo craft idea
Sugar Bee Crafts

What about these 'comfort' boxes, fill with happy images and an uplifting phrase or message and give them out to your friends. This would definitely make me smile. 


ok lovely concept_would be amazing as cig match box idea
Kim Welling

Another book in a box, Oh be still my beating heart, how gorgeous is this, what tiny secrets and things could you write about in here. 

Kate Bowles Books - matchbox size -- Oh my! I LOVE this
Kate Bowles

Boxes are fantastic for presenting gifts and bulky cards, I am sure most of us have made a card with just one too many flowers on it, only to find it would not fit in an envelope. But how about making the box a part of the card. Pop up box cards are such fun, you can cram in so many details. 

Tatty Twinkles Pop Up Box Card | docrafts.com
Claire Boelema
This leads us nicely into exploding boxes, at one time they were so popular and everyone was making them. They involve a lot of work but they are worth it. 


Elaine
Elaine

Let's look at gift boxes, these give you an opportunity to take your design outside of the card or gift, they can be simple of elaborate. They can also be made in almost any shape, these wonderful triangle boxes really caught my eye. 

50 triangle boxes are a whole lot of boxes.
Candy Wooding


Pillow boxes are another unusual shape, but so easy to make. Look at these Halloween pillow boxes, a great way to give out treats in October. 


Maybe fabric is your thing, I went through a period where I loved making fabric boxes as gifts. I have a lovely book called Embroidered Boxes by Janet Edmonds that is worth looking at. 

Here is an embroidered fabric box,made to look like a house, so much work but stunning. 

Janice MacDougall
How about this for a sensory overload, a see through, perhaps walk through? box with no sides! 
This is so pretty, could this be done on a small scale, maybe construction as a hanging mobile in a window? Don't forget just because the original is a huge installation does not mean that you can't take something from that, scale it down, make it work for you. 

Ebony Bizys

A quirky one to finish with, how about this for an aquarium! I think this is the weirdest use of a telephone box that I have ever seen, it was created by students in Japan. 

Kingyobu

Have fun over the next 2 weeks and show us what you can do with a box, let those creative juices go wild and then link up your fantastic creations. 

Don't forget to follow Darcy and Leandra's Pinterest boards if this topic pushes your buttons, you will see plenty more examples to whet your appetite there! I am really looking forward to seeing what you create over the next 2 weeks!

~ Darcy


We always hope that you  learn something interesting from our blog

Our creative team love to read your comments so much, so please take time to let them know you've been inspired!  

You must complete step 1 AND 2 to be entered into the draw. 

To join our challenge:
1. Leave a comment on the Topic Introduction Post and go in the draw to win a PaperArtsy Apron. 
2. Make something arty relevant to the topic, and link your creation from any social URL (eg. Instagram, Pinterest, Blog Post etc) sharing your original make to this challenge page.


The current topic link Topic 8: Boxes will close 17:00 (London Time) Sunday, 13th May 2018, and the winner will be announced 2 hours later at 19:00.


All links go in the draw to win a PaperArtsy creative apron. Please make sure we can contact you as a prize winner - it helps if you share your contact info from the platform you opt to use.

Good Luck! If you have any questions, don't hesitate to ask!

Saturday, 28 April 2018

2018 Topic #7 Kraft card: Collaged elements with VID {by Nikki Acton}

2018 Topic 7: Kraft Card

Kraft card and collage with PaperArtsy Vintage Ink and the Dog stamps - by Nikki Acton


Nikki has opted for a kraft-white-brown ink colour scheme here. This has allowed her to play with all the elements and textures until she was happy with the arrangement. Sometimes it is a really good idea to strip back the colour and force yourself to work with a more limited palette than you otherwise might. Can you meet the challenge and have a go? Go on! ~Leandra

Hi everyone, Nikki from Addicted to Art with you today, and I'd like to share my designs using Kraft card, white and collaged elements.

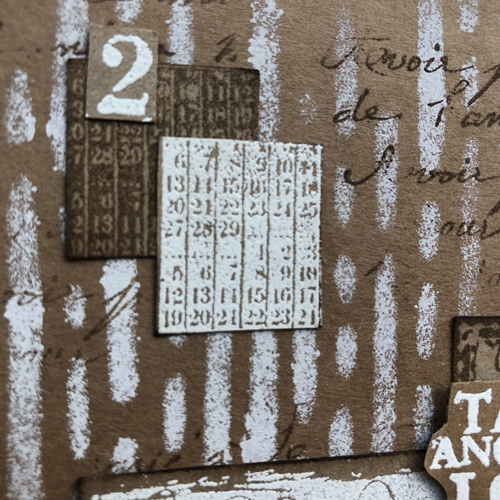
I love the impact of white on Kraft and so decided to keep my colours minimal just adding brown ink to the mix. Having selected my Vintage Ink and the Dog stamp set to work with I knew I was going to chop them all up and create some collaged pieces! When I get a new stamp set I often stamp each one several times on scrap paper and play around with them - whole or in part to find compositions that work. 

Kraft card and collage with PaperArtsy Vintage Ink and the Dog stamps - by Nikki Acton

I took the stamp set - ID08 and stamped each element in brown archival as well as another set with versamark and white embossing powder. I then began mixing and cutting and seeing what I could come up with! 

I love the eyes and the 'Take another Look' phrase but had to separate them all. Similarly with the numbers - I cut them all up to make smaller elements to add to the collage.


Kraft card and collage with PaperArtsy Vintage Ink and the Dog stamps - by Nikki Acton

On the base of the card and tag I added paint with Fresco Finish Chalk Acrylic - in Chalk through a stencil  - PS036  and then randomly stamped the script stamp from the above set.

Kraft card and collage with PaperArtsy Vintage Ink and the Dog stamps - by Nikki Acton

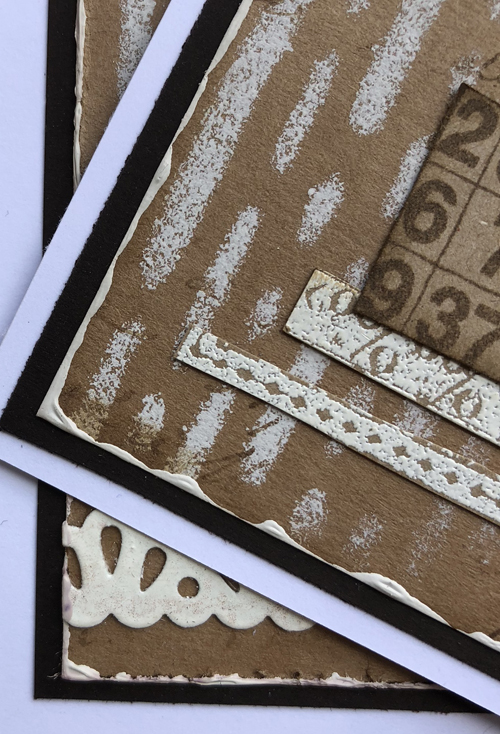
When it comes to arranging elements I try to follow basic rules of composition - although there is a time to break them and sometimes it works! On the card above I tried to create a triangle of three dominant areas of different sizes - this helps to guide the eye naturally around the piece.

Kraft card and collage with PaperArtsy Vintage Ink and the Dog stamps - by Nikki Acton


Framing is also a great way make things stand out. When matt and layering cards I try to add matts of different framing distance from the next - but a great way to achieve this is to use ink or paint. You can see here how I have added a layer of Fresco paint to create a border for the Kraft card.

I had lots of fun playing with this stamp set! If it isn't something you already do I encourage you to play around with stamped images - cut them up, layer them, mix them. Even if it doesn't always work it might generate new ideas. 

Nikki

Blog: Addicted to Art
Instagram: @A2Acardscraft
Pinterest: nikacton


We always hope that you  learn something interesting from our blog

Our creative team love to read your comments so much, so please take time to let them know you've been inspired!  

You must complete step 1 AND 2 to be entered into the draw. 

To join our challenge:
1. Leave a comment on the Topic Introduction Post and go in the draw to win a PaperArtsy Apron. 
2. Make something arty relevant to the topic, and link your creation from any social URL (eg. Instagram, Pinterest, Blog Post etc) sharing your original make to this challenge page.

The current topic link Topic 7: Kraft Card will close 17:00 (London Time) Sunday, April 29th 2018, and the winner will be announced 2 hours later at 19:00.


All links go in the draw to win a PaperArtsy creative apron. Please make sure we can contact you as a prize winner - it helps if you share your contact info from the platform you opt to use.

Good Luck! If you have any questions, don't hesitate to ask!