Showing posts with label 2017 Topic 18. Show all posts

Friday, 29 December 2017

PA 2017: Blog Year in Review: Topics 17-19


Hello again from PaperArtsy HQ,

This is the last of our 2017 review posts. I hope you have all eaten all your Christmas leftovers, and are planning for a safe and Happy New Year. As 2018 looms, it's hard to accept the turn of the century was only 18 years ago. We were all so excited to see if computers would fail the world over, but of course they didn't ! In that time, all our kids have grown from babies to adults. I wonder what life will bring in the next 18 years? I guess we cannot begin to imagine.

Tonight I'm sharing my picks from Topics 17-19, the last 3 topics of 2017.

Leandra 

Topic 17: Shades of White

I was so excited for this topic, but boy were the bloggers challenged by it. Every single one of them said how hard it was to work without colour, yet every single one absolutely LOVED the results and surprised themselves in the process. 

Moral of this: step outside of your comfort zone and stretch yourself to try something new! It might be food or a flavour, maybe its a new job, or maybe a different hairstyle? As you contemplate 2018, what can you push yourself to do differently? Embrace change, why not!

My first pick is this amazing assemblage by Liz Borer. I have seen her make several of these niche frames over the years, and she always kicks the concept out of the park! Amazing!


Wanda layered up a simple 'leaf' stamp by Ellen Vargo, and suddenly it was a white poinsettia! All the layers underneath are also amazing!


Anneke showed us just how many shades of white there are in the PaperArtsy Fresco Paint line - and she hasn't even got Antarctic, Stone, Moonlight.....in that mix! 


But look at what she made...


And Ingrid had so much fun doing this with our Squiggly Ink stamps!


Topic 18: Torn, Ripped and Burnt

So we are lucky no one burnt their house down after this topic, but naught pyromaniacs emerged en masse! What is it about playing with fire that we love so much!

I'm pretty sure Raquel did not resort to flames - she is such an expert with Vintage inks, that she could represent torn or burnt perfectly with her inherent distressing skills! This post had a sewing theme, and the details are stunning!


And I loved the experiments Lauren got up to, this background was fascinating - go and read about the process here.


This post by Kate Yetter was another of her journal cover masterclasses in layers and colour!


And this layer blew my socks off! How stunning is this!


Topic 19 : My Favourite Things

Which bring us to our final topic of the year! It was nice to round off the year with bloggers doing what they most like to do! The biggest problem they all had was choosing where to start!

Claire S got into the Zinskis - and journalling, I'm sure those 2 activities have been a favourite past time for many people this year!


Chris Dark went for textured backgrounds slathered with lovely layers of paint and metallic accents (that seems like a lot of our recent topics rolled into one!)


Lauren's elf in a stocking went down well last week! I must admit, he found his way onto my Xmas cards too! Cheeky chappie.


And finally Ellie rounded up the year with the perfect post where she shared her loved of many recent topics too.


There you have it , 2017 on the PA blog. A mahoosive thanks to all our Blogging team! They are fantabulous! Unparalleled. Totes Amazeballs....I'm sure you will agree!


The past year has been one of political and economic turmoil for many of us the world over. Be it food shortages, weather bombs, extreme viruses (medical and technological), impossible to fathom terrorist attacks, people fleeing their beloved homelands, or election results that we could never imagine. The world has become a smaller place in the past 2 decades since the turn of the century, and yet, it seems so much bigger in our daily lives now that we are more aware about what is happening outside of the 4 small walls we call home.
I'm sure we have all be touched by the anguish and pain of this seemingly incessant turmoil.  As we go about our daily life, we can still choose to be kind, we can choose to share our talent with other people, and we can only try our best to make wise choices in the face of adversity.
Our blog will continue to be a crafty lighthouse of inspiration. Thanks to the tremendous blogging team we have collected over numerous years, we are honoured to be a safe place for you to visit to enjoy their talents, and make your own kind of crafty magic in response. A big thanks to them and to you too!

Have a safe and Happy New Year, we'll see you on the other side with lots of good stuff planned for your enjoyment in 2018!!!

We very much look forward to doing it all again with you next year! Be on the alert, we start fast this year before we hit the tradeshow season....and you know what that means!!! ....shhhhhhhh.....not telling you yet....

Leandra 

Thursday, 28 December 2017

PA 2017 : Blog year in review: Topics 13-16


Hello again from PaperArtsy HQ,

I hope your Christmas break is going well, although many of you will have had a day or 2 back to work, for many people its a relaxing time over the Christmas New year week. Here is another post looking back and celebrating the inspirational ideas presented on the PaperArtsy blog in 2017.

Tonight I'm sharing my picks from Topics 13-16

Leandra 

Topic 13: Metallics

Metallics have been such a strong trend in interior decor for a few years now, and naturally this is also reflected in our crafting. Gold leaf, metallic paints, embossing powders, mica powders and sprays, there are multiple ways that all these elements can successfully add the blingy 'magpie' effect into your work!

Autumn Clark created such gorgeous Xmas cards with Lynne Perrella stamps and a pop of shine. My first pick is this amazing beauty by. A very ...(link to original blog post)

Jennie's trademark soft shades contrast with gold perfectly in this textured assembly of vintage-looking elements.


I thought the delicate metallic embossed colour on Alison's post worked perfectly with the shades of brown. Both she and Raquel prefer to stamp in brown, than black, and i must push myself to stamp wit other coloured inks this year! There you go, one New Year's resolution sorted!


Topic 14: Glitter

Well, yes, we chose Glitter as a topic!!. So don't fall over in shock! But all these sparkly blingy things fell into the same zone for this round, so glitter it is...take a deep breath!

Chris Cresswell made a wonderful array of cards and these popsicle sticks fitted the tall zinski stamps perfectly, look at the cute glittery tops! Go and check out her post, so many card ideas here!


When Jo Firth-Young happened to drop into HQ, and saw me planning out the topics, she booked herself a glitter spot there and then! She LOVES glitter, and Christmas is always her perfect excuse! Here she has decorated an advent calendar perfectly!


The really funny thing about this topic was that (apart from Jo) almost ALL the bloggers were OUT of their comfort zone with glitter, so many went for the non-traditional glitter option, or used very little of it. This was one of those very subtle takes on the topic from Sue Carrington. Fabulous!


And Corrie added subtle holographic glitter to her Halloween backgrounds!


But I was blown away by Raquel's Star decorations. She turned her 'flat' star stamp into a whole bunch of glittered tree decorations!


And Keren used alcohol ink pens to colour glitter paste!! Clever clogs that she is!


Topic 15 : Pearlescent

So glitter lead us nicely into the pearly area of mica, pearlescent paints and so on! You can see this really kicked us into a festive vibe in October! Plenty of cards and decorations were being made in readiness for Christmas!

I loved this frame by Autumn with the pearly vibe to the eggplant EP, but the panel inside was a gorgeous marbled effect! How elegant!


Helen made pearly skins....


And then stamped on them! How does she think this stuff up?!??


I adored Ruth's soft mosaic tiles! These would make an amazing frame for so many pieces of art!


And Bryan created some fast cards with his layering of pearl onto other shades for a quick 'pop' of pearl.


Topic 16 : Rustification

Well we couldn't miss out 'rust' in this round of metallic madness! Many people knew about our rusting powder, but never really played with it extensively! The trick is you need to glue it down first with a good gel medium, then spritz, keeping it damp until the colour is at a tone you prefer. My best results are direct onto untreated wood or fabric. (so no painty base layers) But our bloggers had other ideas to try!

Sue Carrington rusted everything in sight, then created a fabulous homage by the way of this collage.


Clare M used layers of paints to create her rusty effect. This is such a striking background!


Nikki nailed a patina effect (of course she did!!) as she is well known for her patination skills! The colours in this are amazing!And she also used that gorgeous star of Raquel's!


And finally for this topic we saw Miriam rust a stamp image onto fabric! Worked a treat too!


It is awesome to look back on what our bloggers have created. Tomorrow will be our final wrap up of the final 3 topics of 2017. Thanks for being part of our blog, and following along with our designers, and responding to their creativity!

Leandra 

Saturday, 9 December 2017

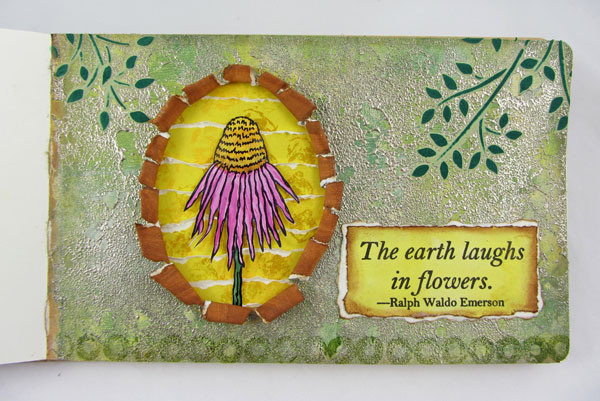
2017 #18 Torn, Ripped, Burnt: Art Journal Page with EEV {by Wanda Hentges}

2017 Topic 18: Torn, Ripped, Burnt


This is a masterclass in stratgic tearing of paper!! Lots of products, lots of tearing, and awesome tips too!

Hi everyone, it's Wanda Hentges (ArtByWanda) with you today, and I'd like to share with you a fun art journal page.

When I saw this topic the first thought, besides tearing paper which I love to do, that popped into my brain was an old technique done by Suze Weinberg using fusible webbing and embossing powder.  It's not really burning but it does involve melting (which is like one step away from burning, lol) and since I hadn't thought about this technique in years I decided it must be revisited.


I've used stamps from Ellen Vargo's sets EEV05, EEV06, and EEV10.  The quote is from the Sara Naumann set, ESN14.  The leaves use Kay Carley's stencil, PS061.


I love Ellen's flowers set and knew I wanted to use a flower along with a window torn into the journal page, but first, the background.


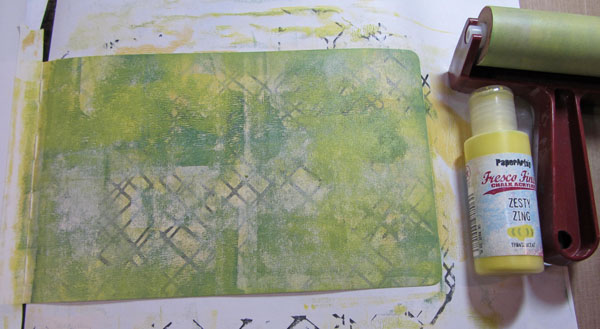
I stamped across the page first and then added layers of brayering with Fresco Finish Chalk Acrylic Paints adding one color at a time (Haystack, Sage, Limelight, Nougat, Hyde Park, and finishing with Zesty Zing).  I love the depth this gives with the stamping peeking through all those colors.  


I cut a piece of fusible webbing (specifically I used Wonder Under but I don't think the brand would matter) a little bigger than my page.  Take the fusible webbing from the liner, if it has one, lay it on the page, add heat with a heat tool.  At this point you just want it to heat enough to start sticking to the page. You don't want to actually melt it.


Once it's sticking to the page you add embossing powder in whatever color or colors you want (I used Ranger's Liquid Platinum here), dump off the extra tapping the page to remove whatever isn't sticking.  Now you heat to melt the embossing powder and as it heats up, the fusible webbing will also melt more creating a random assortment of holes.  Is that not way cool!!!!


An oval cutting die and marker worked perfectly to give me a pattern to follow for my window.


I cut some slits in the center and then tore the page in lines out to the oval line, tearing off the center part of each section.


I chose Toffee to paint on the back in the hopes that it might look a bit heated or singed when the paper was rolled.  I did think about actually burning the edges of the oval and if the page wasn't attached in the book I might of done it but chickened out in fear that I'd catch the whole book on fire.  LOL  


My fancy rolling tool, a toothpick.  I keep a box of toothpicks in my creating area and use them for lots of things, rolling paper, poking out bits from cutting dies, moving itty bits around on a project, etc.


A stamp platform was perfect for the flower.  I could stamp it, be very messy about painting it (Zesty Zing, Toffee, Banana, Candy Floss, Bougainvillea)... (took the picture before painting the stem and used Hyde Park for that).....


put the paper back into the platform....


stamp it again, take it out, dry it.... 


and cut it out for a gorgeous flower!!!


But that flower needed a better background!!!  (Zesty Zing, EEV06,  Archival Inks - Dandelion, Sunflower)


Much better but more wow was needed....


So I also sprayed it with Mica Spray.


I used sprays and a scrap of copy paper to make a matching piece to stamp the quote on.


More tearing, then inking to match the oval, layering, tearing, inking.   


To add more to the background I stenciled using grungepaste mixed with paint.  I did add too much paint.  I used one color, then decided to add some of another color and it got too thin so the paste did spread some.  Once dry I still wasn't happy with the color, it should have been darker but I just put the stencil back on and added ink.  It worked well!!!


 A row of stamping along the bottom using just one row of circles from the image in set EEV06.  Finally I adhered the two pages I'd worked on together to make one page. 


I really love how this turned out!!!!  If I was to do it again, I might add some stamping or stenciling on top of the brayered paint before putting the webbing and powder on but at the same time I kind of like the peacefulness of it the way it is.  It makes me think of walking through a forest or heavily wooded area with all it's green, the sunlight peeking through and bright spots of color where a flower shows up.

I do hope you've enjoyed today's project!!!  There is still time to get an entry into this topic.  I'd love to see what you are creating and maybe you'll even win the random draw.  Who doesn't love shopping!!!

Hugs, Wanda

I love how you just keep working at it until you get everything just right! The toothpick seems to be one handy tool!! And the torn frame worked a treat!! Thanks Wanda


We always hope that you  learn something interesting from our blog. 

Our creative team love to read your comments so much, so please take time to let them know you've been inspired!  

Why not join our 2-weekly challenge by blogging your create response to the current topic and link it here?

The current topic link Topic 18: Torn, Ripped, Burnt will close 17:00 (London Time) Sunday, 10th December 2017, and the winner will be announced 2 hours later at 19:00.

All links go in the draw to win a £50 voucher to spend on products of your choice from the PaperArtsy online store.