Showing posts with label 2015 Topic 7. Show all posts

Friday, 24 April 2015

2015 #7 Art Doll {by Trish Latimer}

2015 Theme 7: Niches

Hi everyone Trish Latimer here, joining you this evening with a post about niches! This is very much a 'create your own' niche project, not a ready made niche in sight! Art Dolls are my go to project if I have a total free rein on what I create, and when I saw Clare's fabulous face stamps I just knew where they would end up! This little lady is named after her stamp designer... may I introduce 'Happy Clare'....


Step One: Whenever I create an Art Doll, I always start off with a sketch so I know where I'm heading. In this case, I stamped the face (Eclectica Clare Lloyd 04), then sketched in the rest roughly.


ECL04


Step Two: As she is to be a free standing clay doll, I made an armature from wire. This does not need to be perfect, it's just a rough shape upon which the clay can be added.


Step Three: I've now added the clay to the shape. This may look like a heavy solid lump of clay but it's not! I used air dry Hearty clay, which is very light and has a spongy feel once dried out. As you might notice, I decided to chop off one of the wire legs from the armature, it was much easier to shape my dolls legs around one strand of wire!


Step Four: No, I haven't forgotten this project is all about niches! The niche in my Doll holds her sparkly heart, and to create it we need to 'cut out' the shape. I've used a cookie cutter for this, it works perfectly through the soft clay.


Step Five: As you can see, we are now left with a perfectly circular hole in the body of the doll. This hole will have a back added to it to form the niche, this is done simply by gluing a decorated piece of card across the back.


Step Six: Once the clay has fully dried out, it can be decorated! I painted the dress with Blue Oyster paint, then added stamped tissue over the top to give the dotty effect. The dots are from the Eclectica Ellen Vargo 06 plate. The glue used to attach the tissue gives the doll a nice glossy sheen, a look I followed through with the rest of the doll.


EEV06


'Happy Clare' was then finished off with bunting, before adding the stamped and coloured face. I emphasized the edge of the niche with doodled circles, before placing in her red sparkly heart!


I just love all of the faces Clare has created, and I'm in the middle of creating a doll for each of them. It's funny how the dolls seem to develop their own quirky personalities as you create them, you will never manage to create two the same! As you can see, adding a niche to this kind of project isn't difficult, and I think a niche just adds that extra detail that will make your art stand out. Why not have a go, I would love to see!
Thank you so much for having me, I've loved sharing 'Happy Clare' with you today!
Trish xx
My Blog  - Ink,Paint,Beads

Thanks Trish, we love your art doll,she is so sweet..with her pretty dress, sparkly heart and red shoes! You have skilfully taken a 2d image and created a 3d doll, fabulous. I hope you will share the rest of your dolls when they are done. ~Darcy

We would love you to join in with challenge #7: Niches If you are inspired by any of our guests who blog with us over the fortnight, then please join in and link up your creativity HERE. 


All links go in the draw to win a voucher to spend on products of your choice from the PaperArtsy online store. The Niches link will close 17:00 (London Time) Sunday, April 26th, winner will be announced 2 hours later at 19:00.
  

Wednesday, 22 April 2015

2015 #7 Treetop Owls {by Helen Chiltonl}

2015 Theme 7: Niches

Hi everyone Helen here, joining you this evening with a post about niches. This theme appealed to me as I wanted to puzzle out how to create a niche rather than use one ready made. Ideas of hammering metal cake cutters into my book page did go through my head (still considering that one!) but in the end I decided to try out one of Tim Holtz's dies and see if I could jiggle around the die sandwich so it would go through the machine. I'm very pleased to say it worked! The book pages were very brittle due to age and I didn't quite get the die truly aligned each time, but in the end it didn't matter - Lin Brown's owl still had somewhere to sit:

First of all get your book and choose your die. I used one of these thicker ones as they cut through more pages at a time. Play around with folding back pages until the die goes through the machine and cuts. keep repeating this until the niche is deep enough:


Coat edge of book and inside niche with glue and then gesso. Paint the book and extra loose pages using Frescos, Mermaid and Smurf for the sky and Autumn Fire, French Roast and London Night for the tree and branches:


Get out the Grunge Paste and tint some with London Night and Stone and scrape through a woodgrain stencil - I've used a Prima stencil here but any will do. Stencil the spare pages as well:

Next cut out branches from the spare pages and stick across the page, tucking the ends under the right hand side book page:
Get out the Treasure Gold (Olive Bronze and Spanish Topaz) and use to highlight the woodgrain texture:)
Accentuate the wood texture by drawing round with a black pen.  Draw round the extending branches with a soft pencil, rubbed with a cotton bud to create a soft shadow:

To finish the tree scene, stamp and paint lots of owls and birds, plus a couple of semi circular nests to make the sun. In addition to the paints already used, I chose Haystack, Butternut and Purple Rain.

 ELB17 

I love these bird stamps from ELB17 - they've got such wonderful expressions! By colouring them with the Frescos you can get great shading by diluting them with water. I've enjoyed making my niche and by using dies, you can create different shaped apertures to fit your theme. So find an old book, get out your dies and have a go!
Helen

Wow, Helen this is fabulous. What a truly brilliant idea, and that texture is so effective. Well done for being brave and experimenting with the book/dies in your machine. I can see lots of people trying this one. 

We would love you to join in with challenge #7: Niches If you are inspired by any of our guests who blog with us over the fortnight, then please join in and link up your creativity HERE. 
All links go in the draw to win a voucher to spend on products of your choice from the PaperArtsy online store. The Niches link will close 17:00 (London Time) Sunday, April 26th, winner will be announced 2 hours later at 19:00.
    

Saturday, 18 April 2015

2015 #7 Niches Fantasy Flowers {by Liz Borer PA Signature Designer}

2015 Theme 7: Niches


Hi there everyone, Liz here again with a project based on the topic of Niches. To me a niche is a small space to put treasures into and I love creating this sort of project. However this time I decided to do something slightly different and use the project to show off some of the faces from my stamps and create some ‘fantasy ‘ flowers. I was inspired by the fact that the magnolias are blooming at the present and I love these flowers because of their amazing sculptural shapes.


I started with a deep frame (from Ikea). I could have used a Tim Holtz configurations box but I wanted larger spaces, so I made my own frame with Niches. I cut a piece of Grey Board to fit the frame and then cut the apertures in the board as I wanted them.


I then cut strips of board the correct width to sit behind the aperture frame so that the back of the main frame would form the back of the niches when it was reinserted into the frame. Using a strong glue I stuck the strips onto the back of the apertures to create the sides and support the whole structure.     


The back of the main frame can then be put in place with plenty of strong glue to hold it in place.   


I then lined all the niches with various papers (these are from Graphic 45) which had co-ordinating colours to fit my colour scheme. I find that if I sand the edges of the paper once the glue is dry I can get a neat finish around the top of the niches.


I wanted to add some Grunge Paste texture to the frame, but because the areas were quite small I decided to stencil various designs onto tissue paper first because it would be easier to get the designs onto the frame. Apply Grunge Paste through a stencil as normal but onto tissue paper and then dry it. 


Now it is possible to cut the paper up into pieces that fit wherever they are needed and adhere them to the frame. To adhere the Tissue/ Grunge Paste stencils in place paint a layer of Matte Medium onto the frame and the put the tissue over it. Carefully paint another coat of matte medium over the tissue and ensure the it is stuck down .                                                                                                     

I then painted the whole frame; The inner area was a mix of Buff and Pumpkin Soup and the outer frame was a mix of French Roast and a small amount of Little Back Dress to make the paint more opaque. I rubbed Treasure Gold over the raised areas when the paint was dry. Classic Gold over the dark paint and a mix of Classic Gold and Onyxite over the pale areas.                                                                                  


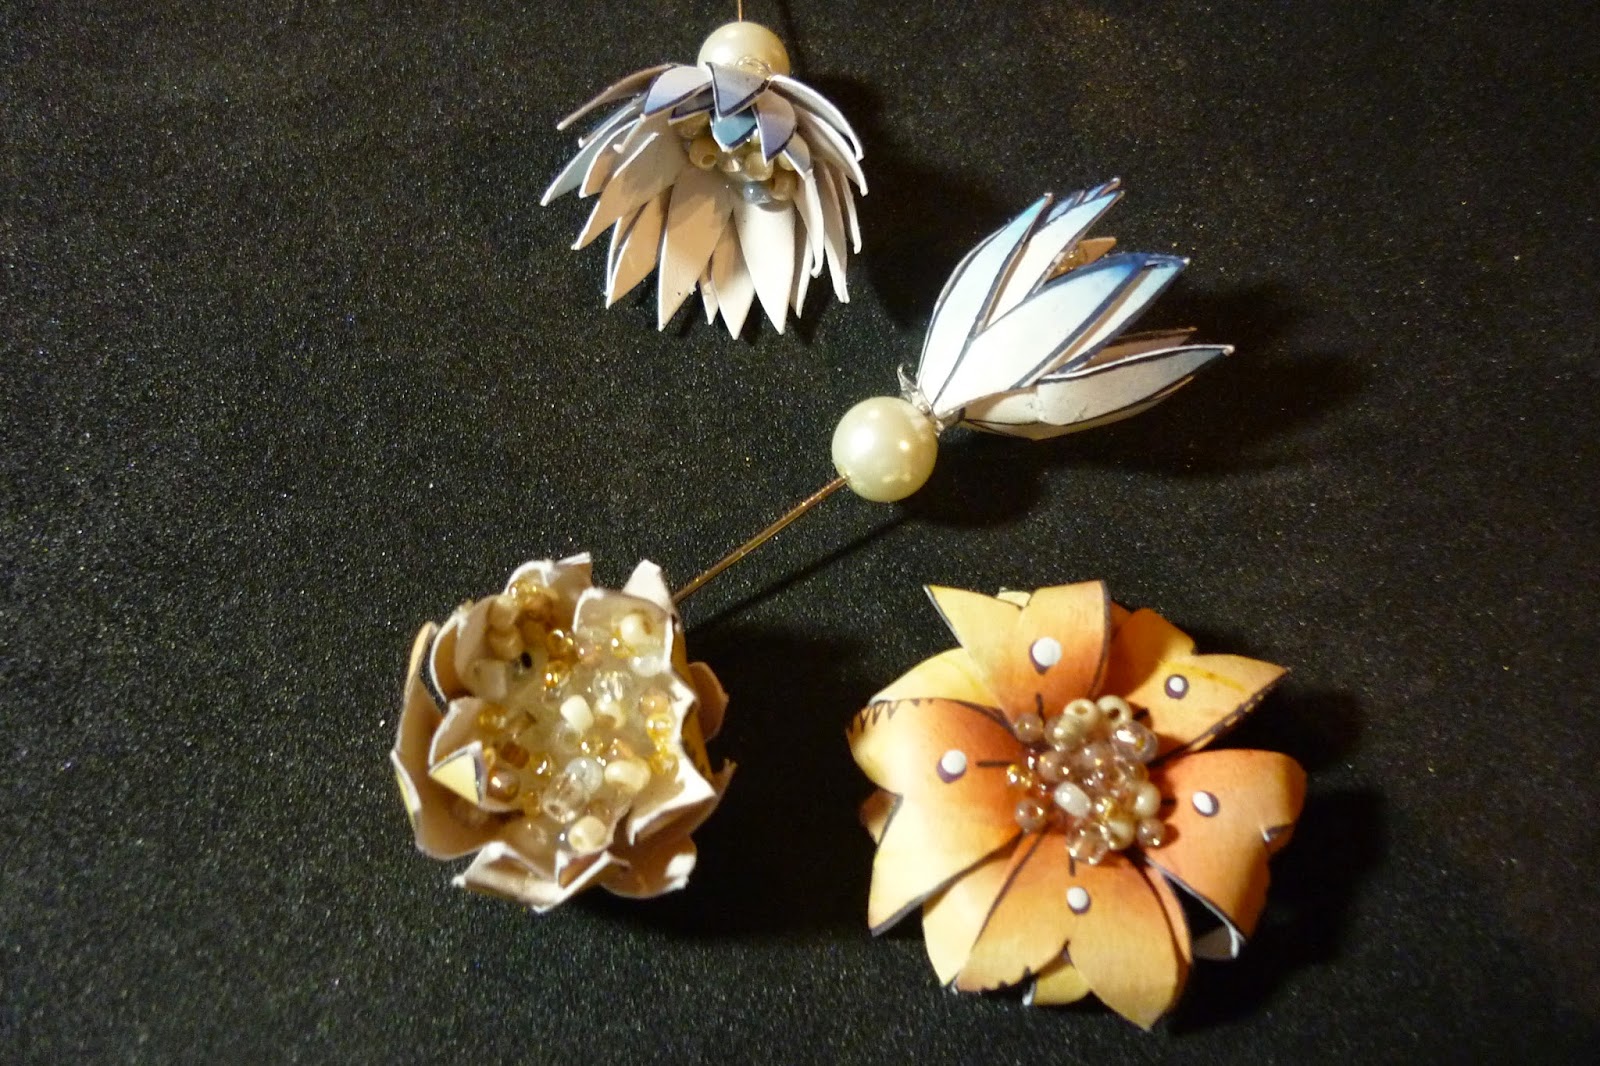
Now I started making the flowers. Firstly I wanted to make Magnolia shaped flowers, so I stamped several of the two larger baubles from EEB01 onto Smoothy White Stamping Card. I cut out the shapes and painted over the design – one side with Honeydew and the other with Nougat. I then washed Pumpkin Soup over the nougat and Autumn Fire towards the base of the baubles. Looking back I think it might have been more interesting to stamp onto card  already painted with honeydew so that the design could have remained and been seen on the inside of the flowers. Too late now! I used a large ball tool to shape the petals and then adhered them to a small wooden bead (also painted with Honeydew). The smaller baubles formed the inner petals and the longer ones formed the outer petals. I stamped some leaves from Squiggly InkFlora and Fauna 5 and painted them to create the base of the flowers. When everything was dry I made the stalks from dried poppy seed stalks but twigs would have done as well.


          EEB01  


The blue flowers were made using ELB15. I stamped them onto card painted with a pale shade of BlueOyster made by mixing it with some Nougat. I washed areas of the flowers withBlue Grass and / or Blueberry and then washed small areas with Autumn Fire.The centers of the flowers were stamped onto the same card using Egg and Nog 4. I washed Autumn Fire in the center and Hey Pesto around the edges before cutting them out. I then cut down the side of on petal and cut out the center of the flowers so that I could curl it up to form a cone shape with the coloured side on the outside (put glue around the center of the flower before curling to stick it together). The flowers put together with two layers of petals with the curled bit in the center.    
                ELB15            


Now for the little spikey flowers which were made in much the same way as the centers of the blue flowers. I stamped the design onto card painted with Nougat and then washesBlue Grass and/or Blueberry around the flower before cutting it out. This time I curled a second layer over the first to get more petals. When the glue was dry I stuck a headpin with a bead on it through the center of the flower and then stuck a pearl onto the pin at the base of the flower. With a little pinflair glue put around the top of the headpin I added some seed beads inside the flower.  


For the orange flowers I used the single bloom from JOFY 26 stamped onto card painted with Nougat. Again I washed Pumpkin Soup around the centers of the flowers and dotted Chalk around the centers for the stamens. I cut out and curled the flowers and made each one using two layers. I added a large blob of pinflair glue in the center of each flower and stuck seed beads onto it. 
                                                                 JOFY26


I then stamped the faces from EEB03/04 and 05 onto card painted with Nougat and coloured them with colours from the palette that I had been using. You can see that the design with the lady who is dreaming doesn’t have the background design showing. Because I had stamped onto a painted background it was easy to paint over  the part I didn’t want to see. I stuck the painted faces into some shaped card and added a frame around one. I raised the pictures inside the niches  by sticking several layers of foam board behind them and then sticking it into the niche.

EEB03

EEB04

        EEB05        


This final photo shows the little extras that I added. I stamped the bee from EEB04 and cut out two layers to give it some dimension. The fan was from my stash and coloured with treasure gold. The central niche holds a dried poppy seed head painted with treasure gold . I added more seeds beads around the base of the seed head. There are several buttons also painted with Treasure Gold.                                                   


Here are two close ups of the finished project after everything was stuck in place.


I hope that you have enjoyed my little adventure into fantasy flowers and I will be back soon with more ideas. 

Liz 

 Liz you have created a beautiful niche using the different collection of stamped images. The attention to detail is wonderful. The application of Grunge Paste and Treasure Gold add beautiful orante texture to this project. We love the 3d dimension the flowers have added. Exquisite! Thank you for sharing your creativity.

We would love you to join in with challenge #7: Niches If you are inspired by any of our guests who blog with us over the fortnight, then please join in and link up your creativity HERE. 


All links go in the draw to win a voucher to spend on products of your choice from the PaperArtsy online store. The Niches link will close 17:00 (London Time) Sunday, April 26th, winner will be announced 2 hours later at 19:00.

Friday, 17 April 2015

2015 #7 Box In A Book {by Lauren Hatwell}

2015 Theme 7: Niches

Hello everybody
My name is Lauren Hatwell, though you might know me as Bluebertie. You are probably wondering what the heck I’m doing here. Guess what? Me too!! I’ve been pinching myself since Clare asked me to help out with some samples for her latest release back in January. So, here I am, a craft addict outed…

One of my favourite things is to re-purpose everyday items to give them extra life and a bit more interest. I was so excited when I saw the theme was NICHES as it lends itself so well to recycling projects. I don’t know about you, but it gives me such a pain when I have to throw a good quality hardback catalogue away at the end of a season and I’m always trying to think of ways to repurpose them. Turns out there are loads of great things you can do with them and this is one…


I trimmed out the pages of my catalogue and used an A4 size box lid to make my shadow box

Now for the fun bit! I coated the whole thing in a layer of torn up paper and gesso, partly for texture and partly to add strength. When dry I used Cosmic Shimmer glue to make swirls and waited for it to dry before breaking out my beloved Fresco paints in my favourite colours, Mermaid and Bora Bora, which I mixed with Liquitex Iridescent Medium to add a subtle lustre. Once dry, I rubbed over the swirls with Gilding Wax in Aquamarine and buffed it with some kitchen towel to bring out the shine.


On to the paper doll. I stamped my image using the girl from stamp plate ECL04 before colouring with Copic markers, sealing with Mod Podge and carefully cutting out.


I cut three identical label shapes with my die cutter and cut an oval aperture in each one (this obviously has to be in exactly the same place so I used the first cut as a template) and layered the three tags with foam tabs to create enough dimension to form a niche. I stuck some clear acetate on the inside of the bottom tag for the heart to sit in so it appears to float in the niche. I painted the top of the dress with Candy Floss Fresco paint and stencilled some polka dots with Snowflake Fresco paint.


I used the dragonflies from SquigglyInk plate 2, Tops and Tails, which is one of my favourite PA stamp sets of all time and one I keep going back to. The sentiment is from the Squiggly Ink range and seemed perfect.

 I coloured my chipboard leaves with guacamole Fresco paint and brushed on a little of the Treasure Gold Spanish Topaz, which is a glorious green/gold colour. The sign post is also coloured with Treasure Gold Spanish Topaz.


I was anxious not to cover up all the texture and swirls in the background so I wanted to keep everything pretty simple. When it came to the front I decided to go with some chipboard letters painted with Candy Floss and Orchid Fresco paints which I swirled together loosely on a glass mat before sponging onto the letters to create a soft ripple effect. Out with the Liquitex again for some added lustre and I just added a few punched flowers throughout the piece to add a feeling of spring as it seems to be well and truly in the air and I can hardly wait for it to get here.


All very simple but once you’ve got the basic box shape you can do whatever you like with it. It will stand up to make a display or it will fold away to go neatly on a shelf. It would make a neat album if you added a fold out book of photographs. You could put a wedding scene in it and give it as a keepsake or gift. You could even add smaller sections to make the shadow box into a print tray. Just have fun with it and add as much or as little as you like. No cash required; just some packaging and a bit of imagination.
Thanks for listening. I hope you’ve found it interesting.
Lauren x

My blog - Marvelous Mechanical Mouse Organ

Thanks Lauren, so lovely to have you here after your debut during launch week. I too hoard more packaging than I will ever be able to use, but I can't bear to throw it away. This is a really cool example of recycling and also of combining different stamp collections so effectively. Mega Brownie points for the fussy cutting of the Dragonfly tails, and we love the shimmery,swirly background texture. ~Darcy

We would love you to join in with challenge #7: Niches If you are inspired by any of our guests who blog with us over the fortnight, then please join in and link up your creativity HERE. 

All links go in the draw to win a voucher to spend on products of your choice from the PaperArtsy online store. The Niches link will close 17:00 (London Time) Sunday, April 26th, winner will be announced 2 hours later at 19:00.