Hi everyone Trish here!. Tonight I'd like to share a post about making houses with you this evening :)
As you might expect, the first thing that came to mind when I thought about a house theme was a 3D creation! As I started working though, it got a little out of hand and ended up just a smidge larger than I had thought! With such a wacky house, I needed some wacky 'people' to live there, and the range of critters and fairies in the Cats Meow stamp range were just perfect for this!
Step One: The base for my house is a selection of MDF cubes, some with apertures. Perfect for my residents to peek out from! These can be stacked up in whatever combination you choose, I went for a 'the taller the better' kind of arrangement!
Step Three: I then did a lot of measuring and cutting up of the masterboards! I added a little Cherry Red smeared paint around the edges of the squares, then stuck them on to the MDF cubes.
Step Four: Some extra stamped details can be added to the cubes at this point, I used the stamping on tissue paper technique to add some flowers along the bottom of the base cube...
Step Six: These were then cut out and placed in random places in (and on!) the house!
I added to the whole '3d-ness' (is that a word?) of the piece by adding a fairy and a bee on a wire, and also the title banner. A few words, and a roof, and the whole thing was done!
I really like creating houses, whether they are bold, bright and a bit wacky like this one, or more sensible! Houses are something that can really grab the imagination, altering techniques and themes to suit just who you may imagine living there! In this case, a bear, an elephant and a couple of fairies... :)
Wow Trish, this is so much fun. Your tower looks such a happy place to live. The background masterboards are delicious, how could they not be with such yummy names, and the pops of red really bring the whole piece to life. The whole thing is the perfect antidote for the grim weather we are having. I think I might need an elephant now!
We would love to see how you interpret this House topic by linking what you make to our 2016 Challenge #11: Our House, on this page HERE.
All of our bloggers love to see your twist on their ideas, particularly if you were inspired directly by their post.
All links go in the draw to win a £50 voucher to spend on products of your choice from the PaperArtsy online store. The Our House link will close 17:00 (London Time) Sunday, June 12th 2016. The winner will be announced 2 hours later at 19:00.
Hi Everyone, Leandra here with some exciting new stamps by Clare Lloyd.
Clare is one busy blogger! She constantly has loads of new ideas popping up on her blog, she is also one of our most efficient designers to deal with! I am convinced she's an octopus with 3 heads or something the amount of work she gets done!
Did you see the announcement online this weekend that she has collaborated with Trish Latimer, Tracy Scott and our own Kim Dellow to make video tutorial called 'creating faces' video under the Craft Stamper umbrella?? How cool, and what a brilliant reference that will be too. Details here. For this release Clare wanted to mix it up a bit, and was craving bigger faces....so that's what she did! Everyone seems to be loving larger format stamping so lets go with that, and it offers up a great opportunity to practise face-colouring too!
Clare has added elements that could be hair and clothing adornments, or perhaps make up part of your background! It amazes me how different these faces can look depending on how you colour them too, you can even change the age of them, make them into spooky witches or old hags if you wish! That flexibility and ability to add personality to them really appeals to me!
Oh and there are stencils too!Elements from the stamps are repeated but not duplicated exactly. A very good idea!
Here's a video introduction and some samples using these new stamps for you to check out!
As ever, we always have some super talented crafters who volunteer to help us work with our newest stamps. I'll hand over now to Clare who will introduce her support crew tonight, and has some of her own work with these new stamps to show you too. Enjoy ~ Leandra
Hi everyone, Clare Lloyd here to share lots of idea with you for my new stamps designed for PaperArtsy.
My new faces are, as Leandra mentioned, much larger and have elements that can be used to make a journal page or mixed-media project. These larger images can be extended into part or whole figures and also can be painted easily using Frescos or your preferred colouring mediums. Of course PaperArtsy have worked hard behind the scenes to ensure all my stamps are available now to buy, check the stockist list at the end of this post. I have had wonderful help tonight with samples, just click on the person's name below to go to their blog, and you will see more details on how they made their samples. Well worth a visit as their work is so varied, and interesting to discover how each piece came about!
Tonight we start with Chris Cresswell. Chris creates fabulous journal pages and mini marvels using wonderful colour combos and as someone who owns every Fresco paint colour....I think you can call her a PaperArtsy Fan!
'Miss Violet' using ECL09 by Chris Cresswell
Chris Says: I love the tilt of this girl's face/head and the fact this allows me to place her anywhere on a page. I love the flexibility of the girls' faces that allows me to use any media to add bodies to the heads. I really love the hair designs on both of the girls. Easy to colour in or add different media.
'Mini Art Flower' using PS023 by Chris Cresswell
Chris says: I love this new stencil. Each element is so useful for backgrounds. When i first saw it I knew I wanted to create some mini art with the flower head. My favourite technique at the moment is to paint over a background, around the focal image. This really makes it pop! The leaves and spotty background are made from the stencil too.
'Patchwork Flower Girl' using ECL10 by Chris Cresswell
Chris says: I love the symmetry of this girl's face. I couldn't wait to add a body to her, which I did here by paper piecing. I'm going to have great fun in my art journal with these girls' faces. I love that little flower accent too.
Next up we have Christine Dark. Chris is a fabulous designer and when I saw what she did with another of my stamps in December's issue of Craft Stamper magazine I just had to ask her to be part of my team! I'm so glad I did!
'Pretty Awesome Postcard' using ECL09 by Christine Dark
Christine says: Another beautiful face and hairstyle to colour and the great thing about these head and neck stamps is that because they’re a larger size they’re going to be great for art journaling and canvases, you can easily add clothing to make a complete figure too.
'Fluffy Blue Jumper Girl' using ECL10 by Christine Dark
Christine says: I love Clare’s whimsical girls, they each seem to have their own character and will suit many occasions, I also love Clare’s open style of drawing which makes them a delight to colour.
'Triple Icon Girl' using ECL09 by Christine Dark
Christine Says: I had such an enjoyable time making my wooden icon triptych as I was able to combine both stamp sets and the new stencil into my scene, you’ve got to love those quirky birds and the always inventive accessory stamps that Clare includes in her sets.
Our third contributor tonight is Trish Latimer . Trish is a designer after my own heart, she loves modern and clean design. She is also a girlie face fan too!
'Flower Power Girl' using ECL09 by Trish Latimer
Trish says: My favourite thing about the face stamps is the hair, I think! This flower power lady has striped hair, with added fine liner doodles for extra detail.
'Tea Cup Tree Birds' using ECL10 by Trish Latimer
Trish says: A nest in a teacup? Such a quirky design needed a quirky project, so I put the nests sitting high above the clouds on stalks!
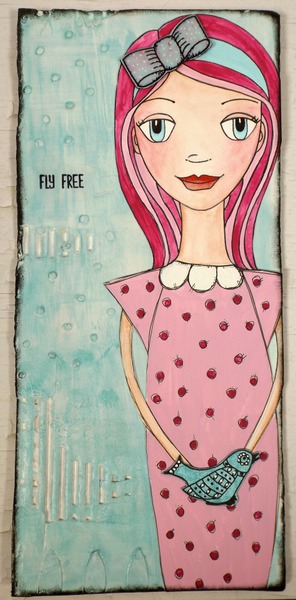
'A Bird In the Hand Girl' using ECL10 by Trish Latimer
Trish says: Scraped Grungepaste through a stencil provided the detail in the background for this project, a bit more of a delicate look for a more delicate face maybe?
Thanks to my wing-men for doing such fun things with these stamps! Don;t forget to go back and see their blogs by clicking on each of their names! So now it's time to show you what I've made with these new stamps. I've got a few step outs so you can see exactly how this all came together.
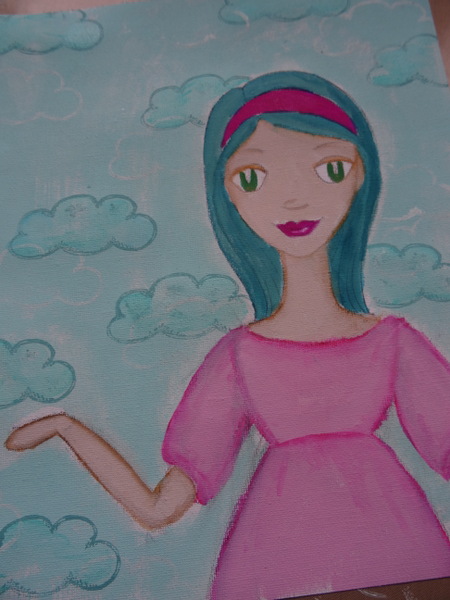
Project One: 'Bird Girl Wall Hanging' using stamp set ECL10 by Clare Lloyd
Firstly I have made a wall hanging. it's hard to appreciate the larger format of this in a photo, but you can appreciate the size more clearly in the video Leandra shot.
Step One: Stamp the face and sketch figure onto sheet of canvas. NB the finer the weave of the fabric, the more detail you will get from the stamp, or you can add layer of gesso or white fresco paint to the canvas to 'fill in' the weave before stamping too if you prefer.
Step Two: Paint figure and background using Mermaid, Candy Floss, Bora Bora and Bougainvillea. Then mask the figure and stamp clouds onto the background using Antarctic and Bora Bora.
Step Three: Add shading using Fibralo Water Soluble Pens, colouring pencils etc. You could also add black to the outlines of the stamped image if you wish too.
Step Four: Time to finish off my fabric wall hanging…embellish the panel using the birds and quote. I added more detail and shading to the figure using water colour pencils; then sewed the canvas onto a quilted fabric panel.
Project Two:'Memory Box Girl' using stamp sets ECL09 by by Clare Lloyd
I've also made a pretty memory box...
Step One: The box was painted with Antarctic and then I stamped all over it using Mermaid.
Step Two: To add some contrast colour I then used new stencil PS023 to add some Candy Floss dots.
Step Three: The girl was stamped onto Smoothy card and coloured using alcohol pens and pencils. The flower, leaves and butterfly embellishments were simple stamped onto painted card, cut and a layered up onto the box.
I am really looking forward to seeing what you do with my new stamps and stencils. Any creations I find on my blog hopping travels or on social media get pinned HERE.
Another amazing post, and a huge round of applause to Clare and her support team. They really came up with some fabulous projects, certainly got my mind ticking!
All tonight's wing-men have detailed step out's explaining how they made their samples on their own blogs, so do drop by and take a look by following the links provided.
These new Eclectica³ Clare Lloyd stamps are available now from your favourite PaperArtsy stockist. As you know, we do urge you to support independent retailers, online and in store by shopping with them regularly.
EDIT: Each night prior to this post publishing, Leandra does a live stream demo via Periscope to show a technique or idea with these new stamps. This time, she shows how to blend paint on a stamped face to add shading and definition with Fresco Chalk Paints. Great tips for you to practise shading.
Below is a list of the retailers who have already got these new releases in stock ready for you to buy, so don't wait, visit them now!
Enjoy and we'll see you here again in 15 minutes for another announcement!!
If you would like to sell PaperArtsy stamps, stencils, or paints in your store, please contact Leandra or Mark: sales@paperartsy.co.uk or call us 0044 1277 212911
Hi everyone, Trish here, joining you this evening with a post about triptychs!
When creating anything at all, 3 always seems to be a magic number. The whole 'rule of thirds' thing, the fact that embellishments always seem look better (to me!) in threes...I could go on! I find a triptych of any kind is just as pleasing to the eye, and I love creating them! My project today was born from a relaxed playing session, simply going with the flow and doing what I love: messing about with paint and background stamping! You may recognise the loose theme I was going along with! I think you will see this better if you click the picture.... long rectangles are always fun to fit into a blog post!
Step One: To create the background on my wooden coasters, I smeared on paint with my fingers. To begin with, the lighter colours in my colour scheme: Snowflake, Zesty Zing and Captain Peacock:
Step Three: I stamped a collaged design randomly on the edges. Not too much, or it overwhelms the main image! I used a variety of circular designs, taken from...
Step Four: I decided to use a hand drawn character as my main image, so sketched her out onto a scrap of card...
Step Five: I wanted to used a paper-pieced bit of card for her dress. The easiest way to do this is to trace the dress first. I used some deli paper, then cut it out.
Step Six: I painted a scrap of card with turquoise paint (a discontinued JOFY colour), then over-stamped in white. The deli paper dress shapes can then be drawn around, cut out and pieced onto the finished figure.
I really love playing about with paint and finding new colour schemes, and the addition of crisp black stamping is always a nice contrast. Don't forget that nice effects can be achieved by not pressing the whole design onto the background when stamping, partial prints with a faded edge can look cool!
I haven't quite decided what to do with my 3 coasters, they are definitely a set, but could just as easily work separately! I may find a shadow box big enough to take all three, and keep them as a triptych. Whether the triptych you create is joined together or separate, it's always fun to have a theme running through all three elements, and I tried to come up with a new twist on an old favourite today! I had great fun in doing so, so thank you so much PaperArtsy for inviting me back for this theme! Take care,
Trish x
www.inkpaintbeads.blogspot.co.uk
What a lot of fun this looks Trish! Love the coaster idea and how you effortlessly have created a cheeky background and put such a fun series of linked collages on top! Thanks for sharing with us! I think you've nailed a couple of recent themes in this triptych too; circles and faces! ~Leandra
We would love you to join in with Challenge #20: Triptychs. If you are inspired by any of our guests who blog with us over the fortnight, then please join in and link up your creativity HERE.
All links go in the draw to win a voucher to spend on products of your choice from the PaperArtsy online store. The Triptychs link will close 17:00 (London Time) Sunday, Nov 8th winner will be announced 2 hours later at 19:00.