Showing posts with label 2015 Topic 17. Show all posts

Tuesday, 22 September 2020

2020 #17 Sliding Through The Day with JOFY {by Jo Firth-Young}

 2020 Topic 17: Day And Night


We've a special introduction to the new topic from Jo Firth-Young (known to many of us as the creator of JOFY stamps). She's created a very clever kinetic card with some fabulously painted acetate. Apparently there was a happy accident involved, (that we'd never have spotted had she not told us) but it really adds to the beautifully designed card.
~ Keren.

Hi everyone!  Jo here - seems like ages since I've been on the blog to share a project with you.  I hope you are all keeping well.

For me the 'night & day' theme was interesting and challenging at the same time - it made me think of light and dark... and then I started to think about how I could make something change from light to dark which is how I settled on the idea of a slider card! This is quite a big card (!) with an enclosed slider panel; it measures approximately 21x21cm, and almost double the width when open.


Here is the card with the 'slider' panel pulled open.


This was a slightly tricky project!  I've made 'slider' cards before but this one needed to be bigger than those I've previously made to accommodate the stamps I've chosen.  I used the lovely new new stems from JOFY97 and an 'old' favourite from JOFY74 and an even older suitable phrase from JOFY26 (I love how this shows how my stamps will all work together regardless how 'old' they are).


But it wasn't the stamps that made it tricky - it was the layers and getting them to work together - and the construction! Making sure elements of the design were hidden/revealed as needed.  Phew - so glad it all came together! I love how it looks;  how the 'day' scene slides out to reveal the 'night' scene.
 

The card is basically 3 layers of card and acetate that work together to hide and reveal images at different stages.  I didn't want the two feature scenes to be exactly the same but the stems stamped and painted on the acetate window needed to work with both so I painted them in colours which complement each background colour.  The images are stamped onto the acetate with StazOn Pigment Ink (black) and painted on the reverse with Fresco Finish (Haystack, Blood Orange, Coral, Snowflake). Painting on the reverse protects the paint from scratches and also helps when painting the details on the image as the line is unaffected... I really like this effect/technique.


The colours used on the 'day' background are Beanstalk, Aqua Duck Egg and Snowflake, and Baltic Blue, Twilight and Aqua Duck Egg are used on the night scene. 


When the project was on my desk being assembled a small amount of paint splashed onto the top left hand corner of the front panel!  NOOOOO!  but sometimes it is those sort of accidents/dramas that can lead to something better... which is why each layer has a book page circle!  I covered the splash with a circle of book paper and added two more circles to the front panel (its my theory that if
 you use 'something' to fix an error you should add several more of the same 'something' because then it looks like a design feature and not a 'fix'). I added one to the centre panel, and then another to the back panel ( the night panel) and on this panel it looks like the moon!!!  I wish I could say I planned it!  But this was a simple 'fix' that worked really well!   and sometimes they are the best aren't they! :o)


The placement of images on the pull-out images had to be planned/placed so they were hidden until the panel is pulled out...(this also reveals the night scene).


There are tutorials on the web for all sorts of variations of this type of card. Take a look and give them a try; they can be tricky but the finished result is worth it!  There are so many ways you can use this technique.
If you are going to stamp onto acetate I encourage you to use a stamping platform. It is much less likely for the stamp to 'slip' on the surface... another reason to add a stamping platform to your crafting kit! 

Take care, stay safe,

Jo

Blog: www.jofy.co.uk
Facebook: www.facebook.com/JoFY.JoFirthYoung & a FB Group called  JoFY Jamboree!!
Twitter: @jofyjo
Instagram: @jofyjo
Pinterest: @jofyjo

I've taught several Facebook Live classes over the last few months and they are still available to purchase and watch.  Details are in my Facebook group.

Monday, 21 September 2015

2015 #17 Brusho Cards {by Catherine Johnson}

2015 Topic 17: Pigment Powders

Hi everyone Catherine Johnson from Inky Fingered Cat  to talk you through this set of cute cards I made using the Brusho crystals. My crafting style varies from day to day, but using Brushos pulled me straight back into clean and simple as using the vibrant colours I felt needed very little else. So I dug straight in and made some cards which allowed the JOFY stamps to shine!


Step One: I decided that the fun flowers in JOFY14 worked well for this style. I stamped them in Black Versafine and then clear heat embossed them. As long as you are quick the powder sticks to the ink. This gives more control than using a black embossing powder with Versamark although the end result is very similar.


JOFY14 


Step Two: Next I used a paintbrush to add water to the areas I wanted to have colour concentrated in. This is where the embossing helps to keep the areas separate. Onto this I sprinkled Gamboge Brusho crystals. The I tapped some of the Brilliant Red onto the craft mat and used the wet paintbrush to add that onto the petals and blend it into the Gamboge.


Step Three: Once the first layer of colour was dry, I sprinkled a little of the Yellow Brusho over the flower head and did a light spray of water to activate the colour and give the image a looser finish. I also used a tiny amount of Leaf Green and the paintbrush to add some colour to the stems. I finished off the panels with a black pen outline to create a faux layer, then mounted it onto the cardblank.


Step Four: The next card I gave more of a blast of water with the Turquoise, Yellow and Leaf Green Brushos sprinkled where I wanted the colour to land. This is definitely a hit and miss type of technique as there is little control over the final effect. But I love these loose watery blooms.


Step Five: For all the cards I made, I added the same image onto the envelope. I used Distress Inks to stamp the image in coordinating colours and then used some very water Brusho to colour the images with a paintbrush.


I am pleased with how these worked, but I have to say that a lot of the creating with Brushos crystals is by chance when looking for the splash of colour finish.  I have tried lots of ways of working with the Brushos, and the unpredictability is the joy of working with them.  Playing and experimenting is the joy!


Catherine


The embossed stamping adds lovely texture to the water coloured pigments Catherine, great clean and simple layout. Thanks for sharing your creativity with us ~ Gillian

We would love you to join in with challenge #17: Pigment Powders If you are inspired by any of our guests who blog with us over the fortnight, then please join in and link up your creativity HERE

All links go in the draw to win a voucher to spend on products of your choice from the PaperArtsy online store. The Circles link will close 17:00 (London Time) Sunday, Sept 27th winner will be announced 2 hours later at 19:00.

Sunday, 20 September 2015

2015 #17 Walk On The Moors {by Darcy Wilkinson PA. Signature Designer}

 2015 Topic 17: Pigment Powders

Hi everyone, Darcy here.  This is such a great topic, I have had my Brushos for more years than I can remember and it is wonderful to see them becoming popular again. I first used Brushos with textiles, so that is what I have gone back to today. I live around 20 minutes from the beautiful North Yorkshire Moors, and these are my inspiration for this project. All those yummy blues, greens and purples of fields and heather take my breath away. 


Top Tip: Put some damp paper towels or kitchen roll down on your desk, under and around your working space. These powders will travel, no matter how careful you are. They will fall and be held in place by the damp towels, making your clean up much easier. 

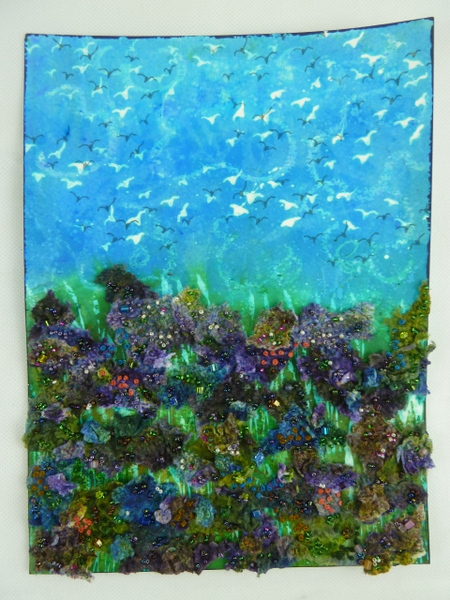
I began with a piece of 12" x 9" watercolour paper. I washed this with Turquoise at the top and Lime Green at the bottom. I then covered this with scrunched cling film and left it to dry. 


The next technique is to apply masking fluid, droplets at the top and lines at the bottom. Once this was dry I washed over the page with Cobalt Blue and Leaf Green. Again it is left to dry and then the masking fluid can be rubbed off. 


My next layer involves making patterns with a candle, then adding another wash of colour. once dry the page can be heated and the candle wax wiped away. 


The above three techniques are masking techniques, each prevents the ink reaching certain parts of the page. this next one is a removal technique. I used household bleach and stamps from EDY09 and EDY10 to add the birds and grasses.

Dip the stamp into some bleach and tap off, then take to the page and press down, the stamp needs to be held in place a few seconds longer than usual. When you lift off the stamp you will see that the image is bleached out.

Clean your stamp immediately to remove leftover bleach and work in a well ventilated area. 


EDY09
Once the bleach was dry on the page, I over-stamped the birds using Watering Can Archival ink.


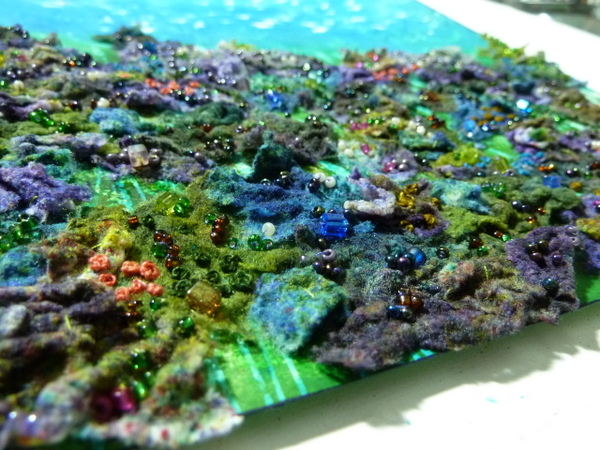
Now to create the heather of the moorlands. I dropped Brusho crystals directly onto damp babywipes, and then heated them with a heat gun. this not only dries the babywipe and ink but also causes the wipe to shrink and curl, creating great texture.


I ripped the pieces up and layered them onto the page. I secured them with just a little glue. 


I coloured some thread with Brushos and gathered lots of different sized beads.


Next came an evening of beading and adding French knots with the coloured thread. I stitched right through the babywipe fabric and the watercolour paper. making sure each piece was secured.


I love how it looks now, the bright blue open sky, the colours of the heather, and the beads acting as small moorland flowers.


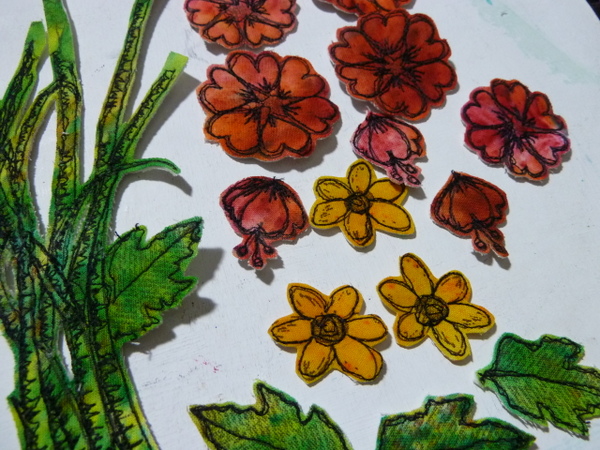
I spritzed some white cotton fabric with water and then dropped on some more Brusho crystals. Once dry I stamped up the stems and leaves and flowers from EDY10

EDY10

I layered this fabric with thick vilene and then a backing fabric and outlined each piece with free machine embroidery. Then these were all cut out. I also did a few small flowers from HP1009.


Finally I coloured some smoothy card with Brushos  in Cobalt Blue, Ultramarine and Purple. I stamped the butterfly from HP1301, then cut this out.


I gave it 2 coats of Satin Glaze and attached it to the page using matte gel. The stems, leaves and flowers were stitched in place with more beads added to the centres. 


I had such fun making this, it really took me back to my textiles and embroidery days. We are so lucky to be able to mix together so many interesting mediums. I hope it gave you some ideas.

Remember that Brushos are not permanent, only use them on fabrics that will not be laundered.

Darcy. x


I will be demoing and doing make and takes at Stampers Grove in Edinburgh on Sat 3rd October. and teaching an all day workshop there on Sun 4th October. There are still places available on both days. Ring them to secure a place. 

We would love you to join in with challenge #17: Pigment Powders If you are inspired by any of our guests who blog with us over the fortnight, then please join in and link up your creativity HERE

All links go in the draw to win a voucher to spend on products of your choice from the PaperArtsy online store. The Pigment Powders link will close 17:00 (London Time) Sunday, Sept 27th winner will be announced 2 hours later at 19:00.

Wednesday, 16 September 2015

2015 #17 Spooktacular Tags {by Helen Chilton}

 2015 Topic 17: Pigment Powders

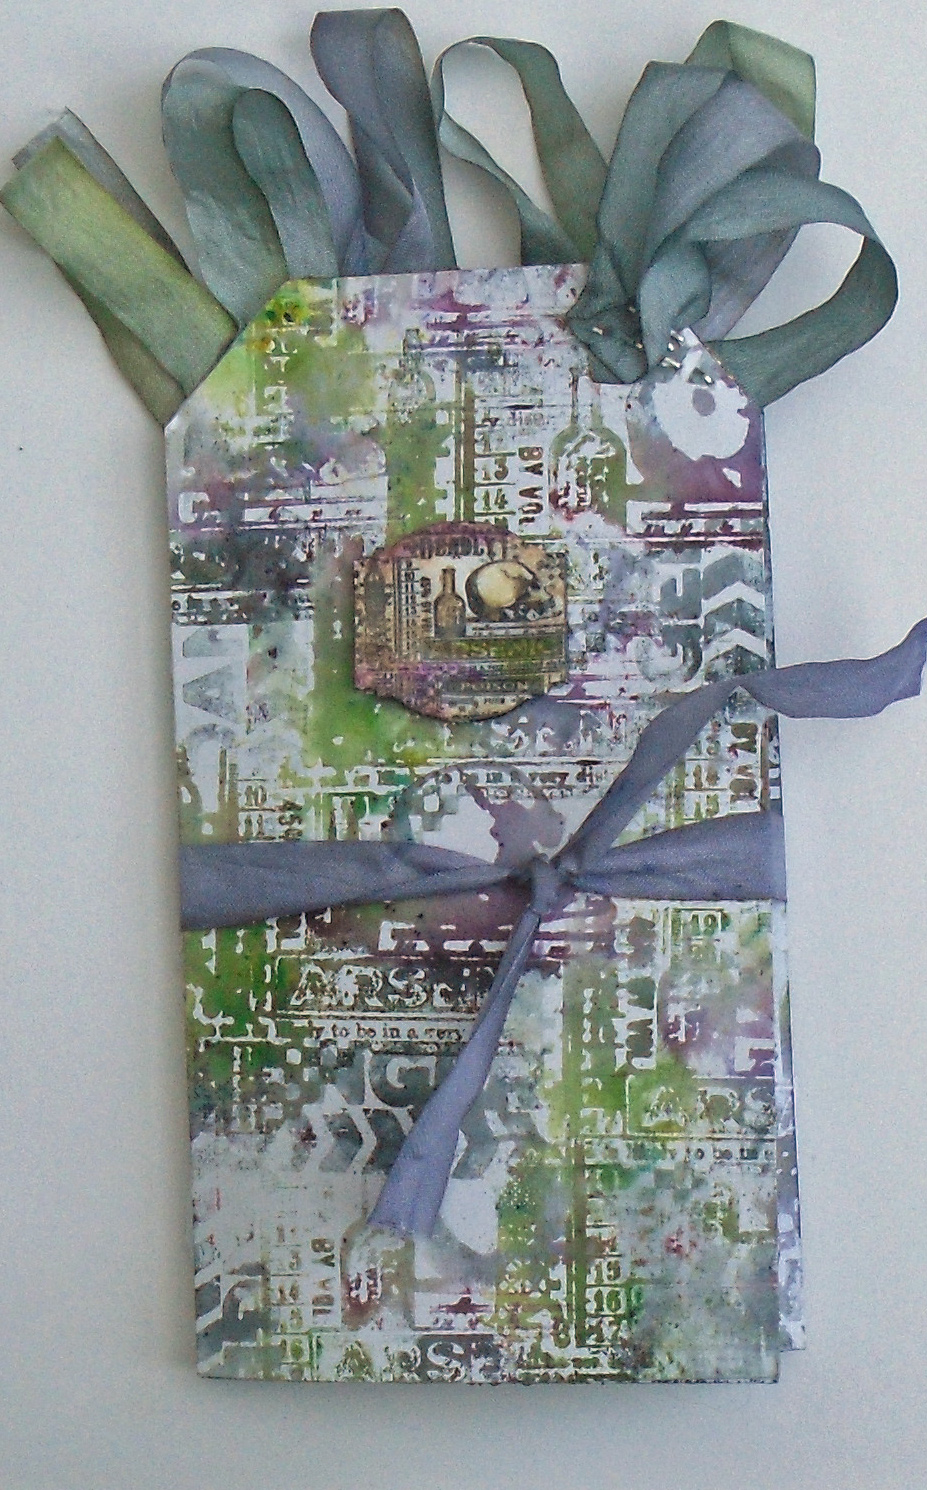
Hi everyone Helen here, joining you this evening with a post about Brushos, those little pots of magic watercolour crystals. There's loads of techniques you can do with these, but tonight I've chosen to look at how to stamp with them and use them dry. I've made a tag book with flaps to showcase the new Hallowe'en stamps HPHW05EZ.


Step One: Select your colours (I've used Purple, Grey and Lime Green) and rub them dry onto a tag, keeping the colours in separate blocks.


Step 2: Spritz your stamp with water using a mini mister and stamp onto tag. The water activates the Brusho crystals. Stamp off onto a spare tag for a lighter image:


Step 3: Ink up stamp with VersaMark, sprinkle Brushos directly onto stamp and rub in:


Step 4: Spritz again with water and stamp two or three times onto tag:


Step 5: prep stamp as for Steps 3 and 4, but this time spray water directly onto the tag not the stamp using a larger spray bottle, then stamp into it. The effect is much more watercoloury:


Step 6: This shows the different types of stamping so you can compare. From left to right: 
  • dry rub on, spritz stamp and stamp
  • VersaMark, rub Brushos onto stamp, spritz and stamp
  • stamping off onto spare tag
  • wetting tag, VersaMark on stamp, rub  Brushos onto stamp and stamp

Step 7: Finally, if you want a bit more definition for your image, outline some of the areas in a black watercolour pen and stamp over the top:


To finish: I've made some cut out flaps using a Framelits die (the shape always reminded me of a tombstone, so seemed appropriate somehow!):


and then hinged it all together and used extra tags to back it. The ribbon is seam binding that I've coloured with the Brushos. Here's the front:


and a couple of close ups:


So there's a lot you can do using the Brushos to stamp with - you get lovely watercolour effects but also a surprising amount of detail. You also get very messy hands, but it does come off (well,eventually!)


Ohhh lovely fun was had here Helen! thanks again for another brilliant post! I love all those ideas using them with your stamps, some fantastic tips and ideas that have certainly never occurred to me, I love how you conjure up all kinds of possibilities!! You are such a wonder! ~Leandra

We would love you to join in with challenge #17: Pigment Powders If you are inspired by any of our guests who blog with us over the fortnight, then please join in and link up your creativity HERE

All links go in the draw to win a voucher to spend on products of your choice from the PaperArtsy online store. The Circles link will close 17:00 (London Time) Sunday, Sept 27th winner will be announced 2 hours later at 19:00.