Showing posts with label Brushos. Show all posts

Wednesday, 23 September 2015

2015 #17 Stamped and Collaged Art {by Pam Thorburn}

 2015 Topic 17: Pigment Powders

Hi everyone, It's Pam Thorburn here, joining you this evening with a post about Brushos. Brushos are so much fun to play with. What I really love about them is the surprise element. These little puffs of powdered pigment can be used in all sorts of ways, and sometimes have a mind of their own. That's what make them fun!

Tonight I have two art projects to show you. The first is the project I had originally conceived, and the second came about because I had lots of Brusho experiments that I felt I should do something with.


The inspiration for my first  project came from the gorgeous Poppy stamp set HP1505 ...


...which lends itself to commemorating those soldiers who fought for their country.

Step One: To create the background I sponged some card stock with some Fresco paint in Stone and Nougat, then used a spot stencil with Toffee Fresco paint. Then I used the seed pod and script stamps from HP1505 and stamped them with Chocolate Pudding paint. Finally I knocked back the colour a bit by sponging some diluted Nougat paint over the whole page.


Step Two: Now for the Brusho. I was after a water colour effect here. I spritzed some water onto the stamp and sprinkled some red Brusho onto the flower and some light green onto the stalks and leaves, and spread it around the stamp with a paintbrush before stamping. I actually stamped the flower part 3 times, overlapping slightly each time as I didn't want a crisp flower image. One of the great things about this stamp is that it is easy to bend the stem as it adheres to the acrylic stamp block. That's why one poppy has a straight stem and one has a curved stem.


Step Three: I over stamped the  image using Stazon ink, then sponged some Toffee paint around the edge of the piece. The 'REMEMBER' stamp is stamped onto Crunchy waxed paper and the soldier image from the HP1505 is stamped onto tissue paper. The frame is made from a die cut oval which I embossed in a script embossing folder, then painted with Chocolate Pudding fresco paint and highlighted the script embossing with Spanish Topaz treasure gold.


So that's my Remembrance piece. I hope it's a fitting memorial to this young ANZAC soldier. 

As a result of playing around with Brushos while coming up with the above piece I ended up with lots of different backgrounds, so I decided to put them to good use and create a collage:


First I'll show you how I did the background, then I'll talk about the some of the techniques used for the collaged frame pieces.

Step one: I mixed three colours of Brusho powder with water making three little puddles of Lemon, Yellow and Light Green on my palette. Then I used a brush to paint blobs of the colours, overlapping and dripping the colours as I went.


Step two: I mixed some Emerald Brusho powder and water into a small spray bottle and spritzed it through a Stencil Girl leaf stencil.


Step three: The collaged frame pieces were made from a cutting up a number of my experiments including spritzing card stock with water, then shaking on Brusho powder, and also doing the opposite, ie. dropping on powder, then spritzing with water. 

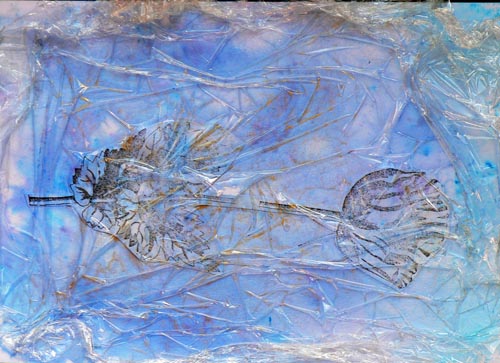
A third technique is this one below. First saturate card stock or glossy paper with water, then sprinkle the Brusho powder into the water. Move the colour around with scrunched up cling film and leave the cling film in place while the card stock dries-overnight is best. (The piece below is one of my rejected experiments).

Step One: Create and assemble the focal image. First the jug. The jug is using the cling film method from above. Draw a jug on the back of the card and cut out. Cut around the front rim of the jug and adhere the small back section, then the flower stems, then adhere the from large part of the jug over the flower stems.


Step Two: The flowers: I found it easier to stamp the flower heads and the stems separately, and reassemble them into the vase later. The flowers were done by first stamping with a mixture of China  and Blue Glass Fresco paint onto  smooth white card. When the paint was dry I went in with some Ultramarine Brusho and filled in the white spaces. The stems were stamped with Tinned Peas.


At this stage the collage looked a bit flat:


Step Three: Finishing details. Using London Bus paint, I stamped the red poppy onto tissue paper and adhered it to the jug. I outlined the jug with a fine black marker and put some in shadows around the jug and flowers using a black watercolour pencil. I added some white highlights and some dark centres to the poppies using acrylic marker pens, and used the same pens to add some dots to the frame.


I really enjoyed using this stamp set and playing with Brushos. I think I have succeeded in making two pieces of art that are quite different in feel even though they both use Brushos and the same stamp set. If you've never used Brushos before I really do urge you to have a go. They are not expensive, as a little goes a long way, and there are so many different techniques for using them. They are just pain fun!!

Thanks for looking.

Pam

Ohhhhh Pam, what a fabulous use of brushos. You have used them in such a controlled fashion, they look wonderful, and I LOVE your Anzac card!.Thanks Pam for showing 2 very different ideas!!

We would love you to join in with challenge #17: Brushos. If you are inspired by any of our guests who have blogged on this topic over the fortnight, then please join in and link up your creativity HERE.

All links go in the draw to win a voucher to spend on products of your choice from the PaperArtsy online store. This link will close 19:00 (London Time) Jan 17th 2015.

Monday, 21 September 2015

2015 #17 Brusho Cards {by Catherine Johnson}

2015 Topic 17: Pigment Powders

Hi everyone Catherine Johnson from Inky Fingered Cat  to talk you through this set of cute cards I made using the Brusho crystals. My crafting style varies from day to day, but using Brushos pulled me straight back into clean and simple as using the vibrant colours I felt needed very little else. So I dug straight in and made some cards which allowed the JOFY stamps to shine!


Step One: I decided that the fun flowers in JOFY14 worked well for this style. I stamped them in Black Versafine and then clear heat embossed them. As long as you are quick the powder sticks to the ink. This gives more control than using a black embossing powder with Versamark although the end result is very similar.


JOFY14 


Step Two: Next I used a paintbrush to add water to the areas I wanted to have colour concentrated in. This is where the embossing helps to keep the areas separate. Onto this I sprinkled Gamboge Brusho crystals. The I tapped some of the Brilliant Red onto the craft mat and used the wet paintbrush to add that onto the petals and blend it into the Gamboge.


Step Three: Once the first layer of colour was dry, I sprinkled a little of the Yellow Brusho over the flower head and did a light spray of water to activate the colour and give the image a looser finish. I also used a tiny amount of Leaf Green and the paintbrush to add some colour to the stems. I finished off the panels with a black pen outline to create a faux layer, then mounted it onto the cardblank.


Step Four: The next card I gave more of a blast of water with the Turquoise, Yellow and Leaf Green Brushos sprinkled where I wanted the colour to land. This is definitely a hit and miss type of technique as there is little control over the final effect. But I love these loose watery blooms.


Step Five: For all the cards I made, I added the same image onto the envelope. I used Distress Inks to stamp the image in coordinating colours and then used some very water Brusho to colour the images with a paintbrush.


I am pleased with how these worked, but I have to say that a lot of the creating with Brushos crystals is by chance when looking for the splash of colour finish.  I have tried lots of ways of working with the Brushos, and the unpredictability is the joy of working with them.  Playing and experimenting is the joy!


Catherine


The embossed stamping adds lovely texture to the water coloured pigments Catherine, great clean and simple layout. Thanks for sharing your creativity with us ~ Gillian

We would love you to join in with challenge #17: Pigment Powders If you are inspired by any of our guests who blog with us over the fortnight, then please join in and link up your creativity HERE

All links go in the draw to win a voucher to spend on products of your choice from the PaperArtsy online store. The Circles link will close 17:00 (London Time) Sunday, Sept 27th winner will be announced 2 hours later at 19:00.

Sunday, 20 September 2015

2015 #17 Walk On The Moors {by Darcy Wilkinson PA. Signature Designer}

 2015 Topic 17: Pigment Powders

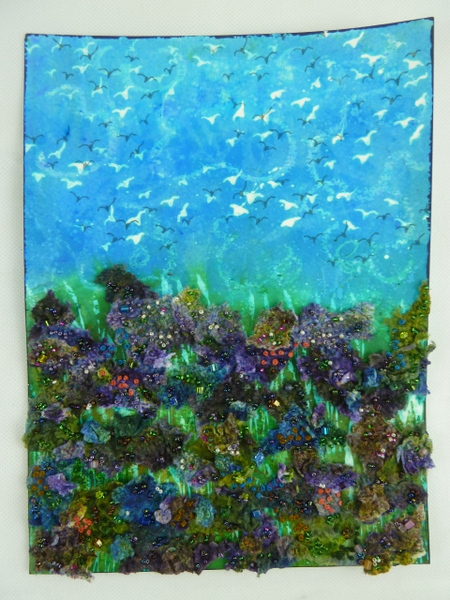
Hi everyone, Darcy here.  This is such a great topic, I have had my Brushos for more years than I can remember and it is wonderful to see them becoming popular again. I first used Brushos with textiles, so that is what I have gone back to today. I live around 20 minutes from the beautiful North Yorkshire Moors, and these are my inspiration for this project. All those yummy blues, greens and purples of fields and heather take my breath away. 


Top Tip: Put some damp paper towels or kitchen roll down on your desk, under and around your working space. These powders will travel, no matter how careful you are. They will fall and be held in place by the damp towels, making your clean up much easier. 

I began with a piece of 12" x 9" watercolour paper. I washed this with Turquoise at the top and Lime Green at the bottom. I then covered this with scrunched cling film and left it to dry. 


The next technique is to apply masking fluid, droplets at the top and lines at the bottom. Once this was dry I washed over the page with Cobalt Blue and Leaf Green. Again it is left to dry and then the masking fluid can be rubbed off. 


My next layer involves making patterns with a candle, then adding another wash of colour. once dry the page can be heated and the candle wax wiped away. 


The above three techniques are masking techniques, each prevents the ink reaching certain parts of the page. this next one is a removal technique. I used household bleach and stamps from EDY09 and EDY10 to add the birds and grasses.

Dip the stamp into some bleach and tap off, then take to the page and press down, the stamp needs to be held in place a few seconds longer than usual. When you lift off the stamp you will see that the image is bleached out.

Clean your stamp immediately to remove leftover bleach and work in a well ventilated area. 


EDY09
Once the bleach was dry on the page, I over-stamped the birds using Watering Can Archival ink.


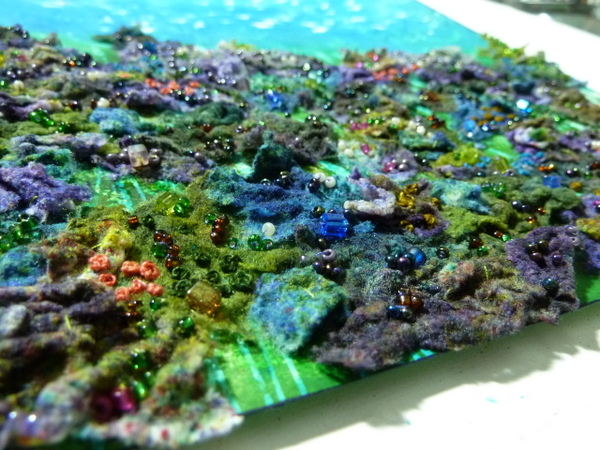
Now to create the heather of the moorlands. I dropped Brusho crystals directly onto damp babywipes, and then heated them with a heat gun. this not only dries the babywipe and ink but also causes the wipe to shrink and curl, creating great texture.


I ripped the pieces up and layered them onto the page. I secured them with just a little glue. 


I coloured some thread with Brushos and gathered lots of different sized beads.


Next came an evening of beading and adding French knots with the coloured thread. I stitched right through the babywipe fabric and the watercolour paper. making sure each piece was secured.


I love how it looks now, the bright blue open sky, the colours of the heather, and the beads acting as small moorland flowers.


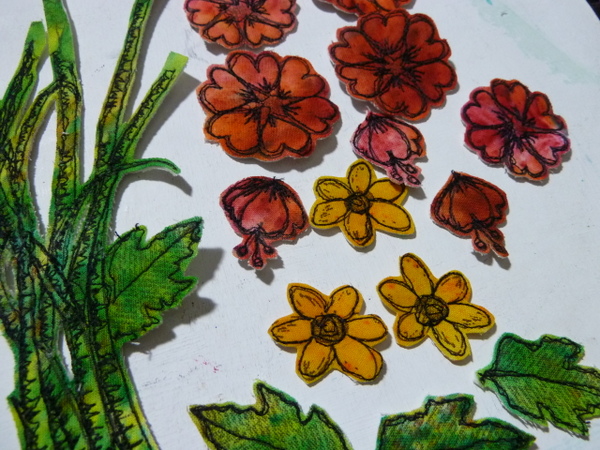
I spritzed some white cotton fabric with water and then dropped on some more Brusho crystals. Once dry I stamped up the stems and leaves and flowers from EDY10

EDY10

I layered this fabric with thick vilene and then a backing fabric and outlined each piece with free machine embroidery. Then these were all cut out. I also did a few small flowers from HP1009.


Finally I coloured some smoothy card with Brushos  in Cobalt Blue, Ultramarine and Purple. I stamped the butterfly from HP1301, then cut this out.


I gave it 2 coats of Satin Glaze and attached it to the page using matte gel. The stems, leaves and flowers were stitched in place with more beads added to the centres. 


I had such fun making this, it really took me back to my textiles and embroidery days. We are so lucky to be able to mix together so many interesting mediums. I hope it gave you some ideas.

Remember that Brushos are not permanent, only use them on fabrics that will not be laundered.

Darcy. x


I will be demoing and doing make and takes at Stampers Grove in Edinburgh on Sat 3rd October. and teaching an all day workshop there on Sun 4th October. There are still places available on both days. Ring them to secure a place. 

We would love you to join in with challenge #17: Pigment Powders If you are inspired by any of our guests who blog with us over the fortnight, then please join in and link up your creativity HERE

All links go in the draw to win a voucher to spend on products of your choice from the PaperArtsy online store. The Pigment Powders link will close 17:00 (London Time) Sunday, Sept 27th winner will be announced 2 hours later at 19:00.

Wednesday, 16 September 2015

2015 #17 Spooktacular Tags {by Helen Chilton}

 2015 Topic 17: Pigment Powders

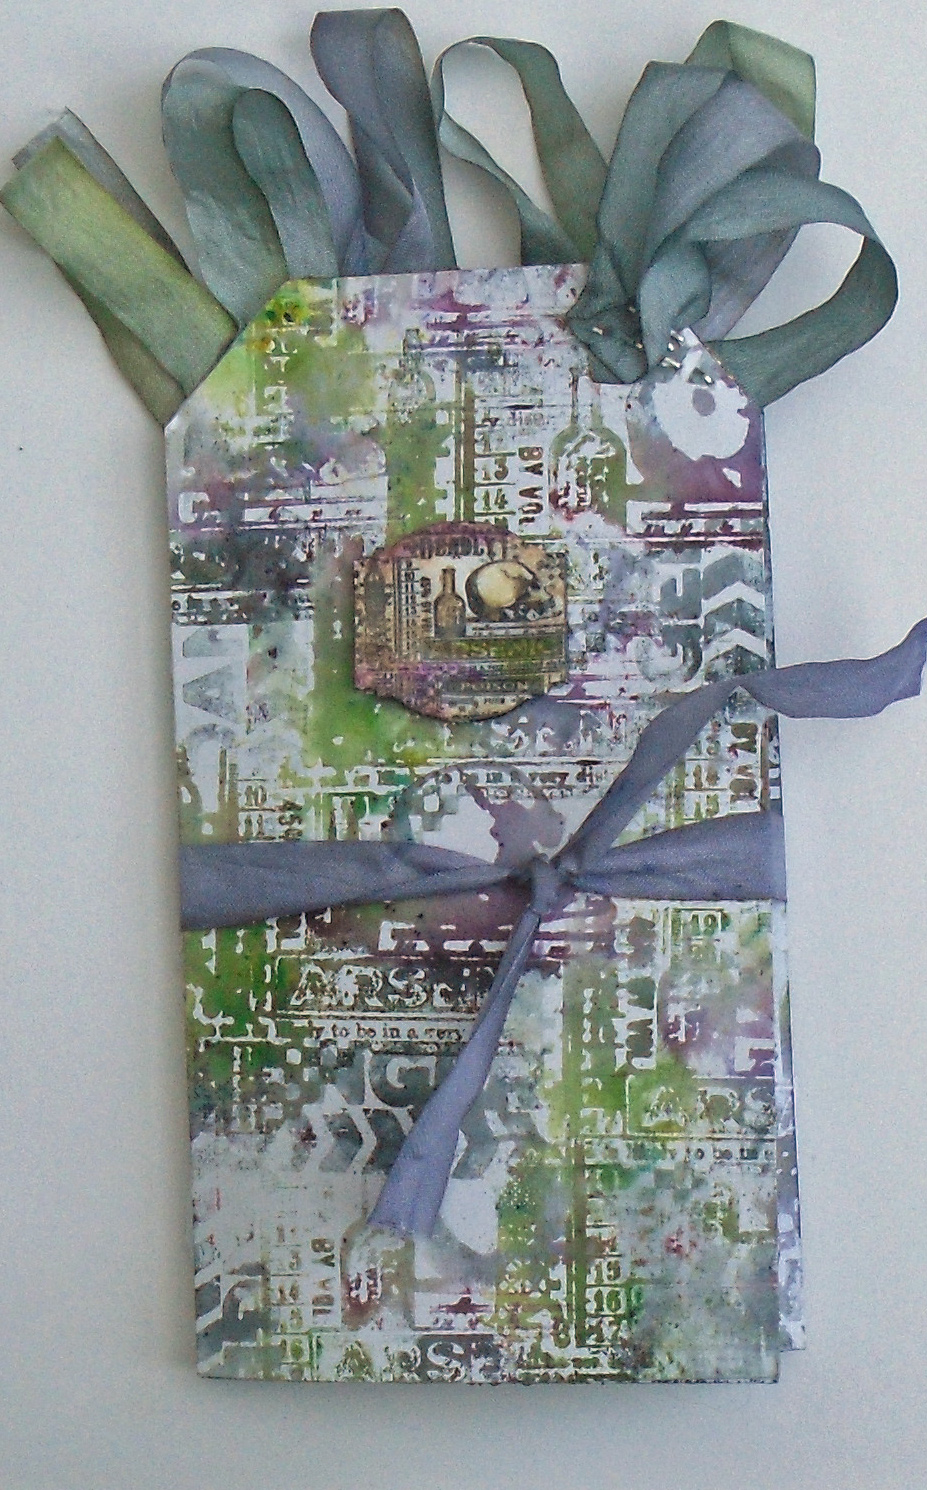
Hi everyone Helen here, joining you this evening with a post about Brushos, those little pots of magic watercolour crystals. There's loads of techniques you can do with these, but tonight I've chosen to look at how to stamp with them and use them dry. I've made a tag book with flaps to showcase the new Hallowe'en stamps HPHW05EZ.


Step One: Select your colours (I've used Purple, Grey and Lime Green) and rub them dry onto a tag, keeping the colours in separate blocks.


Step 2: Spritz your stamp with water using a mini mister and stamp onto tag. The water activates the Brusho crystals. Stamp off onto a spare tag for a lighter image:


Step 3: Ink up stamp with VersaMark, sprinkle Brushos directly onto stamp and rub in:


Step 4: Spritz again with water and stamp two or three times onto tag:


Step 5: prep stamp as for Steps 3 and 4, but this time spray water directly onto the tag not the stamp using a larger spray bottle, then stamp into it. The effect is much more watercoloury:


Step 6: This shows the different types of stamping so you can compare. From left to right: 
  • dry rub on, spritz stamp and stamp
  • VersaMark, rub Brushos onto stamp, spritz and stamp
  • stamping off onto spare tag
  • wetting tag, VersaMark on stamp, rub  Brushos onto stamp and stamp

Step 7: Finally, if you want a bit more definition for your image, outline some of the areas in a black watercolour pen and stamp over the top:


To finish: I've made some cut out flaps using a Framelits die (the shape always reminded me of a tombstone, so seemed appropriate somehow!):


and then hinged it all together and used extra tags to back it. The ribbon is seam binding that I've coloured with the Brushos. Here's the front:


and a couple of close ups:


So there's a lot you can do using the Brushos to stamp with - you get lovely watercolour effects but also a surprising amount of detail. You also get very messy hands, but it does come off (well,eventually!)


Ohhh lovely fun was had here Helen! thanks again for another brilliant post! I love all those ideas using them with your stamps, some fantastic tips and ideas that have certainly never occurred to me, I love how you conjure up all kinds of possibilities!! You are such a wonder! ~Leandra

We would love you to join in with challenge #17: Pigment Powders If you are inspired by any of our guests who blog with us over the fortnight, then please join in and link up your creativity HERE

All links go in the draw to win a voucher to spend on products of your choice from the PaperArtsy online store. The Circles link will close 17:00 (London Time) Sunday, Sept 27th winner will be announced 2 hours later at 19:00.