Showing posts with label 2015 Topic 16. Show all posts

Sunday, 24 January 2016

2016 #2: Romantic Hearts Wall Hanging {by Liz Borer}

 2016 Topic 2: Hearts
2016 Topic 2: Hearts

Hi there, Elizabeth here again. Today the topic is 'Hearts ' and I have unashamedly created a very pretty , romantic Wall hanging because there is a particular date in early February that will be with us all too soon.
 

The base of the Wall hanging is made from heavy card or thin MDF painted with white Gesso. The background is made from white fabric. I cut the fabric larger than the base and allowed a little extra to use later. I made the fabric quite wet and then sprinkled Brusho colours over the fabric (I used Gamboge, Violet, Crimson and Scarlett). I coloured the fabric this way because I wanted the colours to spread and blend together. This created some interesting colours especially when the gamboge and violet mixed.  


Once the fabric was dry I ironed it and then stencilled all over it using various stencils. I covered the whole fabric using Nougat paint. Where the different stencils came close I dabbed paint onto the fabric to fill in the gaps. When finished I had a patterned piece of fabric with the bright base colours showing through the stencilling .  


I then took another piece of white fabric and coloured it the same way but used less of the violet Brusho (because it's a very deep colour). This piece of fabric was much pinker than the first. When it was partially dry I screwed it up to create creases and dried it with the creases in place. Once dry I used the firm side of a piece of cut and dry foam to carefully rub Chalk paint over the fabric to colour the creases. Again I ironed the fabric once the paint was dry. 

 
I cut three hearts from cardboard to use as backings for the fabric and cut the fabric slightly larger than the card so that it could be wrapped around the card. The fabric was then stamped with a script stamp from HP1216 and then flowers from HP1009. I used Archival Inks Jet Black and Plum, alternating the colours on the different hearts. To make the hearts puffy I stuck wadding onto the card bases before sticking the fabric over the hearts and folding it around the back of the card .  

HP1216

 HP1009


Once the hearts were complete I felt that they would not stand out from the background as the colours were too similar. So I mixed a little violet Brusho with some Matte Glaze and rubbed it around the edges of the hearts. I mixed some of the gamboge with Matte medium and painted this over the flowers to add interest.    


The first piece of fabric was adhered to the base, folding and sticking it around the edges. I then stamped the butterflies from HP1506 randomly onto the fabric using plum and jet black Ink. Finally I stamped flowers from EEB06 over the fabric using plum ink .   

HP1506

EEB06


The quote was stamped onto fabric painted with Nougat. The frame was stencilled with texture paste to create some interest. Once dry I painted it with violet Brusho mixed with Matte Glaze. I then rubbed White Fire Treasure Gold over the frame, around the edges of the base and around the edges of the hearts .   


I finished the hanging by sticking lace across the base and then sticking the hearts in place. I rubbed some Royal Amethyst Treasure Gold onto four little hearts and then attached beads and pearls onto the hearts with Glossy Accents glue. I also stuck similar beads to the main hearts. Some of the flowers on the hanging were made from left over coloured fabric die cut with a spiral flower die. These had to be stitched to create the flowers. The hanger at the top of the piece was made from coloured jewellery wire wrapped with lace. The little hearts were hung from the base using the same wire. Finally I stuck on the framed quote and the flowers .


I never know exactly how one of my projects will look until they are finished, but I enjoyed creating this and exploring fabric painting. I hope this project inspires you to try some of these ideas. I'll be back again soon with another project.


Such a wonderful detailed and intricate background to this wall hanging Liz, the colour pigments from the Brusho Powders are beautiful. Love how the fabric hearts have been created and how they add dimension to the center piece. Thanks again for sharing your creativity with us. ~Gillian


We would love to see how you interpret this Hearts  topic by linking what you make to our 2016 Challenge #2: Hearts, on this page HERE.

All of our bloggers love to see your twist on their ideas,  particularly if you were inspired directly by their post. 

All links go in the draw to win a £50 voucher to spend on products of your choice from the PaperArtsy online store. The 'Hearts' link will close 17:00 (London Time) Sunday, February 7th. The winner will be announced 2 hours later at 19:00.

NB this link is open for 3 weeks instead of 2 - all will become clear why on Jan 31st!

Saturday, 5 September 2015

2015 #16 Round One. {by Seth Apter}

Topic 16: Circles

Hi PaperArtsy people! Seth Apter here and I am back on the blog today with a project all about circles. I was so excited that this topic is being highlighted as circles are one of my most favorite shapes to use in art. In fact, I decided to do more than simply add circles to my project but rather actually make it a circle. 


I started with a sheet of 90lb watercolor paper that I painted loosely with PaperArtsy Fresco Finish Acrylic Paints in Space Cadet, Hyde Park, Claret and Yellow Submarine. Thinking outside the (square) box, I decided at this point to cut my paper into the form of a circle with a 10 inch diameter.


Using the script stamp from the Hot Picks rubber stamp set HP1304, I added a bit of additional design and dimension to the background. I chose the script stamp as its curvy nature reminded me of circular fragments. And speaking of script, I followed this with the addition of an expression that I thought was perfect for a circle project: What Goes Around Comes Around. This was completed using black rub-on letters outlined with a white gel pen.

HP1304,

At this point in the project, the fun really began. I started with rubber stamps and added several circular designs using several stamps from PaperArtsy Hot Picks rubber stamp set HPXT01 and my own line of rubber stamps from Impression Obsession. Then I used markers and pencils to add detailed surface design. The finishing touch was some light paint splatter using PaperAtsy Fresco Finish Acrylic Paints in both Inky Pool and Vanilla

HPXT01


Until my time on the PaperArtsy blog comes around again...happy creating! 
Seth
Come take a class with Seth HERE , 13th,14th,15th November. There are still spaces available so book your place. 

Thanks Seth. I just love this background, watching it build up in layers. The background is such an important part, get that right and the rest seems to happen naturally. Your backgrounds are always superb, great colour combinations and stamp choices. ~Darcy

Did you know that you can play along with us on the PaperArtsy blog to share and explore with us how you interpret the current theme. The current topic is Circles, and if you are inspired by any of our contributors on the blog this fortnight, then please join in and link up your creativity HERE.

All links go in the draw to win a voucher to spend on products of your choice from the PaperArtsy online store. The Circles challenge link will close 17:00 (London Time) Sunday, Sept 6th, and the winner will be announced 2 hours later at 19:00.

Friday, 4 September 2015

2015 #16 Stencilled Circles {by Ruth Mescall}

Topic 16: Circles


Hi everyone, Ruth here from a love to create joining you this evening with a post about ‘ever decreasing circles’ using lovely fresco paints and grunge paste. To me the possibilities of using circles in art are endless and I was partly inspired by a couple of quilt designs I’d seen that used circles and lines of stitching. I wanted the finished piece to have texture and dimension so chose grunge paste which is a lovely stone colour to start with. I decided to stick to a neutral colour palette with a touch of treasure gold to create my piece of wall art! 


Step One: Firstly I coated a piece of grey board with gesso. Once dry I created a brayered background using Fresco Chalk Acrylic Paint in Snowflake, Chalk, Nougat and Stone. Then some stamping in paint and antique linen distress ink with Eclectica (Ellen Vargo) Collection (EEV06) and (EEV02). I also masked off 3 thin vertical lines which I stencilled with snowflake paint

EEV02
EEV06

Step Two: I die cut several decreasing (or increasing!) sizes of circles out of acetate. I would use these to stencil paint through and also create my focal points of Grunge Paste stamped circles. After spreading a layer of paste through the acetate I left it in place whilst I stamped the image, this gave a crisper outline. I used images from Eclectica (Lin Brown) Collection (ELB15) and (ELB16) and moistened the stamp first.

ELB15

ELB16

Step Three: Using the same paints plus Taupe I built circles up on the board. I stencilled the large circle first and then positioned the 3 grunge paste circles. The rest of the circles in varying sizes and colours filled in the gaps. Tiny circles and grunge paste motifs were made using PaperArtsy Stencils by Lin Brown (PS001) (PS002) and (PS005).


Step Four: The tiny grunge paste circles had a layer of taupe underneath and then the grunge paste layer was bumped to give some shading. It’s starting to come together now.
.

Step 5: The final step is to use Treasure Gold in Florentine to highlight all the texture. I rubbed my finger over the areas rather than a brush. As you can see treasure gold picks up every single bit of texture from the grunge paste.


My favourite elements are the almost fossil like impressions from Lin’s stamps and when you add treasure gold…yummy! I also love the idea of masking an area off to create a defined shape for grunge paste before stamping into it, why not try squares or ovals instead, or stencilled paint circles in vibrant colours? Hope you’ll be inspired to join in with the challenge, there’s still time to explore the possibilities of circles.

Ruth x

Twitter @argeum1

This is stunning Ruth, so delicate and beautiful. Those Grunge Paste circles remind me of Sand Dollars. The crisp outlines really define the shapes and provide excellent contrast between all the neutral shades. Thanks for joining us this evening ~Darcy

Did you know that you can play along with us on the PaperArtsy blog to share and explore with us how you interpret the current theme. The current topic is Circles, and if you are inspired by any of our contributors on the blog this fortnight, then please join in and link up your creativity HERE.

All links go in the draw to win a voucher to spend on products of your choice from the PaperArtsy online store. The Circles challenge link will close 17:00 (London Time) Sunday, Sept 6th, and the winner will be announced 2 hours later at 19:00.

Wednesday, 2 September 2015

2015 #16 Secret Garden {by Alison Hall}

Topic 16: Circles

Hi everyone Alison/Craftytrog here, joining you this evening with a card, which features a background made with the 4" Round Gelli Plate. This Gelli Plate is my favourite, I'm just mad about using circles in my art right now, and it makes fabulous layered backgrounds, especially when you use bubble wrap! I also used one of my fave new Hotpicks, HP1504, you can guess that this is a favourite of mine, with all those circles, not to mention that brilliant face with the birds on branches hair!


Step One: To make the background for my card, I used the 4" Round Gelli Plate like a stamp, so I first placed it onto a 6x6" stamp block. I chose 2 green Fresco Paints, Limelight & Hey Pesto, and 2 blues, Beach Hut & South Pacific. For each print of the Gelli Plate, I used a brayer to apply a small dot of paint onto the plate, pressed a piece of bubble wrap into it, then stamped it onto a sheet of White Smoothy Card.


Step Two: I used each paint colour individually, overlapping the prints, and stamping all over the card, until my background looked like this. For my card background, I cut a piece approximately 5.5" square.


Step Three: Next, I used black archival ink to stamp some collage flower shapes from HPXT02, onto white tissue. I also used black stazon ink to stamp 3 of the face collage from HP1504, onto shrink plastic. I used a pre-sanded piece of shrink plastic, as this makes it easier to stamp onto, but you could use a sanding block to sand a clear piece yourself.


Step Four: When the ink was completely dry, I cut out the faces from the shrink plastic, then painted them on the stamped sides thinly with South Pacific, Hey Pesto and Snowflake Fresco, before shrinking them with a heat gun. This way the clear un-sanded side of the faces will be the fronts.


Step Five: I used black archival ink to stamp the birds & branches border from HP1005, onto white tissue (3 times), tore it out, and used multi medium matte to adhere it along the bottom of my background. I stamped just the stem part of the dandelion from HP1005 three times for my flower stems. I also stamped the circle border from HP1504 around the edges. I cut out 3 medium and 3 small tissue flower collages, crumpled them up, and layered them with the shrink plastic heads. On a spare piece of background, I stamped the book plate from HP1504 & the quote from HP1005, then cut it out, and inked the edges with black archival.


Step Six: I used glossy accents to adhere the flowers, and black brads to attach the bookplate quote. Covering up the flowers and quote, I flicked watered down Little Black Dress Fresco Paint, using a round paintbrush. I decided the flowers needed something extra, so I stamped the face collage from HP1504 onto white smoothy card 3 times, cut out the eyes, and used glossy accents to adhere them to the faces. 

I finished my card by mounting my artwork onto black card, then attaching it to a 7x7" white card blank.


Those flowers made me so happy, especially after I added the eyes! Lol! In hindsight, I would have added less black paint splatters, I do tend to get carried away sometimes! Anyway, I hope I've inspired you to dig out that round Gelli Plate if you have one, and make some colourful backgrounds. It's addictive! The translucent Fresco paints work really well for this technique, as you can make other colours when they overlap.

Have a  creative day!

Alison x

Blog: Craftytrog's Inky Adventures
Facebook: Alison Hall
Twitter: @craftytrog

OMG Alison. this had me laughing so much..love those heads in the flowers!! And the gelli BG is fabulous with those great layers of colour and printing like that looks so much fun! Thanks for making my day! ~Leandra

Did you know that you can play along with us on the PaperArtsy blog to share and explore with us how you interpret the current theme. The current topic is Circles, and if you are inspired by any of our contributors on the blog this fortnight, then please join in and link up your creativity HERE.

All links go in the draw to win a voucher to spend on products of your choice from the PaperArtsy online store. The Circles challenge link will close 17:00 (London Time) Sunday, Sept 6th, and the winner will be announced 2 hours later at 19:00.

Monday, 31 August 2015

2015 #16 3D Circles {by Trish Latimer}

 2015 Topic 16: Circles

Hi everyone! Trish here, joining you this evening with a post about circles! 

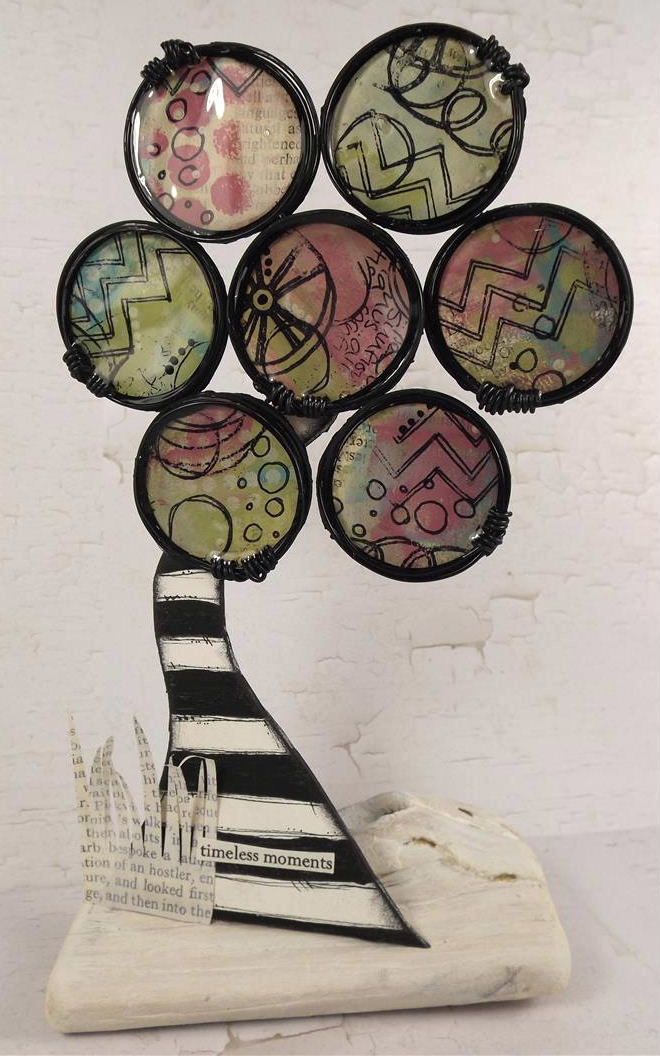
Circles are such a design classic, from polka dots to big, scribbly, free flowing impressions, I'm sure we all use a circle of some sort each time we create. I know my art doesn't look finished until I've added a few dots here and there! With this project though, I decided to go 3D (no surprises there!), and create some circular wire embellishments. I make lots of these, they make wonderful jewellery (just glue on a brooch back or ring blank to the underside), or they can be used individually as a focal point in your art, maybe framing something you wish to 'pop' from your work. I thought I would make a few at once, then join them together to create an assemblage.


Step One: First of all, the wire circle needs to be created. Any craft wire will work, although I like use wire at least 1cm in diameter, as it makes the circle more robust. Wrap the wire around a tube shaped object. I do this at least 4 times.


Step Two: Carefully slide the wire circle from your tube, then wrap the free ends around the circle to secure.


Step Three: For the background, it is important that you use a thin paper. You'll see why soon! I've used an old book page, and smeared on paint to colour it. I've used Guacamole, Smurf, Orchid and Snowflake. A little stencilling through sequin waste helps too!


Step Four: Once the paint is dry, the stamping can start! There are so many background designs on all PaperArtsy plates, you'll be spolied for choice. I've used stamps from EEG07, ECL04 , and JOFY09.


Step Five: Now your masterboard is complete, you can decide which bits you want to use! I find it easier to roughly cut the masterboard up, rather than attach the circles onto the whole sheet. The circles are then glued down, using Glossy Accents. This is why thin paper is needed, it is much more flexible and can be shaped to circles that are not completely flat.


Step Six: Once the Glossy Accents is dry, and you are sure you have made a complete seal around the circle, the circle frame can be filled with more Glossy Accents. You'll soon know if you left a gap... you will see leaks!


Step Seven: The Glossy Accents will dry to give a glassy, shiny finish. Nice and sturdy! The circles can then be trimmed down to remove the last bits of paper. Then they are ready to use!


I joined seven circles together by hot gluing wire across the back where the circles touched. This then created the flower shape.


A stripy trunk, and a bit of white washed driftwood later, the tree was finished! 

These circles are great used singly, and also look fabulous in large numbers on a canvas, great abstract wall art! It's fun to see how many different sized 'tubes' you can find around the house, so you can create wire circles in lots of sizes!
Thank you for having me on the blog again, I really look forward to my GDT stints here!

Trish xxxxx
www.inkpaintbeads.blogspot.co.uk


Trish this is such an awesome 3d project ...the stamped wire circle embellishments create a real focal piece clustered together, always love the bold black and white colours you incorporate into your artwork. Thanks for sharing your creativity.

Did you know that you can play along with us on the PaperArtsy blog to share and explorewith us how you interpret the current theme. The current topic is Circles, and if you are inspired by any of our contributors on the blog this fortnight, then please join in and link up your creativity HERE.

All links go in the draw to win a voucher to spend on products of your choice from the PaperArtsy online store. The Circles challenge link will close 17:00 (London Time) Sunday, Sept 6th, and the winner will be announced 2 hours later at 19:00.

Sunday, 30 August 2015

2015 #16 Circle Crazy {by Emma Godfrey}

Topic 16: Circles

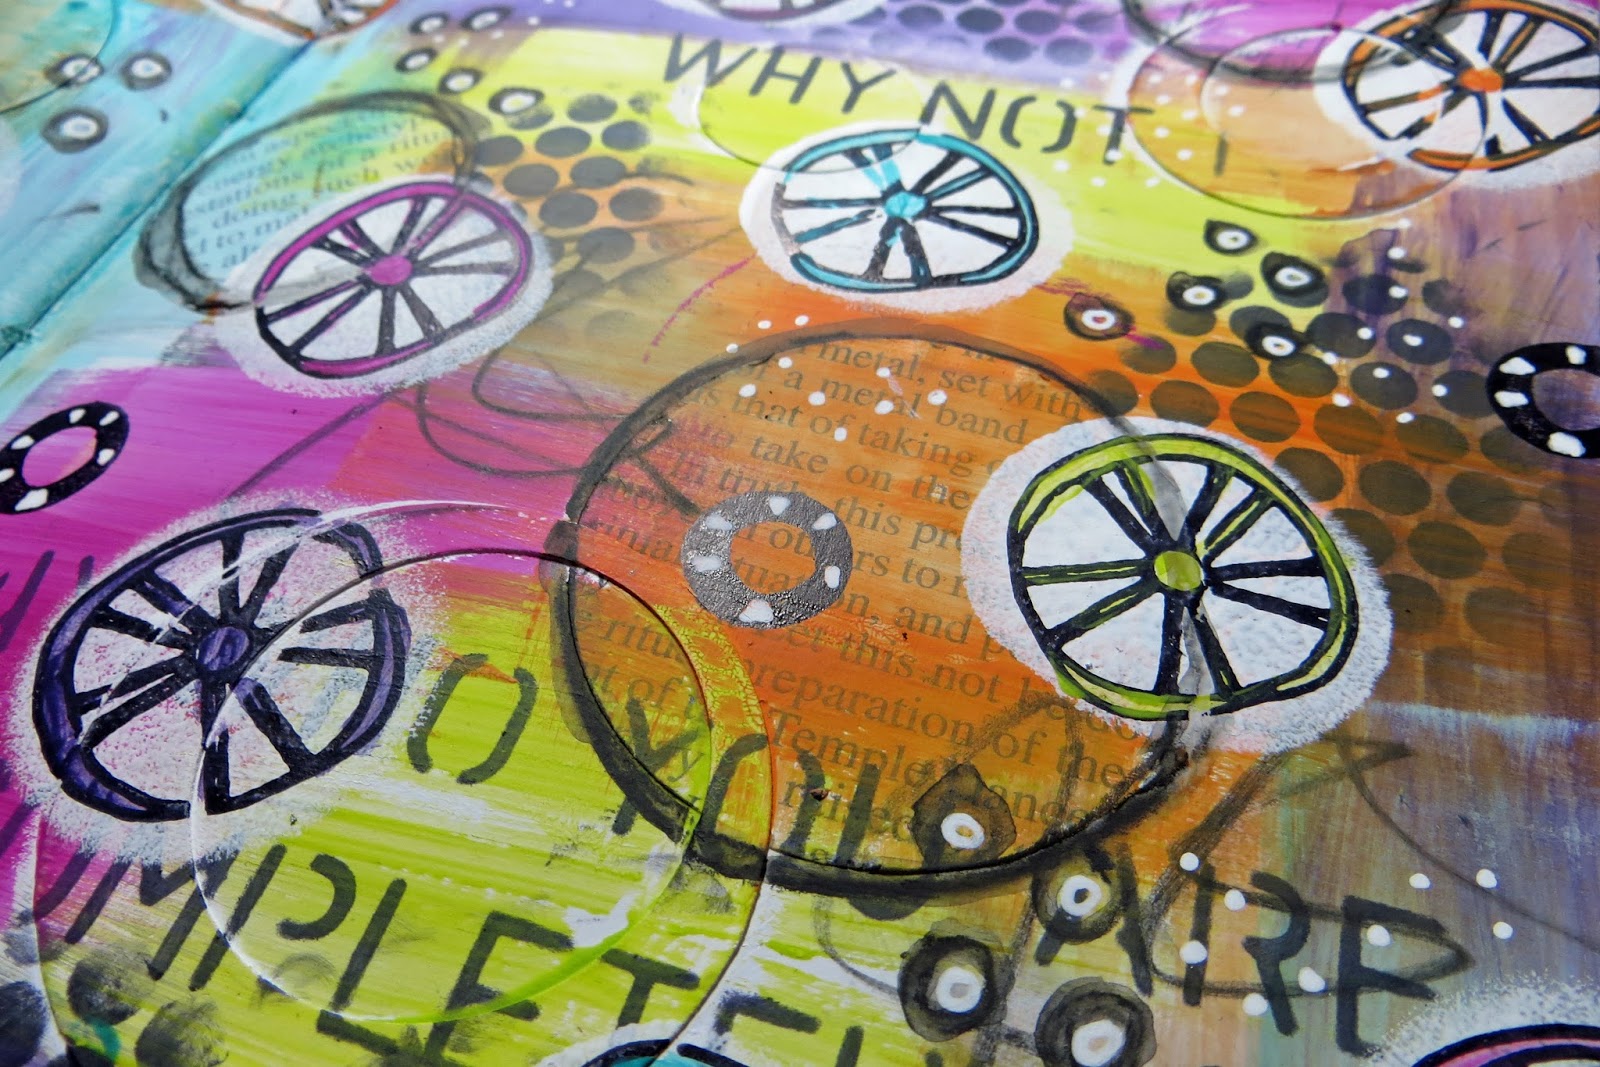
Hi everyone, Emma here, joining you this evening with a post about Circles.  I obviously wanted to use my circle stamps for this project, but I also wanted to add lots of texture to create a "touchy-feely" journal page too.  There are a lot of circles on this page ... hence the title!


Step One: I punched different size circles and hoops from some text paper and Smoothy, and stuck these down. I then went over the whole page with a thin layer of Fresco Finish Snowflake, and when that was dry I added some scribbles with a charcoal pencil.


Step Two: I stenciled with Jet Black Archival Ink through some sequin waste and a text stencil. I mixed my Fresco paint colours: Beach Hut, Limelight, Eggplant, Tango and Bouganvillea (from the Lin Brown Ltd Edition Set 3) with some medium (I used Ranger's Dina Wakely Soft Gel Matte Medium, but you could use Golden Matte Medium, Fluid Matte Medium, or Polymer Medium if you prefer, or any soft or loose matte gel). 


Topic 15 had inspired me to try mediums mixed into paint, and I loved the way the paints became even more fluid and translucent to work with but also retained their brightness, and they don't dry out quite so fast, and are more blendable into each other too. I painted the colours all over the page using vertical and horizontal strokes.

Step Three: Using a round sponge I applied Fresco Finish Snowflake all over the page to use as backgrounds for one of my circle stamps EEG07...


...the larger wheel type one.  I stamped it and the small stripy circle using Jet Black Archival Ink.


Step Four: I coloured in the wheel stamped images with the Fresco Finish paints and a very fine paintbrush. The stripy circle stamp was highlighted with an Extra Fine White Sharpie Paint Pen. I drew tiny circles and around the text paper circles with a black water soluble pencil, and then went over the lines with a wet paint brush. I added white circles and dots with the Sharpie pen. I also added some white splodges with the Fresco Finish Snowflake using just my finger, and when dry highlighted these with tiny dots using a black pen.


Step Five: I liked the page, but thought it was a little bright, so I applied a thin layer of Fresco Finish Snowflake with a palette knife - this added another texture too. When that was dry I realised I'd covered up all my water soluble pencil around the text circles, so I added some more.   Next I stuck down my quote, and lastly I decided it needed just one more texture - and I stenciled some Dreamweaver Translucent Embossing Paste through Stencil PS001. It doesn't photograph particularly well, but it really catches the light in real life.


Here's a close up of the finished page ...


I had so much fun creating this page. I didn't start with a plan, so I just let it flow, and I also got to try some new things for the first time! I {love} the texture that the first layer of punched circles gives to the page, even if it means the stamps won't stamp perfectly on top (I can be a little OCD ... but I'm getting better at just letting things like that go). Their raised edges are obvious even at the end.  That and the translucent embossing just make me want to stroke the page!

Thanks for looking - I'd love to see what you make if this project has inspired you.   You can find me on my blog, facebook and twitter.

Ohhh Emma this is delicious. I love how you manage to get such a variety of bright colours, and use the white to soften. Your circle stamps look stunning!! Thank you! ~ Leandra

Did you know that you can play along with us on the PaperArtsy blog to share and explore with us how you interpret the current theme. The current topic is Circles, and if you are inspired by any of our contributors on the blog this fortnight, then please join in and link up your creativity HERE.

All links go in the draw to win a voucher to spend on products of your choice from the PaperArtsy online store. The Circles challenge link will close 17:00 (London Time) Sunday, Sept 6th, and the winner will be announced 2 hours later at 19:00.