
2018 Topic 20: Foiling

Another blogger with a load of fabulous foiling ideas for you to test yourselves! Dounia's foiling with her embossing machine is fascinating! And true to form, that is just one of her many ideas!! ~ Leandra
Hi everyone, it's Dounia with
you today, and I'd like to share with you a few ideas on how to foil
whole backgrounds, from subtle patterns to blind-you-bling blocks!
I
love foil, just a few accents give dimension and drama to a project! I
am always looking for new ways to mix them with my other supplies and to
use every last bit of those sheets... Let's experiment and make our own
foiled patterned papers!
I used some of my results in a little project entitled "Wish upon a star", more on that at the end of the post...
I used some of my results in a little project entitled "Wish upon a star", more on that at the end of the post...

I most often use foil with stamps and bonding power. I love the results but the sheets become more and more sparse, white still retaining quite a lot of that shiny goodness. To "finish" already well loved sheets, I use them to create fully foiled backgrounds on the backside of stickers (big promotional ones I got for free, hehe). I begin with the most empty sheet I can find and burnish it well on the sticker, the clear layer comes out completely clean, so satisfying! I then build texture by using slightly fuller ones that will stick to the spaces left by the previous layers. I love the resulting multicolor, speckled effect, making a very shiny but not flat surface. Here is a selection (the shine is not easy to photograph!):


Of course these backgrounds are VERY shiny, which is not always easy to incorporate in a project. You can obviously cut them to create accent elements. I also find them to be particularly effective in jewellery, as they are so eye-catching! If you want to keep the whole piece together, here are a few ideas to balance the brightness. You can cover part of the foil with a layer of matte medium for a nice shine contrast. You can stencil on it with Fresco Acrylics paints, playing both with colour and glossiness. In the following samples, I transferred printed images using Matte Glaze (on the left) and Satin Glaze (on the right). I also experimented with a transparent Crackle paste. Apparently the paste bonds with the foil before it retracts so the crackles actually shows the white background!

Now there are lots of media you can use with foil (stamps, stencils, tape, rub-ons...) and I thought, why not embossing folders? I have quite a few of these already and I love their patterns! So I embossed a few scrap inked backgrounds then brayered foiling (or gilding) mixtion onto the raised areas. Mixtion is a liquid that dry sticky, mine is by Pebeo but lot of brands have it under different names. Applying the foil was not easy because of the relief so I sent paper and foil together through my die cutting machine to flatten everything and assure maximum contact. I find the results quite striking:

I also used "pre-loved" foil sheets the create texture and colour effects. It is particularly visible in patterns with large areas.

I wanted to make something of these samples to show their impact in a project. I relied on Lin Brown's designs to help me there, as I thought simple but highly graphic images would be best against these busy backgrounds. I particularly love this plate, ELB29, with the beautiful leaves and funky texture elements.

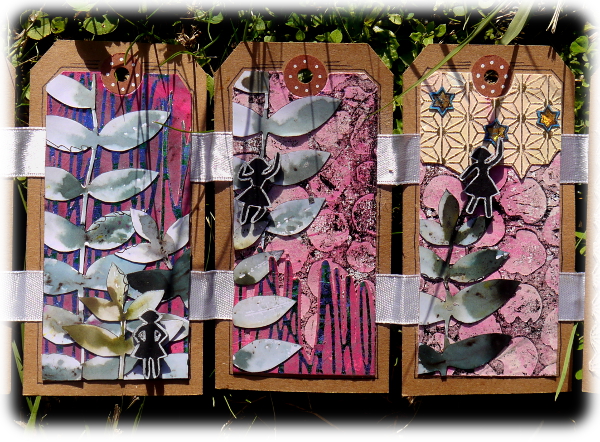


The full foil pieces were here used in tiny elements to make them pop out of the page. By luck a shard of the holographic foil landed right in the middle of the book, giving it a lovely depth.

This
techniques are a win-win: they allow you to use every scrap of foil
while creating lovely new textures. I find them very satisfying and a
bit addictive (I tend to have a pile of shiny backgrounds after a
session...) Their uses are only limited by your imagination so give them
a try and have fun!
To join our challenge and win a PaperArtsy £50 gift voucher:
Simply make
something arty relevant to the topic, and link your creation from any
social URL (eg. Instagram, Pinterest, Blog Post etc) sharing your
original make to this challenge page.
The current topic link Topic 20: Foiling will close 17:00 (London Time) Sunday, 25th November 2018, and the winner will be announced 2 hours later at 19:00.
Please make sure we can contact you as a prize winner - it helps if you share your contact info from the platform you opt to use.
Good Luck! If you have any questions, don't hesitate to ask!


6 comments:
This is wonderful Dounia. What a great idea! I love your finished project.
Wow! Stunning makes from you amazing experiments with foil. Lx
Wow! Your tags are especially wonderful!
Such an interesting post and so creative. Fun idea to use up all the foil left on the sheets. Great creations and wonderful inspiration, thank you x.
Gorgeous use of foils.. how did you do those pictures that reflect and look as if the background gets turned so we can actually see the glimmer?
Absolutely lovely!
Lucy x
Post a Comment