Showing posts with label Foil techniques. Show all posts

Tuesday, 5 April 2022

2022 Topic 06: Mainly Stencils {by Autumn Clark} with Lin Brown Stamps


Hi everyone, it's Autumn Clark from SewPaperPaint with you today, and I'm here to share with you a simple stenciled art plaque created with very few products and very simple methods, in hopes to inspire those of you who are just beginning with mixed media and want to extend a bit beyond card making. 


I chose to omit my gel printing plate for this project and focus on basic painting and stencilling techniques, because so many times I hear stampers say they cannot find a rhythm with their printing and they are discouraged in mixed media. Here on the PaperArtsy blog we hope to inspire every level of crafter and offer a wide variety of techniques. I hope you will see that simple techniques can lead to beautiful and detailed projects and be inspired to try these yourselves.


I envisioned a jagged edged layered plaque, so I decided to work with watercolor papers and tore them down to size using a ruler. For my base layer I wanted to make a nice earthy background. I used a stencil sponge and applied Fresco Chalk Acrylics in Toad Hall and Chocolate Pudding to my water misted panel. The mist helped avoid harsh lines in the paint.  Next I sponged through PaperArtsy Stencil by Lin Brown (PS006) with more Chocolate Pudding. What a beautiful stencil!


I developed this project with a very simple color palette in mind, so those of you with a limited stash can see just how far a few colors of paint can go. PaperArtsy Fresco Chalk Acrylics in Toad Hall and Chocolate Pudding are a match made in heaven and the addition of Caramel really adds life and bright contrast. 
 

For my middle layer, I wanted to go dark, so I sponged mostly Chocolate Pudding with my muddled brush, then used the flower center portion of PaperArtsy Stencil by Lin Brown (PS003) to create a polka dot effect with sponged Toad Hall. I am a huge fan of circles and dots and will definitely be using this stencil for more dotted effects in the future!


Here you can see just how these layers work together. I probably could have gone darker with this middle panel, but it worked out well regardless. In addition to creating contrast with my colorway, I almost always try to balance organic with geometric elements, such as leaves and circles. Contrast and balance are good themes to consider as you work. Ask yourself along the way if you are achieving this.
 
 
For my final layer I tried to lighten things and painted the panel with pure Toad Hall. I then used Grunge Paste through the flower grouping in PS003. After this was dry, I went back over the flower with my paint colors.  The white Grunge Paste creates a bit of a halo effect, which I really like. You can see I added a few more stenciled dots to ground the image. Then I splashed all of my panels with watery Caramel.


I further roughed up all of my edges with a little sponged Walnut Stain ink and some messy stitching. I chose an assortment of fibres to use as a hanger, tied around a broken, mossy branch.

I picked a favorite sentiment from Lin Brown Stamp Set 5 (ELB05) and stamped it onto scrap inky paper and mounted onto the layered panel. This was the hardest part, choosing from all of the beautiful stamped phrases in this fabulous set.


To bring some additional texture and life to the piece, I rubbed over my flowers and the perimeter of the bottom panel with a glue stick, then adhered transfer foil. The subtle metallic shimmer catches the light beautifully and contrasts with the chalk finish of the Fresco paints.

Now, I'm known to use earth tones in my work, but I hope you can imagine these beautiful stencil patterns in your preferred colorway. What three colors come to your mind?


It's always so exciting to think of the transformation from plain white paper to a finished project, especially one you can hang in your home or use as a gift. Stencil work is a great way to add layers of color and pattern. Lin Brown, a classic stamp designer, has created such beautiful nature inspired stencil designs, many of which coordinate with her stamps, and I know you will find them a pleasure to work with. I hope these simple concepts have got your wheels turning for your next stenciled project. Make sure to tag @paperartsy so we can revel in its coolness!

xx, Autumn


YouTube: SewPaperPaint
Facebook: Autumn Clark
Instagram: @sewpaperpaint
Pinterest: SewPaperPaint
 

Thursday, 20 August 2020

2020 #14 Fusing Foils with VID {by Helen Chilton}

 2020 Topic 14: Fused


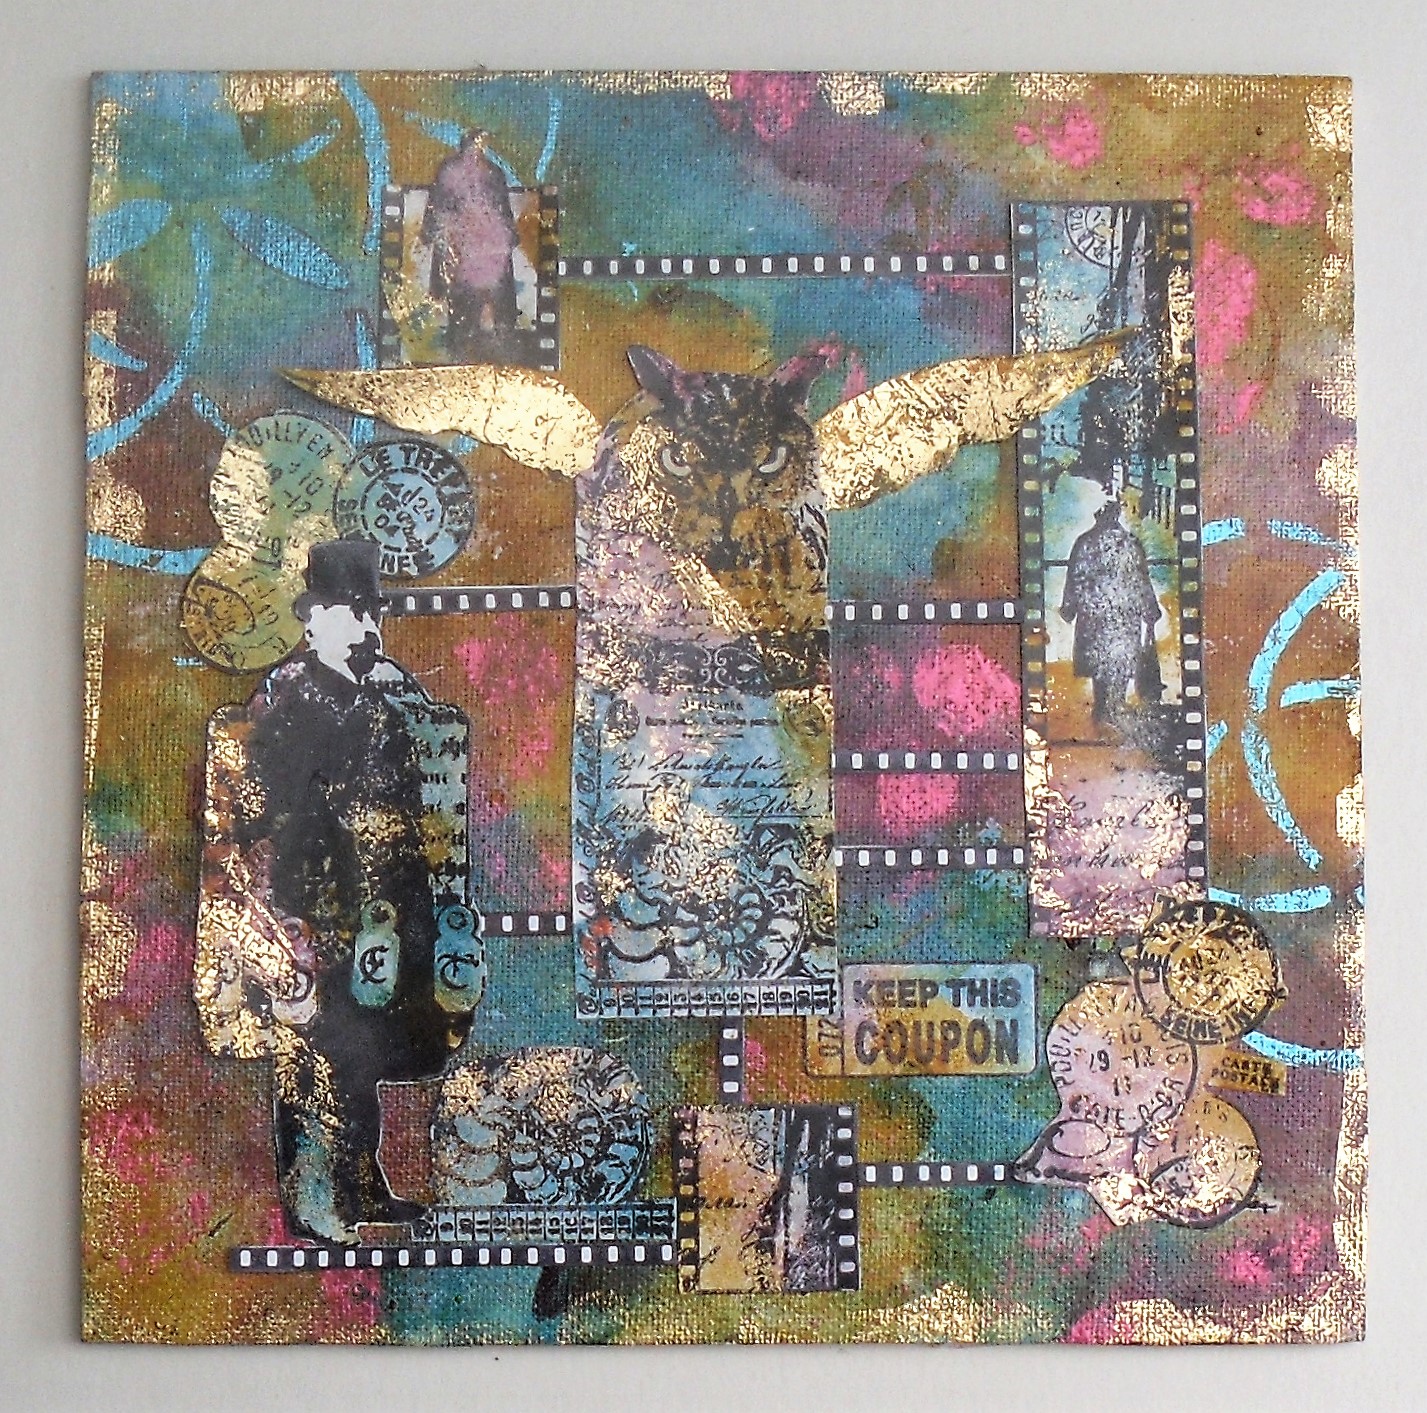
A striking collage of Vintage PaperArtsy stamps pops to life with gold foil fused with sticky ink as the connector to the canvas below. 
~ Leandra

Hi everyone, it's Helen with you today, and I'd like to share with you my canvas using foils.

For 
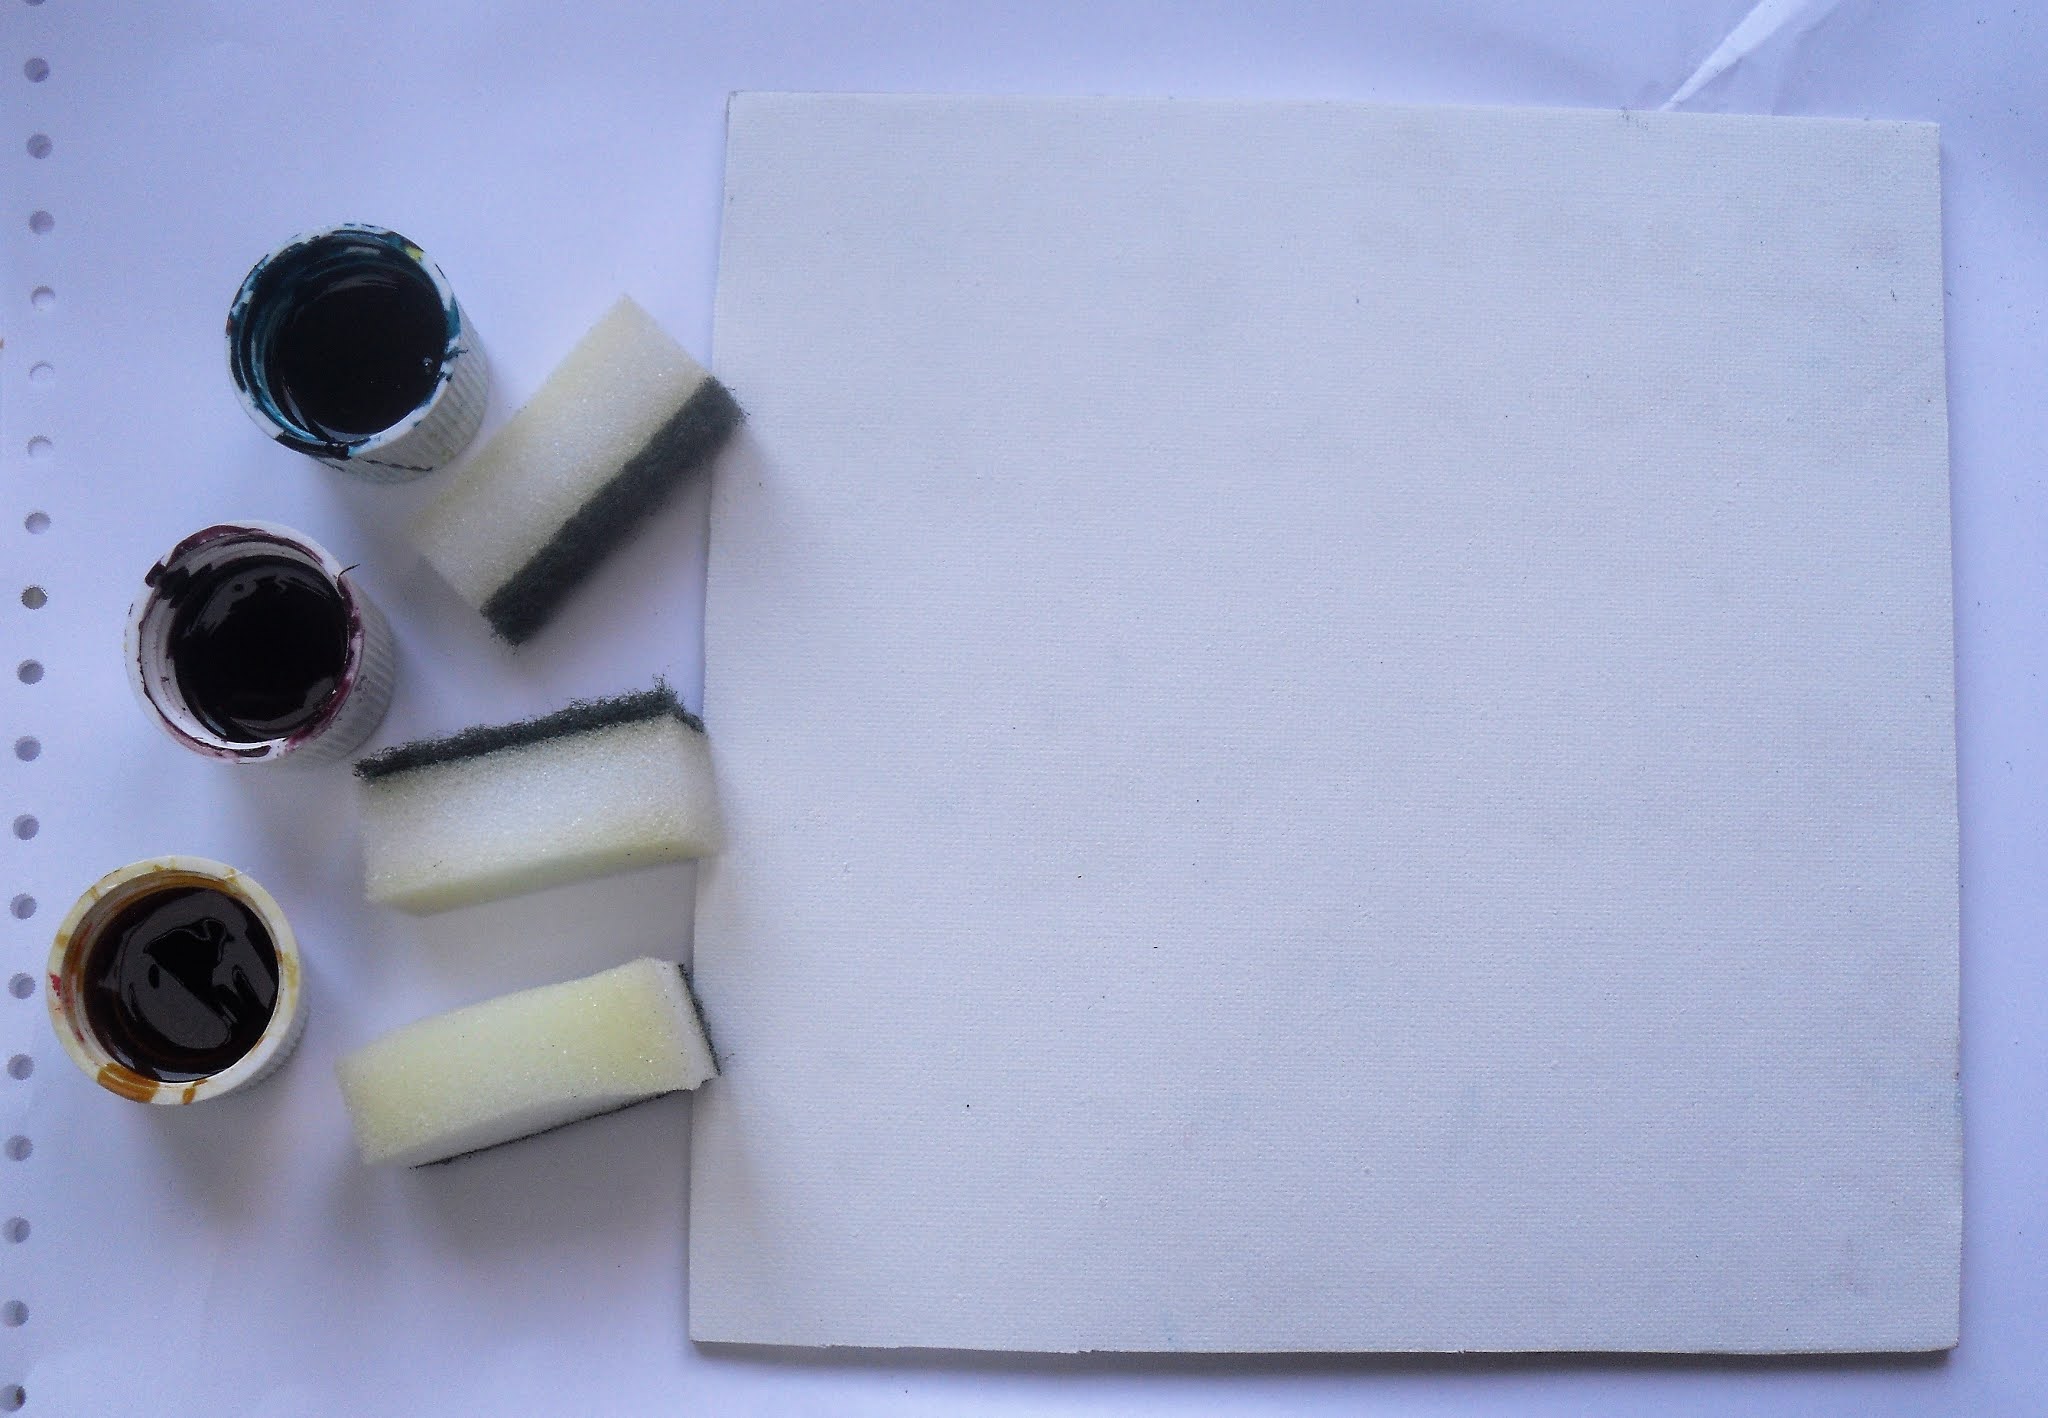
this project I've used Vitrail transparent glass paints which I've had in my stash for years.  I applied them direct to canvas and my images to create a surface to fuse the foils onto. This glass paint is solvent based, transparent and very sticky when first applied, so you can apply the foil directly onto it without the need for more glue. I gave a workshop once using this technique and it works a treat.


Get your Vitrail colours ready - I've used Turquoise Blue, Yellow and Old Pink and cut up a cheap sponge to apply them with.


Dab it on and mix as you go. I like the texture of the canvas showing through.


Stamp your images onto glossy card - it need to be glossy so the paint doesn't soak in - and then dab on colour in the same way.I used the Vintage Ink and the Dog Collection. These are some of the images from I&D in a larger format on A5 sheets, great for journalling or larger size projects. 


Let dry for a couple of minutes and apply the foil - you can see this piece has been well used already. You only want touches of foil, not great solid areas as you'll lose the image underneath.


Use a stencil in the same way. Pressing the foil through the pattern.


And there you go. This works better with a stencil with a definite pattern rather than a more random one.


Here you can see the foiling.


I've pulled it all together with stamping and filmstrip lines.


To finish I doodled round the edge with a black outliner.


These paints work so well because they're sticky. The stickiness does have some disadvantages though as if you don't like getting messy this probably isn't the project for you (I managed to get it in my eyebrow - don't know how!) and you also have to wait quite a while for it to dry if you want to add stamping over the top. Having said that, I find this a really easy way to foil projects - no more waiting for the embossing powder or glue to dry to just the right point to get the stuff to stick. It's also a great way to use up those scraps of foil that have been used but have bits left on. Lynne Perrella stamps would work really well with this technique - you keep the detail of the images and add a touch of glitz at the same time!

Helen

Blog: A Splash of Colour

Saturday, 24 November 2018

2018 #20 Foiling: My Cup of Tea with {ESC} by Josefine Fouarge

 2018 Topic 20: Foiling


Such a delicate effect with this super-interesting technique from Josefine! I love how subtle it is, but I bet the gilding pops perfectly when you hold the card to the light! ~Leandra

Hi everyone! Josefine here and today I'm sharing two tea themed cards with you using foil flakes. These are torn up and crumpled pieces of foil in gold and silver that add a great effect to mixed media projects.

They are a little bit messy to use, but it's so worth it. The shine and the texture that they add to projects is just super unique. And I think that every tea cup needs that bit of glamour, don't you think?


I started by picking some "tea" colors for my background. In particular Lemon Meringue (FF142), Banana (FF91), Peach Nectar (FF144), Prawn (FF98) and Cerise (FF136). 


To create a grungy look, I spread them out on my craft mat using a brayer and then brayered these colors onto my background. One color at a time, starting with the lightest. Once I added the darkest color, I went back to a lighter one, till the background looked done to me.


Then I added a few more layers of interest to the background. 


The ESC16 stamp set comes with a great variety of stamps, perfect for backgrounds. 


Next, I stamped the tea cups using my Misti stamp platform. First in black, then I brayered adhesive on top of the stamp. It's super important to clean the stamp immediately!


Once the adhesive was tacky, I added the foil flakes on top and brushed them into the paper. I used silver flakes for one card and gold flakes for the second one.

Tip: use a container of some sort. These flakes get everywhere and are super static.


To finish the cards, I added the sentiment, adhered the panels onto a black piece of card stock to frame them and then adhered both to the card base.


I'm in the mood for tea now ;)


What do you think of these flakes? Isn't that an interesting effect? I hope you liked these cards as much as I do. If you have ever used these flakes, I would love to see your projects. And if you haven't, now is a great time to try it and enter the challenge with your foil project.

Thanks so much for stopping by!

Facebook: HolyLise
Instagram: @HolyLise
YouTube: HolyLise Designs

To join our challenge and win a PaperArtsy £50 gift voucher:
Simply make something arty relevant to the topic, and link your creation from any social URL (eg. Instagram, Pinterest, Blog Post etc) sharing your original make to this challenge page.

The current topic link Topic 20: Foiling will close 17:00 (London Time) Sunday, 25th November 2018, and the winner will be announced 2 hours later at 19:00.

Please make sure we can contact you as a prize winner - it helps if you share your contact info from the platform you opt to use.

Good Luck! If you have any questions, don't hesitate to ask!