
"Hi all, it’s Jo here again. This week I’m going to playing around with creating different textures and making more home décor. Today’s art is called "Moths". I wanted to create a Victorian style moth collectors display where the moths are pinned out".
I started with a canvas about 10” x 8”and gave it a good
coat of Baltic Blue on the front and sides. One this was dry I added the second
colour Hyde Park. I added some water to
it to thin it down slightly. This second
colour doesn’t have to be as neat as the first layer and as it dries it might
seem to disappear into the background blue. Just keep adding layers varying the amount of water you add until you
like what you’ve created.


For the third layer of paint I started going into the
lighter greens. This time Toad Hall.
Hopefully with this image you can see how roughly I added the paint just in
areas, not all over.

The fourth layer was Sage. I thinned it down quite a lot to get a wash of colour. I added some
paint, let it sit for a moment and then mopped it up with a piece of kitchen
roll. Just keep adding paint and taking it away until you get something you
like.

Finally a really thin layer on the edges with South Pacific
just to add some contrast to the greens. Remember to keep drying in between colours otherwise you’ll
get a muddy brown colour - think really dirty dishwater! Cut a piece of tissue paper that will go over the front and
sides of the canvas. We are now going to make our own tissue wrap. Using a variety of collage stamps randomly fill in the whole
of the tissue paper using a black ink. I
used Versafine and I used the following stamps: Wings 1 (I actually haven’t cut
this one up and left it as the whole A5 plate!), At Home 2 and Wings 4. The
tissue needs to be thoroughly dry before you can start painting the back of it.
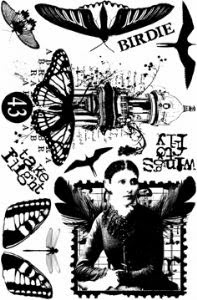
Wings 4


Using the same colour scheme as you used for the canvas
start colouring in the images on the reverse of the tissue paper. Once they are
dry go over the whole of the back with Sage, you might need two coats.

Dry, but be really careful when picking up the tissue paper
as its fragile and could tear easily (doesn’t matter if it does because we are
actually going to tear it anyway!).
Paint Satin Glaze all over the canvas and lay the tissue paper
on top and over the sides. Before it’s
had a chance to dry start ripping away the tissue paper in places around the
edges. I wanted to try and recreate the
effect of wallpaper that has started to peel away revealing the plaster
beneath. Pint over the top of the tissue paper with Satin Glaze to seal it.


One this is dry you can add a thin layer of Grunge Paste in
the middle if the canvas. Again I was trying to create a plaster effect, mostly
smooth but in places some texture using the palette knife and the crackle stamp
from Petals 1. Leave this to dry.

I then started to work on the moths. I took a sheet of MetalCard and added Treasure Gold in Amethyst, Indigo and Aquamarine. I used a stiff
stencilling brush to really work the colour into the metal and get scratch
marks. Let this dry for a bit and then polish with a softy cloth or some
kitchen roll.


Cut out three moths using the die and stamp with moths from
HPSD01 using your favourite black ink that will dry on metal. Set these to one
side. Before I stamp I ran the moths through the die cutting machine to flatten
the edges.


Once the Grunge Paste is dry, paint it completely with
Tinned Peas and then add Sage in places. Using Hyde Park and Holly dry brush some
of the texture, especially the edges of the Grunge Paste to highlight it and
add definition. Also on the sides and
edges of the canvas add some Holly to add “dirtiness” and frame the canvas.


Once this is dry lightly add Indigo Treasure Gold on a few
of the raised texture and on the edges of the canvas. Take a piece of Kraft Card that will sit nicely in the
middle of your canvas and rip the edges. Now scrunch up a page of text from a
book and stick this to the Kraft card (the picture shows that I added Distress
Ink in Frayed Burlap and Vintage Photo but they didn’t work with the canvas –
hence the painting!).

Before it has dried completely rip away some of the text
page to add another subtle layer of texture. Paint this in Sage and add Holly
to the edges of the Kraft Card. Stamp the butterfly lady from Letter 3. Stapled the moths to the Kraft card and finally glue the
Kraft Card onto the canvas. I used a hot
glue gun for this as I wanted it slightly raised up off the canvas.


I ummed and aahed as to whether to raise the moths up but
really wanted to use staples to add another texture with the metal, so they are
flat, but I think I would have preferred them raised. Next time I‘ll try them
raised!


I am really pleased with the tissue paper effect and want to
try it in browns for a different sepia style shabby look. I also think the addition of fabric and
string would be really good collage style effect to create even more texture.
Well I hope you like and give the tissue paper idea a go –
have fun! I will be back tomorrow evening with another project.
Leandra Says: The stamped Tissue Paper alone looks brill Jo, the effect you have achieved on this collaged canvas looks totes-amazeballs. Love the placement of the stamped gentleman on the top right peeking out from underneath all that texture.
Gillian Says: Love the simplistic direction you took using the Moth images as the focal point, set amongst the wonderful textures Jo.


12 comments:
Wow! Stunning! I'll be having a go at something on Friday I hope
the tissue wrap is fabulous - not sure I'd have been able to cover it up! It would make great wrapping paper, if you could stop it tearing.
Wow! Jo, this is amazing. I love the colour palette and the way you are so bold about just going in there and covering stuff up! I would be too timid! This is a great project and a lesson is boldly going...then creating something really original! Julie Ann xx
That's wonderful! I love how the tissue paper looks with the grunge paste on top, fantastic texture.
Fabulous you've really achieved the look and style you were after originally and it looks great, definite a work of art x
Fab project:-)
Merry Christmas.
Beautiful panel. Texture of many layers has given wonderful feeling to work. I love your project.
Very vintage, love what you have done with this. Colours and textures are just brill!
Wow Jo. Just love the layering and everything ties together beautifully. Clever. X
I just adore that stamped tissue, Jo!
Lucy x
Stunning piece of work Jo. Gorgeous texture and you really achieved the effect you wanted imo! Love the stamped tissue!
Hugs
Lesley Xx
Wow absolutely stunning, I love the tissue technique, it makes the whole piece look so unique. Kezzy:-) xxx
Post a Comment