Monday, 27 October 2014

Welcome Back Lelainia Lloyd Project #1 Alternative Festive Gift Card Idea

"Hi everyone Lelainia here! So excited to be working with Lynne Perrella images this month! I have been thinking about the holidays which are rolling up on us quickly. I wanted to help give you a jump start on preparing, so the projects I’ll be sharing this month will reflect that. My first project is a quick and easy one which lends itself well to giving small gifts, but making the presentation extra special".


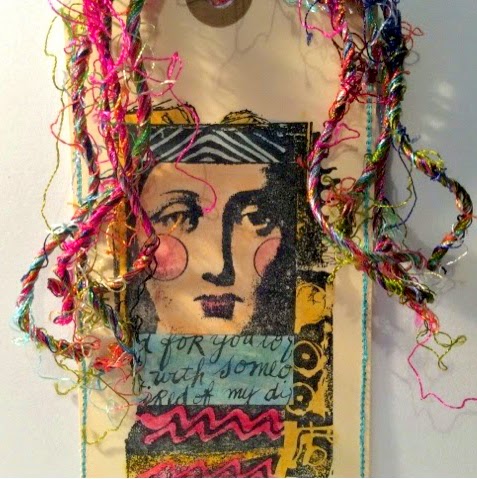
I began by stamping the smaller face image from the LPC006 on a Size 6 Manila Tag with Black StazOn Ink. 


To add colour to the image, I pulled out my trusty Portfolio Water Soluble Oil Pastels. I use a simple trick to control where the colour goes when working on small pieces: I use a small tipped paint brush (in this case, a Plaid #2 shader) dipped in water to paint the colours on. I put a minimal amount of water on the brush and then swipe it against the pastel to pick up colour. I keep a paper towel nearby to remove excess water by dabbing the brush on it if the brush is a bit too wet.


The less water you use, the more intense the colours will be.


While that tag was drying, I took a second Size 6 Manila Tag and stamped the flag image onto it.


I repeated the image 3 times working my way down the tag. I let some of the image bleed off the sides-I never like anything to look too perfect.


I painted the designs on the flags using my shader paint brush and the Portfolio Oil Pastels.


Next, I put the two tags back to back, blank sides together and I straight stitched around them on 3 sides, leaving the top open. 


I used a very scant 1/8 inch seam allowance to make sure that there would be enough room for a gift card to fit inside. I started stitching on the right hand side, just below where the corner is angled. 


I went around the 3 sides twice, just to make the stitching stand out and I was purposely messy about it.


For the next step, I cut a strip of cardstock 1 inch x 11inches and folded it in half lengthwise. I put the gift card between the fold. This strip is going to allow the gift card to be easily removed when the recipient opens it.


I slid the gift card with the strip around it into the tag pocket and then centred the top of the strip so it showed in the tag hole.


I used my hole punch to punch a hole through the strip.


Finally, I cut a piece of sari silk fibres 48 inches long and folded it into 4. I chose sari silk because I thought it would go nicely with the prayer flags on the reverse, but also because they are so colourful. You can use any fibres or ribbons you have on hand. I threaded the sari silk through the holes and tied a knot. 

Join me again tomorrow evening when I will have another project to share with you all.

~Lelainia~

A huge thank you from the PA team for sharing this alternative gift idea for the upcoming holiday season. Love the vivid depth that you have achieved using the Oil Pastels. The colours from the Sahri ribbon match perfectly with the focal image.


We would love you to join in with our monthly challenge. If you are inspired by any of this month's guests who have blogged between Oct 1st 2014 and Oct 31st 2014 then join in and link up your creativity HERE. You will go in the draw to win a £50 voucher to spend on products of your choice from the PaperArtsy online store. You need to add your link by 19:00 (London time) Oct 31st 2014.

Sunday, 26 October 2014

Tinted Grunge Paste {with Eclectica³ SN Stamps by Designer Sara Naumann}

All Life is an Experiment.

Hello, Sara here. By now you know I’m a bit of a Grunge Paste addict. Well, this week I’ve been playing with different methods of coloring Grunge Paste. It’s gone a bit cold and grey where I am in Poland, so I wanted to create some bright, fresh color!


Grunge Paste has a natural putty color that’s ideal for tinting with pigment ink reinkers. {or Fresco paint} The best thing is that you only need one drop to get a gorgeous colour! Pigment ink is a great option for this and a super way to put those reinkers to use.

And adding pigment ink to Grunge Paste means you get the texture and dimension of Grunge Paste, too—just with fabulous custom color. Pair it with texture stamps like these from the Eclectica ESN09 set, and you’ve got a fabulous background.

Eclectica ESN09 

Sara has very kindly made a video for us, showing just how she brought the elements of this wonderful card together.  As a reminder of the steps we also have photos and instructions below. 


1. Place strips of washi tape onto white card. I chose three in a color scheme of black, white and gold metallic. They coordinate nicely with each other and will provide a distinct contrast to the teal Grunge Paste. Trim the piece and mat it on white card, then black. Tear the bottom of the black card.


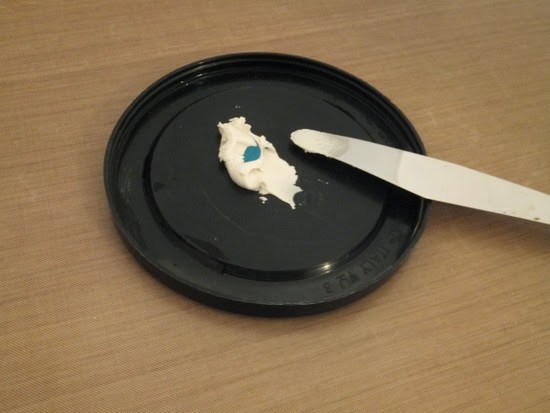
2. Place some Grunge Paste on a craft sheet or palette and squeeze in a drop of ink. I’m using Clearsnap’s Crafter’s Aruba refill. One drop will do it. Mix with your palette knife.


3. Place the polka dot and open-dot spatter stamps from the Eclectica ESN09 set onto a Flexi Block. Use the palette knife to apply the tinted Grunge Paste to the stamps and stamp on the washi tape piece.


4. Use the palette knife to edge the washi tape piece with tinted Grunge Paste. Let dry—I pop the piece on the Grunge Paste jar so the edges can dry without touching anything.


5. Stamp the dot and spatter with tinted Grunge Paste as before on a piece of white cardstock. Let dry, then glue the washi tape layer on top.


6. Stamp and heat-emboss “all life is an experiment” with black embossing powder. Mat the long edges on black cardstock and glue to the washi tape layer, trimming the edges even with the sides of the white card. Glue to a black card blank


7. Add a layered silk flower as shown, and a knotted piece of teal ribbon.


I hope you enjoyed the project as much as I did! Remember, you can see a video tutorial for this project on the PaperArtsy You Tube channel.

Thank you also to the lovely Leandra and PaperArtsy for letting me share this project with you here!
Sara.

A huge thanks to Sara from all at PaperArtsy, another fantastic video, great , easy to follow instructions. Tinted grunge paste is the perfect way to add colour coordinated texture to any project. 

We would love you to join in with our monthly challenge. If you are inspired by any of this month's guests who have blogged between Oct 1st 2014 and Oct 31st 2014 then join in and link up your creativity HERE. You will go in the draw to win a voucher to spend on products of your choice from the PaperArtsy online store. You need to add your link by 19:00 (London time) Oct 31st 2014

Friday, 24 October 2014

Multi Frame {with Eclectica³ Darcy Stamps by Claire Snowdon}

Evening everyone! Claire here tonight on the Paperartsy blog and I’m very excited to be here! I have been crafting for around five years now and stamping is by far my favourite technique. I enjoy making lots of different things from cards, to altered art to tags and whatever else I fancy.

For my blog post tonight I decided to alter a plain wooden frame that I found in a sale bin using new stamps from Darcy’s Eclectica range.


I started by removing the glass and painting the frame with two coats of Paperartsy Fresco Paint in Slate.

Once dry I added a thin layer of Paperartsy Fresco Crackle Glaze and once that was dry used a paintbrush to add Very Berry Fresco paint and watched the lovely crackle appear.

I took a sheet of Paperartsy Smoothy card and gave it a coat of Chalk Fresco paint. I then stamped all the images I wanted from Darcy’s new stamp sets EDY09 and EDY10 using Onyx Black Versafine ink.
EDY09
EDY10
I painted all the stamped images using Fresco paints. The colours I used were Moonlight, Eggplant, Blush, Zesty Zing, Hey Pesto and French Roast. I tried to use a limited palette to tie all the images together once they would be in the separate frame compartments.


I measured all the frame apertures and cut my Smoothy card to size to fit. At this point I thought they looked a little stark so added a very light coat of Tumbled Glass Distress Ink around all the pieces using a soft brush – it’s very subtle!


Once the images were in the frame I decided it was a bit too brash so did some dry brushing using Vintage Lace Fresco paint just to give it a much calmer and more weathered look!
I much prefer this toned down version of the frame! My favourite image from Darcy’s new stamps has to be a lovely heart petal flowers so it had to get the biggest space in my new frame.


Thank you for asking me to be on the blog tonight – I had a great time making my project.

Claire 

A huge thanks to Claire from PaperArtsy, this is a gorgeous use of collective spaces. The limited but complimentary colour palette works really well and keeps the whole piece fresh and clean. I really like the positioning,especially how  little 'Neville' is looking up at all the other flowers. 

We would love you to join in with our monthly challenge. If you are inspired by any of this month's guests who have blogged between Oct 1st 2014 and Oct 31st 2014 then join in and link up your creativity HERE. You will go in the draw to win a voucher to spend on products of your choice from the PaperArtsy online store. You need to add your link by 19:00 (London time) Oct 31st 2014

Thursday, 23 October 2014

Wintery Frame {with Eclectica³ Lin Brown Stamps by Sue Carrington}

Hello, it's Sue here and tonight I'm sharing a small, wooden Christmas frame using the gorgeous Lin Brown stamps.


I started by lightly sanding the frame then giving it a coat of Chalk Fresco Finish and when it was dry I used a baby wipe with some Antarctic Fresco Finish. The recessed area was painted with a mixture of Antarctic and Merlin Fresco Finish paints.


I then used the snowflakes stamp from the ELB10 set and stamped it using Merlin Fresco Finish. I added some dots of Chalk too, which you'll see in a later photo.

ELB10


The flower is made from Crunchy Paper, 3 layers were painted with Merlin and then I splattered them with watered down Antarctic Fresco Finish paint. The botton 2 layers are painted with a mixture of Antarctic and Merlin and I dabbed a little Merlin around the edge of the petals. I've stuck a panel of Smoothy Card behind the flower which I've stamped with the snowflake.


The word Noel is from the ELB11 set and is stamped on to mount board that's been painted with a mixture of Antarctic and Merlin. I've then cut it in to individual letters and mounted them onto another piece of painted mountboard. I then attached the panel using some jump rings and screw eyelets.


ELB11


Hope you've enjoyed tonight's post ! See you again soon !
Sue


A huge thanks to Sue from all at PaperArtsy. Wow! we love that flower. The whole project is wintery elegance. The title looks great hanging underneath, makes it much more of a statement piece.
We would love you to join in with our monthly challenge. If you are inspired by any of this month's guests who have blogged between Oct 1st 2014 and Oct 31st 2014 then join in and link up your creativity HERE. You will go in the draw to win a voucher to spend on products of your choice from the PaperArtsy online store. You need to add your link by 19:00 (London time) Oct 31st 2014

Wednesday, 22 October 2014

GD:Anneke De Clerck Project #3 Festive Card Designs

Hello there, Anneke here with my final blogpost of this month. I have more Christmas cards to share with you tonight. The versatility of these designs are endless.


Tonight I'll feature a beautiful Christmas ornament stamp from the new JOFY Collection 27. In my opinion it's a very versatile stamp, 


I've chosen to combine the stamp with washi tape and Fresco Finish Paints. First I decided which colours to use.


I picked two colours for each card. Then I looked for matching tape in my stash.


I started by putting strips of tape on white paper.


I overstamped the tape with the ornament stamp and black Archival Ink.


I let the ink drying for a while, then cut out the ornaments.


I had a watercolour technique in mind so I've chosen watercolour paper for the cards. I mixed a tiny bit of Fresco Finish Paints with water and applied some paint randomly.


This cute corner stamp is from the same JOFY Collection 27.


I added dots with paint and a stencil (The Crafter's Workshop Mini Circle Explosion) to finish the background.


I applied some Ice Blue, Tango and  Slate on scraps of paper. I stamped stars from the JOFY Mini 06 set on it to use as embellishments. I punched out tiny Christmas trees as well.


Time to assemble the cards. 


It usually takes me some time before all the elements are in place :)


I added a star, strips of tape, trees and enamel dots.


I attached pieces of Tim Holtz Silver Tinsel Twine to the ornaments.


I love mixing different fonts. Christmas is a stamp from the JOFY Collection 27. I combined it with a part of a word stamp from  the EclecTica ELB11 set.


I added highlights to the dots with a white pencil.


I hope I could inspire you this week. I would love to see your takes, so join the PaperArtsy October Challenge!


I'll be back with more projects next month. So stay tuned!

~Anneke~

A huge thanks from all at PA Anneke for a week of refreshing festive ideas/designs. We all need every hour in the day in the run up to the festive season, so these designs are perfect for gathering up the craft supplies on those cold winter nights in front of the tv.

We would love you to join in with our monthly challenge. If you are inspired by any of this month's guests who have blogged between Oct 1st 2014 and Oct 31st 2014 then join in and link up your creativity HERE. You will go in the draw to win a £50 voucher to spend on products of your choice from the PaperArtsy online store. You need to add your link by 19:00 (London time) Oct 31st 2014.