Wednesday, 6 December 2017

2017 #18 Torn, Ripped, Burnt: Autumn Leaves with ESC {by Lauren Hatwell}

2017 Topic 18: Torn, Ripped, Burnt

So it seems we have created a bit of a fad for people burning things!The challenge entries are growing as people realise how much fun scorching things can be! Lauren has gone into the torn-and-burnt-zone and shares here a bunch of fun ideas for you to explore! Torn Xmas gift tags? There you go! Sorted! Step away from your paper trimmer!

Hi everyone, Lauren here and today I'd like to share with you a couple of projects I made using torn paper which I burnt gently before using the charcoal created to colour the paper...... 

My inspiration was my daily walk through the woods with my dogs. I particularly love walking in the autumn when the leaves are changing and there's a nip in the air. As the days get colder I can often catch the gentle tang of wood smoke in the air beckoning me home to a warm fire and a cup of tea... 

I love torn paper layers and I wanted to see how burning them slightly would affect the paper. I was pleased to find I could spray the burnt edges and get some colour to spread onto the paper too. I did managed to set quite a lot of paper and fabric on fire before I got the result I wanted but it was worth it in the end. 


Raquel's (Scrapcosy) stamps are, of course, perfect for my woodland theme and I couldn't resist a stencilling with some lemon juice through one of her stencils. I love the calendar words (picture above). They are the perfect way to suggest the passage of time...

PaperArtsy Stencil 071 (PS071)


For the panel, I tore up strips of Regular Smoothy card and then burnt the edge of each strip before sticking them down onto another piece of card to form layers. I found the best way to get the gentle smoulder I was after was to use a candle and then damp down the flames on a heat resistant glass mat or craft sheet. (if you blow the flames you often blow the candle out - been there, done that, got the t-shirt!?)....


I was really pleased with the way the flames nibble away at the paper to soften the edges and create a nice definition. What I didn't expect was the amount of ash I saved on the glass mat and it got me thinking that maybe I could use it in some way. The embossing was an afterthought but I found I could rub the dry ash onto the paper with a damp piece of cut and dry foam and it acts like ink.

Now for the tag...


For the tag, I tore Smoothy card and stuck down the layers before burning the edges and then spraying with water. I was amazed at how much colour variation I got.  I really like the effect. The colours are much lighter and I can only think it might be because I was working from the edges so I had less ash. Once the water had soaked in a bit and the staining had spread, I dipped the tag in the bits of ash still left on the mat to get some black sooty patches.  I think this is my favourite of the two effects.


Such beautiful texture. It reminds me a bit of wood shavings or silver birch bark.

Eclectica³ Scrapcosy Set 05 (ESC05)


I love a bit of colouring and fussy cutting.... I used a little watered down Rusty Car, Olive Tree and Gold Sands to watercolour the leaves and and a bit of Terracotta for the acorn.  I think this image is gorgeous. I love the detail. 

Who knew you could have so much fun with a candle and some strips of scrap paper? I really enjoyed these two projects. Why not give it a try? You'll get a different result every time but I think there are lots of different effects you could get depending on what material you use. I struggled with fabric and managed to set every single piece alight. That's something I want to try again once I've thought about it a bit more. I think perhaps my fabric was too fine or the weave was too open. One thing I didn't try was burning holes in the paper. I think that would look really cool.

That's me for today. I hope I've got your creative juices working a bit and you've found it interesting.

Blog: marvelousmechanicalmouseorgan
Facebook :Lauren Hatwell

I have a Demo Day at Birds in the Barn on 16 December. 

Well we always knew you were a clever chookie. Ink from ash!! Who knew!!!! Knowing what a natural klutz you (very occasionally) can be (LOL) it's a blooming miracle you didn't burn yourself OR your craft room!!! I would have felt somehow responsible had that happened! So hurrah for an awesome post and you survived! Whew! Thankyou! Leandra


We always hope that you  learn something interesting from our blog

Our creative team love to read your comments so much, so please take time to let them know you've been inspired!  

Why not join our 2-weekly challenge by blogging your create response to the current topic and link it here?

The current topic link Topic 18: Torn, Ripped, Burnt will close 17:00 (London Time) Sunday, 10th December 2017, and the winner will be announced 2 hours later at 19:00.

All links go in the draw to win a £50 voucher to spend on products of your choice from the PaperArtsy online store.

Monday, 4 December 2017

2017 #18 Torn, Ripped, Burnt: Sewing Art Journal with HP {by Raquel Burillo}

2017 Topic 18: Torn, Ripped, Burnt


A vintage treat from Raquel today, and she has made you a video too!! Read on!

Hi everyone, it's Raquel here from scrapcosyToday I'd like to share with you my latest art journal inspired in this fortnight challenge. 

I was craving to try these stamps by HotPicks. They are the most awesome stamps I've seen on the haberdashery subject! Every single image of them is absolutely beautiful. I'm so happy to have them as part of my collection now.


I love vintage style and I love aged items, so to me this challenge was the perfect opportunity to try and get even a much more distressed and aged look on a project. With that objective in mind, I torn some pages and played with my distress (plain and oxides) as well as with infusions, and additionally I decided to incorporate many different textures: lace, metal, buttons, thread and cheesecloth. I enjoyed it very much! As you will be able to see in the  how-to video I created.


I had this idea in my mind to create some holes in my pages and leave the edges curled up and dark, so they could give like a burned effect, and I wanted to show something through the holes. That's when I decided to incorporate some cheesecloth dyed with Golden Sands Infusions and glued on the underlying page, which painted with Chocolate Pudding Fresco Paint. You can still see the words behind the cheesecloth. And the holes were the perfect place to insert my metallic scissors, which are not glued.   


I always love incorporating something playful or interactive in my projects. In this case I decided to add a chain to my scissors so I could move them around between holes but at the same time don't loose them. The chain is attached by a brass safety pin. 


When I see a stamp of a spool of thread, I have the urge of actually loading it with real thread. So I created these three by stamping the 3-spool image thrice: from the first stamped image I cut the spool in the middle, from the second one I cut the left and right spools (in this instance I ignored the middle spool and I just cut the shape of the 2 spools the best I could) and the third one I used it as a base to glue the 3 spools back in place. Instead of thread, for the one on the left I used baker's twine that I frayed. 


Again, I found an opportunity to put some thread through the sewing machine. This stamp is so detailed!


The stamp set also incorporates a lace image which I stamped, cut and then I combined with 2 real laces and used these as a base to ground some other images. I love how these 3 laces stacked look like. Next time I may try to emboss the stamped lace, to try and get more texture. I also added more torn details in the bottom of the pages, some of them were intentional, like these ones:


But this other bit was broken by chance (or by me being to harsh when applying ink in the edges), so I decided to embrace it and keep it. And I also added cheesecloth and paint as I did on the main big holes so everything came together. By the way, here you can see a bit of detail in the background which I created using regular Vintage Photo Distress ink combined with Vintage Photo Distress Oxide and flickering some water.


I love the manikin Image! Here I decided to incorporate the same lace I used before to create a skirt for the manikin. I stamped the image twice. I cut the corset from one of them and this allowed me to glue the little skirt behind and then I glued these on top of the other stamped manikin. It reminded me of playing with dolls and dressing them up, I really had fun with it! By the way, all images are stamped with Vintage Sepia Versafine Ink and then water coloured with only 2 colours of Infusions: Golden Sands and Rusty Car. And then I always like to age the edges with Vintage Sepia Distress Ink, that gets rid of any white edges of the cut images and gives some volume.


A friend of mine (Aida) taught me a trick on how to torn very little pieces of paper, you just need to wet them with water and paper becomes super flexible. That's what I did on that little piece of paper on the left, I did few little cuts with the scissors and then with a wet brush you just touched them and then you can curve the paper. I did the same on the corners. I only "knew" the trick but I hadn't tried till now and OMG, it really works!! Super easy! On another matter, I love these stamps which have empty space where you can sew whatever you want. I, of course, chose to sew mother of pearl buttons, my favourite type.


Another chance to sew few more buttons, but on a bigger piece. By repeating the same techniques or same materials in different places of the project you achieve that all comes together.


And if you want to see how this Art Journal came to life, you can watch the video below.


I enjoyed so much this challenge! It gave me the chance to explore a more grunge side of my vintage style. And the best of this challenge is that it teaches you to embrace imperfection: if something gets broken while you're working on a project, relax, don't throw it away and just incorporate it in the design by breaking few other elements in the same way. It will seem you did it on purpose and it will add a twist. 

I also enjoyed playing with these stamps, they are so much fun to use! I would love to create a little sewing book with them. They would also be perfect to decorate a box so it becomes a proper sewing kit. Or even another option can be creating your DIY mini sewing kit for when you travel. I'm sure it would be the most cute travel sewing kit ever, perfect for a little stocking gift, now that Christmas is round the corner! ;)

If you want to stay in touch, you can follow me in these places. Thanks for reading and see you soon!

Raquel

Youtube: https://www.youtube.com/c/scrapcosy 
Etsy: https://www.etsy.com/uk/shop/Scrapcosy
Blog: https://scrapcosy.com
Instagram: https://instagram.com/scrapcosy/
Facebook: https://www.facebook.com/scrapcosy

Oh my goodness, so many amazing details in this post - we love what you do soooo much! Thankyou!


We always hope that you  learn something interesting from our blog

Our creative team love to read your comments so much, so please take time to let them know you've been inspired!  

Why not join our 2-weekly challenge by blogging your create response to the current topic and link it here?

The current topic link Topic 18: Torn, Ripped, Burnt will close 17:00 (London Time) Sunday, 10th December 2017, and the winner will be announced 2 hours later at 19:00.

All links go in the draw to win a £50 voucher to spend on products of your choice from the PaperArtsy online store.

Sunday, 3 December 2017

2017 #18 Torn, Ripped, Burnt: 'Imperfection' canvas with ETS {by Corrie Herriman}

2017 Topic 18: Torn, Ripped, Burnt


This is a gorgeous soft interpretation of this topic, I adore it! I hope you do too!


Hi everyone, it's Corrie from MadeByCHook with you today, and I'd like to share a canvas with you.The inspiration for this canvas came from one of the earlier topics: shades of white, combined with this one. I like bright colours but I also like vintage projects. The torn, ripped and burnt topic goes really well with vintage so for this one I went with light colours. I thought this was also a great idea as stamp designer Tracy always uses very bold colours with her stamps and this way I can show you that they look equally beautiful in light shades. 

To me it is a great joy to find 'things' in my craft room and sometimes around the house to use in my projects and that is just what I did for this one. 


Here you see some of the stuff I collected to use in my project. I enjoyed stamping Tracy's flowers, painting them with Fresco Finish Chalk Acrylics {Stone}, {Nougat}, {Chalk}, {Snowflake}, {Antarctic} and {Blue Oyster}. Of course all the stamp lines had gone after painting but because I stamped them with a stamping tool and left the stamps in, I could just re-stamp. I then cut them out, ready to use. I used Archival {Jet Black} ink. 


I added a crackle paste on the canvas first; I used one of Tracy's stencils for this {PS052}. I thought the crackles would go nicely with the vintage style ripped and worn theme. After it had dried I painted the whole canvas with Fresco Finish Chalk Acrylics {Chalk}. (tip: some crackle pastes have to be left to dry. The crackles will not or not as well develop when you use a heat tool)


To make the crackles stand out I used a Distress Oxide Ink {Walnut Stain}, a blending tool and a baby wipe. This was actually not as easy as it looks. It took a few attempts to get it how I liked it. Next time I shall probably use something like a glazing technique because that might just be easier.. also Distress Oxides are not waterproof so I had to fix them. I gave the canvas a quick spray with a fixative. 


On this little pile were some of the bits and pieces I collected. Some cardboard, painted with Fresco Finish Chalk Acrylics {Snowflake} and {Chalk} and ripped into a rough square, some ripped fabric which I sewed back together with embroidery floss, some burned paper... 


In this detail photo you can see part of the cluster of 'things' I found around the house and my room to use for my project. I had a great time putting it all together to make it look pleasing to the eye. Sometimes this takes longer than preparing the separate elements but I do enjoy it.

Eclectica³ Tracy Scott: Set 09 (ETS09)

PaperArtsy Stencil 052 (PS052)


And here is the whole thing finished. I added some stamping using Distress Oxides {Walnut Stain} and {Broken China} and fixative. I also edged the canvas with the same ink. 


A lot of layers in this project and that is what I like. I also added some gauze and some thread to make it look even more interesting. 

I hope I gave you inspiration to come and join us in this topic. I also hope you really enjoy finding and preparing stuff from around the house and your craft room to use in your project. I love the end result but would try a different technique to add the colour to the crackle background. It might also be nice to do this in bright colours to get a totally different look ! But whatever you decide to make, remember to enjoy the process ! 

Thank you so very much for stopping by today ! I hope you'll visit me over at my blog and my other locations too ! 


I love how this turned out, these colours are exactly what I had in mind for another project, and you have reflected what I had in my mind perfectly here! I love how all the elements look so beautiful together! Great idea using the distress oxide over the crackle too! I wondered if you could have used re-inker mixed with a Fresco clear glaze (satin?) into the cracks, then dab off the excess, in theory that would then get into the cracks, and dry permanent! One to try! Thanks Corrie ~ Leandra 


We always hope that you  learn something interesting from our blog

Our creative team love to read your comments so much, so please take time to let them know you've been inspired!  

Why not join our 2-weekly challenge by blogging your create response to the current topic and link it here?

The current topic link Topic 18: Torn, Ripped, Burnt will close 17:00 (London Time) Sunday, 10th December 2017, and the winner will be announced 2 hours later at 19:00.

All links go in the draw to win a £50 voucher to spend on products of your choice from the PaperArtsy online store.

Saturday, 2 December 2017

2017 #18 Torn, Ripped, Burnt: Boho Journal with EEA {by Kate Yetter}

2017 Topic 18: Torn, Ripped, Burnt


We have an assembly of stunning layers tonight from Kate. She creates such gorgeous journal covers, many of the materials she uses are recycled found objects that become coveted treasures! Fantastic!


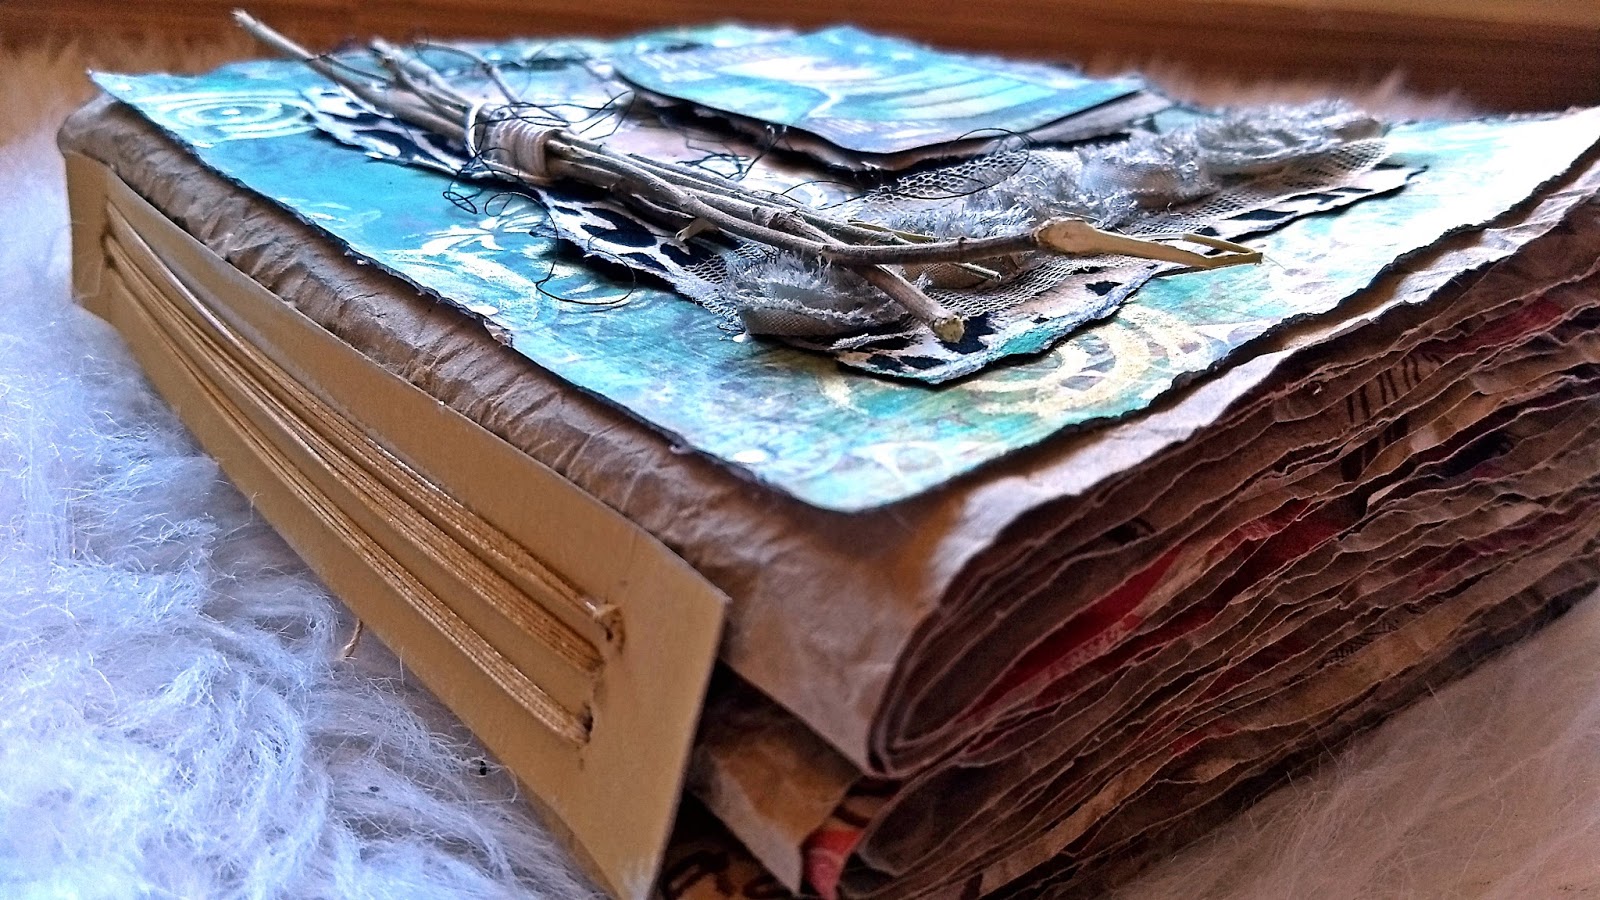
Hello. Kate here today and I am sharing an Altered Art Journal Cover for our theme: Torn. This theme is perfect for all styles because it adds a bit of texture and vintage flair.


I started by making an art journal from brown paper grocery bags. After cutting, wetting, drying and ironing I made three signatures using an online tutorial. After the journal was bound, I started altering the cover using patterned paper from my stash. 


I am going for the boho look on the cover because my art journal theme will be global. As a result I tried to layer patterns as best as I could. I spread some Fresco Finish Green Patina and allowed it to dry. After stenciling with Distress ink over top of my painted patterned paper I went back and added more stenciling with gold ink. I stamped in gold over top with the circle stamp from Eclectica³ {Everything Art} 01...


I chose a few more patterns and as you can see, I tore the edges. The smaller rectangle has been painted with a bit of Fresco Finish Haystack, stamped and then stenciled with 051 PA Stencil {by Scrapcosy}.


This dried twig had been sitting on my table for ages so I tore it into multiple pieces, tied it together with string and used it as an embellishment.


Overall, I think my favorite part about this project was adding the details such as doodling around stamped images, adding liquid pearls and watching the gold ink shimmer depending upon the paper angle.


Not only did I try a new technique for me (layering patterns) but I was also able to use a few things that had been floating around on my table for a while.


My focal image was stamped, painted and mounted on top of a piece of torn paper bag. I decided to doodle on my image in black because I love adding my own touch. I even brought out my white out pen to see if I could add more contrast. I like how it turned out!

Layering patterns on each piece of paper was a lot of fun but I was a bit skeptical about putting them all together. I thought it might be too busy or that they wouldn’t jive together. Thankfully I was wrong. I hope that you are inspired to layer up patterns and to tear up paper and sticks. Thank you for stopping by the blog and taking the time to read today.

Kate Yetter
 

Blog: https://scrapyardthe.wordpress.com
Pinterest: https://www.pinterest.com/katesscrapyard/
Facebook:  https://www.facebook.com/katesscrapyard/
Twitter: https://twitter.com/katesscrapyard

OK, I have serious background envy over that gorgeous boho background with the gorgeous stencilling and distress ink and the gold paint! OMG amazing!!! Fabulous!! ~ Leandra


We always hope that you  learn something interesting from our blog

Our creative team love to read your comments so much, so please take time to let them know you've been inspired!  

Why not join our 2-weekly challenge by blogging your create response to the current topic and link it here?

The current topic link Topic 18: Torn, Ripped, Burnt will close 17:00 (London Time) Sunday, 10th December 2017, and the winner will be announced 2 hours later at 19:00.

All links go in the draw to win a £50 voucher to spend on products of your choice from the PaperArtsy online store.

Friday, 1 December 2017

2017 #18 Torn, Ripped, Burnt: Organic Art with ELB {by Claire Snowdon}

2017 Topic 18: Torn, Ripped, Burnt


If you are unsure about tearing up things, then in this post Claire shows you how step by step and the results speak for themselves! Let's do this!


Hi everyone, it's Claire Snowdon here on the blog with you today, and I'd like to share my torn, ripped and burnt loose leaf journal page.

I decided to create a journal page....and quickly decided that a loose one might be a good idea as I was planning to burn it and I didn't want to end up setting fire to my whole art journal!


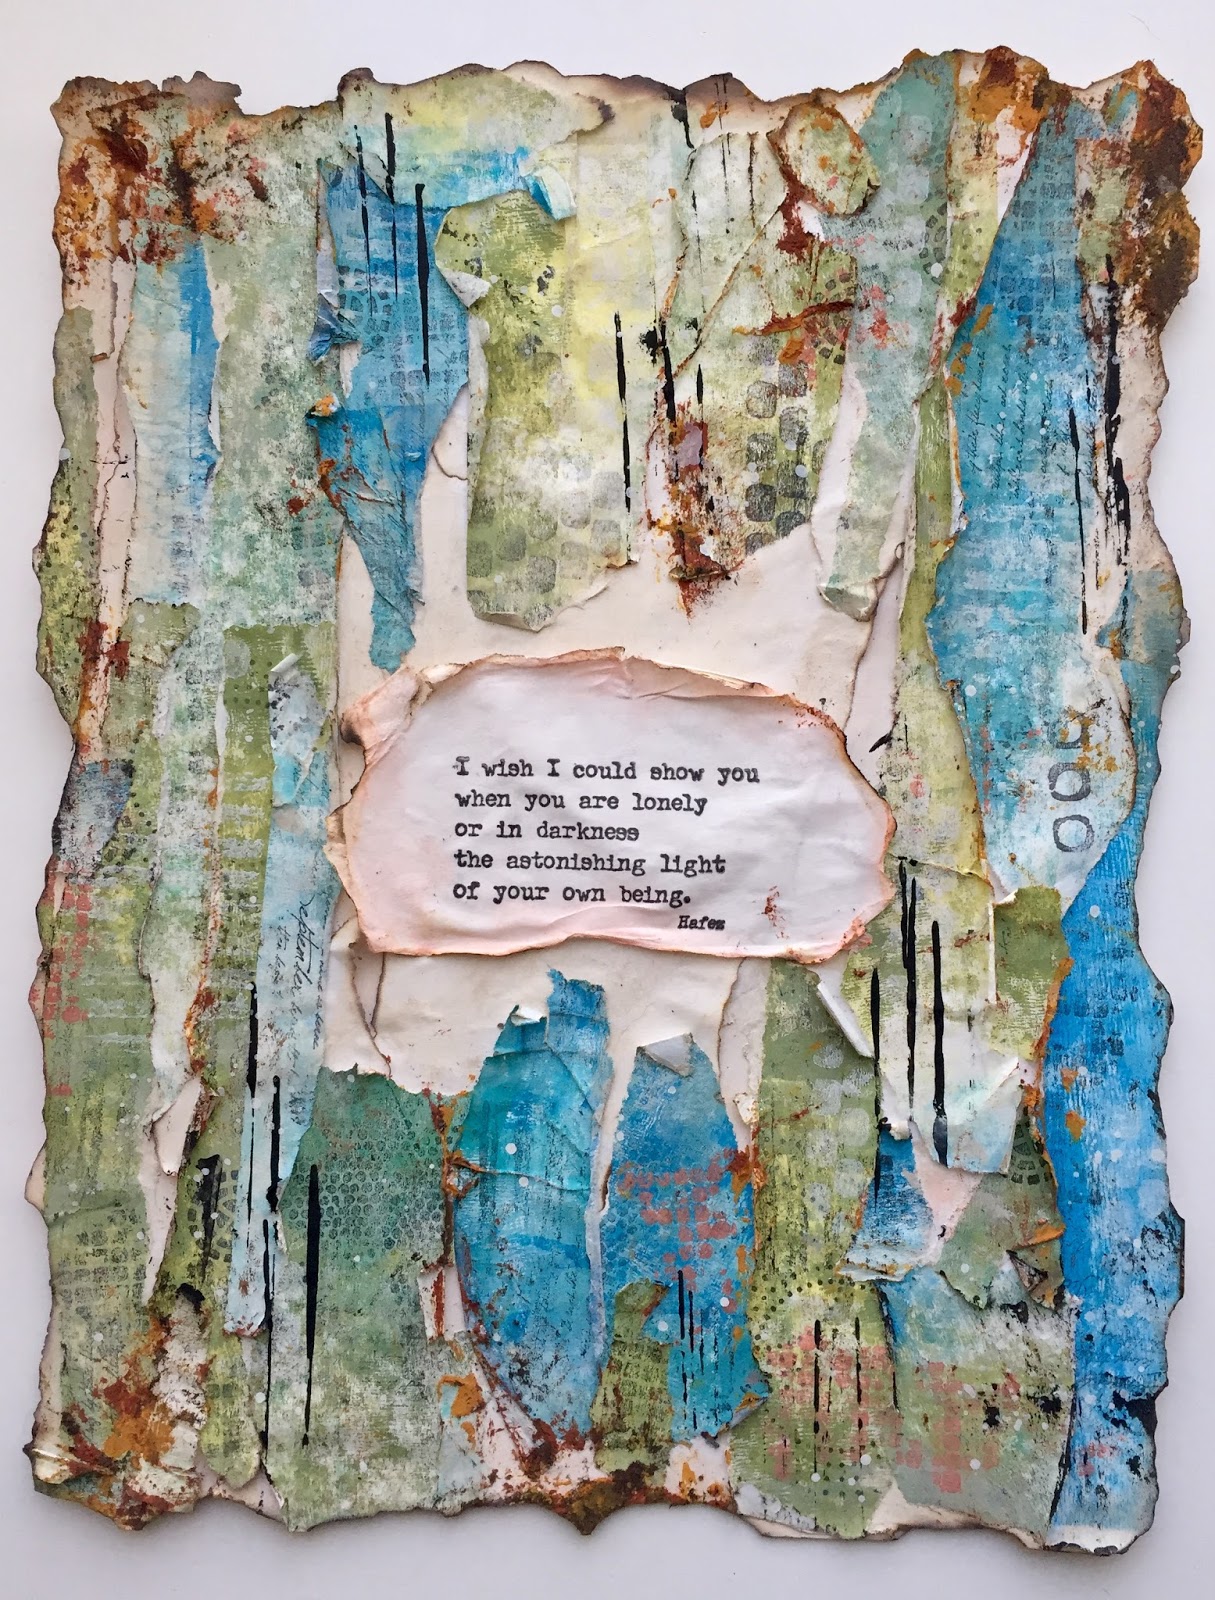
I loved creating this page as it has so much texture and feels very organic due to all the burnt edges and the colours I selected for it.


I decided to use an A4 manilla cardstock base and use deli paper for the ripped textures.  I created a type of masterboard on the deli paper and used a whole variety of stamps from the Lin Brown stamp plates Eclectica {Lin Brown{ Set 29 (ELB29)


 ELB30 

and ELB31 ...

along with Paperartsy Fresco paints Zucchini, Tinned Peas, Green Patina, Key Lime, China, Blue Oyster, Glass Blue, Beach Hut, Bora Bora and Chalk.


I started by ripping and burning some plain deli paper to create the first layer before moving on to ripping and tearing up pieces of the masterboard, burning the edges as I went.


I spent a long time burning the edges of both the cardstock and also the loose edges of the torn deli paper before using a quote from Eclectica³ {Alison Bomber} Set 02 (EAB02) as the  focal point.


Some extra stamping, splattering and mark-making was added after the piece was all together to create a further sense of depth. Also some Prima Finnabair rust paste added at the end aged the page further.


This was a really fun page to create - I did do my burning outside (just in case!) but I love the irregular shape it gives my page.  I would like to try to create another page in a similar vein using a much brighter palette to see if that organic feeling would also be present.  I also have plenty my deli paper master-board left over to be used up in future projects!

Hope you enjoyed my post today and will join in with the challenge!  

Claire

Blog:  Claire's Crafty Makes
Twitter: @Claires10
Instagram: Claires10
Pinterest: MrsSno

This looks like it came together perfectly! The colours are very 'Forest Floor' Don't put it in a journal! Hang it on the wall!! Fabulous!!! Thank you ~ Leandra


We always hope that you  learn something interesting from our blog

Our creative team love to read your comments so much, so please take time to let them know you've been inspired!  

Why not join our 2-weekly challenge by blogging your create response to the current topic and link it here?

The current topic link Topic 18: Torn, Ripped, Burnt will close 17:00 (London Time) Sunday, 10th December 2017, and the winner will be announced 2 hours later at 19:00.

All links go in the draw to win a £50 voucher to spend on products of your choice from the PaperArtsy online store.