Showing posts with label Powertex. Show all posts

Monday, 26 December 2016

PaperArtsy Blog Summary of Topics 4-6 {Curated by Lucy Edmondson}

Blog Summary: Image Transfers, Art Dolls, Fabric Stiffeners


Tonight's curator is Lucy Edmondson and she is looking back on Topics 4-6: Image Transfers, Art Dolls and Fabric Stiffeners like Powertex, Paverpol etc. 

We are so fortunate here at PaperArtsy to have a wide array of wonderful bloggers who share their stunning ideas with us. I am really looking forward to reflecting on the gorgeous work created earlier in the year.

Leandra

Hello all, Lucy from Lucy's True Colours here, and it's such a pleasure to be sharing with you some of the pieces of artwork which most inspired me this past year, from three of my favourite topics. 

My own creativity was dampened down this year by a family loss, and I owe it to PaperArtsy for the massive impetus it gave me to take time to craft, trying out exciting new experiences and products, and sometimes rushing into my craft room as soon as I'd read a blog post, not just on PaperArtsy's blog but by the challenge entrants too. The sense of fun, community, friendship, and at times suspense as we awaited new product releases, and the crafty education brought to us by the blog was a very positive part of my year.

Far and away the most exciting experience for me was that Leandra kindly gave me the opportunity to demo at Ally Pally for a stint in April and September. Here I am!


It was a huge boost to my confidence to find I could do it, and I thoroughly enjoyed meeting the customers, who were so interested to find out more about the PaperArtsy products and to chat about their favourite types of crafting. I really felt it was a chance to lose myself and be 'me' for a few hours.

Topic 4: Image Transfers

I have always had a love-hate relationship with Image Transfers, loving what others do, and hating my own failed attempts. Oh the frustration of the perfectly prepared substrate, ruined by a one eyed image transfer with the cloudy caste of paper pulp, and a sore finger. I've always been so confused about inkjet images versus laser,  the array of expensive specialist products on offer, and even ones involving getting the iron out! By the end of this challenge though, I had the satisfaction of having cracked it, and it is such a worthwhile technique to add to your portfolio. I love the way it allows you to choose any image and blend and harmonize it with your artwork

My first pick is this exquisite panel depicting Fountains Abbey by Lesley Ebdon, Craftymamma


Lesley created the whole project from first principles, using her own photograph and cutting the aperture herself to perfectly replicate the archway in the picture and thus draw the eye in. Putting the transfer behind an aperture created added depth to the piece. She then created brickwork around the image with careful use of stencil, grungepaste, and Frescos which has created such a very realistic textural aspect, and framed and softened the piece with glorious Morning Glory and trailing ivy by Liz Borer, coloured in an understated and ethereal way.

What I loved most about this piece is that the image itself has been transferred onto cotton fabric which to my mind is the beauty of image transfer as, arguably, there is no benefit in simply transferring the item from paper to paper. Lesley used Golden Gel Medium and as I had some of this myself, it inspired me to give it a go. Thank you so much Lesley for such a beautiful and inspiring piece, and for enabling me to have successful image transfers for the first time.

And I hope you didn't miss this post by Keren Baker. I love how Keren has such a varied, but always such a professional and well executed style. In this instance she has shown us how to ink an acrylic block to give a reflection of the bird in water, which is such an effective technique and such a great trick to have in your crafting arsenal. 


I adored this post by Kaz Hall of the Little Shabby Shed.  Kaz transferred her image onto grungepaste and I had no idea you could do this, but it has worked so perfectly. The effect looks like plasterwork and she has blended and highlighted the edges so beautifully. To me, it is evocative of seeing a poster left on the wall of a tumbled down building and I love it. So clever.


Topic 2 : Art Dolls

Art Dolls was quite simply by favourite theme this year. I particularly love art dolls when they are three dimensional and self-supporting but that can be hard to achieve. I love ones that are quirky and made from found items. I rushed to the computer when each new blog post was due and checked on all the challenge entries excitedly to see what everyone was making, and entered a record four times myself! I learnt so much, and it was the first time I have made a wire hooped skirt, and managed to make one where the doll stood up on her own! That is quite a feat of engineering for me! At the end of the two weeks I really wanted the challenge to run and run, and would love to revisit it using fabric sculpting mediums.

The introductions to the challenge themes on PaperArtsy are second to none, and if you put them together would make a fabulous history of art coffee table book. So much work must go into bringing them to us. Contained within the Intro on this occasion were two examples of Art Dolls by two PaperArtsy regulars. I adored this quirky and original piece by Lynne Moncrieff of Adorn, made up of Lynne Perrella stamps. Isn't it just perfect, with the pen quill quiff and the monocle!?


And Julie Ann Lee, of Magpie Heaven's, three dolls, Dream, Reflect, and Flourish, created with her very own hand drawn faces, so full of expression. I think Reflect is gossiping to Dream, and Flourish is trying to eavesdrop!


I adored this post by Gabrielle Price. Gabby, from Crafty Thoughts, fashioned her doll, who she named Carmen, completely out of air dry clay, and has given her such movement and charm. Gabby has a wonderful way with Lynne Perrella stamps, which I feel are perfect for the art doll look. She has cleverly used a mixture of hand drawn striped arms and legs, a face stamped directly onto clay, and stamping onto tissue for the dress. Then she made a wire loop so she could be hung on the wall.


The challenge entrants were quite incredible, and I was so excited each day to see what had been uploaded. One of my many favourites was this post by Jane Castle of Castle Kelly Crafts.


Do have a look at the post and the exquisite hand embroidered body of this dainty doll, and Jane's incredible attention to detail.

I was also inspired by this terrific art doll challenge entry by Sue from Arty Creation Inspiration. She and her friend, Rebecca, obviously had such fun gathering together the pieces to make their dolls. This is so original and well crafted.


Topic 3 : Powertex/ Paverpol

I was so excited to see the topic of Fabric Sculpting Mediums such as Powertex, Paverpol, and Modroc pop up. This was a completely new discovery to me in 2016 when I attended a craft show in February and there was a make and take style workshop where I decorated a beer bottle with a scrap of old tee shirt and was hooked! I really felt it filled a gap for me in mixed media crafting as I love dimensional projects but have never been good at engineering or construction. Suddenly I had a product which would glue items together and also create structure, movement, body, and allow items to stand up on their own, without recourse to a drill and work bench (it was never going to happen ....!). I love that you have a bit of open time whilst the fabric starts to harden and you can manipulate it further. I also love that you can use up lots of recycled items you would otherwise throw away. But most of all, it is just so lovely and messy ......!

So what did we all get up to?
Well, I was completely captivated by this post by Helen Chilton.  Helen from A Splash of Colour made this colourful figure from Paverpol using a mixture of Frescos, Brushos, and Treasure Gold, complete with handmade flowers and a wonderful parasol with Emma Godfrey stamps! So many techniques, and the result is stunning!


For a completely different look with fabric sculpting medium, have a look at  this post by Ingrid Vichova of Ingrid's Craft Corner.  It's such an elegant and understated piece of wall art which wouldn't look out of place in any art gallery. It would grace any home and be such a conversation piece. There are no facial features and yet the pose manages to convey such expression. This was the first time I had seen Powertex used with Bister to create crackle, and it was one of those times when I wanted to rush into my craft room within moments of reading Ingrid's post, I was so excited to try it.


This Fabric Flower Lady by Liz Borer  is exquisite. Again it is a posed figure without a face, creating a tremendous sense of expression, but here the similarity ends as Liz has created a delicately coloured ornamental doll, using the fabric draping qualities of, in this instance, Powertex. Liz of Decorative Delights has an incredible talent with colour blending and paint, and an affinity with flowers, which this project showcases so beautifully. As with Helen's project, I love that it shows how fabric sculpting mediums can be painted in many colours, as opposed to one colour with just highlights, as is often seen.


Every single post on the blog this year was a joy to read, and it's been such a pleasure to pick out just a few from these three topics. I have found the PaperArtsy blog such a genuine source of crafting education and a place of refuge and friendship for which I am truly grateful. Keep joining in the challenges as I know there are some great themes in the year ahead, and 2017 will be just as exciting! Wishing you happiness and good health with your loved ones.

Lucy xx 


Lucy Edmondson
Twitter:@Craftyluce

Friday, 24 June 2016

2016 #12 Fabric Vase {by Lucy Edmondson}

 2016 Topic 12: Fabric

Hi everyone Lucy from Lucy's True Colours here. Tonight I'd like to share with you a technique using Powertex to make fabric roses, with the transparent version enabling the gorgeous colours of Fresco paints and PaperArtsy stamp designs to show through. You may be pleased to hear, this is a no-sew project!

I'm still a novice with Powertex and the other similar brands, as I haven't attended any workshops and I hadn't used the transparent or the Ivory versions, only the Bronze one, until I started this project. I really loved using the Bronze to make a garden figurine and it's great how it covers and unifies what is underneath. I had in my mind, though, that it would be a completely different look, and would really be a chance to use stamp with paints if I used the transparent version. It's less forgiving in terms of your substrate but there are still plenty of possibilities. Here I've used a glass bubble bath bottle which has flat sides, and turned it into a vase, but a Mateus Rose bottle would also work well. I've used some Eclectica Ellen Vargo stamps, which, being abstract, were absolutely perfect, because I didn't have to worry about detail being lost or being 'wrong side up' when the fabric was draped.


Step One: I started off by making some roses. I made far too many as I didn't know how many petals I would want for each rose, or how many roses to decorate the final vase, but I tell myself it was worth having some extra for another project whilst I had the Powertex out! Using the larger splodge stamp from the Eclectica EEV06 set, apply a generous amount of Coral and Candy Floss to one piece of cut n dry foam and Wisteria and Lavender to another. Use both pieces to 'ink' up the stamp each time and stamp all over a piece of calico. Cut out the petals, keeping close to the paint lines rather than trying to achieve a circle.

 Eclectica EEV06


Step Two: Pour a puddle of transparent Powertex onto a non stick surface and massage into each petal with your fingers. Make a little pleat in each petal. At this stage I found it easier to leave them for about half an hour to go tacky before building up the roses. I rolled the centre petal and then arranged the other petals around it, using a little more Powertex at the base to hold everything together. It was very easy as you get a lot of open time where you can come back and manipulate the petals after another half an hour and put a bit more shape into them as they start to get a little firmer. Obviously you can have a tightly layered or a more open rose, and as many petals as you want. My final rose has eight petals and is about one and a half inches across. Leave the roses to harden completely on your non stick surface. You can leave them overnight or speed things up with a hairdryer.


Step Three:- Now for the bottle. Cut a piece of stockinette big enough to fit over the top like a jumper, as it is tubular, and to reach from the top to the bottom. It looks a bit small in the picture as it has curled up on itself. Soak it thoroughly in Ivory Powertex. I find it easier to use a throwaway container for this, like a foil dish. I put an opened out plastic bag on my worksurface to contain the drips. Rub it in with your hands then wring out the excess and pop it over the top of the bottle. Arrange it in lots of lovely folds and press it down around the contours of the bottle. It will be nice and tacky so it will stick to itself easily. Make sure it is pushed down right to the base but not covering the base so it will stand. [At the end of the project I drizzled Nougat into the inside of the bottle to cover the base to give a good finish when it was lifted up].


Step 4: Next I prepared the calico to wrap around the vase over the stockinette layer. It needs to be a rectangle big enough to almost meet when wrapped around at the widest point. I stamped it in exactly the same way as making the petals but using the smaller splodge stamp from the same set. I stamped both sides as I thought the reverse might show when I draped the piece around the vase.


Step Five: I made a clay butterfly from a mould and used the remaining paint on the cut n dry foam to colour it to match the project, lightly touching the raised areas of the wings with the Wisteria/Lavender foam for highlights. The stockinette was now dry so I used the Coral foam to go over the folds and raised areas of the bottle. You can see in the background of this photo I also made some clay faces as I had wondered about using these as an alternative to the butterfly as I often see this done with Powertex.


Step Six:- I soaked the stamped calico in transparent Powertex and wrapped it around the bottle like a cape, tying it below the neck but without knotting it, and fanning out the two loose ends. I pressed the material against the contours of the bottle and created folds as I did for the stockinette, making sure there were folds at the back as well. I spread a little Powertex onto the stockinette in some of the grooves and sprinkled with two sizes of the small balls you can purchase from Powertex stockists which add loads of lovely texture. I added some more Powertex where I wanted my butterfly and rose to be and pressed them into it to act as glue. To finish off, once everything was dry, I dry-brushed Coral on the folds and frayed edges of the calico, the edges of the rose petals, and the textured balls.


Here's a photo of the back of the bottle. My favourite part of the project is a silly little thing - the strands of the stockinette which I trained with the hairdryer to dry upright out of the top of the bottle!


I hope you've found my experiment useful. I do have a bit of a confession though. I had really wanted to make an art doll but we had already done that theme! It would be so cool to have a doll's dress made from Fresco stamped material, with a full skirt and puffed sleeves stiffened with Powertex, and lots of beautiful billows and folds, but with no sewing machine required! I think there are lots of possibilities left to explore and I hope I have given you some ideas to try.
Lucy

Blog Lucy's True Colours
Twitter @ CraftyLuce

Oh I love the shawl effect wrapped around the bottle, it is quite reminiscent of a Victorian look. The Powertex offers so many possibilities, giving more versatility to fabric than ever before. Fabric flowers are always pleasing to see, and ehre is another take on them. ~Darcy

We would love to see how you interpret this topic by linking what you make to our 2016 Challenge #12: Fabric, on this page HERE.

All of our bloggers love to see your twist on their ideas,  particularly if you were inspired directly by their post. 

All links go in the draw to win a £50 voucher to spend on products of your choice from the PaperArtsy online store. The Fabric link will close 17:00 (London Time) Sunday, June 26th 2016. The winner will be announced 2 hours later at 19:00.

Friday, 1 April 2016

2016 #6 My Grandmother's Doily {by Lesley Ebdon}

2016 Topic 6: Liquid Sculpting Medium

Hi everyone, Lesley here tonight to share a Powertex and Hot Picks project with you. I've been to a couple of lovely, messy workshops recently creating with Powertex products so jumped in when I saw this topic coming up as one of the challenge themes. PaperArtsy products and Powertex, Wow, what a combination! Add to that mix one of my treasured doilies crocheted by my Grandmother and I created a doily 'vase'.


Step 1 : I started with a plain black glass vase and after making sure it was clean of any greasy finger marks, etc., and well dusted with an antistatic bag I stamped images from HP1008, HP1010 and a sentiment from HP1102 using Versamark ink and heat embossed them with WOW Vanilla White embossing powder.


HP1008, 
HP1010 
HP1102 

Step 2 : Once it had cooled down I covered the vase with cling film, turned it upside down with a kitchen roll middle inside it to raise it from the surface a little. I soaked the doily in Ivory Powertex, working it into the cotton yarn with my fingers (unless you like getting your hands extremely messy and sticky then latex gloves are a must, lol) draped it over the vase and then used my hairdryer to start the curing process whilst coaxing the doily into the shape I wanted. Once it was stiff enough to hold the shape I left it overnight to cure. (Apologies for shadowed photo but it was late at night when I took this one). 


Step 3 : Next I set about creating a butterfly. I drew the basic shape I wanted and cut it out as a template then dug out a wire working pin board that hasn't seen the light of day for years. I pinned around the template keeping the shape as much as possible and then wrapped wire round the pins twice for strength. I covered the wire with masking tape.


Step 4 : Time to get messy with Powertex again! First I removed the glass vase from the doily and using some old gauze dressing I had in my 'might come in handy' box and I cut a piece into strips about 2” wide then kept dipping a finger into the Powertex and very gently covering the gauze which I wrapped around the butterfly shape leaving a few tattered ends here and there. I used the same gauze to drape pieces onto the doily 'vase' and a tip for this is to use a wooden kebab skewer to tease the fragile gauze into the shapes you want. I again used a hairdryer to speed up the curing which didn't take long as the gauze was so fine. I then applied Sapphire, Classic and White Fire Treasure Gold to all the gauzy areas on the doily vase and the wavy folds around the top together with the butterfly.


Step 5: Now I turned to the flowers. I took a 12” x 12” sheet of good quality blue scrapbook paper, roughly brayered Buff (discontinued) and Snowflake Fresco Finish paints and then stamped the same 'bubbles' all over which I had embossed onto the vase, this time using Snowflake paint. I used a die to cut out the large spiral flowers.


Step 6 : I created wire stems covered with florists sticky tape which I glued to the back of the flowers with a glue gun and also added some stamens to the middles with the hot glue. To finish them off I edged the petals with White Fire Treasure Gold.


Step 7 : Finally, I removed the cling film and put the glass vase back into the doily, added the flowers and then glued the butterfly, with which I was inordinately pleased (it doesn't take much, lol), to the rim with hot glue.


I chose to keep my Treasure Gold colours very subtle but you could make them much stronger or you could dry brush your choice of Fresco colours. The finished doily vase reminded me very much of the little stiffened crochet baskets my Gran used to make which I think were starched. Powertex is a lot more fun and much more permanent, lol! There are quite a few similar ways doilies and lace can be used, for example you could shape them around blown up balloons to make light/lamp shades or over nicely shaped bowls to create lacy ones as tea light holders. Another tip is to remember Powertex only works with natural fibres not synthetic apparently although I haven't tried it myself. I hope this has given you a few ideas for using a permanent fabric stiffener.
Lesley

You can find me here:
Blog: Crafty Love n Hugs
Facebook: Lesley Ebdon
Twitter Craftymamma2

Wow Lesley what a wonderful way to use a treasured piece from your Grandmother, practical and beautiful and so much better than being stored in a drawer. Well done for taking the plunge and using it. ~Darcy

We would love to see how you interpret this topic by linking what you make to our 2016 Challenge #6: Liquid Sculpting Medium, on this page HERE.
All of our bloggers love to see your twist on their ideas, particularly if you were inspired directly by their post. 
All links go in the draw to win a £50 voucher to spend on products of your choice from the PaperArtsy online store. The Liquid Sculpting Medium link will close 17:00 (London Time) Sunday, April 3rd. The winner will be announced 2 hours later at 19:00.


Wednesday, 30 March 2016

2016 #6 Comparison Tags { Darcy Wilkinson}

2016 Topic 6: Liquid Sculpting Medium

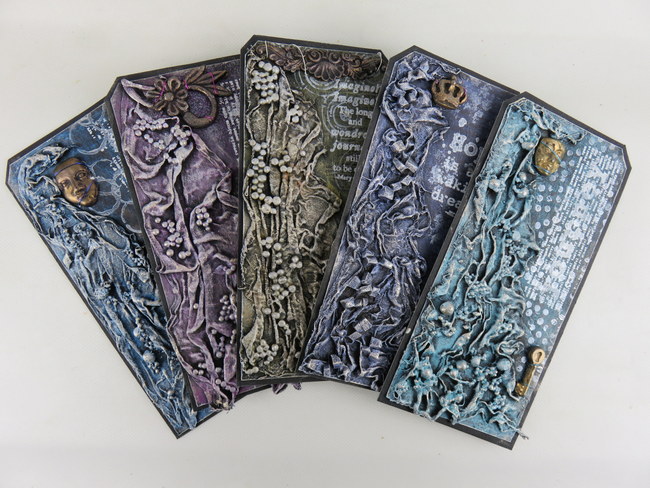
Hi everyone Darcy here, we have seen some great projects over the past 10 days  using Powertex, Paverpol and Modroc. These are fun products to play with and I urge you to try them if you get chance. In the meantime, if you don't have any of them i wanted to show that other products can produce similar results.


To do that I have created 5 tags with a different product on each one. 

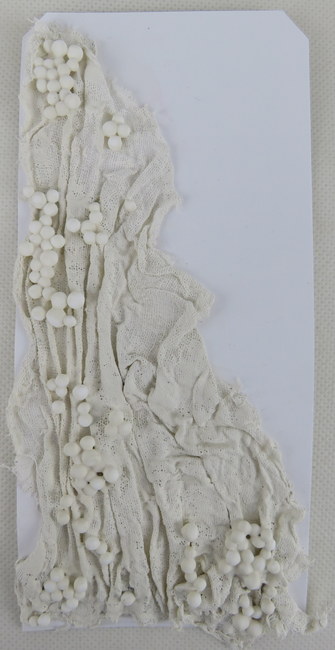
I began by cutting 5 large tags, all the same size, and 5 pieces of muslin fabric. Each piece of fabric was cut in a rough triangle shape larger than the length and width of the tag so that I had plenty to drape. 
Step 1
Tag1. I started with Paverpol, this is white in appearance and very thick and gloopy. I dipped my muslin and allowed it to drip then pulled the fabric up through my fingers. This pushed the liquid into the weave of the fabric and squeezes out the excess. It is super sticky and has a plastic feel to it. 
Tag 2. This is Powertex, my bottle is the cream coloured one. It has the consistency of slightly heavier than single cream. It is much less sticky than the Paverpol. However it does have a much stronger smell, almost like a cleaning fluid type of smell. 


Tag 3. This is Matte Medium (Winsor and Newton Galeria), it is very runny and has that gluey smell. It is not too sticky, though I recommend cleaning your hands quickly as once dry it is harder to remove than regular glue. I misted my fabric very lightly and then poured on a few drops of the medium before scrunching it up and massaging it well. 


Tag 4. This is matte gel (Golden) like the matte medium this is white and just has a regular glue smell, though slightly less than the matte medium. The gel is much thicker and is very sticky. I misted my fabric very lightly and worked the gel in with a palette knife. 


Finally Tag 5. This is Grunge Paste. It is creamy in appearance and has a much drier feel. I put some onto my craft mat, and added a little water. I then added my fabric and again I worked it in with a palette knife. It is very easy to work in, but as it is a much drier medium it did require just a tiny smear of gel to help the fabric stick to the tag. 


Step 2. Adding extra texture

Tags 1 and 2, these are the Paverpol and Powertex tags. This medium needs to be applied to natural substrates as it will not stick to plastic. Powertex sell some fabulous 3d balls and sand in decent sized pots. 4 sizes ranging from the smallest which is sand through 3 sizes of balls.( Excellent value as you get loads in each pot, however they do a starter pack if you just want a bit of each) I added these to each tag and then add a little more of each of the liquids. 


Tags 3 and 4. These are matte medium and matte gel. You have many more options with adding texture here as these glues will stick to natural and synthetics substrates alike. On the matte medium tag I raided my bean bag and added some of the polystyrene balls, with a little medium over them. Onto the matte gel tag I added some pieces of cut up makeup sponge. 


Tag 5. Back to the Grunge Paste tag, again there are no restrictions with this medium, it will take to natural and synthetic substrates. I added more of the raided polystyrene bean bag beans. 


Results so far. 
All the tags were left overnight. 
Paverpol: The fabric on this tag is totally solid, no flexibility at all any stray bits of fabric hanging over the tag are extremely sharp. The 3d balls are held in place really well. The medium has now dried clear and is a little shiny. 

Powertex: This has a matte finish and feels very solid. Overhanging bits are sturdy but not as sharp as those on the Paverpol tag. The areas that are lower and closer to the tag are more solid, the raised up ridges are very sturdy with a little flexibility. Again the 3d balls are held securely. 

Matte medium: This has a matte appearance and has dried clear and is no where near as solid. The folds are held in place but there is a lot of flexibility. The polystyrene beads are well stuck but as you would expect they still feel squishy. overall this has a much more delicate feel and appearance. 

Matte Gel: This has a matte feel, and is well set and dries clear.  The areas closer to the tag are solid and the raised folds have a little movement, though much less than the matte medium. the edges of the fabric are very hard but not sharp like the Paverpol. The foam pieces are held in place and still slightly soft. 

Grunge paste: This is well set and has the chalky matte appearance that you would expect. The folds are pretty solid with very little movement. The balls are well set and have a harder coating , however when pressed hard they do go down. 

Step 3. Adding Colour
I added black gesso(Winsor and Newton Galeria) to each tag. They all took the gesso really well, however it is time consuming getting into all the nooks and crannies. Well worth persevering though, as this base layer becomes the shadow for the top layers. 


I left the tags to dry over night, and then gave each a good rub with a baby wipe, making sure to rub over a raised area and also a flat area. 

The gesso on the Paverpol tag came off pretty easy when rubbed. On the Powertex tag a little came off but it did require stronger rubbing. The other three tags did not give up any paint even with really hard rubbing. 

Next I added 3 shades of a colour to each tag using Fresco Acrylic paint. These shades were dry brushed on and then each was topped with a little Chalk to highlight. 

I have to say I am more than a little in love with them at this point. 


The Paverpol and Powertex tags are the most interesting .However I am very impressed with the Gel tag and the chunks of makeup sponge. Now that the sponge has a coat of gel, a coat of gesso and 4 dry brushed coats of paint they are pretty solid. The Polystyrene balls on the other 2 tags work well, and they are a great substitute if you have nothing else, though even after all the paint they are still slightly soft. 

Step4. Finishing off

This isn't really a comparison step as such, but as I had come so far I thought I may aswell finish each tag and then do a final roundup of how each looked. To keep some consistency I will be using ESN stamps to finish each tag. 

To each tag I added text in black archival ink, and over that I added a large text using Snowflake paint.

ESN10

Over the white paint I added a background stamp using Pewter for a nice sheen. 

ESN15

Then I rubbed White Fire Treasure Gold all over the stiffened fabric. I didn't skimp on the Treasure Gold, I added at least a couple of layers to get a real shine going. 


Finally I glued and wired some molded embellishments onto each tag, matching the wire to the colours of the tag. 


Here are the five finished tags. 
Paverpol:

Powertex:


Matte Gel:


Matte Medium:


Grunge Paste:


As you can see they all look fairly similar, this might help you when deciding which medium to go for. 
The Paverpol and Powertex are by far the most interesting visually, the folds are detailed and the 3d balls area great addition. Out of the two, the Powertex has retained the texture of the fabric better and looks a little more natural. 

Out of the matte gel and matte medium the more detailed one is done with the gel. It holds the fabric better, where as the one done with matte medium is very soft and a lot flatter. However don't discount this one, if you are going for a much softer look then this may be perfect for you. the polystyrene beads worked great as a cheap addition, but all being the same size does make them look very uniform. I love the pieces of makeup sponge, I will definitely be using those again. 

The Grunge Paste tag is a brilliant all rounder. Not as completely solid as the Paverpol and Powertex, but it still holds the fabric really well and has not lost the fabric weave: again the balls are uniform, a grunge paste tag with the 3d Powertex balls would have been pretty much perfect. 

So there are my experiments. I hope you found them interesting and helpful. It is very hard to pick a winner, as each has plus points and could be used in different situations. For me personally my favourites would have to be the Powertex tag and the Grunge Paste tag. Which ones do you prefer? Leave your thoughts on them in the comments. 

Darcy 
Twitter: Darcy UK
Facebook: DarcyEclectica

We would love to see how you interpret this topic by linking what you make to our 2016 Challenge #6: Liquid Sculpting Medium, on this page HERE.

All of our bloggers love to see your twist on their ideas, particularly if you were inspired directly by their post. 
All links go in the draw to win a £50 voucher to spend on products of your choice from the PaperArtsy online store. The Liquid Sculpting Medium link will close 17:00 (London Time) Sunday, April 3rd. The winner will be announced 2 hours later at 19:00.