Showing posts with label 2016 Topic 6. Show all posts

Friday, 1 April 2016

2016 #6 My Grandmother's Doily {by Lesley Ebdon}

2016 Topic 6: Liquid Sculpting Medium

Hi everyone, Lesley here tonight to share a Powertex and Hot Picks project with you. I've been to a couple of lovely, messy workshops recently creating with Powertex products so jumped in when I saw this topic coming up as one of the challenge themes. PaperArtsy products and Powertex, Wow, what a combination! Add to that mix one of my treasured doilies crocheted by my Grandmother and I created a doily 'vase'.


Step 1 : I started with a plain black glass vase and after making sure it was clean of any greasy finger marks, etc., and well dusted with an antistatic bag I stamped images from HP1008, HP1010 and a sentiment from HP1102 using Versamark ink and heat embossed them with WOW Vanilla White embossing powder.


HP1008, 
HP1010 
HP1102 

Step 2 : Once it had cooled down I covered the vase with cling film, turned it upside down with a kitchen roll middle inside it to raise it from the surface a little. I soaked the doily in Ivory Powertex, working it into the cotton yarn with my fingers (unless you like getting your hands extremely messy and sticky then latex gloves are a must, lol) draped it over the vase and then used my hairdryer to start the curing process whilst coaxing the doily into the shape I wanted. Once it was stiff enough to hold the shape I left it overnight to cure. (Apologies for shadowed photo but it was late at night when I took this one). 


Step 3 : Next I set about creating a butterfly. I drew the basic shape I wanted and cut it out as a template then dug out a wire working pin board that hasn't seen the light of day for years. I pinned around the template keeping the shape as much as possible and then wrapped wire round the pins twice for strength. I covered the wire with masking tape.


Step 4 : Time to get messy with Powertex again! First I removed the glass vase from the doily and using some old gauze dressing I had in my 'might come in handy' box and I cut a piece into strips about 2” wide then kept dipping a finger into the Powertex and very gently covering the gauze which I wrapped around the butterfly shape leaving a few tattered ends here and there. I used the same gauze to drape pieces onto the doily 'vase' and a tip for this is to use a wooden kebab skewer to tease the fragile gauze into the shapes you want. I again used a hairdryer to speed up the curing which didn't take long as the gauze was so fine. I then applied Sapphire, Classic and White Fire Treasure Gold to all the gauzy areas on the doily vase and the wavy folds around the top together with the butterfly.


Step 5: Now I turned to the flowers. I took a 12” x 12” sheet of good quality blue scrapbook paper, roughly brayered Buff (discontinued) and Snowflake Fresco Finish paints and then stamped the same 'bubbles' all over which I had embossed onto the vase, this time using Snowflake paint. I used a die to cut out the large spiral flowers.


Step 6 : I created wire stems covered with florists sticky tape which I glued to the back of the flowers with a glue gun and also added some stamens to the middles with the hot glue. To finish them off I edged the petals with White Fire Treasure Gold.


Step 7 : Finally, I removed the cling film and put the glass vase back into the doily, added the flowers and then glued the butterfly, with which I was inordinately pleased (it doesn't take much, lol), to the rim with hot glue.


I chose to keep my Treasure Gold colours very subtle but you could make them much stronger or you could dry brush your choice of Fresco colours. The finished doily vase reminded me very much of the little stiffened crochet baskets my Gran used to make which I think were starched. Powertex is a lot more fun and much more permanent, lol! There are quite a few similar ways doilies and lace can be used, for example you could shape them around blown up balloons to make light/lamp shades or over nicely shaped bowls to create lacy ones as tea light holders. Another tip is to remember Powertex only works with natural fibres not synthetic apparently although I haven't tried it myself. I hope this has given you a few ideas for using a permanent fabric stiffener.
Lesley

You can find me here:
Blog: Crafty Love n Hugs
Facebook: Lesley Ebdon
Twitter Craftymamma2

Wow Lesley what a wonderful way to use a treasured piece from your Grandmother, practical and beautiful and so much better than being stored in a drawer. Well done for taking the plunge and using it. ~Darcy

We would love to see how you interpret this topic by linking what you make to our 2016 Challenge #6: Liquid Sculpting Medium, on this page HERE.
All of our bloggers love to see your twist on their ideas, particularly if you were inspired directly by their post. 
All links go in the draw to win a £50 voucher to spend on products of your choice from the PaperArtsy online store. The Liquid Sculpting Medium link will close 17:00 (London Time) Sunday, April 3rd. The winner will be announced 2 hours later at 19:00.

Wednesday, 30 March 2016

2016 #6 Comparison Tags { Darcy Wilkinson}

2016 Topic 6: Liquid Sculpting Medium

Hi everyone Darcy here, we have seen some great projects over the past 10 days  using Powertex, Paverpol and Modroc. These are fun products to play with and I urge you to try them if you get chance. In the meantime, if you don't have any of them i wanted to show that other products can produce similar results.


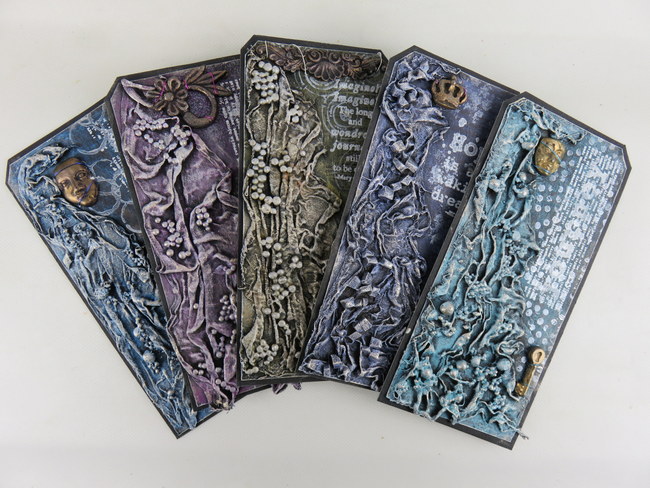
To do that I have created 5 tags with a different product on each one. 

I began by cutting 5 large tags, all the same size, and 5 pieces of muslin fabric. Each piece of fabric was cut in a rough triangle shape larger than the length and width of the tag so that I had plenty to drape. 
Step 1
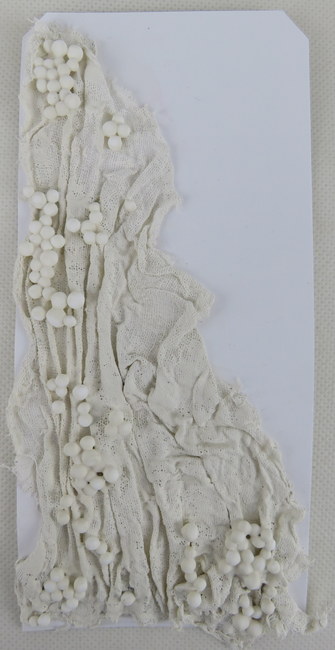
Tag1. I started with Paverpol, this is white in appearance and very thick and gloopy. I dipped my muslin and allowed it to drip then pulled the fabric up through my fingers. This pushed the liquid into the weave of the fabric and squeezes out the excess. It is super sticky and has a plastic feel to it. 
Tag 2. This is Powertex, my bottle is the cream coloured one. It has the consistency of slightly heavier than single cream. It is much less sticky than the Paverpol. However it does have a much stronger smell, almost like a cleaning fluid type of smell. 


Tag 3. This is Matte Medium (Winsor and Newton Galeria), it is very runny and has that gluey smell. It is not too sticky, though I recommend cleaning your hands quickly as once dry it is harder to remove than regular glue. I misted my fabric very lightly and then poured on a few drops of the medium before scrunching it up and massaging it well. 


Tag 4. This is matte gel (Golden) like the matte medium this is white and just has a regular glue smell, though slightly less than the matte medium. The gel is much thicker and is very sticky. I misted my fabric very lightly and worked the gel in with a palette knife. 


Finally Tag 5. This is Grunge Paste. It is creamy in appearance and has a much drier feel. I put some onto my craft mat, and added a little water. I then added my fabric and again I worked it in with a palette knife. It is very easy to work in, but as it is a much drier medium it did require just a tiny smear of gel to help the fabric stick to the tag. 


Step 2. Adding extra texture

Tags 1 and 2, these are the Paverpol and Powertex tags. This medium needs to be applied to natural substrates as it will not stick to plastic. Powertex sell some fabulous 3d balls and sand in decent sized pots. 4 sizes ranging from the smallest which is sand through 3 sizes of balls.( Excellent value as you get loads in each pot, however they do a starter pack if you just want a bit of each) I added these to each tag and then add a little more of each of the liquids. 


Tags 3 and 4. These are matte medium and matte gel. You have many more options with adding texture here as these glues will stick to natural and synthetics substrates alike. On the matte medium tag I raided my bean bag and added some of the polystyrene balls, with a little medium over them. Onto the matte gel tag I added some pieces of cut up makeup sponge. 


Tag 5. Back to the Grunge Paste tag, again there are no restrictions with this medium, it will take to natural and synthetic substrates. I added more of the raided polystyrene bean bag beans. 


Results so far. 
All the tags were left overnight. 
Paverpol: The fabric on this tag is totally solid, no flexibility at all any stray bits of fabric hanging over the tag are extremely sharp. The 3d balls are held in place really well. The medium has now dried clear and is a little shiny. 

Powertex: This has a matte finish and feels very solid. Overhanging bits are sturdy but not as sharp as those on the Paverpol tag. The areas that are lower and closer to the tag are more solid, the raised up ridges are very sturdy with a little flexibility. Again the 3d balls are held securely. 

Matte medium: This has a matte appearance and has dried clear and is no where near as solid. The folds are held in place but there is a lot of flexibility. The polystyrene beads are well stuck but as you would expect they still feel squishy. overall this has a much more delicate feel and appearance. 

Matte Gel: This has a matte feel, and is well set and dries clear.  The areas closer to the tag are solid and the raised folds have a little movement, though much less than the matte medium. the edges of the fabric are very hard but not sharp like the Paverpol. The foam pieces are held in place and still slightly soft. 

Grunge paste: This is well set and has the chalky matte appearance that you would expect. The folds are pretty solid with very little movement. The balls are well set and have a harder coating , however when pressed hard they do go down. 

Step 3. Adding Colour
I added black gesso(Winsor and Newton Galeria) to each tag. They all took the gesso really well, however it is time consuming getting into all the nooks and crannies. Well worth persevering though, as this base layer becomes the shadow for the top layers. 


I left the tags to dry over night, and then gave each a good rub with a baby wipe, making sure to rub over a raised area and also a flat area. 

The gesso on the Paverpol tag came off pretty easy when rubbed. On the Powertex tag a little came off but it did require stronger rubbing. The other three tags did not give up any paint even with really hard rubbing. 

Next I added 3 shades of a colour to each tag using Fresco Acrylic paint. These shades were dry brushed on and then each was topped with a little Chalk to highlight. 

I have to say I am more than a little in love with them at this point. 


The Paverpol and Powertex tags are the most interesting .However I am very impressed with the Gel tag and the chunks of makeup sponge. Now that the sponge has a coat of gel, a coat of gesso and 4 dry brushed coats of paint they are pretty solid. The Polystyrene balls on the other 2 tags work well, and they are a great substitute if you have nothing else, though even after all the paint they are still slightly soft. 

Step4. Finishing off

This isn't really a comparison step as such, but as I had come so far I thought I may aswell finish each tag and then do a final roundup of how each looked. To keep some consistency I will be using ESN stamps to finish each tag. 

To each tag I added text in black archival ink, and over that I added a large text using Snowflake paint.

ESN10

Over the white paint I added a background stamp using Pewter for a nice sheen. 

ESN15

Then I rubbed White Fire Treasure Gold all over the stiffened fabric. I didn't skimp on the Treasure Gold, I added at least a couple of layers to get a real shine going. 


Finally I glued and wired some molded embellishments onto each tag, matching the wire to the colours of the tag. 


Here are the five finished tags. 
Paverpol:

Powertex:


Matte Gel:


Matte Medium:


Grunge Paste:


As you can see they all look fairly similar, this might help you when deciding which medium to go for. 
The Paverpol and Powertex are by far the most interesting visually, the folds are detailed and the 3d balls area great addition. Out of the two, the Powertex has retained the texture of the fabric better and looks a little more natural. 

Out of the matte gel and matte medium the more detailed one is done with the gel. It holds the fabric better, where as the one done with matte medium is very soft and a lot flatter. However don't discount this one, if you are going for a much softer look then this may be perfect for you. the polystyrene beads worked great as a cheap addition, but all being the same size does make them look very uniform. I love the pieces of makeup sponge, I will definitely be using those again. 

The Grunge Paste tag is a brilliant all rounder. Not as completely solid as the Paverpol and Powertex, but it still holds the fabric really well and has not lost the fabric weave: again the balls are uniform, a grunge paste tag with the 3d Powertex balls would have been pretty much perfect. 

So there are my experiments. I hope you found them interesting and helpful. It is very hard to pick a winner, as each has plus points and could be used in different situations. For me personally my favourites would have to be the Powertex tag and the Grunge Paste tag. Which ones do you prefer? Leave your thoughts on them in the comments. 

Darcy 
Twitter: Darcy UK
Facebook: DarcyEclectica

We would love to see how you interpret this topic by linking what you make to our 2016 Challenge #6: Liquid Sculpting Medium, on this page HERE.

All of our bloggers love to see your twist on their ideas, particularly if you were inspired directly by their post. 
All links go in the draw to win a £50 voucher to spend on products of your choice from the PaperArtsy online store. The Liquid Sculpting Medium link will close 17:00 (London Time) Sunday, April 3rd. The winner will be announced 2 hours later at 19:00.

Monday, 28 March 2016

2016 #6 Fabric Flower Lady {by Elizabeth Borer}

2016 Topic 6: Liquid Sculpting Medium

Hi there, Liz here working with the current topic using Powertex universal medium. I've not used this medium before, but I have used Paverpol. So I decided to try Powertex, they both do a very similar job because they cause fabric to become hard so that it can be used to create wonderful sculptures. I really don't mind which one I use because the result for me was great with both of them. However, if like me, you are a messy crafter and always get your hands covered in whatever you are using then I found Powertex to be slightly easier to use. When I used Paverpol I found it difficult to get off my hands but I found Powertex much easier to remove! Of course I could have worn gloves, silly me. I don't want to give long instructions about how to use this medium. There's lot of information available if you get interested, I'm just going to give you some ideas and hopefully inspiration about what I did .


To create a base for my little lady, I stuck a small mdf box onto an oval mdf plaque. I then coated a large piece of white cotton fabric with Powertex and draped and folded it over the MDF. The Powertex not only stiffens the fabric but sticks it to the base.


I have seen pictures of wire used to create a figure shaped form to drape the fabric on but I had a mad idea which worked quite well. I used a wooden manikin (often used by artists for drawing figures) as the base for my lady. I used strips of fabric  about 2 cm wide soaked in the medium to wrap around the arms and legs. I then used a larger piece to completely cover her head and neck. Finally I used more fabric to cover her chest. I didn't need to cover the whole figure because it was going to have 'clothes' added. The medium starts drying quite fast but there is plenty of time to position the figure on the base so that it all sticks together and hardens in place.


Once the figure is in the right place she can be dressed! I used rectangles of fabric to create the main part of the dress and then added the sleeves. I twisted fabric and added it around the head before adding longer pieces hanging down from the head.
 

 I used artificial fabric flowers, again soaked in the medium, to create a little garden around the lady and also added flowers to the figure. It doesn't matter what colour the flowers are because they will all be painted. I then left the whole thing to dry overnight. It's amazing once dry because it is so hard, like stone. This picture doesn't show that I added pearls to the centres of the smaller flowers and across the top of her head. They can be seen on later photos.


I then painted the whole piece with Fresco paints. I used Nougat because I like the fact that it is quite neutral with a warm tone to the colour. It also is a good skin tone so the areas of skin on the figure won't need extra colour. The coloured flowers needed two coats of paint.


The sculpture could be painted any colour and left at this stage. It looks amazingly like stone in just a single colour. However I am going to show you a few more ideas about adding colour to the sculpture. In this picture I used a darker colour to add shading and an aged effect. I used Squid Ink thinned and made more transparent by mixing it with Matte Glaze. This can be painted into the nooks and crannies of the fabric folds and into the centres of the flowers. Also add the colour anywhere there would be shadows. Again the sculpture could be left at this stage. If the base colour had been grey and a darker grey was used for the shadows it would look like stone.


Finally I decided to add colour to the sculpture. Again I mixed Matte Glaze with some Fresco paints so that the colours weren't solid. The main coat/ dress is  painted with Lake Wanaka and the largest flowers were painted with washes of Plum. I used shades of purple and pink and blue for the other flowers. I noticed that the fabric felt softer when the wet paint was applied but once dry it was solid again. Once dry I dry brushed Nougat over all the colours to soften them and tone them together. I finished by adding some gold highlights by mixing Treasure Gold colours White Fire and Florentine together. I mixed the Treasure Gold with alcohol ink blending solution to create a paint so that I could paint the centres of the flowers and pearls and add highlights to the petals .


Here's a closer photo of one of the larger flowers and the boots of the figure. I created the boots by cutting a shield shaped piece of fabric and folding it around the feet .


It didn't occur to me until it was too late that although the sculpture was hard it was made of fabric, So I used a new paintbrush. Oops ! Painting fabric is not good for brushes, it damages the bristles, so I would advise using an older brush for this work .
I hope you have enjoyed seeing my ideas and this sculpture. Maybe you will be inspired to have a go with one of these mediums. I had a lot of fun and am now thinking of stamping a design onto fabric before sculpting with it. I know it's a bit late, but Happy Easter to all. 


Liz .


Thank you Liz for sharing this exquisite art creation with us. This is so reminiscent of one of those fine art ornaments we all know and love. The folds of the fabric sit beautifully and the soft pastel colours tinged with Treasure Gold is just wonderful. ~Gillian

We would love to see how you interpret this topic by linking what you make to our 2016 Challenge #6: Liquid Sculpting Medium, on this page HERE.
All of our bloggers love to see your twist on their ideas, particularly if you were inspired directly by their post. 

All links go in the draw to win a £50 voucher to spend on products of your choice from the PaperArtsy online store. The Liquid Sculpting Medium link will close 17:00 (London Time) Sunday, April 3rd. The winner will be announced 2 hours later at 19:00.

Sunday, 27 March 2016

2016 #6 Textured Canvas {by Lin Brown}

2016 Topic 6: Liquid Sculpting Medium

Hi everyone Lin Brown from Yoursartfully here. Tonight I'd like to share with you, a post about Powertex in conjunction with things that I use everyday in my artwork.

I have been aware of Powertex for some time now but only recently purchased some to experiment with. I was drawn to some fabulous abstract canvases on display at a show last year and really wanted to have a dabble for myself. 

As many of you are loyal PaperArtsy followers, I wanted to try and combine Powertex with PaperArtsy stamps, stencils and other products that I frequently use, so that my canvas would be recognised as my style and not influenced by the artwork I had seen. I'm not gonna fib, it was a challenge, the finished piece is not the vision I had in my head but hey ho, it's all about learning, discovery and understanding a new product.


Step One: For this project, I decided to recycle a canvas that had been used for a previous experiment. It has scraps of fabric stuck to it along with sections of Bead Gel. If my memory serves me correctly, I think I had painted it with "Silks" by LuminArte, followed by some Gesso to tone it down.


Step Two:  I poured a puddle of Ivory Powertex on the surface of the canvas and used a palette knife to spread it out. It seemed to be self levelling so I left it over night to dry. In the morning, I was surprised to find that some of the underlying colours had seeped through, but that was OK  I quite liked it.


Step Three: Realising that the consistency of Powertex is too runny to use through a stencil (you can apparently mix another of their products with the Powertex fabric hardener which I guess may enable you to use it through a stencil but I didn't have any of this!) I reverted to my trusty Grunge Paste to add some texture through my new stencil PS024. I used a pokey tool to create little holes in the leaves while the Grunge Paste was still wet.


Step Four: I stamped some images from ELB26 on some interfacing using Archival ink which needed to be heat set. I chose this fabric as I knew it wouldn't fray when I cut it out. As the fabric was quite thin, I stamped double the amount of images so that I could stick two together to create a more substantial flower.

ELB26

Step Five: This is the part of the project where I started to struggle. I now wish I had used a different fabric, something with a bit more texture to it and also a fabric that is more flexible. My flowers are looking rather rigid in my opinion. As I said earlier, I'm not too bothered, it's all part of the learning curve. If you look closely, you'll see that the fibres I used have much more movement to them and were definitely easier to coat with the Powertex. When using Powertex on fabric, you really need to massage the product into the weave of the fabric to achieve the best results. Those little balls are also a Powertex product, they stuck to the Powertex easily and are great for added dimension.


Step Six: It was at this point that I decided to sprinkle on some of the brand new Infusions. The Powertex was still a little wet at this point so it did stick to the surface quite well but I needed to give it a light mist of water to help dissolve the crystals and spread the colour a little more. Loving this effect!!!


Step Seven: At this point, I decided to grab my Fresco Finish paints and start painting. I also added some Treasure Gold to highlight the textures.


Step Eight: As a finishing touch, I painted Powertex on a paper flower and sprinkled it with Infusions. I love how that enabled me to shape the flower.


Here is a close up photograph of my favourite part. I love how Treasure Gold really enhances the texture of the fibres and little balls.


I hope my project inspires you to have a play with some Powertex. My head is certainly buzzing with ideas for future projects. Personally, I'd really like to try making a selection of 3D fabric flowers that could be placed in a vase.

Lin Brown
Yoursartfully (blog)
@yoursartfully (Twitter)

Thanks Lin, the texture here is fabulous. My favourite part is the section of fibres too, to be able to give something so floppy such great body and strength is wonderful and opens up so many possibilites.  The whole canvas is definitely your style, but with added depth and dimension. ~Darcy

We would love to see how you interpret this topic by linking what you make to our 2016 Challenge #6: Liquid Sculpting Medium, on this page HERE.
All of our bloggers love to see your twist on their ideas, particularly if you were inspired directly by their post. 
All links go in the draw to win a £50 voucher to spend on products of your choice from the PaperArtsy online store. The Liquid Sculpting Medium link will close 17:00 (London Time) Sunday, April 3rd. The winner will be announced 2 hours later at 19:00.