Showing posts with label Image Transfers. Show all posts

Saturday, 14 July 2018

2018 #12 Transfers:Part 2: Tape Transfer {by Dounia}

2018 Topic 12: Transfers

Dounia continues with her experimentation in this post, with more super-interesting effects. AS we have the challenge open for an additional week, you can still join us to share you preferred transfer techniques! ~Leandra


Hi everyone, it's Dounia back with part two of this exploration of transfer techniques. This time I will be sharing some ideas using clear tape, one of the quickest ways to transfer!

Clear tape transfer is not a new technique but I hope to show you it can be creative and versatile, and without any drying time, perfect my impatient self!


If you have not come across tape transfer in your creative musings before, here is a great video tutorial by Sara Naumann:


Quick summary: You cover your chosen image with clear tape, overlapping if necessary.  You burnish it really well then soak the paper with water. Finally you rub the back side to take off the paper pulp until smooth.


The basic process is the same as paint/medium/paste transfer but you get a transparent film you can then apply to you project. I like that there is no drying time! Personally, I tend to make a bunch at the same time and let them soak in a bowl of a water as the plastic tape, unlike the paper, will resist it.

I find this technique particularly useful to transfer small images, from magazines or catalogues. As what you see is the ink stuck to the tape, clouding is not a problem and you can transfer words, they will be the right way around! These pieces are then easy to position and glue exactly where you want them to be, like the little characters in this project:


As the pieces are slightly transparent (that depends on the paper) you can easily create depth and interest by layering the images:


You can also transfer a pretty or interesting pattern, from paper scraps for example. The transparency film can be used as the background of a tiny project or die cut to make embellishments like these butterflies:


Another possibility is to use patterned plastic tape. They are not as common as washi tape but lots of designs exist out there. I have a useful one with the alphabet, great for titles. For an added layer of interest and easy coordination, I like to use it to transfer scraps left over from the background (here a classic Satin Glaze transfer).


I also own a lovely large tape printed with vintage images that provides beautiful elements by itself. Transfered backgrounds make them even greater.


You might recognise the moth from yesterday's project. On the same roll is also the butterfly for this project:


Clear Tape is a quick and easy transfer technique that can be a nice first experiment without worrying  about which or how much medium to use. It is quite versatile, from transferring whole pictures to creating embellishments. And there surely are even more ways to creatively use it! I hope you give it a try and have fun.
 
Dounia x

Blog: Doudoulina


To join our challenge and win a new Zinski apron:
Simply make something arty relevant to the topic, and link your creation from any social URL (eg. Instagram, Pinterest, Blog Post etc) sharing your original make to this challenge page.

The current topic link Topic 12: Transfers will close 17:00 (London Time) Sunday, 22nd July 2018, and the winner will be announced 2 hours later at 19:00.

NB you have 3 weeks for this challenge due to New Products being announced


All links go in the draw to win a PaperArtsy creative apron. Please make sure we can contact you as a prize winner - it helps if you share your contact info from the platform you opt to use.

Good Luck! If you have any questions, don't hesitate to ask!

Friday, 13 July 2018

2018 #12 Transfers: Part 1: Grunge Paste Transfer {by Dounia Large}

2018 Topic 12: Transfers

This is part one of 2 posts from Dounia. Always experiments, this is such a great way to throw a bunch of ideas at you to explore further! ~ Leandra

Bonjour everyone, it's Dounia from France and I'd like to share with you an experiment with partial tranfers, adding relief and pattern to this already quite versatile technique!

I love Grunge Paste so I wanted to try transfering with it, as shown by Kaz Hall in this post. However, what else is Grunge Paste great for? Stenciling! I therefore decided to see if you could combine the two... Spoiler: it works!


I mainly see transfers done with faces, characters or scenes and while I like the results I personally love to use transfers to build background interest and texture. I find a good source of images for that is home decor catalogues with all their pictures of luxurious fabrics an wall-papers. So many patterns to chose from!


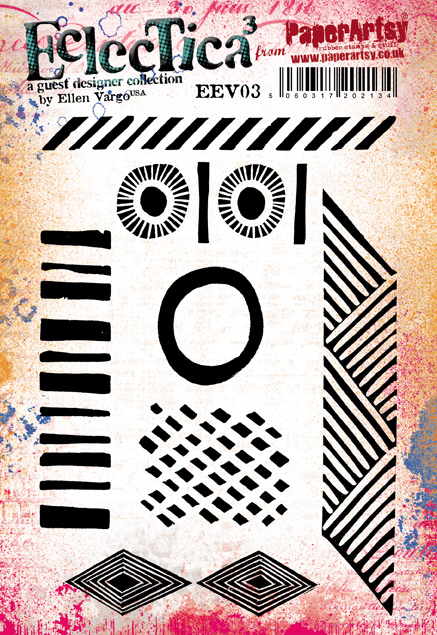
I however like to begin with a painted base, that might eventually be seen by transparency. Here I used the lovely Frescos Acrylic paints with a bayer and the fantastic abstract stamps by Ellen Vargo. The bold shapes of EEV03 provide a great simple first layer.


It can then built on with EEV05 or EEV06 for examples. I love that no matter how you stamp them, these stamps give you an organic, unique and complex look.


The idea is then to stencil with Grunge Paste and put the image on it as for a usual direct transfer, hoping that the magic only happens where the Grunge Paste is... In order to see the pattern from the transferred image, I believe it is better to use stencils with large open areas. Here I used the striking heart stencil PS054 by Tracy Scott. Perfect for the job!


The Grunge Paste is a joy to stencil and the transfer works quite well. I however find it a bit more fragile than the ones made with paint or medium. I can see several possible causes: maybe it is inherent to the paste as it can be sanded, or maybe the lighter than usual pressure I apply in order to not completely squish the stenciled pattern is not enough, or maybe I'm too impatient and the paste was not totally dry when I begun rubbing!


Anyway on this one, you can see I rubbed quite a few spots bald and then found myself at lost about what to do with this sample.... so I focused on the second one with the help of another great Tracy Scott's stencil, PS089:


This time I was much more careful and I'm quite happy with the result! Sometime you are able to pull big pieces at once and can see the "reverse transfer". The transfer is still far from perfect but I like the organic corrugated look, I think it fits this project. I am pretty sure that with more care, gentleness and patience, you could get a near pefect tranfer.


To provide a alternative focus point, I sneaked in another type of transfer but that's a story for tomorrow!


I think this is a interesting technique to vary your transfers, and it was not as fidly as I feared it might be! This was only an experimental project to see if it would work and this idea can be taken in lots of directions: you could use ultra thick gel medium instead of Grunge Paste for a transparent variant or you could substitute the abstract patterns for faces or little scenes in the bigger stenciled areas. I hope this post inspired you to try!

Lots of creativity to you
Dounia x

Blog: Doudoulina


To join our challenge and win a new Zinski apron:
Simply make something arty relevant to the topic, and link your creation from any social URL (eg. Instagram, Pinterest, Blog Post etc) sharing your original make to this challenge page.

The current topic link Topic 12: Transfers will close 17:00 (London Time) Sunday, 22nd July 2018, and the winner will be announced 2 hours later at 19:00.

NB you have 3 weeks for this challenge due to New Products being announced


All links go in the draw to win a PaperArtsy creative apron. Please make sure we can contact you as a prize winner - it helps if you share your contact info from the platform you opt to use.

Good Luck! If you have any questions, don't hesitate to ask!

Wednesday, 11 July 2018

2018 #12 Transfers: Transfers on Clay {by Alison Hall}

2018 Topic 12: Transfers


Hmmm I've been wondering if this was possible, and Alison now shows us how, not 1 but 3 ways! What wonderful results! ~ Leandra

Hi everyone, it's Alison/Craftytrog with you today, and I'd like to share with you some transfers I did onto oven-bake clay. When I decided to create a project for this challenge, I thought I'd check out YouTube to see if I could find a different sort of transfer technique. I found a few videos using clay which looked pretty cool, so thought I would give a couple of the techniques a try. For my projects, I've used both paper napkins and laser prints with Premo Polymer Clay.


The first technique I used was the paper napkin one. This involved separating the 3 layers of the napkin, and using the top layer, image face down on the clay. You just roll out your clay, gently burnish the tissue image onto the clay using your fingers, cut your required shape, then bake it with the tissue still in place, as directed on the clay packaging.


Placing cling film over the clay and tissue whilst cutting, gives smooth and rounded edges. Once cooked and cooled, pop the piece into water, then use your finger to rub away the tissue to reveal the image transferred onto the clay. 


I also used a few laser printouts on the clay, a black & white photo of my daughter, part of one of my own art pieces, and also a free background download by artist Carolyn Dube. This technique involves placing the image face down on the clay, then using cotton wool to dab it with rubbing alcohol. I used Isopropanol. You need to apply the alcohol a few times, leaving it to dry out in between. Carefully lift the image to check whether the image has transferred, and also be careful not to slide the image whilst dabbing on the alcohol. 


The black and white image didn't transfer well, but the others turned out pretty good.


I found both techniques fairly easy to do, although I put the napkin image on the wrong way up in my first attempt, which resulted in no image on the clay! Lol! That was rather disheartening, but I persevered and was pleased with my second attempt. The piece with the birds in the centre below, was made with a napkin image, onto a partial laser print transfer. I really like this double effect. After baking, you can also use alcohol pens to accentuate the colours of your clay transfers if you wish. 


I decided to make a few cards with my clay transfer pieces. I stamped backgrounds using images from PaperArtsy Ink & The Dog stamp sets


The Premo Clay is very light once baked, so it works very well on cards.


Making transfers onto the clay were fun techniques to do, and I would encourage you to give them a try. You could also use your clay pieces to decorate boxes and canvases. On one video I looked at, the artist rolled out her clay a bit thinner, and made book marks, which I think is a lovely idea. I look forward to seeing your clay projects for the Transfer Challenge.

Alison x


To join our challenge and win a new Zinski apron:
Simply make something arty relevant to the topic, and link your creation from any social URL (eg. Instagram, Pinterest, Blog Post etc) sharing your original make to this challenge page.

The current topic link Topic 12: Transfers will close 17:00 (London Time) Sunday, 22nd July 2018, and the winner will be announced 2 hours later at 19:00.

NB you have 3 weeks for this challenge due to New Products being announced


All links go in the draw to win a PaperArtsy creative apron. Please make sure we can contact you as a prize winner - it helps if you share your contact info from the platform you opt to use.

Good Luck! If you have any questions, don't hesitate to ask!

Monday, 9 July 2018

2018 #12 Transfers: Imagine {by Carol Fox}

2018 Topic 12: Transfers


It's always interesting when a blogger makes a slight boo boo and then shares with us how they recover! Carol does that so well in this post. Read on! ~Leandra


Hi everyone, it's Carol from Welcome to my World here with you today, and I'd like to share with you a journal page using Fresco Finish Matte Glaze to Transfer a magazine image as the main feature on my page. I wanted my image to be the main feature but also to fall into my page and be part of the background so I used stencils, stamps and paint over my image to hopefully create this effect.


I was slightly annoyed with myself as I forgot to closely trim my image, I was so busy getting the position of it before I glued it down so no dark blobs of paint were where the face would be that I just totally forgot until I rubbed the backing off. But lesson learned, I will never do that again.


Fresco Paints in colours of Sage, Antarctic and Magic Moss dry brushed on to, making sure that the area where my image would go is the lightest shade.


I gave my card one coat of Fresco Finish Matte Glaze and let it dry, I then applied a second very generous coat where my image would go, laid it down and rubbed it really well to make sure it was thoroughly stuck. I left it over night to dry.


I spritzed the back of the image with water and rubbed off the backing until the image was revealed, this is where I was really annoyed with myself and realised I had not closely trimmed my image. But as it was a magazine page I did not have another so decided to work with what I had. 


I had some scraps of paper tissue left from a previous project and I layered these over the background and over the image to (a) hide my lack of trimming and (b) to start to create my feel of the image going into the background a bit.


PaperArtsy Stencil {EKD} 046 (PS046)

I used Kim Dellow's Stencil PS046 and Fresco paint  Dolly Mix to add  bit of a pop of colour against all the greens.


I then bumped the stencil several times to repeat the image using the same Fresco Paint colours as for my background to bring the background back to the foreground. 


Working from the palest colours to the brighter Magic Moss (from FFSA3 - above) to finish.


Eclectica³ Sara Naumann Set 24 (ESN24)

I used stamp set ESN24 for my stamping with black archival ink.I used the circle element from the Imagination stamp around the edges and corners of my page too, the larger circle at the top of the image is well away from the words and very easy to use separately.

I have learnt through trial and error that it is best to leave my image to "set" overnight when image transferring using this method. I have wrecked it many times through my impatience, so now I do my images late at night, so I am not tempted to just have a go to see if it's going to work. I have also found that shiny images work best, I do still get some bits that lift but as I generally tend to be a bit grungy I see this as a plus and this is why I always paint the page first so at least you are not seeing blank page underneath.

I hope you enjoyed my project and that you have a go at it yourself.

You can find me at the following palces.

Carol x

Blog: Welcome to my World
Facebook: Gingers Altered Bits
Instagram: Gingernonuts
Pinterest: Carol Fox

To join our challenge and win a new Zinski apron:
Simply make something arty relevant to the topic, and link your creation from any social URL (eg. Instagram, Pinterest, Blog Post etc) sharing your original make to this challenge page.

The current topic link Topic 12: Transfers will close 17:00 (London Time) Sunday, 22nd July 2018, and the winner will be announced 2 hours later at 19:00.

NB you have 3 weeks for this challenge due to New Products being announced


All links go in the draw to win a PaperArtsy creative apron. Please make sure we can contact you as a prize winner - it helps if you share your contact info from the platform you opt to use.

Good Luck! If you have any questions, don't hesitate to ask!

Friday, 6 July 2018

2018 #12 Transfers: The Courage of Your Dreams {by Alison Bomber}

2018 Topic 12: Transfers


PaperArtsy HQ intro to the post / and the blogger...
 

Hi everyone, it's Alison from Words and Pictures here with you today, with something in a slightly different style from my usual textures and layers.  I've been playing with my Gelli plate and some magazine images, following a great tutorial on YouTube from Birgit Koopsen.

I thought it looked fun, and I had a lovely time experimenting with a variety of paints and various book pages and magazine photos.  The cards that I'm sharing here today - a pair and a trio - are the tip of the iceberg of a pile of trials... some successful, others less so.  And although they're not in my usual style, I ended up loving the atmospheric look.


I found it was best to have a strong colour contrast between the transfer layer and the pick-up layer and I was happiest when I played with simple neutrals, rather than lots of bold colour (no big surprises there!), so I stuck mostly to a dark Payne's Grey for the transfer layer and a soft Titanium Buff for the pick-up (both Amsterdam Acrylics).  And I used two separate brayers just to make sure that, even if the paint hadn't quite dried on the brayer, I wouldn't be contaminating things with completely the wrong colour!


I followed Birgit's suggestion to keep my paint layers nice and thin.  You need a good coating of the Gelli plate for the transfer layer, but it mustn't be thickly applied.  Then just burnish on the image you want to use, face down onto the paint.  When you've made good contact across the whole area, then peel the page away.  The image will be visible on the plate.


You need to let that layer dry thoroughly before applying the pick-up layer.  As you can see, I'm using a really pale colour to contrast with the dark transfer layer.  And again, apply it thinly.  You should be able to see the original image hovering behind.  (Sorry about the huge shadow across the photos - it's my inconvenient window frame.)


Then immediately press your chosen paper/cardstock onto the Gelli plate while that top layer is still wet, and burnish firmly across the whole plate.  For these, I was working directly onto some 7 x 7 inch pre-folded cards.


A couple of things to bear in mind... if there's really nothing showing after you've pressed the image onto your painted plate, then you should probably give up.  Different print qualities and inks mean not all images will play nicely.  But what you see is pretty much what you'll get - so if you've got a good image showing, you'll probably get a good "pull" with your pick-up layer.


Before I started printing my cards, I positioned one directly underneath the Gelli plate.  That means I can use it to line up each print to create a border around the edge.  It also means you have a white surface underneath the Gelli plate so you can see what's going on nice and clearly, and get a good sense of how thick your top layer is when you apply it.


Regulars at Words and Pictures will know I've been playing with the Gelli plate quite a lot recently (often with natural elements from my garden) and I've fallen in love with the textured look which you get from printing with paint.


There was one particular photo shoot which caught my eye in the magazine I was using for these cards.  I loved the slender tree branches they'd hidden the model amongst.


They create a fabulous textured look all of their own in the subtle printed versions - almost a creased or crackled look (and you all know how much I love my crackle!).


For this trio, I gradually decreased the amount of buff paint and increased the amount of Seth Apter's Glacier Ice (from his recent Set 4 Limited Edition) I was using as I printed them, so that there's an ombre shift from card to card.


I really like how the ombre works when you see them as a set with, of course, their added words.


For the trio, I used quotes from EAB07 Dreaming & Doing.  She has such a dreamy look about her.


I stamped the words in Jet Black Archival on a separate piece card, and edged them in black before gluing them in position.  


And for the pair of faces, with the strong simplicity of their expressions...


... I chose quotes from EAB08 Strength & Courage.


These I stamped directly onto the prints and embossed them.  Over the dark background of the first card I used pale embossing powder...


... and over the pale edge of the second card I stamped in black again, and then clear-embossed.  I'm embracing the imperfection of the words hovering in and out of the shadows where the image gets darker!


So, you see, it's a really different look for me... practically CAS, wouldn't you say?  Though not quite single layer, I guess, given that there are two layers on the Gelli plate to start with.


In any case, I had a fascinating time stepping outside my comfort zone.  I enjoyed playing with the dramatic photos, but it's not something I'll probably do very often.  I'm not really a glossy magazine reader, so I don't tend to have these kinds of images lying around, but for those who do, I really recommend keeping pictures which appeal to you and trying this out.  But I also had good results with text and old music manuscript, and I can definitely see those becoming a more regular part of my crafting "language".  

Thanks so much for stopping by today.  I hope you'll be tempted to try out this technique.  Be patient, and be ready to experiment with different paints and different magazines, and you could end up with some really exciting results.

Blog: Words and Pictures
Pinterest: butterfly crafter

If you teach: add venue, dates, booking info with links here for the next 2 months

To join our challenge and win a new Zinski apron:
Simply make something arty relevant to the topic, and link your creation from any social URL (eg. Instagram, Pinterest, Blog Post etc) sharing your original make to this challenge page.

The current topic link Topic 12: Transfers will close 17:00 (London Time) Sunday, 22nd July 2018, and the winner will be announced 2 hours later at 19:00.

NB you have 3 weeks for this challenge due to New Products being announced


All links go in the draw to win a PaperArtsy creative apron. Please make sure we can contact you as a prize winner - it helps if you share your contact info from the platform you opt to use.

Good Luck! If you have any questions, don't hesitate to ask!