Showing posts with label Green man. Show all posts

Saturday, 11 July 2020

2020 #12 Going Back To The Start with Eclectica Lin Brown Stamps {by Claire Snowdon}

2020 Topic 12: Typography


Really 
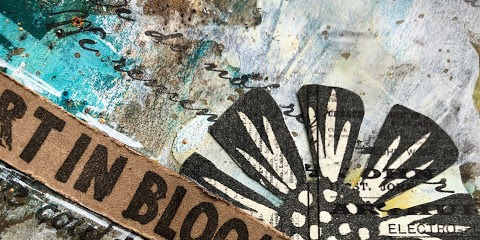
loving how the Kraft paper substrate, Kraft paper words layered on top and Walnut brown infusions tie this journal page together so well with those chiming shades of brown bouncing off each other. Can you see how the infusions sink into the journal pages for those spots missed by the randomly-scraped snowflake paint, giving  instant depth and allowing the same colour to have a two-tone effect? Plus plenty of Lin Brown quotes abound. There is lots to appreciate here!
~ Leandra

Hi everyone, it's Claire Snowdon here with you today, and I'd like to share with you an art journal spread I created.

I've gone right back to the start with this journal spread - back to Lin Brown's very first stamp release for PaperArtsy! In February 2013, Lin started designing for PaperArtsy with a series of Hand Carved stamps,and matching dies - you can see the original blog post here


I created my pages in a Prima Finnabair art journal - the pages I choose to use were two different ones; one was kraft and the other was already pre-printed with some typography, so I thought it would make a good starting point for this topic.


I scraped on a thin layer of Fresco Finish paint in Snowflake to give a good base for my pages. 


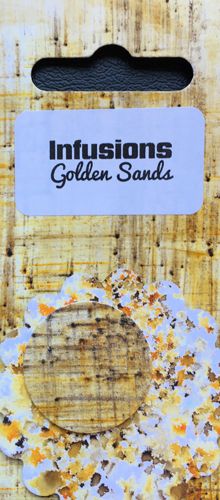
Then I added a mixture of Infusions: Green Man, Golden Sands, Emerald Isle and Slime.


I wanted to add more depth to the page so I added some Fresco Paint in South Pacific and Pumpkin Soup using my fingers to blend. 


Then added some script stamping using ELB30 and Versafine Vintage Sepia ink.


Lin has loads of different quotes in various fonts amongst all of her stamp sets so I chose a few of my favourites and stamped some directly onto the page using Versafine Black Onyx ink and some onto kraft paper.


All the quote stamps are from these sets: ELB01, ELB02ELB05, ELB28 and ELB33.


I took an old offcut of text covered scrapbook paper and stamped the flower and leaf  from ELB01 and ELB02 onto it and then fussy cut.


I added all the elements to the pages and then splattered them with gold pen.  Then to finish I added Black Soot Distress Ink around the edges.


I hope you've enjoyed my typography project and that you'll join in with this theme!  Thanks for visiting today, take care.


Tuesday, 25 February 2020

2020 #4 Mighty Mica: Fairy Play with ELB {by Etsuko Noguchi}

2020 Topic 4: Mighty Mica


Etsuko's glimmery and textured Wall Hanging is the perfect place for the fairies to play. The joint tape is a fabulous inexpensive addition which really adds to the finished result. Look closely, there are so many extra details and products! 

Hi everyone, it's Etsuko (My favorite thingwith you today, and I'd like to share with you a Wall Hanger using lovely Lin Brown's stamps and stencil.

Lin's collections are so popular with many craftspeople and I always looked forward to the release of her wonderful work. Today I used her beautiful flower stamp and the stencil of my favourite bubbles to create a scene for the fairies to play in.


This time I used a papier-mache base. It's one of my favourite materials which I bought a long time ago from PaperArtsy and still have many left. First I gessoed over it.


I pasted Joint Tape randomly and  applied Grunge Paste with the bubble stencil PS001.


I wanted a little texture so added white crackle paste. After each layer dried I sprinkled water and dusted the panel with three Infusions colours. (Green ManOlive Tree and Golden Sands) I added water and Infusions until I got the effect I wanted. Then I painted Light blue, Lime and Gold mica with Satin Glaze, and dry brushed over with white. The mica's shine was not well reflected in the photo.

Next I made the flowers by applying Snowflake, Cheesecake, Mustard Pickle Fresco Finish Chalk Acrylics and Gold Mica on Smoothy white card with a flat paint brush. After it had dried I stamped ELB23 with Jet Black Archival ink then I cut and made double petals.


At the top of panel, the resin fairies applied a little Treasure Gold-White Fire over the blue and lime mica and pasted them over the flowers and the Dreams word!


Pearl mica flakes and silver micro beads were added and cogs and gears were inserted to finish the background.


Finally each petal was glued on, the centre pollen made of gold glass glitter. The word Dreams from ELB28 was stamped onto some Smoothy white card with Green Man Infusions on, and embossed with black powder.


I've enjoyed playing with Lin's collection and I hope you enjoy my project too. There are plenty more of her wonderful stamps in PaperArtsy shop. I'm so looking forward to having a new release someday.
Thank you so much for taking the time to stop by.
Etsuko xxx

Blog: My favorite thing
Facebook: Etsuko Noguchi
Instagram: Pixienest
Pinterest: Etsuko N