Showing posts with label Florence Pedreau. Show all posts

Monday, 15 August 2016

2016 #15 Monochrome Patterns {by Florence Adam}

2016 Topic 15: Patterns

Hi everyone Florence of Mlle d'Antan here, joining you this evening with a post about Patterns. The range of patterns is so large: arrows, diamonds, squares, dots, lines, I think I’ve used most of them! Patterns are everywhere: decoration, art, fashion, let’s see in craft how we use them…


Step One: On my rectangle piece of wood, I applied 2 coats of gesso on the side I will be working on. I also applied 2 coats of white paint on the back as well. This allows the wood not to bend. Then, I applied Chalk and Pewter with the black side of cut n’ dry.


Step Two: I started to build my background, using Grunge Paste through a stencil (the square dots and arrows from stencil PS016 and PS018) and then stamping with Snowflake with stamps coming from different sets (JOFY36, Mini 27, EEG 18, EEG 17, ESN 14, ESN 16)

Step Three: I splattered Snowflake and The Little Black Dress all over. I took a paintbrush dipped in paint and then proceeded to tap the brush with another brush. Using this method, I can have various shapes of drops on the piece. This technique can also be done with an old toothbrush but you will not have the same effect. I have just discovered on YouTube some Artists splatter the paint from their mouth…does not look attractive but the results are nice. 

I splattered some fluffy paint as well, it makes really bumpy dots which is funny.


Step Four: I stamped few text stamps with Jet Black Archival ink. My text is: “COLOUR and inspire yourself”. COLOUR is from the set EEG017. I placed the “Inspire yourself” in a frame and added some glossy accents.

We went to a Fish and Chip restaurant recently (a bit rare in the area – West of France) and the food was served in a super beautiful printed wax paper … I glued some pieces for the background. 


Step Five: I stamped my Venus de Milo (from the set At Home Plate 4, Ink & the dog) three times on a cardboard with Jet Black Archival Ink. I colored one with a tiny bit of Silver Treasure Gold, the second one with White Fire and the third one with Amethyst mixed with Silver so It’s not too dark.


I used gauze with Regular Medium from Golden and some paint to colour it and make it matching the background. I placed a lovely old lace, a black string. At the back there is a tag made with the stencil 016, covered with Silver Treasure Gold. 


Step Six: I made my flowers by stamping with Black Stazon on a transparent plastic. At the back of it, I painted it with a bit of Bubble Gum and Bougainvillea and on some other flowers with Pearl Glaze mixed with Blackcurrant infusion. You cut the flowers and heat it with the Heat gun, it gives a crazy shape and a super glossy result to your flowers! The flowers come from Jofy 32


I hope that you like this project, I am always amazed on seeing what you can do with just a plain piece of wood or paper. It was hard to find the right direction at the beginning, but slowly you’re building up and then you know what you want. I like the fact that everything is quite monochrome, quite grey, with only one colourful part. 

So in the meantime, stay inspired, stay creative! 
Florence

Facebook: Florence Pedreau
Pinterest :Florence Adam 

Great work Florence, the use of patterns on the monochrome background is a perfect support for the focal image and the pops of colours on the flowers are really eyecatching.  Using the fish and chip paper was a cool addition to the background too.~Darcy 

We would love to see how you interpret this House topic by linking what you make to our 2016 Challenge #15: Patterns, on this page HERE.
All of our bloggers love to see your twist on their ideas, particularly if you were inspired directly by their post. 
All links go in the draw to win a £50 voucher to spend on products of your choice from the PaperArtsy online store. The Paper Piecing link will close 17:00 (London Time) Sunday, Aug 21st 2016. The winner will be announced 2 hours later at 19:00.

Friday, 8 April 2016

2016 #7 Ir-'resist'-ible {by Florence Adam}

2016 #Topic 3: Resists 


Hi everyone Florence of Mlle d'Antan here, joining you this evening with a post about Resists. This is my second blog post for PaperArtsy and I have enjoyed working on this project. I am currently on the PaperArtsy stand for Version Scrap in Paris when the blog post will be online. Tonight this is a very shabby chic project I’m sharing with you. I did not know what  “resists” were until Darcy explained them to me (who does a wonderful job by correcting my English! Thanks Darcy!) Basically I was doing it without knowing there was a word for it. I chose the beautiful Lynne Perrella stamps LPC030 for this project and used only the biggest stamp.


Step One: My very first idea was to do the project on a canvas, but in the end I was not very inspired. Once upon a time there was an old wood beam at the back of my Mum’s garden. I thought I could definitely give another life to this beam. I started to sand a little bit, then rub some candle wax to do the resist, to do the barrier. Then It was a mix of different layers: some Mushroom, some Chalk, some Taupe, some sanding, some candle and again some Fresco.


Step Two: I randomly put some modelling paste on the left side, and added some green chicken wire. I stapled the chicken wire on the wood to make sure it will be secure. I then painted over this with Pewter. There is some resist here again, I guess, as the paint does not  cover the modeling paste where the chicken wire is.


Step Three: I still didn’t really know where I was going, but suddenly I thought that I will give a 3-Dimension to few areas of the stamp. Then, one small piece of wood, covered with Taupe and Mushroom, using the candle in between so the paint can resist, I glued some buttons and then painted over again with Mushroom, Taupe and a bit of Chalk.

On another small piece of wood, I made the same system with nibs. 


Step Four: On the third piece of wood, same preparation, and then with Jet Black Archival Ink, I have stamped the face of the lady in the middle and then I stamped on the edges some buttons and added ink stain. To finish, I added some lace on top to make her “a hat”. 

On cardstock I have stamped the main image, also onto a piece of cotton fabric, and on corrugated card.  On the fourth piece, I have glued on a piece of glass, a heart, painted and stamped.

LPC030

Step Five: On the right side, I started to paste some old paper, I wrote with Glossy Accent (to do the resist), then I put over some Fresco (A mix of Mushroom, Pewter, Taupe) and then wipe on the glossy. 
Sorry, the weather was so nice this day, so much sun that, I have shadows on my photos.


Step Six: I stamped with Jet Black Archival Ink on a tissue paper the right corner of the main stamp. I have added this part on a glass bottle. I added some buttons in this glass bottle, put a wire around so it attaches to the chicken wire. I thought “let’s glue a bit with the glue gun” to make sure that it’s strong enough. Good, all done! Project finished! “Oh no, the glass bottle is not straight, let’s put it back straight!” I should not have told myself! I completely broke this very fine glass bottle! OMG I had to go in an emergency (not to the hospital, just a little cut, I am fine!), to the garden centre store for a replacement bottle! I found one; a bit bigger than the original one. Next time I won’t glue it, just keep it in place with the wire.


I hope that you like this project and I also hope to see your version one day! It was so much fun to try to use the images of a rubber stamp in 3D. I like this project because it’s quite dimensional, with plenty of textures, layers and in a family of colors I am keen of. I had fun to try to re-use older post themes, as transparent and  hearts.
So in the meantime, stay inspired, stay creative and  have a lot of fun!
Florence

Pinterest: Florence Adam

Bravo Florence! to create such a beautiful piece despite incurring an injury in the process! The combination of candle and chicken wire and glossy accents have made for very interesting resists. They all add to the natural beauty and texture of the wood. A great find in your mum's garden, you definitely brought it back to life. ~Darcy 

We would love to see how you interpret this Resists topic by linking what you make to our 2016 Challenge #7: Resists, on this page HERE.
All of our bloggers love to see your twist on their ideas, particularly if you were inspired directly by their post. 

All links go in the draw to win a £50 voucher to spend on products of your choice from the PaperArtsy online store. The Resists link will close 17:00 (London Time) Sunday, April 17th 2016. The winner will be announced 2 hours later at 19:00.

Wednesday, 28 October 2015

2015 #20 Vintage Parisian Trio {By Florence Adam}

2015 Topic 20: Triptychs


Hi everyone Florence of Mlle d'Antan here, joining you this evening with a post about Triptychs. 

This is my very first blog post for PaperArtsy and I have enjoyed working on this project. I’m French and live in a small city called Guerande in the west of France. I’m married to a British man and have a 6 year old boy. It is probably because I am French that I chose the lovely Sara Naumann stamps. I’ve been thinking about making a Triptych for a while now and I thought that I will give it  a go with this blog post. I am happy now that I’ve made it!


Step One: For the first part of my trio I used a rectangular board, this was painted with Taupe, and then used different stencils with grunge paste. Once it dried, I used Treasure Gold (mainly silver, and a bit of Amethyst) and then stamped a little over the rectangle with black Archival ink.


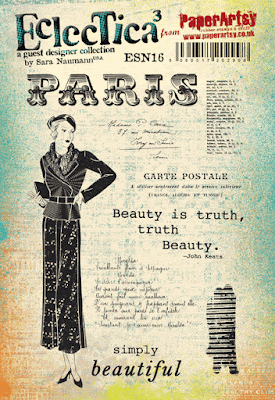
Step Two: Onto my tiny linen canvas, I stamped some words and add a little bit of Chalk on the sides to brighten it. I finished by adding vintage embellishments in a haberdashery theme. I stamped the Parisian lady from ESN16 onto card, this was added to a vintage frame.


Step Three: For the middle section I used a canvas and covered it with an old book page. Then, I stamped here and there with Taupe and Chalk but also with Black Archival ink. This section was also decorated with vintage sewing elements and images and text from ESN16.


Step Four: For the third, and bottom part, I used a wooden arrow that I painted with Taupe and a little bit of Mushroom and Chalk. I stenciled arrow on the left side.


Step Five: One of my favorite parts now: I read Wanda’s blog post about wearable art, and the fact that she used shrink plastic (literally called “crazy plastic” in French!) inspired me! I stamped my beautiful lady on the white shrink plastic and then heated it (no need to use the oven). Thank you Wanda!


Step Six: I then stamped some words on the arrow with Black Archival ink. To soften the black text, I like to brush over it with a small amount of paint left on my brush. It links the all background. Then, I glued my real cogs (found in a garage sale) and painted them over to harmonize everything. I could not finish this part without adding of bit of … treasure gold of course!


Finally I had to think about a way to hang every thing together. For the hanger with the heart... don’t ask me where I bought it from… garage sale again. These hangers are used for embroideries.

Here is a closer look at the centre section.


I hope that you like this project and I also hope to see your version at some point! This Triptych could work with any other support or shape that matches nicely. Note that you need the perfect glue for heavy embellishments! I think that next time I want to do it just on fabric, it could be fun!

So in the meantime, stay inspired, stay creative!
Florence


Hi Florence!
What a lovely project and oh-la-la you have given it the French shabby chic gorgeous treatment! I adore the dry brushed style and little touches of Treasure Gold! I know how much you love that stuff!! Thanks so much for showing up a vertical Triptych with texture - I'm longing to reach out and touch it! Perfect! ~Leandra

We would love you to join in with Challenge #20: Triptychs. If you are inspired by any of our guests who blog with us over the fortnight, then please join in and link up your creativity HERE

All links go in the draw to win a voucher to spend on products of your choice from the PaperArtsy online store. The Triptychs link will close 17:00 (London Time) Sunday, Nov 8th winner will be announced 2 hours later at 19:00.