Showing posts with label 2016 Topic 15. Show all posts

Friday, 19 August 2016

2016 #15 Bloom {by Jennie Atkinson}

 2016 Topic 15: Patterns

Hi everyone Jennie here with you tonight to share my patterns project using Ink and the Dog Minis. I really love these vintage stamps and never tire of them. 

They are probably not the most obvious stamps to go to for a patterned background, but I hope that I can show you how versatile they can be when used in conjunction with the Gelli Plate. Yes, after years of being scared of getting one I can't get enough of it now!


Step One: I started with my master board and brayered Sour Grapes, Sugar Plum and Nougat Fresco Paints onto the the 8 x 10 Gelli plate. I used two of the Minis to create my pattern MN96 and MN46:

 MN46:
 MN96

Step Two:  I then used another two Minis MN09 and MN74 and Watering Can Archival Ink to stamp over the painted surface. I don't use a stamp block but just pick up some ink on the stamp and roll it onto the paper. You need to be a little careful with the lovely young lady as if you don't press on her head she comes out rather bald! (see top right hand corner!)
MN09 
 MN74

I needed a text stamp to finish it off so used two from the Vintage Ink and Dog A6 Set Petals 4

Petals 4
Step Three:  And then it was fun time trying to see what I could cut from the master boards. I was aiming to cut something large enough for a 5" x 3.5" card and got five good pieces, although I noticed afterwards that I had a very "bald head" in one of them!


Step Four: And here is the finished card. I stamped the lovely MN09 again in Black Archival and did a bit of fussy cutting and layered her on top of some torn old book paper and a piece of lace. 


Step 5:  I had lots of little bits left over so I thought I would keep one card to send and package the other three up as a little present using the scraps to make a little band to hold the cards together.


I really love the versatility of these little mini stamps which can so easily be mixed and matched together so easily. And being so reasonably priced I find they drop into my basket very easily!


Thank you for joining me tonight and I hope this little project of (quite quickly made) cards will spur you on to use your vintage stamps in your backgrounds as well letting them take centre stage.

Jennie
Live The Dream

Fabulous masterboard Jennie, using the same image to echo the focal image creates brilliant balance and unity.What a special little parcel you have created, perfect inspiration for a last minute gift.~Darcy

We would love to see how you interpret this House topic by linking what you make to our 2016 Challenge #15: Patterns, on this page HERE.
All of our bloggers love to see your twist on their ideas,  particularly if you were inspired directly by their post. 
All links go in the draw to win a £50 voucher to spend on products of your choice from the PaperArtsy online store. The Paper Piecing link will close 17:00 (London Time) Sunday, Aug 21st 2016. The winner will be announced 2  hours later at 19:00.

Wednesday, 17 August 2016

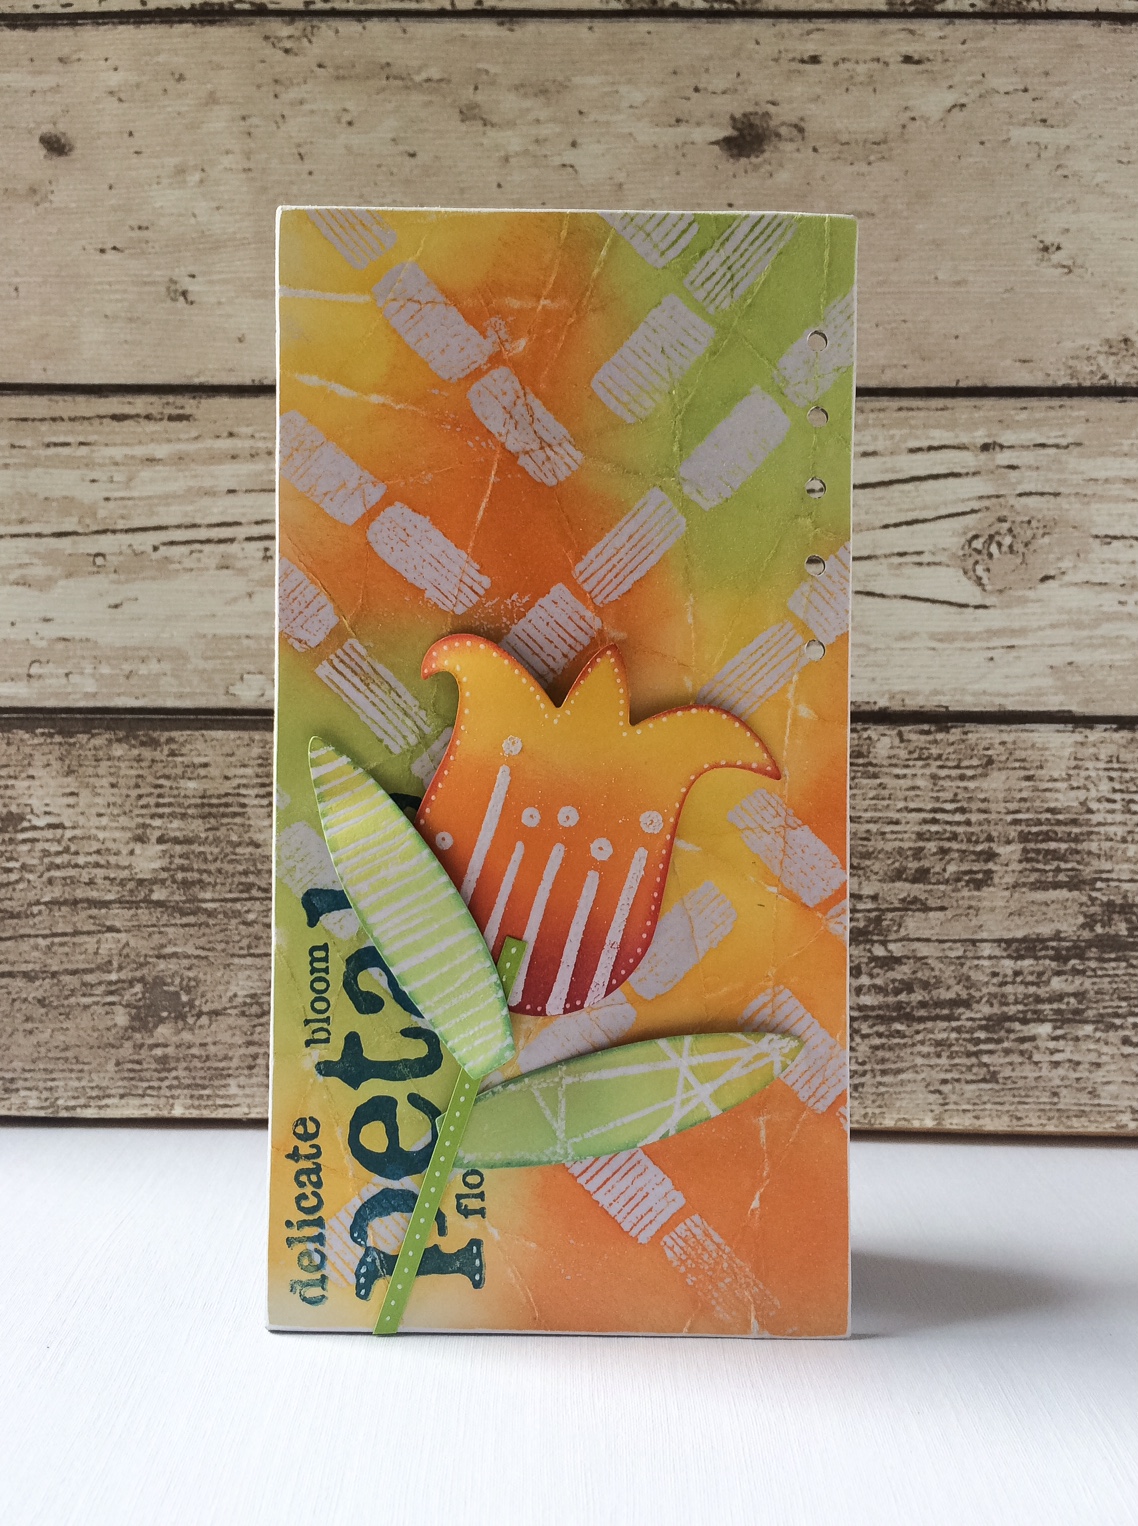
2016 #15 Faux Batik {by Keren Baker}


2016 Topic 15: Patterns

Hi everyone Keren Baker here. Tonight I'd like to share with you this evening with a post about Faux Batik.


When I saw the Eclectica Ellen Vargo 05 set it reminded me a little of the dye resist technique for fabric called Batik.


I remember going to a craft club in a local secondary school when I was in Junior school and my Mum creating a Batik piece with layers of wax and dye. I have no idea what I created but the process of her project was fascinating. I've recreated something vaguely akin to it using a version similar to this one.

Step One: First up, create a pattern with the patterned images! This post is about pattern after all! Ellen's set is full of wonderful bold images. For the best results, you want solid images, so I chose the most solid from the set and heat embossed with clear embossing powder. I went for a vague herringbone styled pattern.


Step Two: Now create lines in your cardstock (use a thinner weight card) by folding in lots of different directions. You don't need to continue a line across the whole width, change direction and go for random rather than ordered.


Step Three: Add colour. I've used a dye ink, and want to try this with Frescos too.


Step Four: Once you've completed adding colour (darker colours are definitely better, but I wanted a fresh, lighter scheme), iron the piece between some scrap paper so the embossing powder sinks into the paper and is removed from the card. You will probably need to do this a couple of times. Once you've done that, try sanding a few of the folded lines to give some contrast.


Step Five: You now have a reasonably flat piece, but it does need a decent anchor, so I adhered it to a piece of Heavy Grey/White board. I wanted to add more pattern and by using the same colours but different pattern, it didn't end up too cluttered. I used the older Eclectica {Lin Brown} Tulip die set with leaves (which some of you may have). I love how the pattern gives the impression of stamen too!


I finished the piece with a sentiment from Ink And The Dog Petals Plate 6


...in a dark blue and punched 5 small holes near the top right to help balance the design!

Hopefully you can see that the areas where the embossing was, now have strands of colour going through them. It's a cool technique and one that is more striking when using darker colours. I'd love to experiment with Frescos and see the differences that acrylic paint makes. Do have a go with this technique, I'd love to see some unusual variations. The more folds you have through the embossed images, the better, and make sure the colour is worked in well as when you remove the embossed areas, you'll only be left with the original substrate colour.

Thanks for joining me tonight!
 Keren xx 
(Twitter, IG, Pinterest @craftstampink )

Keren what a fun idea! There are so many bold stamps that could crack this technique! We could have fun making loads of Batik backgrounds with this! Thanks so much for the inspiration! ~Leandra

We would love to see how you interpret this Patterns topic by linking what you make to our 2016 Challenge #15: Patterns, on this page HERE.

All links go in the draw to win a £50 voucher to spend on products of your choice from the PaperArtsy online store. The Patterns link will close 17:00 (London Time) Sunday, Aug 21st 2016. The winner will be announced 2 hours later at 19:00.

Monday, 15 August 2016

2016 #15 Monochrome Patterns {by Florence Adam}

2016 Topic 15: Patterns

Hi everyone Florence of Mlle d'Antan here, joining you this evening with a post about Patterns. The range of patterns is so large: arrows, diamonds, squares, dots, lines, I think I’ve used most of them! Patterns are everywhere: decoration, art, fashion, let’s see in craft how we use them…


Step One: On my rectangle piece of wood, I applied 2 coats of gesso on the side I will be working on. I also applied 2 coats of white paint on the back as well. This allows the wood not to bend. Then, I applied Chalk and Pewter with the black side of cut n’ dry.


Step Two: I started to build my background, using Grunge Paste through a stencil (the square dots and arrows from stencil PS016 and PS018) and then stamping with Snowflake with stamps coming from different sets (JOFY36, Mini 27, EEG 18, EEG 17, ESN 14, ESN 16)

Step Three: I splattered Snowflake and The Little Black Dress all over. I took a paintbrush dipped in paint and then proceeded to tap the brush with another brush. Using this method, I can have various shapes of drops on the piece. This technique can also be done with an old toothbrush but you will not have the same effect. I have just discovered on YouTube some Artists splatter the paint from their mouth…does not look attractive but the results are nice. 

I splattered some fluffy paint as well, it makes really bumpy dots which is funny.


Step Four: I stamped few text stamps with Jet Black Archival ink. My text is: “COLOUR and inspire yourself”. COLOUR is from the set EEG017. I placed the “Inspire yourself” in a frame and added some glossy accents.

We went to a Fish and Chip restaurant recently (a bit rare in the area – West of France) and the food was served in a super beautiful printed wax paper … I glued some pieces for the background. 


Step Five: I stamped my Venus de Milo (from the set At Home Plate 4, Ink & the dog) three times on a cardboard with Jet Black Archival Ink. I colored one with a tiny bit of Silver Treasure Gold, the second one with White Fire and the third one with Amethyst mixed with Silver so It’s not too dark.


I used gauze with Regular Medium from Golden and some paint to colour it and make it matching the background. I placed a lovely old lace, a black string. At the back there is a tag made with the stencil 016, covered with Silver Treasure Gold. 


Step Six: I made my flowers by stamping with Black Stazon on a transparent plastic. At the back of it, I painted it with a bit of Bubble Gum and Bougainvillea and on some other flowers with Pearl Glaze mixed with Blackcurrant infusion. You cut the flowers and heat it with the Heat gun, it gives a crazy shape and a super glossy result to your flowers! The flowers come from Jofy 32


I hope that you like this project, I am always amazed on seeing what you can do with just a plain piece of wood or paper. It was hard to find the right direction at the beginning, but slowly you’re building up and then you know what you want. I like the fact that everything is quite monochrome, quite grey, with only one colourful part. 

So in the meantime, stay inspired, stay creative! 
Florence

Facebook: Florence Pedreau
Pinterest :Florence Adam 

Great work Florence, the use of patterns on the monochrome background is a perfect support for the focal image and the pops of colours on the flowers are really eyecatching.  Using the fish and chip paper was a cool addition to the background too.~Darcy 

We would love to see how you interpret this House topic by linking what you make to our 2016 Challenge #15: Patterns, on this page HERE.
All of our bloggers love to see your twist on their ideas, particularly if you were inspired directly by their post. 
All links go in the draw to win a £50 voucher to spend on products of your choice from the PaperArtsy online store. The Paper Piecing link will close 17:00 (London Time) Sunday, Aug 21st 2016. The winner will be announced 2 hours later at 19:00.
Sunday, 14 August 2016

2016 #15 Wallpaper Memories {by Gabrielle Price}

    2016 Topic 15: Patterns


Hi everyone Gabrielle from Crafty Thoughts here. Tonight I'd like to share with you this evening with a post about patterns. 

I love patterns and some stick with you for years! I wanted to recreate some wallpaper from my childhood. I used to count the circles before I went to sleep - I never did count them all! I couldn't just leave it as wallpaper so turned into a journal page but it could equally be a master board! 


Step One: Start by sprinkling some Infusions (I used Are You Cerise) on your page and mist with water


Step Two: When you're happy that you've let the Infusions react with the water, wipe the page with a baby wipe. This will feel counter intuitive as you've made such a beautiful pattern on your page but you want the Infusions to stain the paper and act as the anchor colour for the finished result.


Step Three: I then brayered layers of Snowflake paint on top of the Infusions. (I think the sun went in when I photographed this step so the photo looks blue!)


Step Four: I added yellow circles and blue stencilled lines (PS031) using Yellow Submarine and Beach Hut. Then I sanded them to ensure a smooth surface for stamping. My wallpaper had similar circles and lines - it was in the eighties!


Step Five: Using the circles from Darcy's EDY17 I repeatedly stamped the page.

EDY17

Step Six: I added a final layer of Snowflake paint - the eighties were fond of it's pastel colours!


Step Seven: I stamped the flowers from EDY09 and EDY17 and the sentiment from EDY18. I used Beach Hut, Yellow Submarine, Bougainvillea and Limelight to paint the flowers. The Bougainvillea was mixed with water to get a stained glass effect. These flowers are such a fabulous stamp!

It was such fun trying to recreate my childhood wallpaper - I must confess I've counted the circles and that really took me back to being 8 again!
Thank you for popping by, 

Gabrielle x

Thanks for joining us Gabby, I love that you wanted to recreate your childhood patterned wallpaper. You have great layers here, with those background Infusions just peeping through. Adding a white layer between others is such a great bridging layer. ~Darcy

We would love to see how you interpret this Patterns topic by linking what you make to our 2016 Challenge #15: Patterns, on this page HERE.
All of our bloggers love to see your twist on their ideas, particularly if you were inspired directly by their post. 
All links go in the draw to win a £50 voucher to spend on products of your choice from the PaperArtsy online store. The Patterns link will close 17:00 (London Time) Sunday, Aug 21st 2016. The winner will be announced 2 hours later at 19:00.

Friday, 12 August 2016

2016 #15 Botanicals {by Katy Leitch}

2016 Topic 15: Patterns


Hi all – Katy here with my guest post on the theme ‘patterns’. One thing I love to do with stamps is to make them go further. When I buy a set of stamps I always try to think of at least 3-4 ways I can use them; this way I know I am getting value from my purchase. This theme was an ideal way for me to show you how to think outside the box when looking at your stamps. Using parts of stamps is a great way to get a lot more mileage from them – use them as random pattern or to create borders. Stamping tone-on-tone can create depth to your background, and because the image recedes it doesn’t really matter what stamp you use. Here I used a clock stamp for this technique – it doesn’t really go with my ‘botanical garden’ theme but in the final piece the eye doesn’t register the clock image, just the texture it creates.


Step One: For my background I used Fresco Finish Vanilla, Pumpkin Soup and Yellow Submarine paints, mixing them lightly while still wet.


Step Two: I stamped the clock (HP1509) all over with Pale Ochre Archival to give subtle texture in the background then add some stamped pot lids (HP1109) in Archival Tree Branch. This texture will recede into the background so it’s about looking at the shapes of the stamps rather than the images as such.


HP1509
HP1109


Step Three: Using just parts of images is a great way to add pattern or borders. Here I used the edge of the key stamp (HP1509) to make an ornate repeating border along the top and bottom edges.


Step Four: In a similar way I used the top edge of the door image (HP1509) to create a grungy border to frame my design.


Step Five: I stamped the flower (HP1109) at various angles to finish my layered background.


Step 6: I used coloured pencil to shade the flowers and leaves then added detail with black fineline and white gel pens.


Step 7: I again used the door stamp (HP1509) in an abstract way to add pattern to a die cut butterfly. The symmetry of the door stamp works perfectly on a similarly symmetrical image like a butterfly. I painted the die cut with Fresco Finish paints before stamping it with black Archival.


To finish the piece: 
Stamp moths onto card, colour with Fresco Finish Bora Bora and Pumpkin Soup and cut out. Stamp again onto the background and position the cut out moths on top. Stamp the pot lid (HP1109) in Tree Branch onto book paper painted with Vanilla Fresco Finish. Mat onto card to give it some depth then glue to the background.


 Add the butterfly on top and embellish it with a pen nib. Stamp ‘take flight’ (HP1005) onto a scrap of painted card and add behind a bookplate.

HP1005

I really enjoyed challenging myself to use the stamp for this project in new ways and I love the botanical garden feel of the end result. I hope this project has encouraged you to look again at the stamps you have and consider how you might use them in different ways.

Thank you to PaperArtsy for having me today.
Katy x

Facebook: katyleitchcrafts
Instagram: katyleitchcraft


Thanks for joining us Katy and sharing your beautiful botanical project. The background layering works so well  to introduce both patterning and texture. Careful choice of colours really helps these melt into the background while still providing support and depth for your focal images. My favourite bit though has to be the patterned butterfly, using the door stamp for patterning was genius. ~Darcy


We would love to see how you interpret this House topic by linking what you make to our 2016 Challenge #15: Patterns, on this page HERE.
All of our bloggers love to see your twist on their ideas,  particularly if you were inspired directly by their post. 
All links go in the draw to win a £50 voucher to spend on products of your choice from the PaperArtsy online store. The Paper Piecing link will close 17:00 (London Time) Sunday, Aug 21st 2016. The winner will be announced 2  hours later at 19:00.