Showing posts with label EKD01. Show all posts

Thursday, 15 July 2021

2021 Topic 8: Nature's Treasure with EKD {by Claire Snowdon}

2021 Topic 8: Nature's Treasure


A cluster of dimensional flowers truly is a treasure. Claire's clever painted details really make the branches come to life and leap off the page. Using Crunchy Waxed Kraft paper creates a clever grounding and also a frame to focus the flower's painted beauty.
~ Keren

Hi everyone, it's Claire Snowdon with you today, and I'm here to share with you a mixed media panel I created for the Nature's Treasure topic.  I really enjoyed creating this panel - it could be easily adapted to a journal page.
 

My panel was created using an off-cut of kraft coloured mount board.  It's approximately 10 x 7 inches and is lovely and sturdy for this kind of project.  I used Fresco Chalk Acrylic (A Bit Fishy, Shutters, Aqua Duck Egg, Zucchini and Slimed) to start my background - I kept adding the colours and blending them on the mount board with a paint brush until I was happy with how it looked.


I then added this beautifully large leafy stencil in Grunge Paste to the panel - this stencil is by Lin Brown (PS043)


Whilst my Grunge Paste was drying I moved on to creating the extra elements needed for my panel.  I painted some Paperartsy Smoothy Card with Fresco Chalk Acrylics (ZucchiniTinned Peas and Slimed) and stamped out my leafy elements from Kim Dellow Set 5 and 6 (EKD05 and EKD06).  I created another painty panel using Fresco Chalk Acrylics (Tangerine TwistPersimmonFirebird and Cherry Red) and stamped the flower elements from Kim Dellow Set 6 (EKD06).


I then stamped the same flower elements out onto some Paperartsy Crunchy Waxed Kraft Paper and cut them out with a generous border to ensure they would be visible once layered onto the panel.  I fussy cut all the flower and leaf elements as well.


My Grunge Paste was now nice and dry so I sanded it back a little - then to grunge it up a little I added some watered down Fresco Chalk Acrylic (Mud Splat).
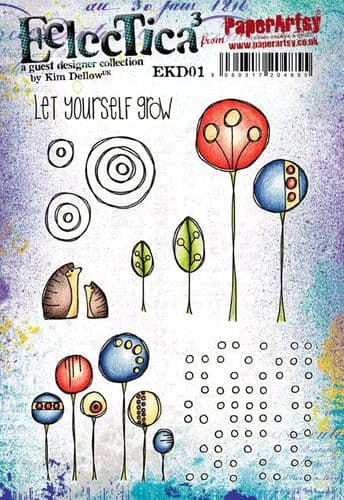
Then I gave the background some grungy attention by adding faint stenciling with Emma Godfrey stencil (PS015) and Fresco Finish Acrylic (Chalk). Some 2nd and 3rd generation stamping in Ranger Archival Ink (Jet Black and Potting Soil) and stamps from Kim Dellow Sets 1 and 5 (EKD01 and EKD05).
Of course the background wouldn't be complete without some nice splatter effect!  Here I used Fresco Finish Acrylic (Gold and Chalk).


I added a frame to my panel using Ranger Archival Ink (Jet Black) before I started to add any of the dimensional elements to my panel to make things a little easier.
 

I created the focal point of the panel by layering up all the elements - I scrunched up the Paperartsy Waxed Kraft Paper flowers to sit under the main flowers - I really love the extra depth, colour and texture this adds to the piece.
 

I added some gold and white pen work to the grunge paste tall leaf - the shadows and highlights this creates makes the 3D effect of the Grunge Paste pop even more.


As well as adding pen work to the Grunge Paste leaf I also added it to the flowers and leaves on the left hand side of the panel - this gives them just that little extra lift and draws the eye in.
 

I felt like this sentiment from Kim Dellow Set 1 (EKD01) was really fitting for this topic - I stamped it using Ranger Archival Ink (Jet Black) onto Paperartsy Smoothy Card and then mounted it onto black card.

 
The flower elements and the Kraft Waxed Paper underneath were all layered up using foam pads to really give this panel dimension.  The leafy elements were glued down with the tips of the leaves left unglued to create a more natural effect.


A few more extra photos of the final, finished product to show how dimensional it is :)


This panel really was such a joy to make!  Flowers are probably my number one images to create with - especially when I'm creating cards or art journal pages.  There is just something about them that draws me in and has done ever since I started crafting years ago.  It was nice to push myself out of my art journal comfort zone and create a panel instead - I would really love to encourage you to try and create something out of your comfort zone too!

Thanks for your company today,
Claire x


Thursday, 30 July 2020

2020 #13 Using lines in composition with Kim Dellow Stamps {by Nikki Acton}

2020 Topic 13: Lines


Sometimes simple cards can take more planning and design choices, and Nikki has taken a deceptively simple card which actually has lots of designed elements within. Nikki cleverly transforms some inexpensive plastic grid that we'll all be looking out for now.
~ Keren

Hi, Nikki here today, from Addicted to Art. For the theme of lines I decided to utilise various 'lines' to, hopefully, enhance the composition / layout of my card.

Composition in my artwork is really important to me - although sometimes I get it very wrong! Colour, positioning of items, focal points and tonal balance can all impact the overall design. The goal is for the eye to be drawn to the focal points and not get confused chasing elements around a page or being drawn out of the picture!


I started with two initial line ideas - some of this grid material I have (had it ages -UK  Poundland I think!) and my inky highlighted folds in the background. But as it developed I also used the lines of numbers and the horizontal tag to bring it all together.


I first brayered some white card lightly with Sand and Chocolate Pudding Fresco Paints. I  used my score board to create lines on the reverse and then swept the edges and creases with Potting Soil Archival ink (any brown ink will do). I stamped the little circles from Kim Dellow stamp set EKD01 and the lines of numbers from France Papillon Stamp set FP002. However I did these later so I knew where to place them to build the composition.


I added some Chocolate Pudding paint to the plastic grid so there was more of contrast with the background and also added a little tissue paper underneath.


I used Distress Oxide (Peeled Paint) to colour some card which I used to stamp my flowers and little hedgehog from EKD01. I cut my little tag to frame my greeting (from EM18). This horizontal 'line' compliments the vertical lines of the the background, the flower stems and the stamped numbers.


A relatively simple card! But hopefully you can see how I used the various vertical and horizontal lines to create the composition. 

Nikki x

Instagram: @Nikki_Act
Pinterest: nikacton


Tuesday, 5 May 2020

2020 #8 Popping Pink: Trio of Cards with EKD {by Claire Snowdon}

2020 Topic 8: Popping Pink


It's easy to assume that you need lots of colours to make impactful art but here, using a plethora of pinks in this beautiful trio of cards, Claire has woven them together to create a gorgeous masterboard. The gold splatters are the perfect finishing touch!
~ Keren

Hi everyone, it's Claire Snowdon with you today, and I'd like to share with you a trio of Popping Pink birthday cards I made.  Of course these cards could be used for any occasion - but it's always handy to have a few birthday cards prepped and ready to go!

I chose to create some masterboards as the basis for my cards - masterboards are great as I have loads remaining to create more cards or to use in collages or art journalling.....the options are endless.


I started by creating some backgrounds on a couple of pieces of white A4.  I did this by blending lots of Fresco Finish paints in various shades of pink with a paintbrush until I was happy with how they looked.  I probably spent more time playing at this stage of the project, adding and covering sections,  more and more paint layers than I did on the rest of the cards put together! 


These are all the shades of pink I had in my Fresco Finish collection.....and I used every single one somewhere in these cards!  :)


The next stage of the masterboards was to add stamping and stenciling.  I used some of the lighter pink shades to do the stenciling with a The Crafters Workshop stencil and PS015.  Then used elements from EKD01, EKD03, EKD05 and EKD06 to add background stamping with a few different pink inks I found in my stash - Distress Oxide (Picked Raspberry), Archival (Pink Peony) and Archival (Cactus Flower).


Once I was happy with the masterboards I cut them up and added stamping using Black Versafine ink and stamps from EKD05 and EKD06.


I tried to play around with the placement of the stamps and also varied the stamps for each card so that each of them are unique.  Then I added some paint splatters in white and gold....I love the combo of pink and gold together. 


I layered up the stamped pieces onto kraft card, added to a card blank and added the happy birthday sentiment from JOFY14 - it's an oldie but a goodie!!


These cards are pretty easy to make - the fun part is creating the masterboards.  There are no rules to creating masterboards so just have a go and let your imagination run wild!!

Thanks for joining me here today,
Claire x

Blog
Instagram
Pinterest

Saturday, 16 November 2019

2019 #18 Shaving Foam: Mixing it Up with EGL and EKD {by Amanda Pink}

2019 Topic 18: Shaving Foam


Amanda is back with part 2 of her experimental shaving foam project and in this post she is exploring ripples that the foam creates in her prints. ~Leandra

Hi everyone, it's Amanda (ink-a-pink) here with you again today, and I'd like to share with you the second project I have created for the current topic: Shaving Foam. 
After yesterday's creative fun I was curious and keen to try out other ways of using the shaving foam within my creativity to create interesting and effective results. All of which resulted in my finished project - an 8x8 Art Panel. 


I used PaperArtsy Fresco Finish Acrylic paints with my shaving foam, initially working with three colours: Green Patina, Smoked Paprika and China.  


The first way I used the foam was by adding a drop of each colour onto their own individual 'blob' of shaving foam.


I then mixed the paint into the foam. As the foam is white it lightened the colour tone of the paints (top line) like it would if you were to mix the paints with white paint such as PaperArtsy Fresco Finish Acrylic Paint : Snowflake. (bottom line) 


To apply the foam/ Fresco Finish mix onto PaperArtsy Heavy Super Smoothy card I used a PaperArtsy brayer, working one colour at a time. 
Both the foam/ Fresco Finish mix and the loose braying created some lovely 'ripple' effects. 

After I'd brayered all three of the mixes I felt the panel still needed something more so I added a few more PaperArtsy Fresco Finish Acrylic Paints into the mix: Butternut and Midnight (no foam added) 


I  thought Butternut to add a touch of warmth and Midnight to add the dynamic and bring the  whole piece to life.
  
The second way I used the foam was by mixing it into some PaperArtsy Grunge Paste along with some PaperArtsy Fresco Finish Acrylic paintAntarctica.


The photo above shows the grunge paste straight from the pot on the LHS and the grunge paste after its been mixed with the foam and the paint on the RHS. 

I applied this mix through PaperArtsy's Stencil by Kim Dellow PS036 


Where I'd mixed the paste into the foam well the texture was smooth.   


Where I hadn't mixed the paste into the foam quite so well the texture was much grungier. 
A great contrast of textures all achieved in one round of stenciling. A win win in my book!

The third and final way I used the Shaving foam was again to mix it with PaperArtsy Fresco Finish Acrylic Paint, this time Snowflake.


 After covering the stencil with the 'Foam/ Fresco' mix I used the stencil to monoprint. 


 It created a lovely subtle lightly textured print. 

To finish off the background I used some of the stamps from PaperArtsy Eclectica Kim Dellow Collection EKD01 and EKD03


With the panel being quite busy already I thought the simple line designs of the stamps offered just the right amount of extra detail.

For the focal feature I used some of the stamps from one of PaperArtsy new designer stamp sets: Eclectica Gwen Lafleur collection EGL01.  


They are coloured using the initial three PaperArtsy Fresco Finish paints I set out creating with (no shaving foam added). I either used the complete stamp design or part of the stamp design. They all rest on Seth Apter die cuts painted with PaperArtsy Fresco Finish Acrylic paint: Midnight


I know I've been a bit of a 'creative rebel' veering away from the basic shaving foam technique but I'm pleased I did as I had a lot of curious creative fun along the way and on the whole the ways I've used the shaving foam today proved to be far less messy than yesterday and produced some pretty cool effects and texture.  I just love those 'ripples' . 


If you have never tried creating with shaving foam before then I would encourage you to give it a go. Ok, it can be a little messy but there are ways to control the mess and I'm sure you will have plenty of foamy fun!
   
Thanks for joining me today/ tonight and yesterday  
Keep on creating 
Amanda 
x

Blog: ink-a-pink
Facebook: Amanda Pink 
Instagram: kynapi10
Pinterest: PinkArt