Showing posts with label Autumn Leaves. Show all posts

Thursday, 16 December 2021

2021 Topic 15: Journaling Gratitude with ECF {by Jenny Marples}

2021 Topic 15: Journaling Gratitude

Have you tried stitching on your projects? Jenny has several options for you here, including a really fail-proof faux stitching one, that you can hardly tell isn't real! With lots of ideas for layering and beautiful paint effects, this flip up journal page will keep you engrossed for quite a while! 
~ Keren

Hi everyone, it's Jenny Marples (Pushing The Right Buttonswith you today, and I'm here to share a journal page which celebrates the Autumn and Winter seasons, helping to make me feel more grateful for them along the way.

Inspired by the beautiful needlework often seen in Keren Baker's work I've had a go at 'drawing' with machine stitching as well as coming up with a way of turning 'a negative into a positive' to create colourful Autumn leaves with Courtney Franich's gorgeous stamps.
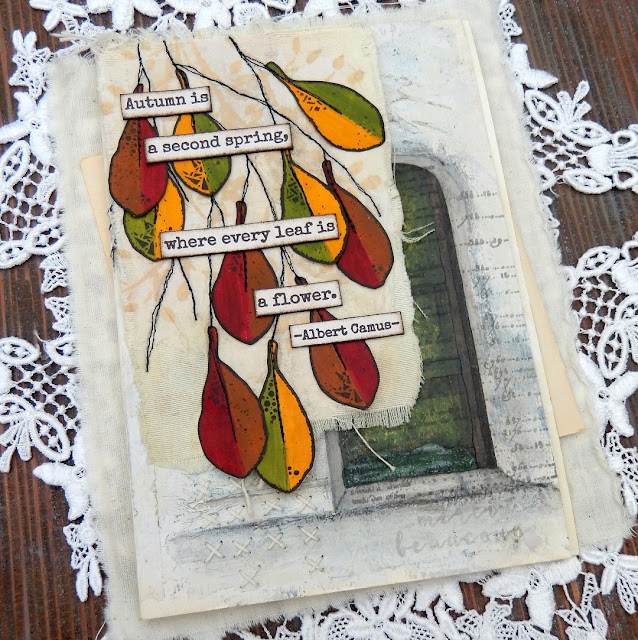

Flip up those Autumnal leaves to reveal a Wintery scene beneath.


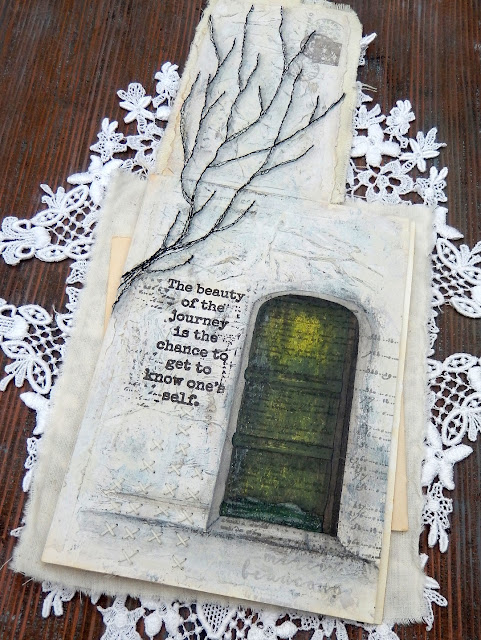
This piece all started after an October morning walk where the leaves were changing colour from their familiar Summer green to jewel-like shades of yellow, red and brown. They brought to mind a photo of an old green door I'd seen the previous day and an idea was sparked.


Wanting to capture the visual magic of both the Autumn leaves and the door I came up with a layout 'sketch' which involved adding a 'flip up' element to a journal page using the smallest leaves from Courtney Franich's stamp set ECF05.


The main journal page was already prepped with a scrap of book page and some white gesso. To create the flip up piece I took a blank index card torn along the edges and cut some fabric to a similar size with the idea of sticking those two together. A way of adding extra texture to the surface of all of these is to apply wrinkled tissue paper with some gel medium; once paint is added those wrinkles come to life. When dry the index card was stuck to the fabric and attached to the top of the journal page with masking tape.
 
 
Laying down layers of paint that won't be totally visible in the end is key to getting surfaces with a look of depth and interest (think Seth Apter's incredible pieces as a perfect example of this). Adding a little Sand PaperArtsy Fresco Finish Chalk Acrylic Paint with a spatula over the crumpled tissue revealed the texture beneath: I avoided the area where the door would eventually go.


Up close you can see where the Sand paint was used through Kay Carley's PS061 stencil multiple times on top of the fabric to mimic the illusion of further tree branches being behind the stitched ones.


The doorway was drawn on the right side of the page to make sure part of it would be visible beneath the leaves; by providing a 'sneak peek' at what lies on the next page you encourage viewers to turn over (or in this case flip up!) and see more.


That layer of crumpled tissue really comes into its own at this stage. Add layers of paint (in this case from darkest to lightest shades) unevenly over the top, allowing some of what lies beneath to remain visible. For this page I chose French Roast, Stone, Heavy Cream and finally Cloud 9 PaperArtsy Fresco Finish Chalk Acrylic Paints. When dry use a sanding block to gently rub away the upper layers and reveal those wrinkles - be brave and rub harder to get the most out of those lower layers.


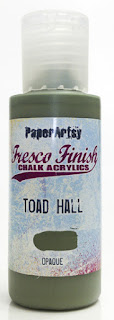
When it came to painting the door I found applying very thin layers with a small spatula helped control the application and allowed lower layers to show through - try scraping away some of the paint as well as adding more and think about leaving lighter areas as 'highlights'. I chose to use Guacamole, Toad Hall and Winter Green PaperArtsy Fresco Finish Chalk Acrylic Paints for this process with Hyde Park added over the kickboard at the bottom and French Roast used on the door frames.


You can 'shift' the colour and give the door a richer glow by painting on a very thin layer of the translucent Pumpkin Soup PaperArtsy Fresco Finish Chalk Acrylic Paint over the top - that's the beauty of having opaque, semi-opaque and translucent options. I added dimension using Stone around the edge and stopped the door from 'floating' by drawing a smudged line of French Roast below it.


Going back to the original sketch I'd drawn branches onto a piece of tissue and liked the design. Rather than transfer it with carbon paper and risk adding ink onto the fabric beneath I ran lines of gel medium along the drawn lines on the reverse and stuck the tissue to the fabric.


Having lines to machine stitch over helps immensely, and accuracy is definitely discouraged because in that way your finished look echoes the feel of delicate branches. You can see I carried the lines onto the attached page too. Remember, underneath the tissue is another layer of wrinkled tissue with gel medium and paint over it so it is now resistant to water. That's important because it means you can use water on a thin brush to help tear away the excess above.


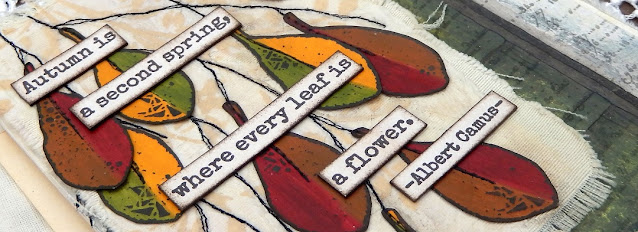
At the beginning I mentioned turning a negative to a positive - well here goes. Courtney's leaf designs are solid so when stamped they cover up what is below. I wanted the colour beneath to be visible so after painting a strip of paper with Blood Orange and Toffee PaperArtsy Fresco Finish Chalk Acrylic Paints I clear embossed them before painting over the top with the French Roast. Once dry rub over the leaves with a dry cloth to remove the paint from the embossed areas and reveal the design in reverse.


Repeat with Pumpkin Soup, Hey Pesto and French Roast PaperArtsy Fresco Finish Paints for the second set of leaves.


If you want to eliminate the shine of the embossing powder cover the leaves with layers of PaperArtsy Fresco Finish Acrylic Matte Glaze.


Glue the leaves onto the stitched branches using the sketch layout as a guide. I realised that it would look better to echo that stitching down the centre of the leaves but to run them through the machine at this stage could risk tearing them; in future would opt do this while they are still in situ on the painted strip. As the next best option I chose to 'fake it', using a tracing wheel to add indentations and drawing on the 'thread' with a narrow tipped black pen.


I love adding stamped detail over the top of hand drawn images to add extra interest; in this case I used the Courtney's script stamp from the same set over the door using grey permanent ink to keep it subtle.


Adding words can help to convey the intentions of the page; this sentiment from Sara Naumann's ESN42 stamp set spoke to my recognition of the understanding that whilst Autumn and Winter often fill me with a sense of sadness and dread these seasons have their own beauty, helping to make me even more appreciative of Spring and Summer. By stamping the words under the tree (in brown permanent ink) also means they are hidden from view until the leaves are 'removed'/raised. From a design perspective they also help lead the eye from the tree down to the door.


More words from Sara Naumann's ESN36 stamp set spoke to the beauty of the leaves seen on those October walks mentioned at the start of the post.
 

Here are some close ups of the finished journal page;


The hand stitching at the bottom of the page peeps out beneath the leaves.


Here you can see how the stitching was extended down from the index card flip onto the page underneath. Grey shadows were also added to one side of the stitching to give the branches more of a sense of dimension.


I stamped the postage stamp from Courtney's set in the top corner, blotting the brown ink to knock it back a bit. I also chose to over-stamp it with a postmark image from another of Courtney's stamp sets, ECF06, using grey ink. As an alternative you could re-use the circular element of the postage stamp on either side of the brown stamp.


Can you spot the 'hidden' expression of gratitude beneath the door? These words came from Sara Naumann's ESN43 stamp set and were deliberately made barely visible with blotted grey ink.


With lots of techniques and design ideas included in this post I hope you feel excited to give them a go. Whether drawing (or even tracing) a design on tissue and machine stitching over it or using crumpled tissue under your layers of paint and sanding it back, there are lots of ways to add texture to your journal pages. And if you have solid stamped images that you'd prefer to see through try using clear embossing powder as a paint resist.

Thank you so much for stopping by.
Jenny

Sunday, 7 July 2019

NEW PaperArtsy Products: July 2019 {Sara Naumann}

 Eclectica³ Collection {Sara Naumann}
July 2019 New Product Announcement


A note from Leandra: These new stamps from Sara have a strong botanical vibe, one that crosses gender with ease and allows you to make cards, journals or even striking interior decor items. I'm sure you will enjoy Sara's ideas too. She always has beautiful use of colour and composition that I find so inspirational.

Hi everyone, Sara Naumann here!

I'm super-excited to show you my newest release for PaperArtsy: 3 stamps and 3 coordinating stencils!

As Leandra said, these stamps and stencils have a botanical vibe, which I think works really well for summer themes and moving into autumn. I love leaves and branches and tend to collect them as I'm out and about—I find their shapes, textures and colors really inspiring
, and you can easily integrate them with other collage elements. 

Speaking of collage elements, you'll see snippets of text from the stash of old letters, credit notes, receipts and postcards I discovered at a flea market in Paris. (I suspect I am the world's worst flea market bargainer... they can see me coming a mile away.)

It's always my goal that you can mix and match between my designs, combining this year's images with last year's while still getting a look that's comprehensive. (Spoiler alert: These stamps and stencils will also coordinate with releases I have coming out in January.) 

Today and tomorrow you'll see ideas with these stamps from myself and another of the Team PA Bloggers. You can also see plenty of activity on PaperArtsy's Instagram, Facebook, Twitter, Pinterest. (links at the foot of this post) So no matter what your preferred social media platform, we will be sharing with you!

Let's check out these new beauties, some ideas from each set and a couple of projects.

  New Stamps
Price: RRP £18.74 +VAT
Size:5" x 6" (13 x16.5cm)
All stamps are individually trimmed onto cling foam, presented in a clear hanging bag
with a laminated storage/index sheet.

  
Eclectica³ Sara Naumann: Set 35 (ESN35)


I love remixing collage elements—my hope is that stampers feel they can use any of these images as they are, but also can cut, layer and re-combine images to create a totally new look. (Side note: I found that large branch while walking around the Chateau de Vincennes in Paris—it's about 12" long—and thought it was so lovely that I stuck it in my purse and brought it home in my suitcase. Because that's the kind of souvenir you bring home from Paris, right?)

Eclectica³ Sara Naumann: Set 36 (ESN36)


This set includes another favorite motif for me: Birds. I love the symbolism of flight and freedom. I photographed this bird last winter. My mother-in-law lives far out on the Washington State coast—it feels like the absolute end of the world but it's really just the end of the peninsula. We were walking along the boardwalk with the wind and the waves crashing around us and I saw this very stoic bird perched on top of a post, as if nothing could disturb him.  

Eclectica³ Sara Naumann: Set 37 (ESN37)


Ferns are all over in the woodsy area where I grew up in Oregon. My mother knows I use a lot of botanicals in my artwork and she—an avid gardener—often preserves flowers and leaves for me. She pressed and dried the fern for me and here it is! (Thanks, Mom.) The script and postmarks are from my Paris stash, and I think they make a very nostalgic combination. For the Grunge Pasted stripe background, just keep reading to see the new stencils!

New Stencils
Regular Size: 6.5" x 7" (16 x 18cm) Price: RRP £4.60 + VAT
  
PaperArtsy Stencil 144 (PS144)


Very often, people leave really fabulous stuff at our neighborhood recycling stations. Who would toss out a vintage chemistry textbook when it can so obviously be used in artwork? Of course I lugged it home immediately because I love the beauty and symmetry of the symbols. (You'll see these in the Eclectica ESN35 stamp set too.)

PaperArtsy Stencil 145 (PS145)


Dots are such a basic background element—of course wonky dots are a lot of fun. This stencil is meant to be used to stencil through, and to be used for reverse stenciling, as I did on this piece. I couldn't stop there, though, and then Grunge Pasted PS144 on top. 

PaperArtsy Stencil 146 (PS146)


Like dots, stripes are great... and wonky stripes give more options (and make Grunge Pasting easier). Lately I'm really into adding metallic foil into wet Grunge Paste... it gives a bit of distressed shine that adds texture without dominating the whole composition.

Project One: Leafy Double-Stenciled Collage Card


I love layering stencils–who says you have to stop at just one, after all? For this piece, I wanted to play with the technique of stamping through a stencil, on top of a Grunge Pasted stenciled background... I wanted just fragments of the text, and this method turned out to be really effective!


First I made a background with Butter, Mermaid and Gold Fresco Finish paints, just randomly brayering it on. Let it dry.


Next, tint Grunge Paste with Hint of Mint, Sargasso and Mermaid and apply it through the PS144 stencil. Let that dry.


Next place the PS145 wonky dots stencil on top of the piece and stamp the large credit note background image from ESN36 through the stencil with black ink. You'll get gorgeous snippets of text. 


And finally, smoosh Hint of MintGold and a bit of Sargasso onto Smoothy. When it's dry, stamp the Saint Mande collage on top. I die-cut it into a circle to balance with the linear look of the stenciled stripes. Stamp the large postmark and leaf trio collage from ESN35 onto painted card, then paint in the leaves with Sargasso and Blue Lagoon; cover them with clear gloss embossing powder. Cut out and add as elements. Stamp the chemistry border from ESN35 and paint in with Sargasso, then cut out and glue. Hemp twine is always a nice accent, especially in contrast to the metallic gold.

Project Two: Spring Fern Stamped & Stenciled Card


I love layers of color and texture; I also love pops of white (or off-white) to contrast and enhance those layers. Working in some old sheet music is always a good idea, and it takes on a different effect when coated with clear gloss embossing powder.


First I made a painted background by brayering Blue Lagoon Fresco Finish and Sargasso. Take care not to overblend. Then spatter a lot of watery gold on top. I'm using the Tim Holtz Splatter Brush but you can use a waterbrush, paintbrush or even old toothbrush.


Now tint Grunge Paste slightly with Hint of Mint, and use a palette knife to apply it through PS144. My tip: Use an old key card to scrape off excess Grunge Paste from the stencil, then lift the stencil straight up.


Next stamp the leaf trio from ESN35 and the clock from ESN37 onto Smoothy that's been brayered with Butter. Clear-emboss them and cut them out. Note: The clock is upside down because I wanted to show the half with the postmarks—the other half is on the project above for ESN37.


And finally, brayer sheet music with Hint of Mint and let dry. Brayer Blue Lagoon onto the PS145 stencil, mist with water and press the sheet music onto the wet painty stencil. Lift, let dry, then stamp the fern collage from ESN37 and clear-emboss. Add the stamped sentiment from ESN36.

Thank you so much for joining me today—I really hope you enjoy the new releases. I'll confess: The design process can be a long and intense one. (I binge-listened to true crime podcasts for a week while working on these; maybe not the best idea?) It's always a massive relief when I start working with the actual stamps and stencils and find that they lend themselves to looks and styles I didn't expect. I truly hope you find them as much fun as I did. 

A huge thanks as always to Mark and Leandra for providing us all with this opportunity to connect and create together. 

Socials...
Website: www.saranaumann.com/blog
Twitter: @saracnaumann

Teaching Schedule:
Coming in October at my website: Christmas Cardmaking online workshop!
Creativation trade show in Phoenix, Arizona


PaperArtsy Stockist List

We ONLY manufacture RED RUBBER STAMPS (not clear, polymer or silicone). We manufacture ALL our red rubber stamps and stencils on site in Essex, UK. We do not outsource any of our stamp or stencil manufacturing.

If you see PaperArtsy stamps or stencils listed for sale on websites such as AliExpress or Wish, then they are counterfeit products manufactured illegally without our consent in direct breach of our Copyright and Intellectual Property  protections. To purchase counterfeit products from such sites is not only illegal, but it directly undermines our brand, our retailers and our product designers. We are regularly checking these sites and regularly reporting any counterfeit IP breaches for immediate removal.

We EXCLUSIVELY supply only the following stockists in this list below. If you purchase from these approved PaperArtsy retailer, you know you are buying authentic, PaperArtsy made products.

Australia
Art and Soul Studio, Burrum Heads, Queensland www.artandsoulstudio.com.au
Arts and Craft Supply, Frenchs Forest, NSW https://artsandcraftsupply.shop  
Auzz Trinkets and Crafts, Calamvale, Queensland https://atcraft.com.au/
Bella Paperie, Brendale, Queensland, www.bellapaperie.net.au
Bev's Cross Crafts, Spreyton, Tasmania https://www.bevscrosscrafts.com.au/
Crafters Cupboard, Berwick, Victoria www.crafterscupboard.com.au
Scrap Matrix, Port Elliot, South Australia http://scrapmatrix.com/
Scrapbook Superstore & More South Penrith, NSW https://www.scrapbooksuperstore.com.au/
The Thread Studio, 6 Smith Street, Perth http://www.thethreadstudio.com/
The Scrapbook Store, North Perth,WA http://thescrapbookstore.com.au/
Time To Create, Modanville, NSW www.timetocreate.com.au

Austria
CP Marketingservices Gmbh, Wilhering, Upper Austria,office@cpmarketing.at

Belgium
Cart N Scrap Art, Antwerp, cartnscrap@gmail.com
Cotrain, Kontich, www.cotrain.be
Expression Hobby, Marcinelle www.expressionhobby.be

Canada
Emerald Creek, Clagary, Alberta, https://emeraldcreek.ca/ 
Scrapbook Centrale, Dollard Des Ormeaux, Quebec www.scrapbookcentrale.ca
Treasured Memories, Duncan,BC www.treasuredmemoriesscrapbooking.ca
Simply Scrapbooking, Prince George, BC https://www.facebook.com/simplyscrapbooking/
Scrap Addicts, Edmonton, Alberta https://www.scrapaddicts.ca/
Scrap and Bean, Edmonton, Alberta http://scrapandbean.com/
The Paper & ink Boutique, Calgary, Alberta https://www.paperandinkboutique.com/

Czech Republic
Hurapapir, Brno https://www.hurapapir.cz/

Denmark
Hobbyboden Scrapworld Samso www.hobbyboden.dk
Papir Ulven, Lejre www.papirulven.dk
Three Scoops Design, Frederiksberg, www.threescoops.dk

Finland
Käsitellen, Lempäälä, https://www.kasitellen.fi/
Piia Takalo, Kittila, www.piiapaper.com/fi

France
Eirl Bancon Cartoscrap, Midi Pyrenees, https://www.cartoscrap.com/blog/
Horizon Creatif, Ste Jalle h.creatif@gmail.com
Katzelkraft, Ingwiller http://www.katzelkraft.fr/en/
Kerglaz, Basse Goulaine, https://www.kerglaz.com/  
Kerudoc Creation, St Yvi www.kerudoccreation.com
Quartier Serre Teston, Ste Jalle, hcreatif@gmail.com
Scrap by Nini,  Uzerche, Limousin https://scrapbynini.fr/ 
Scrapo'naturel, Tourville La Riviere, www.scraponaturel.fr/livraison 
Toutencolle, Dun sur Avon www.toutencolle.fr

Germany
Paperbasics, Hessen, www.paperbasics.de
Stempelbar, Berlin, www.stempelbar.de
Stempeloase Munich, Munich www.stempeloase.de
Stempelfee Shop, Hilden www.stempelfee-shop.de
Stempellaedle, Stuttgart, www.stempellaedle.de/shop

Greece
Scraps N Pieces, Kallithea www.scrapsnpieces.gr

Italy
Immagine SAS di Rapaccini, Rome, www.immaginelab.com
Il Negozio Della Mamma Di Cle, Torino, clelia27@liberio.it
Marte Savona, Savona, www.martesavona.it
L'artistica Glo, Cinisello B (Mi), www.artisticaglo.it 
Piccole Passioni, Siena, www.piccolepassioni.it
Scrap it Easy, Rome, https://www.scrapiteasy.com/it/

Japan
Tiny Dots, Funabashi-shi, Chiba www.facebook.com/TinyDots

Netherlands
Creafine, Papendrecht www.creafine.nl
Creatotaal, Barendrecht, www.creatotaal.nl
De Hobbystudio, Genemuiden, www.dehobbystudio.com
De Scrapheap, Sprang-Capelle, https://www.descrapheap.nl/ 
Doe@ding,Spijkenisse https://doeading.nl/
Hobbidee Breda, Noord-Brabant, www.hobbidee-breda.nl
Hobbycompleet de Duif, Leeuwarden www.hobbycompleet.nl
Kimya Verpakleingen, Arkel, https://kimya.nl/
Noor! Design B.V. Waspik, https://www.noorenzo.com/
Scrap & Co, Klarenbeek www.scrap-co.nl
Scrapbookdepot, Uitgeest, www.scrapbookdepot.nl
Stampingcorner, Capelle Aan Den Ijssel www.stampingcorner.nl
The Stamping Cottage, Schaijk www.thestampingcottage.nl

New Zealand
Art of Craft, Papamoa, Bay of Plenty, www.artofcraft.co.nz

Norway
Hobbygarasjen, Kopervik, www.Hobbygarasjen.no
Hobbykunst, Rasta, www.hobbykunst-norge.no
Scrapbookengros AS, Kleppe www.hobbylageret.no

Spain
Arts & Crafts, Barcelona, pebdesign@hotmail.es
Cien por Cien Manualidades, S.L., Bizkaia, Catalunya,  www.100x100manualidades.es
Endulze & Crista S.L, Navarra, endulze@gmail.com
Ideas 10 Manualidades Y Scrapbook, Bilbao https://ideas10manualidades.com/
Marakiscrap, Tarragona, www.marakiscrap.com
MundoMint, Sabadell, Barcelona, www.mundomint.es
Scrap & Papers Experiences, Barcelona, Info@casonadequintana.com
Scraphouse S.L. Barcelona www.scraphouseshop.es
The Paradise Corner, Barcelona, www.facebook.com/theparadisecorner 
Endulze & Crista S.L., Pamplona, Navarrawww.endulze.com 

South Africa
Kcraft Imports Ltd, Centurion, www.kcraft.co.za
Stencil Art, Gauteng, www.stencil-art.co.za 

Sweden
Butik Elva, Staffanstorp, https://www.butikelva.se/
HC Design, Svedala, www.hcdesign.nu

Switzerland
KRL and Co, Payerne, http://www.krlandco.com/en/

Taiwan
Mandy's Cards, Taipei www.facebook.com/mandy.card

United Kingdom
A Trip Down Memory Lane, Ipswich, Suffolk, http://www.atripdownmemorylane.co.uk
Abermaw Quilting & Crafting, Gwynedd, Wales ph 07818556758
Aldridge Crafts, Attleborough, Norfolk www.aldridgecrafts.co.uk
Amelia's Creative Crafts, Studley, Warwickshire  www.ameliascreativecrafts.co.uk
Art from the Heart, Harrogate, Yorkshire www.afth.co.uk
Bellacrafts, Eastleigh, hampshire www.bellacrafts.co.uk
Blade Rubber Stamps, London www.bladerubberstamps.co.uk
Charlottes Crafty Corner, Suffolk, http://www.craftycorner.suffolkcraftshop.co.uk/
Clacton Art Craft Model Centre, Clacton on Sea,  Essex, http://www.clactoncrafts.co.uk/
Countryview Crafts, Potton, Bedfordshire www.countryviewcrafts.co.uk
Craft World Scotland, Glasgow www.craftworldonline.co.uk
Craft Your Art Out, Ballynahinch, County Down, craftyourartout@outlook.com
Crafty Bunch, Telford, Shropshire, http://craftybunch.co.uk/
Crafty Snippets, Billingshurst West Sussex www.craftysnippets.co.uk
Crafts & Candlelight, Ipswich, Suffolk www.craftsandcandlelight.co.uk
Crafts @themalthouse, Herstmonceux,  East Sussex, http://www.coldfusionglass.co.uk/
Craftrange, Burnley, Lancs, https://www.craftrange.com/
Handmade at Helen's, Dumfries, Scotland, https://www.handmadeathelens.co.uk/
I Love Mixed Media, Cromhall, Gloucestershire, https://www.ilovemixedmedia.co.uk/
Imagine, Design, Create, Seaton, Exeter http://imaginedesigncreate.co.uk/shoponline/
Keep on Crafting, Bury St Edmunds, Suffolk www.keeponcrafting.co.uk
Kraft Crazy, Amesbury, Wiltshire https://www.facebook.com/KraftCrazy/
Lisa B Designs, Maidstone, Kent, http://www.lisabdesigns.co.uk/
Lets Create, Lincoln, Lincolnshire, http://www.letscreateartandcrafts.co.uk/
Loobie Crafts, Leighton Buzzard, Bedfordshire, www.loobicrafts.co.uk
Papermaze, Ipswich, Suffolk www.papermaze.co.uk
Paperstory, Norfolk www.paperstory.bigcartel.com
Poppycraft, Wallingford,  https://poppycraft.co.uk/
Rowan Tree Crafts, Carnforth, Lancashire www.rowantreecrafts.co.uk
Fave Rave, Stourbridge, West Midlands www.shabbychicstencils.co.uk
Scrapbook Magic, Mullion Helston, Cornwall, www.scrapbookmagic.co.uk
Shed Load of Crafts, Enfield, Middlesex, www.shedloadofcrafts.com
Simply Crafts, Cardiff, www.simplycraft.com
Snazzy's, Swindon, Wiltshire. https://www.facebook.com/snazzystampingandscrapbooking/
Stampers Grove, Springbank, Lilliesleaf, Melrose,Scotland www.stampersgrove.co.uk
Stamps & Memories, Hungerford, Berkshire 
www.stampsandmemories.co.uk
Swanstitch, Deal, Kent www.facebook.com/swanstitch
That's Crafty, Romford, essex www.thatscrafty.co.uk
The Artistic Stamper Craft Store, Faversham, Kent www.theartisticstamper.com
The Craft Box, Barnsley, South Yorkshire www.thecraftbox.biz
The Craft Den, Wisbech, Cambridgeshire www.thecraftden.co.uk
The Craft Room, Newcastle-Under-Lyme, Staffs https://www.garnersgardencentre.co.uk/crafts/
The Craft Studio, St Austell, Cornwall https://www.facebook.com/thecraftstudio/
The Forget me not Kraft Kabin www.facebook.com/TheForgetMeNotKraftKabin
The Stamp Pad, Saddleworth, stamp-pad.blogspot.com
Whichcraft, Wallasey, Merseyside

USA
Artistic Artifacts, Alexandria, VA https://www.artisticartifacts.com/
Artistic Studio Creations, Fayetteville, Georgia www.facebook.com/ASCbyCrystal
Artistree Workshops, Fulton, New York, www.facebook.com/artistreeworkshops
Big Mouth Scrappers, Forney, Texas, https://www.bigmouthscrapperstx.com/ 
Clay with Me, Colorado www.facebook.com/Claywithmestudio
Creative Designs by Debbie Castle Rock, Colorado debbie.knight@centurylink.net
Creative Inkling, Hatnboro, PA https://www.creativeinkling.com/
Creek Bank Creations, Indiana www.creekbankcreations.com
Ephemera Paducah, Paducah, Kentucky www.ephemerapaducah.com
Everything Scrapbook & Stamps, Lake Worth, Florida www.everythingscrapbook.com
Frantic Stamper, Oregon www.franticstamper.com
Free Heart LLC, Denver, Colarado, http://www.freeheartllc.com/
Golden Hills PaperCrafts, Fairfax Station, Virginia, https://www.goldenshillpapercrafts.com/
Guadalupe's Fun Rubber Stamps, Santa Fe, New Mexico www.santafe.com
Joggles, West Warwick, Rhode Island, www.joggles.com 
My Rusty Crown, Escondido, California, https://myrustycrown.com/
PaperCraft Clubhouse, Westbrook, Connecticut, http://papercraftclubhouse.com/
Papere Parachute Art Design Co., Beaverton, Oregon www.paperparachute.com
Runaway, Art & Craft Studio, NE Salem, Oregon http://www.runawayart.com/
Sherries's Stuff, Warrenton, Virginia, https://www.facebook.com/sherriesstuff.va/
Simon Says Stamp, Columbus, Ohio www. simonsaysstamp.com
Stamplistic, Cleveland, Ohio www.stamplistic.com
The Artistic Palette Studio, Eugene, OR, http://www.artistspalette.com/studio/
The Crafty Scrapper, Waxahachie, TX http://www.thecraftyscrapper.com/
The Doodlebug Inc, Jasper, IN, https://www.thedoodlebuginc.com/
The Ink Pad, New York, www.theinkpadnyc.com
The Queen's Ink Savage, Maryland www.queensink.com
Topflight Stamps, Irmo, South Carolina https://topflightstamps.com/
Seth Apter, New York www.sethapter.com
Stamp Fever, Orange, California www.stpstamp.com
Whim so Doodle, Saint Petersburg, Florida, http://whimsodoodle.com/ 
Vintage in KC, Shawnee, Kansas, http://vintageinkc.com/

Our brand is only available from established stockists who are VAT/ GST/ sales tax registered and for whom product education is a core principle. We would rather supply a few hand selected stockists, than the greater masses. If you would like to apply to be a stockist, you can find our more about our supply criteria here

PaperArtsy Links
Facebook Group (NEWPaperArtsy People
Facebook Page PaperArtsy