Showing posts with label 2017 Topic 2. Show all posts

Monday, 25 December 2017

PA 2017: Blog Year in review: Topics 1-4


Hello and a very Merry Christmas from PaperArtsy HQ!

The next few days ahead are the time of year that we reminisce and look back on the topics this blog has explored during 2017. 

Did you learn something new this year? Did you achieve a personal goal, or tick something off the bucket-list? Were you challenged in ways you least expected? 

I think for all of us there have been numerous unexpected twists and turns in international terms for us to absorb throughout 2017, lets hope for calmer waters in the year ahead! I'd love for us all to move towards a more fulfilled and content future!


We've all been provided with the highest quality and widest variety of artistic styles on the PaperArtsy blog this year. We deliberately strive to bring you bloggers with different styles, strengths and experiences and this melting pot suits the equally broad array of products available from the PaperArtsy brand.


Tonight I'm sharing a few reminders from 2017 Topics 1-4. Read on to find out more. 


Leandra.


Topic 1: Pink and Orange

In 2017 we decided to add a subtle structure to our topics. Each round of 4 topics started with a colour theme, and the first of these colours was based on the True Colours Publication, curated by Lynne Perrella.


My favourite and a real turning point for me, was the chapter on Pink and Orange by Teesha Moore. And, so it naturally followed that this would be the first topic of 2017, a burst of enthusiasm and boldness!

Wendy Malls kicked off her year with this perfect representation of those zingylicious colours and made a Book of Pockets


We have come to rely on Keren pulling rabbits out of hats. On this occasion she was on a clever transparent kick, which was sublime ....


or is that subpink (and orange)!


Honestly, I could show you every post for this topic - they were all astonishing, which really is the story of the entire year on this blog! Here, Chris Dark lobbed Kay Carley's stamps out of the park...look at this in-progress shot!! Stunning!


OK Just one more...Jennie Atkinson interpreted the colour theme as led by Infusions. Her palette was soft and subdued, as is her style... I love that any colour combination can be re-worked to suit personal preference. So now you know,  Pink and Orange certainly doesn't have to be HOT! It can be dusky too!


Topic 2 : Masks

Do you know the difference between stencils and masks? Well, it is fascinating how the lines have blurred. But a mask hides things right !? So let me leave that with you and you figure it out!

Anneke is a masking guru. Layer upon layer of soft and delicate paints with a poweeee-pop of orange! I love how she uses colour in such an effortless way. And I love how this picture links the last topic to this topic!!!

OK, I'll admit it, sometimes you feel like you have to turn your brain inside out to understand how stancils and masks can be used. And our own, very lovely Missy Jo is very good at turning my head inside out on an annual basis! This post fascinated me, and the stencil she created to do this is ACE!!!


Another of our talented in house designers, in fact a newbie 2017 PaperArtsy designer, is Alison Bomber. I think we are all a bit scared of white, but look at how masks make this box pop!


Sue's canvas used masks in several ways...can you count the ways??? There's 3 very obvious techniques, on 3 separate layers....


Topic 3 : Paints and Infusions

We all know the basics of using infusions now ...well if you don't yet, just use the search bar on the sidebar of this blog and you'll be bombarded with posts from the past 2 years! Our Fresco paints are chalk, so this can inherently provide a really good tooth for infusions to grab onto, it can also offer up other creative options too, let me share a few with you now!

Take a deep breath those 'cleanies' out there...infusions WILL stain your fingers, but that's part of the fun right?!! Hey it scrubs off, so don't panic....Xmas parties are O-V-E-R you're allowed to get messy!! Helen used bleach! Not to clean up (sheesh! silly!!) noooo... to knock back her infusions in the most stunning way....Look!! You know you want to sprinkle just like her!!!


I think this is one of my fave's from Hazel. She got so excited when she was layering up this book of Seth's newest products: wood, paint, rusting powder, and of course infusions all feature within the covers. It's a bit like those interactive books you buy for kids to poke and prod...except it's for us grown ups!!


I adored how Clare Messenger made this piece ready for the wall, how cool would 4 of these look for a fabulous statement piece in your house!

Boy are we lucky that Kay Carley is getting out and about in 2018 teaching her skills to us all! Check this out!! An amazing amount of detail to bring this sample together, lucky for you she shares the steps in great detail too in her blog post! Go and check it out!


Ok, how about this! Ruth Mescall is also an infusions guru! I adore this post too...I love them all, how can you choose just a few to share !!??.... this is torture!...but look, it's so lovely!!! On the back of this I was demoing Lin's flora stamps with infusions all year at the shows we do! Love love, love. If you haven't yet tried infusions, take a minute to absorb the colours, the tones, and the depth. They make you feel awesome!


Topic 4 : Doors and Windows

I have a secret fascination with doors. Every time we head over to the fabulous continent of Europe, my first photo is ALWAYS a door, or wrought iron covering a window, or gates...all those elements always look more romantic on the continent than here, in the generally dull, grey-skied Britain! Who wants a shiny red or black or cream spick and span door, not me! Give me a rusty peeling hardy old well-loved door any day!!!

Julie Ann has been creating astonishing miniature hinged art blocks and they are a delight! My first pick to remember is this, she writes gorgeous back stories to them too!


I think this was the best thing from Emma Godfrey with her stamps! Not only has she created windows, she's also used infusions as 'pops' of colour - you know you want to sprinkle those things ... yes you doooo....(I digress - I'm under the spell of infusions). Where were we, oh yes, Emma's super-cool frame. Go take a look!


So this next sample not only do I love, but the colour follows on perfectly from Emma's sample above!! Yup, it's Seth with one of his original doorways...he makes a lot of interactive art! Love the pop of color inside the doors, and his masterful painty layering ideas.


It is so much fun to look back on what our genius bloggers have shared with us over the course of a year. This year seems to have zapped by in a blink, but at least the blog remains as the perfect reference tool Don't forget to save the posts that float your boat on pinterest. No excuse now, you'll hit the New Year with a dozen ideas to crack on with!


See you again tomorrow with more!

Leandra

Saturday, 18 February 2017

2017 #2 Spring-ish Hanger {by Etsuko Noguchi}

2017 Topic 2: Masks


Etusko is a bit of a Lynne Perrella fan, as you are about to find out! In this post she effectively shows how to pull out all the details from these amazing stamps so effectively! Carefully placed colour really brings these stamps to life like no other collection. Enjoy!

Hi everyone, Etsuko Noguchi of My Favorite Things here. 

Every year January and February are very exciting month because new products will be released. Especially the new Lynne Perrella stamps, that was a wonderful gift for PA freaks! 

This fortnight Topic is 'Masks'. I'd like to share with you this evening a post using masks with Lynne Perrella's stamps. The new stamp collection is so beautiful and high-quality --AMAZING!!--  I have often used this method with using stencils. But for this project I'd like to try with a masking tape that I leaned in Mary Jane Chadbourne online class last summer. Masking tape is very convenient and do not damage a surface of paper, there are the reason.


A hanger is most popular gift object. It is nice to put a family picture in the back of this door.

Using the masking tape is very easy...I stamped new Lynne Perrella collection on top.


I love brayer work, sometimes I found an unexpected mixture of colors, this time I used Caribbean See and Coral Fresco, to finish I added Nougat Fresco to make it soft colors.


like to make three-dimensional objects. It's like something extra and still stimulates my child's mind. This time I attached a thin interior to behind the door.


I couldn't decide the color of the background Linda Brown ELB29 leaves so I made a color scheme using Photoshop. These are another color candidates and the doors and face were scanned in advance. Finally I used Lake Wanaka Fresco on the background.


I stamped LPC036 it using a stamp positioner so I don't want to mistake the position.


I painted with watercolors.


I love to make any embellishments so I made the door items with paper clay. Painting Lake Wanaka, Chocolate Pudding Fresco and Treasure Gold Classic.


This is the interior, I used beautiful LPC36 and Hot Pics HP1602EZ  butterfly. 
On the left messy stamped paper is for masks.


Finally I made the frame painting Space Cadet Fresco also I added the swing beads and the chain. 

New Beautiful Lynne Perrella collections are high-quality stamps that evokes various ideas of my craft life. Thank you for joining me, and hope you like it. I look forward to meeting you soon.

Etsuko Noguchi
Blog--My Favorite Things
Facebook
Pinterest

Oh my Etsuko, I loved reading your process so much! From Photoshop to clay!!! The depth by turning this into something dimensional  and niche-like was fantastic! Thankyou for sharing on the blog, a pleasure to have you here! ~ Leandra


We hope that you  learn something interesting from our blog. Our bloggers deeply appreciate your comments so much, so please take time to let them know you've been inspired! Why not join our challenge by blogging your interpretation of the current topic and link it here?

The current topic link will close 17:00 (London Time) Sunday, 26th February 2017, (note you have 3 weeks for this challenge) and the winner will be announced 2 hours later at 19:00.

All links go in the draw to win a £50 voucher to spend on products of your choice from the PaperArtsy online store.


Friday, 17 February 2017

2017 #2 Canvas in Green {by Sue Carrington}

 2017 Topic 2: Masks


Feeling the need for a bit of interior decor? Check out Sue's easy and coordinated layering ideas from masks to papers. All you need is a few Frescos some lumps of texture and tadaaa! Fun and very satisfying!

Hi everyone Sue here from Stamping Sue Style.

Fab to be here on the PA blog tonight! I've chosen to share with you a canvas using lots of layering of masks.

Masks are not so different from stencils to use, you can still use layers and you still get amazing effects when you use one over the top of the another. Being a big fan of making my own backgrounds and masterboards, masks are just another way to get fantastic results.


Leaving space so that you can see the fabulous detail the masks have created is something I love to do. In fact I rather liked this canvas without any of the embellishments, plus I decided to go with my favourite colours greens and blues!


Starting with a pale colour always feels like it's a waste of time sometimes as when the darker colours follow it's mainly covered over, but when you see those little pockets of light it adds so much depth and I love to see it!


When I'm creating a project I always think in layers; background, middle and top, this doesn't exactly mean that these need to be on top of each other but it's the layers of detail. The Art Stones have created the top layer and without them I felt like something just wasn't quite right. A little glaze of Slate added some contrast over the stones.


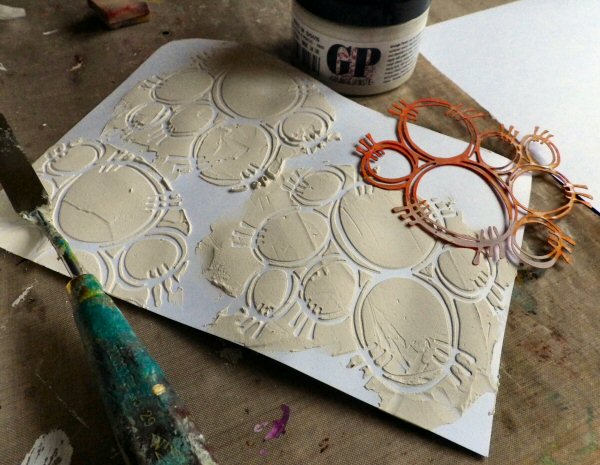
Using texture is so important to me. Masks are fabulous to use with Grunge Paste , it reveals all the detail so perfectly, and you get a solid result which is great to paint and then sand.


Working around the corners on chunky canvases really finishes it off, especially when it's hung on the wall and you can see it from different angles.


Adding white to the mix is something I like to do and stamping with Snowflake is great on these canvases as the paint sucks on to the canvas surface which helps a lot as there's no support to press on. A little flicking of watered down Snowflake and Gold Fresco Finish just make it not so neat and tidy in my eyes.


The sentiment stamp is from one of Emma's new sets...as are the masks I used...all to be revealed in full next week!


I've really enjoyed this project as it's doing what I love, using masks gives a twist on stencilling but still gives wonderful results. Sometimes I have an idea but not sure that it will work so the magic when the mask is removed and you see the patterns and colours work together is what crafting is all about for me ! Using masks with paints, pastes and sprays are all great ways to achieve patterns, colours and textures, so give it a go !

Sue

Stamping Sue Style
Twitter: @Ink_and_me

It the small details that fascinate. The sanded Grunge Paste, dollops of Prima beads, flicks of paint, and the Sentiment is perfect too! Marvellous project Sue!

We hope that you  learn something interesting from our blog. Our bloggers deeply appreciate your comments so much, so please take time to let them know you've been inspired! Why not join our challenge by blogging your interpretation of the current topic and link it here?

The current topic link will close 17:00 (London Time) Sunday, 26th February 2017, (note you have 3 weeks for this challenge) and the winner will be announced 2 hours later at 19:00.

All links go in the draw to win a £50 voucher to spend on products of your choice from the PaperArtsy online store.

Wednesday, 15 February 2017

2017 #2 Pencil Case {by Carol Fox}

 2017 Topic 2: Masks


So come on, be honest, how many of you have used fabric onto your gellie/ gel plate?? It's clear that Carol has, and what a brilliant way to add colour! And the mask, oh my, those large StencilGirl masks are to die for!! Love how that turned out too!! We are super-fortunate to have people with such clever ideas as this sharing them with you on the PaperArtsy blog!!!

Hi everyone Carol here.

Great to be here on the PA blog tonight. I've chosen to share with you a Pencil case made using a Stencil Girl Mask and my Gelli Plate. I have been on the look out for a case to take to classes and demos that was large enough to get a good range of bits and bobs in and most importantly that I liked. But then I thought  "why not make my own". So that is what I have done!

I approached my project in exactly the same way that you would a journal page, layering, stamping, adding those last little details that make it your own, before stitching it up into my case.


I often use the Gelli Plate for a quick background to start off a blank page or project, once I get paint on something I always feel like I am halfway there and the New Tracy Scott Paint set is a lovely combination of colours and gave a lovely effect once brayed on and a print pulled off onto my fabric


I loved how the large 9x12" Stencil Girl Mask by Traci Bautista filled my Gelli plate, with no need to jiggle to get good coverage. The snowflake paint really popped over the previous layer.


The large white circles from my masked layer gave a perfect background to stamp the flowers from the new

Tracy Scott Stamp set ETS07 (see list of stockists here)

... and the Tracy Scott paint colours looked lovely again too, I was feeling very happy with my project.


The the large flowers stamped in Little Black Dress added a focal point, I stuck to paint to stamp with as I felt ink might get lost on the painted fabric.


I painted my flowers with the same colours of paint I had previously used, and added extra stenciling with...
... PS036 (by Kim Dellow)

... and PS034 (by Kim Dellow)

Again the white Snowflake paint gave a lovely pop to my project and really seemed to lift the colours.


I decorated a back panel for my Pencil case in exactly the same way, but I left it without the final stamped touches. I then joined them together adding a zipper to the top. I followed the instructions from here which were very easy.


I drilled a hole in a little acrylic circle and then stamped and embossed onto it using the smallest stamp from the set, I added this to my zipper pull.


I do like to make things I will use,  and I think that is why I like to work on fabric as it is so versatile and once printed or painted on it has a million uses. Over the last couple of years I have been making some printed bunting, adding to it with my favorite stamps of the moment, it is getting rather long!!.

I have found fresco paints to be very versatile on fabric and that by adding the same amount of Satin glaze to them it makes the paint flow better on fabric, and also slows down the drying time, which is always handy when working on fabric as the nature of fabric makes it want to suck all the moisture in immediately.

I hope you enjoyed my project and it inspires you to have a go and get your art out into everyday use.

Carol 

Blog: http://gingernonutsbits.blogspot.co.uk/
YouTube: https://www.youtube.com/channel/UCn4c4HqW1kIVvWDBssF_YQg
Twitter: https://twitter.com/Gingernonuts
Facebook: https://www.facebook.com/GingersAlteredBits/
Instagram: https://www.instagram.com/gingernonuts/

It's just the next level when the thing YOU make serves a purpose and will be used daily! I was looking for something just like this for my crochet hooks, now I need to have a serious talk with myself about not thinking outside the box. What you have made is EXACTLY what I need too! Thanks Carol! 'Wood' and 'trees' comes to mind! ~ Leandra

We hope that you  learn something interesting from our blog. Our bloggers deeply appreciate your comments so much, so please take time to let them know you've been inspired! Why not join our challenge by blogging your interpretation of the current topic and link it here?

The current topic link will close 17:00 (London Time) Sunday, 26th February 2017, (note you have 3 weeks for this challenge) and the winner will be announced 2 hours later at 19:00.

All links go in the draw to win a £50 voucher to spend on products of your choice from the PaperArtsy online store.