Showing posts with label Bracken Sparkes. Show all posts

Wednesday, 21 September 2016

2016 #18 Birdhouse {by Bracken Sparkes}

2016 Topic 18: Autumn Leaves

Hi everyone, It's me, Bracken, again! Hope you're all okay? This time I've been busy making a bird house not only for a bird but for a Hedgehog as well, which I have named Hogwart:)


1. First I painted the house with Fresco Finish Chalk Acrylic Slate(All paints used for this project were Fresco's), then applied Crackle Glaze in a few spots I'd like the cracks to show. Once that had semi dried, I painted Stone on top of the glaze and the rest of the house.


2. Next I mixed Slate into Grunge paste and covered the roof in it using a thin layer as well as the little ledges on the base. The underside of the roof and base were just normal Slate without the Grunge paste.


3. Using a trusty glue gun and small round wood chips bought at The Range, I glued together a stand for the bird house. As the chips were layered, I encorporated fake moss also bought at The Range (live for that stuff!..so cool and handy!)


4. I wanted to wind some sort of twig round the house but couldn't find one thin or bendy enough to wrap round it so took a small piece of one of my mum's ornaments...Sorry mum! (she didn't mind really). I attached that using the glue gun.


5. Onto a piece of thin card, painted chunks of Autumn Fire, Brown Shed, Cherry Red (limited edition:(),Claret, Blood Orange (Sadly no longer with us:(...But Claret is almost identical anyway), plenty of Irish cream (Good bye old friend:(...But Mushroom isn't a bad alternative) and Caramel. Once that'd dried, I stamped the cluster of leaves from the Squiggly ink set Flora and Fauna 3 using Jet Black Archival ink. They were then all cut out and stuck onto the twigs using the Ranger Glossy Accents.

 Flora and Fauna 3 
6. Hogwart was Stamped onto Yellow tissue paper which had been painted in watered down Toffee and Irish cream. He was then stamped with Black Staz-on. Hogwart was from the Squiggly ink Flora and Fauna set 2. He was also attached to the house using the glue gun.

Flora and Fauna set 2.

If you wanted to do something different, you could always create more of a silver themed bird house by adding treasure gold to the leaves and using glossy card to cut the leaves out of.


Hope you liked this are having a great day. 
Happy making.

See Ya, ArtymeB:) X

Please feel free to cruise my blog but please be aware that I'm literally going into Exams head first at the moment so haven't and won't be able to post anything until at least next May so I can really focus on getting that good result.


Great to see you here Bracken, we know how busy you are and wish you well with your final exams at school. Wow, such patience to cut out all those tiny leaves, but a fantastic result. ~Darcy

We would love to see how you interpret this Autumn Leaves topic by linking what you make to our 2016 Challenge #18: Autumn Leaves, on this page HERE.

All of our bloggers love to see your twist on their ideas, particularly if you were inspired directly by their post.
All links go in the draw to win a £50 voucher to spend on products of your choice from the PaperArtsy online store. The Autumn Leaves link will close 17:00 (London Time) Sunday, Oct 2nd 2016. The winner will be announced 2 hours later at 19:00.


Friday, 4 December 2015

2015 #22 Counting Down to Christmas {By Bracken Sparkes}


2015 Topic 22: Masterboards

Hi guys, Bracken here again. This time showing you what I can do using masterboards. I really enjoy using masterboards in my work because there's so much you can do with them...and it's fun to play about intertwining stamps. December is my favourite month as Christmas makes me spin round the ceiling with excitement and it's my birthday sooo...yeah!..This gave me more drive to making this project full of fun and FOOD!


Print all required stamps around the page using no specific order what so ever. stamp in Jet Black Archial ink in first and second generation stamping.

The main stamps I used were those from EDY 16 but did use some of JOFY's (JM 07, an ivy leaf from JM 28, stars fromJOFY 18, and the little flurry of stars and dots from JOFY 19.)


Now for the fun part, and somewhat time consuming part...getting in a painty mess.

Paints used...Guacamole, Smoked Paprika (unfortunately discontinued), Cherry Red and Candy Floss (Limited editions out of stock), Sage, Hyde Park, Toffee, Chocolate Pudding, Pewter, Irish Cream (discontinued) , Blue Oyster, Toad Hall, Bora Bora, London Bus, Holly, and Brown Shed.) 


Also a cosmic shimmer paint in Gold.

To add a little bit of sparkle and interest I added some Stickles in Crystal, Holly, Frosted lace, Silver, Xmas Red, Starry Night. Dovecraft-Gold and Ranger liquid pearls- Silver Pearls. 

Once FULLY dried, it is time to get the main structure ready.

I painted the majority of the 'frame' in Slate first and once dry, went over the front in Chalk to add a little rustic feel.


I painted the sides of the inner frames in colours I had previously used. Those were, Bora Bora, Sage, Gold, Candy Floss, Blue Oyster, Pewter and a random red paint from The Range only because it was a little more opaque for what I wanted it for.

Then I cut the masterboard and other sheets of paper to the size of the frames and stuck them in with double sided red tape.


I then sprinkled the bases with 'snow' found in the Crimbo section of a local garden centre. I stuck it all on with Cosmic Shimmer PVA glue and let dry completely.


As the last stage of this advent callendar, I added small Christmassy bits and bobs to almost every box, including 7 decorated trees, a stocking and holly, Santa's hat, a MERRY CHRISTMAS, numbers on the backs of scrabble pieces and a cute vial filled with Reindeer food. Then stuck multiple cuts of the Sizzix On The Edge Snow Flurries Die with double sided red tape to the top and covered the joins with cotton wool. To finish the whole thing off, I, (with a little help from Grandad) screwed in 28 little screws (found at Tiptree Cheap shop) and wound a length of bakers twine (found at The Range) round them and attached small pegs to the twine. 


I really enjoyed making this for you all and if I were to do another one I'd paint the 'ground floors' of each box with Chalk before adding the snow so you don't see the natural wood showing through. I had to do SOOO much touching up of the snow it was painful!!lol I'd also change the way the sweets were going to be displayed. instead of having them suspended from the twine, I'd probably just have them in the box so they don't look so messy and I could use bigger sweets.

Anyways...I hope you like this and if you wanna see what else I've been up to just head on over to my blog or even follow me on Pinterest. I mainly just fangirl over products I love and Harry Potter but there's a lot of arty stuff too.


Blog- ArtymeB
Pinterest- Bracken Sparkes

I hope you have a safe, magical Christmas filled with FOOD (sprouts...ugh) and Crimbo jumpers and have a very happy new year.
See ya,
ArtymeB Xxx.


Wow Bracken, this turned out just wondereful, so bright and cheery, just as it should be. What a fantastic way to use your masterboard. All the little finishing tuches are wonderful and the snow is magical. Thankyou for all your hard work on this project and thanks to Grandad too! ~Darcy

We would love you to join in with challenge #22: Masterboards If you are inspired by any of our guests who blog with us over the fortnight, then please join in and link up your creativity HERE

All links go in the draw to win a voucher to spend on products of your choice from the PaperArtsy online store. The Masterboards link will close 17:00 (London Time) Sunday, Dec 6th winner will be announced 2 hours later at 19:00.

Wednesday, 27 May 2015

2015 #10 Message in a Bottle {by Bracken Sparkes}

2015 Theme 10: Bottles

Hi Guys, My name is Bracken and I'm 14 years old and been arty for over four years. 

I experiment with all types of art and craft and love messing about with colour under the name ArtymeB!.. My Nana was a HUGE influence on me from the word GO and has continued to be very supportive in my many ventures. 

I chose this theme because there are SO many different variations you can use with a bottle to get a pleasing result...like your own little message in a bottle!


Paint the entire box frame with Chalk using a flat paintbrush avoiding the glass. In the roof of the frame and an inch in from the right (approx)  fix a mini screw eye.


Onto a slab of Heavy Grey-White Board distress with Ranger Distress Ink almost the whole board (leaving a white space in the middle) with Squeezed Lemonade then again with Spiced Marmalade layered around the sides and then with a smidge of barn boor..this time only on the edges.


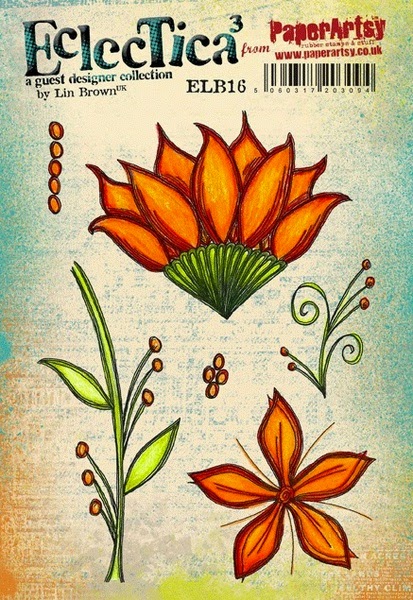
Using Jet Black Archival Ink, stamp the large flower head from ELB 16 and a sentiment from EEV 10 onto the board and flick watered down Tango also. Paint the flower in this order with watered down...Yellow SubmarineTangoAutumn Fire and London Bus. The watery green paints used were... SageHey PestoTinned PeasHyde ParkGuacamole and Limelight.

ELB 16
EEV 10

Cover the flower petals head in a thick layer of Glossy Accents and allow to dry.


On the cork of a mini glass vial, twist in a mini screw eye and attach a jump ring along with a length of chain. Fill the bottle with small black beads and stick a sign with 'seeds' (Dovecraft mini alphabet set) onto the bottle. Fasten the chain and vile with another mini jump ring to the screw eye mentioned in Step 1.


Finally glue the completed board to the frame. 

Thanks, Bracken.
Blog... ArtymeB
Pinterest... Bracken Sparkes

This is just wonderful Bracken, and it is a real treat for us to have you joining us. Your attention to detail is superb. Seeing someone so young entering the craft world and enjoying it so much  is so encouraging to us. Adding this little bottle to a framed piece is a brilliant touch, a really great way to add dimension and interest. 


We would love you to join in with challenge #10: Bottles If you are inspired by any of our guests who blog with us over the fortnight, then please join in and link up your creativity HERE. 

All links go in the draw to win a voucher to spend on products of your choice from the PaperArtsy online store. The Bottles link will close 17:00 (London Time) Sunday, June 7th, winner will be announced 2 hours later at 19:00.