Wednesday 31 July 2024

With 3 things : Spinning Card {by Mi Mii}

Hi friends it's Mi Mii with you for another With 3 Things post. 

This feature on the PaperArtsy Blog is where 3 bloggers are sent 3 items in the post. We have no clue what PaperArtsy HQ is going to send us, there might be a slight variation (for example on this round we each were sent different stamp sets for the same release) but generally 2 of the 3 things will be identical.


I must admit that opening this mystery package made me wonder: the theme of the Scrapcosy stamp set (ESC20), with the vintage birds, flowers and frames, was quite outside my comfort zone! But that is exactly the point of this feature and I was ready to face the challenge!
My starting point was a circle card, with spinning part to match the current 'Hidden' theme, and that would work well with the stencil too! Let me take you through my creative process!

J'avoue que la découverte des 3 produits qui composaient mon colis m'a fait me questionner. Ce thème, fleurs, oiseau et cadre, de la planche de tampon Scrapcosy , un tantinet vintage, me fait sortir de ma zone de confort ! Qu'à cela ne tienne, je tente de relever le défi ! 
Pour se faire, je décide de partir sur un format carte ronde, avec une partie rotative pour coller au thème du moment "Caché". 
Allez, je vous embarque dans mon processus créatif !


Here are the basic supplies I used for this project. I added a few personal favourites to the initial package!
Voici une partie du matériel que j'ai utilisé pour réaliser cette carte.


For my substrate, I cut 3 big circles of PaperArtsy Heavy Smoothy (SCA4H). In the end, I only used two 14cm diameter white circles and an additional 15cm black one.

Pour ma carte, je commence par découper 3 grands ronds dans le papier PaperArtsy Smoothy 340g card 
(SCA4H). Au final, je n'en ai utilisé que 2  de 14 cm de diamètre et un noir de 15 cm de diamètre)

On the first circle, meant to be the base of the card, I applied Grunge Paste (GP190) though the PaperArtsy Stencil (PS376) by Scrapcosy. 

Sur mon premier cercle, qui sera la base de ma carte, j'applique de la PaperArtsy Grunge Pate (GP190) avec le pochoir PaperArtsy Scrapcosy (PS376)


Using one of the masks included in the stencil, I traced and cut a window on the second circle.

A l'aide du cache fourni avec le pochoir, je trace et découpe une fenêtre sur mon second rond de papier.


Time to stamp! First I used black Stazon to to stamp the text on the acetate that will fill the window. Then I stamped my focals: the bird in its frame twice and the daisies four times, on scraps of Heavy Smoothy (SCA4H).

Je passe aux différents tamponnages. Tout d'abord le texte sur du rhodoïd avec de l'encre stazon noire (il viendra se coller devant la fenêtre découpée dans mon second rond). Je tamponne ensuite sur du papier blanc PaperArtsy (SCA4H) l'oiseau dans le cadre (en 2x) ainsi que la pâquerette (en 4x)


I framed the rest of the card with more stamping. These small flowers are so delicate and finely detailed!

J'agrémente ma carte de différents tamponnages, ces petites fleurs sont si délicates et d'une finesse incroyable. 


To add some colour and highlight the dimension of the Grunge Paste, I applied a selection of Fresco Finish paints (FF122FF33FF196) and Mattints (MT08, MT01, MT03randomly with a brayer.

Je mets en couleur le fond avec différentes peintures PaperArtsy Fresco Finish (FF122FF33FF196) et Mattint (MT08, MT01, MT03). Je les applique aléatoirement au rouleau pour faire resortir le relief de la Grunge Paste.


I built a little 3D bouquet with the pretty daisies of stamp set ESC20, and coloured them with the same Fresco Finish paints and Mattints.

Je compose un petit bouquet avec les jolies pâquerettes qui se trouvent sur la planche de tampons PaperArtsy Scrapcosy (ESC20) et le colorise avec mêmes peintures PaperArtsy Fresco Finish et Mattints.


I did the same for the flowers on the base, leaving a lot of white space for the 'focals' to pop.

J'ai aussi mis en couleur des différents tamponnages qui composent la carte, en laissant pas de mal de blanc pour que les éléments principaux ressortent bien.


Here is the finished project! I am quite happy with how it turned out despite being an unusual project for me. I like the contrast of vintage imagery and fresh colours!

Et voici le projet final ! Je suis contente du résulata malgré que ce soit un projet en dehors de ma zone de comfort. J'aime le contrast entre les images vintage et les couleurs vives!


Facebook:  Mi Mii
Instagram:  @themy32

Tuesday 30 July 2024

With 3 things: A decorated gift bag {by Riikka Kovasin}

Hi friends! It's Riikka from Paperiliitin with you for another 'With 3 Things' post. 

This feature on the PaperArtsy Blog is where 3 bloggers are sent 3 items in the post. We have no clue what PaperArtsy HQ is going to send us, there might be a slight variation but generally 2 of the 3 things will be identical.


An upcoming blog topic is the designer focus on Scrapcosy so we were each sent a stamp set and stencil of hers for this feature. I decided to go with a vintage vibe on my make, tying the project to the classical Scrapcosy style. The three items also included a stencil and a jar of Grunge Paste. 

I used the three items to make a decorated gift bag using a recycled brown paper bag as my base. Let's take a closer look how I did that!

Upon receiving the package of these items, my first idea was to make a card. But I wanted to challenge myself a bit further and tried to think outside of my regular card/ATC/art journal realm. The summer with several parties and family get-togethers then inspired me to make a little decorated gift bag. Mind you, you could use the exact same steps to create a junk journal page or a card! 

The monthly theme of "hidden" is present in two ways in my make. I hid the book page, the initial layer of the piece underneath other layers coming on top. You could argue, that I hid several layers underneath others, too, as I love to build clusters. Secondly, you can hide the present inside the bag! Clever, eh? 


I started the make by adding an easy layer to break the blank page, so to say. I added some double sided adhesive to the back of an old book page and then tore a piece of the page. I added this to the bag. The page was actually from the same book I used for my bunny art doll (link).


I then used the Grunge Paste (GP190) and the stencil (PS376) to create a doily of sorts on top of the book page. As I needed to repeat one section, I had to reposition the same portion of the stencil 6 times. I dried some of the segments with a heat tool as I was moving forward, but honestly the project needed me to allow more drying time so each section could dry properly. As you will see, it is just a layer, so perfection was not necessary

I played with the idea of doing the stenciled part on top of a transparency, but I was a bit hesitant how the paste would handle such a sleek surface. If I had been doing an art journal page, that would not have played such a big part, but as the gift bag is a usable item, I didn't want the paste to potentially flake off in use, perhaps if the transprency was sanded a little for tooth .... an experiment for another day perhaps! 

To heighten the grungy look, I added some touches of the paste here and there across the bag.


While the paste was drying, I turned my attention to the stamp set (ESC19). My usual go-to ink is black, but this time it felt too overpowering for the vintage vibe I was going for. So, instead of black I chose a dark brown ink. I stamped the bird and the flowers to pieces of cardstock once but added the postage stamps twice as I realized I couldn't get them all cut out with just one set.


Next it was then coloring time for these images! I opted for two ink colors to be used like watercolors for the coloring. With the two colors I was able to achieve the look I wanted as I could layer and mix them. I added more color to the bird and the flowers but kept the postage stamps in lighter shades.


I just can't help adding some splashes to my projects! They are a marvelous way to add a touch of color to the background and also tie the layers together. For this make I diluted the Grunge Paste to get some white splashes but also introduced another color to the mix. Inspired by the peachy coral red I used to color the stamped images, I used Fresco Finish Peach Nectar (FF144) to add some splashes with a fan brush. If you haven't tried splashing with a fan brush, I highly recommend it! It's such an easy way to get a burst of splashes at once. 


Then it was cutting time! I used plain, normal craft scissors for the bird and the flowers. If you have watched one of my YouTube lives, you know that I prefer to use scissors over a craft knife as I'm way better with the scissors and also way faster. For the stamps, though, I used two different scissors. I own these decorative edge scissors that have like a perforated edge style design. I also saw Megan Quinlan to use thinning shears to make some faux postage so I used those, too. Even in the risk of sounding like Goldilocks, the decorative scissors were a bit too big and the thinning shears too small, I would have needed something in between!


Now that I had my elements cut out, I used the inks I already had in my craft table to ink around the edges of the cut-outs. I also added a bit of stamping to the bag itself as I felt it needed more contrast against the huge white area.


Lastly, it was construction time. I used foam tape to add the bigger elements in and double sided tape for the postal images. I also added a length of ribbon to a piece of hand made paper underneath the focal elements. 

After securing everything in place, the bag was done and ready to be used! 


I really like how the bird and the flowers turned out. I started the coloring with lighter tones as it's always easier to add color and contrast than to take it off. Even if the blooms have brown leaves, they still seem vibrant and alive as the color palette matches the background and the over all aesthetic. 


I also really like the little postage stamps! Inking the edges highlighted the perforated look even further and made the thinning shears ones look better. 


I hope you enjoyed this little project using the three items received and a couple more to top things up. If you want to see the whole process in a video form, stay tuned for a Reel on my Instagram account! 

Thank you for stopping by today! Wishing you an inspiring day! 

Xoxo Riikka

Instagram: Paperiliitin
YouTube: Riikka Kovasin
Facebook: Paperiliitin


Monday 29 July 2024

With 3 things: Trio of Journal Tags {by Mags Woodcock}


Hi everyone, it's Mags with you for another With 3 Things post.

This feature on the PaperArtsy Blog, is where 3 bloggers are sent 3 items in the post. We have no clue what PaperArtsy HQ is going to send us, there might be a slight variation (for example on this round we each were sent slightly different stamps) but generally 2 of the 3 things will be identical.


The next blog topic coming your way is a focus on Scrapcosy products, and the current theme is 'hidden', so if we can tie that to this 3 things post, then that adds another layer within this project.

Today I have made a set of tags with hidden notepads for secret journaling, so let's take a closer look.


It was a lovely surprise to receive such wonderful supplies to work with and I couldn't wait to get started. I decided to create a set of tags with a space for hidden journaling inside.

I started by creating a set of 3 double tags, each folded in the middle. I then set to work adding interest. I wanted a grungy look to the tags, so mixed Squeezed Mattint (MT06) with some Just Walnut Infusions powder (CS25) and used this to collage some of the ScrapCosy printed tissue (PT05) onto the tag. As you can see, it created a lovely almost rusty colour.


I wanted to knock back the colour just a little, so brayered on a random layer of fresco Finish chalk acrylic, Heavy Cream (FF203)

It was time to start playing with those gorgeous stamps now. I used the words and numbers as a background stamp on the tags, varying the position on each one. Archival ink worked well for this.


I wanted to use the stencil (PS376) in a couple of different ways. Using a fine-liner pen I added the hexagon shapes to the tags, concentrating more at the edges. A soft pencil and cotton bud worked well for adding shading.


It was at this point I realised the pencil might smudge and transfer when the tag was handled. So I painted on a coat of the Squeezed Mattint, which did the trick, sealed it nicely and also added a bit more of a pop to the hexagons against the Heavy Cream areas of the background.


It was now time to move on and put the Grunge Paste (GP190) through it's paces.
I brayered a small amount of Grunge Paste onto an old tile, and using the rectangular stamp from the set, picked up the paste and stamped onto a wad of kitchen roll paper. Whilst the paste was still wet, I sprinkled over the Rusting Powder (RP45) and set aside to dry completely.


Whilst I had the Grunge Paste and Rusting Powder on my desk, I applied the paste through the stencil to another wad of kitchen roll paper, and again sprinkled on Rusting Powder. 
When both lots of grunge paste were dry, I brushed off the excess powder and sprayed on some white vinegar to activate. You can see the results below, lovely dimensional rust and gorgeous rusty kitchen roll.


I have often wondered how grunge paste would mix with translucent Fresco Finish paints, it was time to give it a go. Rusty (FF227) was the obvious choice. 
I mixed the paste and paint in a 50/50 ratio on my old tile, stamping onto cotton tape using the numbers from the stamp set. I love how clear the results were, but with a bit of raised texture.


My next job was to stamp out some of the labels and numbers to embellish my tags. For this step I wanted a distressed look and chose to use one of my favourite techniques. Again I brayered some of the Rusty Fresco Finish Chalk Acrylic onto my old tile. I inked up my stamp with Ranger Jet Black Archival ink and then pressed it lightly into the paint, then stamped it onto blank vintage book pages. I cleaned my stamp after each stamping so I didn't ruin my ink pad with paint. The numbers were added to the labels using the same technique.


Now I had all my elements prepared and ready to add to the tags. I started by adding torn fragments of the rusty kitchen roll, using matte medium as the adhesive. On some tags I added individual rusty hexagons from the  stencilled Grunge Paste, whilst others had the dots added. The rusty labels framed some areas of the tag as well as adding more grungy texture. Don't forget the plain areas of the kitchen roll can also add interest and rust.


The next step was adding groups of the stamped labels, both the distressed, and some stamped onto vintage dictionary pages. Inking the edges of the tags with black ink helped frame the whole composition. Can you spot the textured cotton tape ? I gently ran a black ink pad over the top to add a distressed look, this also had the bonus effect of highlighting the texture.


All that was needed now was to add an eyelet to each tag and create a mini notepad to go inside the folded finished projects. Luckily I had some gold/yellow twine that coordinated nicely with the project and a rusty paperclip secured the bottom of each folded tag


I've thoroughly enjoyed creating these tags and have lots of rusty and distressed leftovers for future projects. Keep a look out in the PaperArtsy People Facebook group for my journal pages using those in the future. I am definitely going to try combining more Mattint colours with the Just Walnut Infusions in the future and can't wait to see what vintage inspired colours I create.


I hope I inspired you to try out the combinations of products and techniques I used in this blog post. Have fun and Happy crafting........... Mags

YouTube: @magswoodcock
Facebook: @magswoodcock
Instagram: @magswoodcock

Saturday 27 July 2024

2024 Topic 5: Ink Pads {by Autumn Clark} on the PaperArtsy Blog


Hi everyone!  It's Autumn Clark from SewPaperPaint here with you today.  Summer days are passing by quickly for me, as I'm sure you can relate.  The current topic, Ink Pads, had me thinking of quick and easy ways to stay creative during the busy summer months.


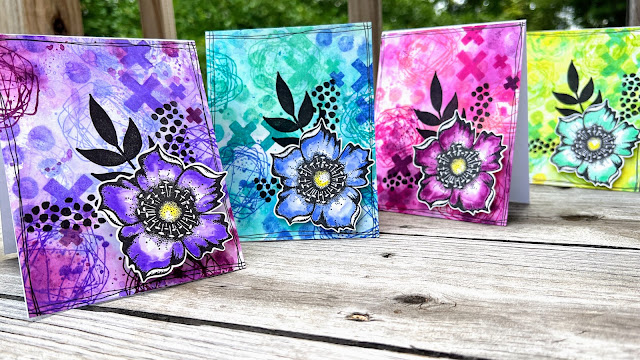
Creating simple stamped projects with ink pads has always been a favorite way for me to play.  Getting inky just suits my need to make a mess and be expressive with color.  I created a series of cards to give for birthdays and hope they inspire you to get inky too!


I really enjoyed working on these fun backgrounds and love how beautifully these stamps work together for such fun patterns.  The bold flowers and punch of black really makes the finished cards pop, something that is especially fun for birthdays.


It took me a while to decide on a set of stamps, as Tracy Scott has so many wonderful background sets that would work perfectly with this project.  For my backgrounds I went with the gorgeous PaperArtsy stamp set 25 by Tracy Scott (TS025).  I would highly recommend trying stamp sets TS041 and TS085 for similar backgrounds if you have a chance! EM58 has been re-coded now that Tracy is on her own index sheets as TSM02, and EM64 as TSM08


Next, I poured over my Distress Ink Pads to choose three analogous colors in four colorways.  I was hoping to both inspire you in your favorite colors AND to give you several options if you have a limited selection of ink pads.  I hope you like the palettes I picked:  Saltwater Taffy, Picked Raspberry and Seedless Preserves.  Squeezed Lemonade, Twisted Citron and Cracked Pistachio.  Cracked Pistachio, Peacock Feathers and Blueprint Sketch.  And finally, Shaded Lilac, Wilted Violet and Seedless Preserves.


You'll notice I tried to overlap color choices where possible.  When using water based inks in this way, it's usually best to pick colors near to each other on the color wheel to avoid making muds when the colors mix.  I cut my four card panels from an 8.5x11" piece of Bristol cardstock so I would end up with four finished creations.


The process for each card follows the same process.  First I tapped the lightest color twice and parts of the two darker colors once, all right next to each other onto my kraft mat.  I spritzed them with water a few mists, then dipped the panel into the colors.


While the panel was wet, I grabbed Tracy's mini stamp 08 (TM08 - formerly EM64) and inked it with two colors at a time repeatedly stamping all over the panel so the wet on wet ink would smear.  If it dried too fast, I spritzed it with more water to encourage the ink to bleed.


It would have been really simple to do an entire sheet of card with one color as a masterboard, and then cut into four panels after.  If that is easier for you, then go for it!


I loved this look right away, but added some additional stamping.  I stamped the crosses and scribble circles over in solid inks without the bleeding technique.


Once my inky backgrounds were dry, I overstamped the leaves and added some dots from Tracy's mini stamp 02 (TSM02 - formerly EM58).  


Next, I stamped our the smaller flowers and used my Distress Inks to color them.  I cut them with a small white border to give them a small frame and pop of white.


I used Seedless Preserves for the pink card, Cracked Pistachio for the yellow, Blueprint Sketch for the blue and Wilted Violet for the purple.


This stash building project was loads of fun and I hope the various colorways inspire you.  


The fun part will be picking a color to give specific friends throughout the coming months on their special day.  As we wrap up the Ink Pad Topic, I hope you're encourages with the plethora of ideas for your next stamping project.  Happy inking, Autumn 


YouTube: SewPaperPaint
Facebook: Autumn Clark
Instagram: @sewpaperpaint
Pinterest: SewPaperPaint