


Hi everyone, it is Peley Renata with you today and this time I have a very different project to share with you. When I say different, perhaps it won’t be as obvious to you, but for me it was quite a change out of my usual pace. For instance, do you know how the inspiration first came? It wasn’t a stamp set, it wasn’t a color combo, nor another project I saw. Believe it or not, it was from a branch that I found on a walk with my dog. At that point, I still didn’t know I might do this particular blog post, but I had a rough idea for a project. And when this topic was offered, everything fell in line for me. Also, my substrate was fabric and I didn’t use any kind of paint at all. So, you see it can be considered as a somewhat unusual project for me, but I don’t want to give away too much this early on, so stick with me and I hope you will have fun seeing how I take this challenge.

As you can see here, the substrate for my project was fabric, and if you read some of my previous blogs, you know I struggle with textile, but this time I decided to be brave… that and also my mother came guesting and she is really pro with sewing, so I could count on her pro help this time.

I have already mentioned from where my inspiration came, and I already told you that I worked with fabric, but what else? What comes to your mind if I mention fabric wall decorations? If I ask my husband, he will think of a large piece of fabric with a playful pattern that he had in his childhood to cover the wall at his bed. It served the purpose of making the walls feel less cold and give a cozy feeling. My mother will think of a patchwork fabric that she made herself and proudly decorated a large piece of wall when she was just a teenager. And me? Well, I think of those boho macramé wall decorations, or woven tapestries with tassels hanging on one end. And you know what? That’s what I wanted to replicate…in a way at least, as I don’t do actual macramé.

On the photo above, you can see the Lynne Perrella stamps that I chose to work with, the textile that I used as a substrate, my famous branch, vellum paper and of course the very, very important tassels. 😊

Now that you know the basic plan for this project, it is time to dive in a little deeper. As you probably know, this quarterly topic was “Transparency”. This can be interpreted in many ways, some more obvious than others. In my previous blog post “Art dolls”, I interpreted transparency in an abstract, more creative way, but this time I thought to be more concrete. And a way to do that was to make my project have some more transparent areas and for that, I chose to use vellum paper.
To make things more interesting, I didn’t want to just stamp my images on a vellum paper, so instead I chose to heat emboss them. Truth to be told, I don’t use embossing powders too often so I have a limited choice of colors. But of course, that has a workaround. I decided to choose between a couple of inks in brown colors and heat emboss them using clear embossing powder, but I didn’t know which one would be the best fit, so I had to test them out.
By the way, if you choose to heat emboss using clear embossing powder and colored ink, be sure to use more juicy inks with slower drying time to make your life a bit easier.

What
helped me to choose an ink color was the idea that I wanted a shade that would
stand against my fabric, otherwise it would all look a bit bland, so I decided
to go with the Lavinia Elements Ink pad called Truffle. The stamps that I used
to create focal points for my projects are from PaperArtsy Lynne Perrella
collection: LPC004, LPC049 and LPM13.


With
the images ready, I had to start planning the layout. I had a limited
amount of the textile that I planned to use so that was a consideration in my
case as well. Also, in order not to make the decoration feel too flimsy and so
that it would look good from the back as well (to give it a bit fancier feeling
😊) I had to fold my fabric in half.

In the image above, you can see I laid out a couple of leaf skeletons, as I thought they would be a great way follow along with the transparency topic, but at the end I really didn’t find a way to incorporate them in my project.
Anyway, now to the hardest part of this project: the sewing. After I decided on my final image layout, the first step was to secure the images in their positions using pins.

As you probably see, I have attached the pins from the inner side of my fabric, with the images facing towards the textile, before creating the little windows. I felt it is a bit tricky to cut them out before sewing in the images since it could be hard to get the ideal size of them right, so the plan was to sew in the images and only then cut out the windows. That way I was going to be sure the size would be good and they would be in the appropriate’ positions on the fabric. Of course, you can take a completely opposite route, and first cut out the windows and only then sew in the images. Both methods can work, so you can do whatever you find easier or more practical.

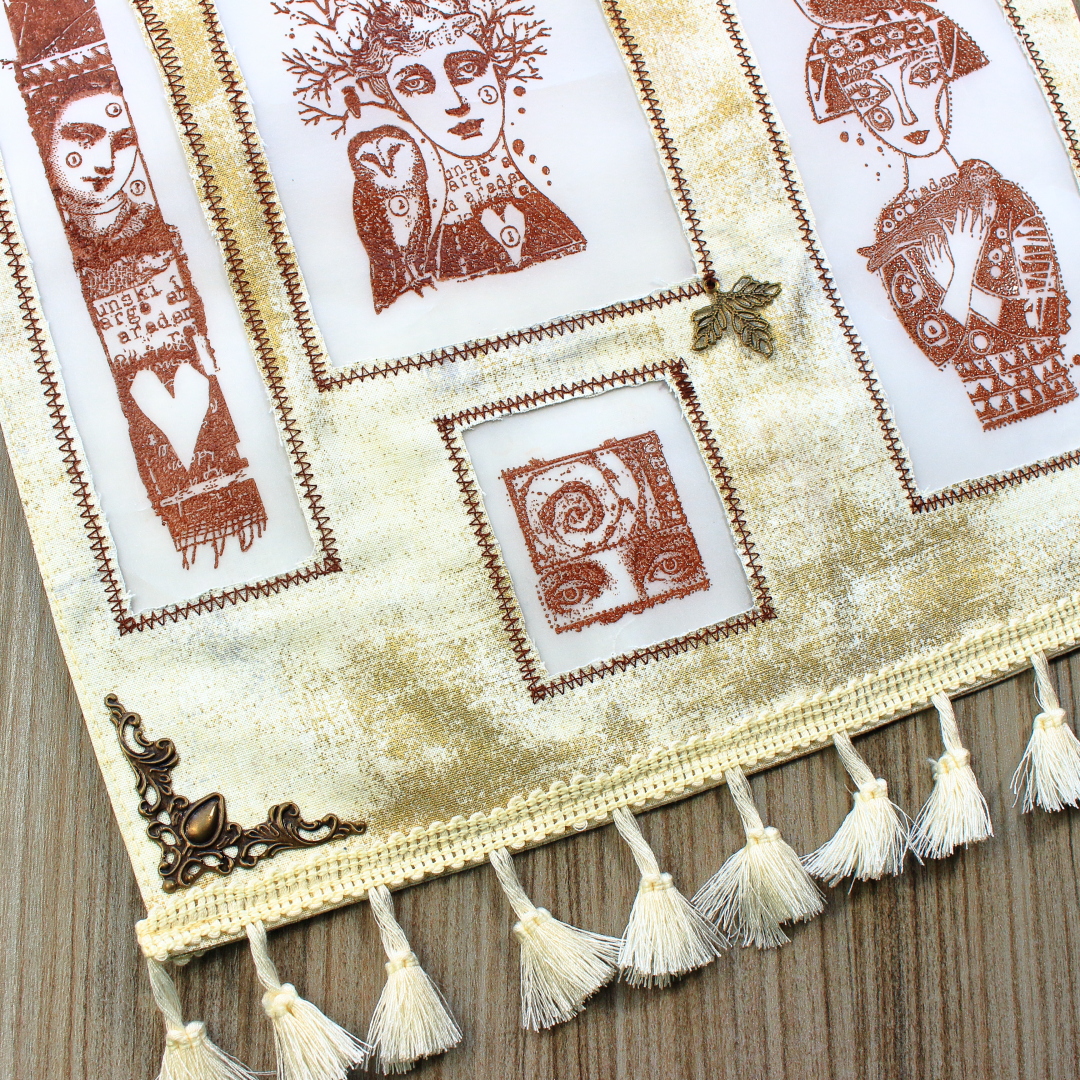
When picking a thread for sewing the vellum paper, I tried to use one which would be similar in color to the ink that I used for stamping the images, as I didn’t wish to introduce any new colors to my project.
Also, have fun when choosing a stitching pattern! I chose to combine a simple linear with the zig-zag one, as I really like how they look together.

Since I don’t do much sewing, I don’t own some fancy sewing machine and as a result, I struggled a bit. On a couple of spots on the stitched frames, you can see a lack in my sewing skill and sewing machine performance, but I decided to embrace these imperfections as a part of a grungy look.
Anyway, ignoring these little annoyances, I moved on to cutting the windows in my fabric so that the images could be revealed.

Sorry for the bit lower quality in my photos, but at my sewing table I had a bit limited opportunities for good lightning. Which, if I think it through, probably also contributed to the lesser quality in my sewing.
Earlier I said that the plan was to fold my textile in half, since having two layers would make it a bit sturdier. So, the next step was to sew in those two layers of fabric, but this time I used an off-white color thread. This color matched the fabric color. I felt that using a darker thread would give my project a frame and this is not the look I was going for at the moment. Also, this time I used a very basic stitching pattern as I did want it to be kind of invisible.

I was very excited for the next step: attaching the tassels. The tassels, that I had in my stash were connected to a lace, so it was really easy to attach them with a sewing machine.

With this, the main body of my project was complete, but I still felt it a bit empty. I thought some more decorating was in order, but I had no idea what to use or how.

Probably you remember that earlier I mentioned how I wanted to incorporate skeleton leaves, but didn’t figure out how. I really did want to find a way use them, but no matter how I was twisting and turning the project, I just didn’t like how it looked. Then it came to my mind to use some metal charms from my stash. Anyway, I will show you a photo of my brainstorming process down below.

As you can see, I also tried combining a charm with two skeleton leaves, but even if I did like the look of that combo, it just wasn’t sitting well on the project. It gave it a bit messy, and weirdly random look…at least in my eyes. In the end I gave up on the leaves and decided to use charms only. I sew in most of them manually but I adhered the bottom ones using fabric glue.
If I am honest, I really struggled with decorating this piece. All the time I got this feeling as if I was missing something. I thought, after I finished it, I will come back with an amazing idea, but in the end, no great ideas came, and I started thinking that it is truly enough and it is pretty as it is.

For
this project, a finishing touch would be figuring out a way to put a hanger to
my piece while incorporating my famous branch. The original idea was that the
whole thing would hang from the branch, but I wasn’t really convinced that
would be the most practical solution. So, I thought to take some wide jute lace
and make two hangers to attach the fabric to the branch and then another one to
make a hanger for the whole project.

As you can see, here are two pieces of lace, marked to the same length that I will sew in to my project and then push the branch through.

At this point, the project looked complete and ready to decorate my wall, and the last finishing touch was to ask my husband to hammer in a nail so I can hang my new piece. 😊


I did struggle with this project, mainly with some technicalities, but those gorgeous Lynne Perrella stamps, tassels, the branch…it all came together so naturally and I just love how it turned out. And truth to be told, even though it had its difficulties, I did enjoy the process as well.
The main thing I like about mixed media is its versatility. It is so diverse and if you are willing to experiment, it can never get monotone. I am a person who easily gets bored and distracted, so I usually get a period when I wish to do only watercolors, or paint with acrylics, or just draw and doodle…and then when I think I had enough of it all, I challenge myself and make a full fabric project. All this can help you develop a sense for beauty, improve your skill and imagination. Never be scared to try something new and search inspiration wherever you go.
Renata 💜

Facebook: Renata Peley
Instagram: @renata_artjournaling
Pinterest: Renata Art Journaling
YouTube: renata_artjournaling


No comments:
Post a Comment