Showing posts with label LPM13. Show all posts

Monday, 11 September 2023

2023 Topic 9 : Lynne Perrella - Designer Focus {by Renata Peley}


Hi everyone, it is Peley Renata with you today and this time I have a very different project to share with you. When I say different, perhaps it won’t be as obvious to you, but for me it was quite a change out of my usual pace. For instance, do you know how the inspiration first came? It wasn’t a stamp set, it wasn’t a color combo, nor another project I saw. Believe it or not, it was from a branch that I found on a walk with my dog. At that point, I still didn’t know I might do this particular blog post, but I had a rough idea for a project. And when this topic was offered, everything fell in line for me. Also, my substrate was fabric and I didn’t use any kind of paint at all. So, you see it can be considered as a somewhat unusual project for me, but I don’t want to give away too much this early on, so stick with me and I hope you will have fun seeing how I take this challenge.

As you can see here, the substrate for my project was fabric, and if you read some of my previous blogs, you know I struggle with textile, but this time I decided to be brave… that and also my mother came guesting and she is really pro with sewing, so I could count on her pro help this time. 


I have already mentioned from where my inspiration came, and I already told you that I worked with fabric, but what else? What comes to your mind if I mention fabric wall decorations? If I ask my husband, he will think of a large piece of fabric with a playful pattern that he had in his childhood to cover the wall at his bed. It served the purpose of making the walls feel less cold and give a cozy feeling. My mother will think of a patchwork fabric that she made herself and proudly decorated a large piece of wall when she was just a teenager. And me? Well, I think of those boho macramé wall decorations, or woven tapestries with tassels hanging on one end. And you know what? That’s what I wanted to replicate…in a way at least, as I don’t do actual macramé.


On the photo above, you can see the Lynne Perrella stamps that I chose to work with, the textile that I used as a substrate, my famous branch, vellum paper and of course the very, very important tassels. 😊


Now that you know the basic plan for this project, it is time to dive in a little deeper. As you probably know, this quarterly topic was “Transparency”. This can be interpreted in many ways, some more obvious than others. In my previous blog post “Art dolls”, I interpreted transparency in an abstract, more creative way, but this time I thought to be more concrete. And a way to do that was to make my project have some more transparent areas and for that, I chose to use vellum paper.

To make things more interesting, I didn’t want to just stamp my images on a vellum paper, so instead I chose to heat emboss them. Truth to be told, I don’t use embossing powders too often so I have a limited choice of colors. But of course, that has a workaround. I decided to choose between a couple of inks in brown colors and heat emboss them using clear embossing powder, but I didn’t know which one would be the best fit, so I had to test them out.

By the way, if you choose to heat emboss using clear embossing powder and colored ink, be sure to use more juicy inks with slower drying time to make your life a bit easier.


What helped me to choose an ink color was the idea that I wanted a shade that would stand against my fabric, otherwise it would all look a bit bland, so I decided to go with the Lavinia Elements Ink pad called Truffle. The stamps that I used to create focal points for my projects are from PaperArtsy Lynne Perrella collection: LPC004, LPC049 and LPM13.


I liked the fact that these stamps had feminine and nature inspired elements included, so I thought they would be a perfect match for my wall decoration. And besides, even Lynne Perrella thought they look good with tassels (hint: look at the stamp set LPC004). 😉


Here you can see how some of the stamped and heat embossed images look. Now a very important detail! The idea was to sew in these images into the little windows that I will cut out in my chosen fabric piece. That means I had to pay attention to leave an at least 1.5cm (about half an inch) frame around each image when stamping, in order to have some empty vellum paper to use to sew them to the fabric.

With the images ready, I had to start planning the layout. I had a limited amount of the textile that I planned to use so that was a consideration in my case as well. Also, in order not to make the decoration feel too flimsy and so that it would look good from the back as well (to give it a bit fancier feeling 😊) I had to fold my fabric in half.


In the image above, you can see I laid out a couple of leaf skeletons, as I thought they would be a great way follow along with the transparency topic, but at the end I really didn’t find a way to incorporate them in my project.

Anyway, now to the hardest part of this project: the sewing. After I decided on my final image layout, the first step was to secure the images in their positions using pins.


As you probably see, I have attached the pins from the inner side of my fabric, with the images facing towards the textile, before creating the little windows. I felt it is a bit tricky to cut them out before sewing in the images since it could be hard to get the ideal size of them right, so the plan was to sew in the images and only then cut out the windows. That way I was going to be sure the size would be good and they would be in the appropriate’ positions on the fabric. Of course, you can take a completely opposite route, and first cut out the windows and only then sew in the images. Both methods can work, so you can do whatever you find easier or more practical.


When picking a thread for sewing the vellum paper, I tried to use one which would be similar in color to the ink that I used for stamping the images, as I didn’t wish to introduce any new colors to my project.

Also, have fun when choosing a stitching pattern! I chose to combine a simple linear with the zig-zag one, as I really like how they look together.


Since I don’t do much sewing, I don’t own some fancy sewing machine and as a result, I struggled a bit. On a couple of spots on the stitched frames, you can see a lack in my sewing skill and sewing machine performance, but I decided to embrace these imperfections as a part of a grungy look.

Anyway, ignoring these little annoyances, I moved on to cutting the windows in my fabric so that the images could be revealed.


Sorry for the bit lower quality in my photos, but at my sewing table I had a bit limited opportunities for good lightning. Which, if I think it through, probably also contributed to the lesser quality in my sewing. 

Earlier I said that the plan was to fold my textile in half, since having two layers would make it a bit sturdier. So, the next step was to sew in those two layers of fabric, but this time I used an off-white color thread. This color matched the fabric color. I felt that using a darker thread would give my project a frame and this is not the look I was going for at the moment. Also, this time I used a very basic stitching pattern as I did want it to be kind of invisible.


I was very excited for the next step: attaching the tassels. The tassels, that I had in my stash were connected to a lace, so it was really easy to attach them with a sewing machine.


With this, the main body of my project was complete, but I still felt it a bit empty. I thought some more decorating was in order, but I had no idea what to use or how.


Probably you remember that earlier I mentioned how I wanted to incorporate skeleton leaves, but didn’t figure out how. I really did want to find a way use them, but no matter how I was twisting and turning the project, I just didn’t like how it looked. Then it came to my mind to use some metal charms from my stash. Anyway, I will show you a photo of my brainstorming process down below.


As you can see, I also tried combining a charm with two skeleton leaves, but even if I did like the look of that combo, it just wasn’t sitting well on the project. It gave it a bit messy, and weirdly random look…at least in my eyes. In the end I gave up on the leaves and decided to use charms only. I sew in most of them manually but I adhered the bottom ones using fabric glue.
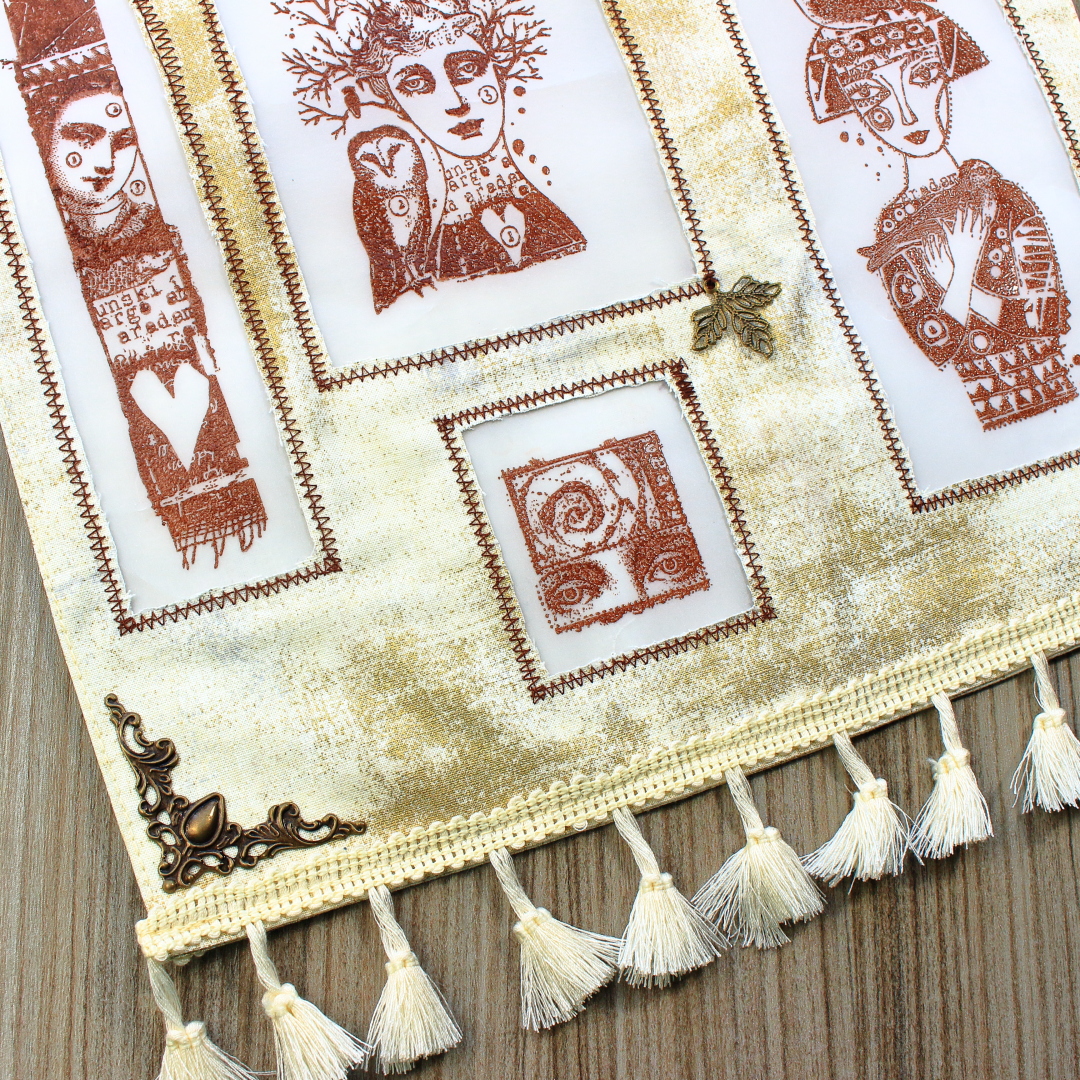

If I am honest, I really struggled with decorating this piece. All the time I got this feeling as if I was missing something. I thought, after I finished it, I will come back with an amazing idea, but in the end, no great ideas came, and I started thinking that it is truly enough and it is pretty as it is.

For this project, a finishing touch would be figuring out a way to put a hanger to my piece while incorporating my famous branch. The original idea was that the whole thing would hang from the branch, but I wasn’t really convinced that would be the most practical solution. So, I thought to take some wide jute lace and make two hangers to attach the fabric to the branch and then another one to make a hanger for the whole project.


As you can see, here are two pieces of lace, marked to the same length that I will sew in to my project and then push the branch through.


At this point, the project looked complete and ready to decorate my wall, and the last finishing touch was to ask my husband to hammer in a nail so I can hang my new piece. 😊


I did struggle with this project, mainly with some technicalities, but those gorgeous Lynne Perrella stamps, tassels, the branch…it all came together so naturally and I just love how it turned out. And truth to be told, even though it had its difficulties, I did enjoy the process as well.

The main thing I like about mixed media is its versatility. It is so diverse and if you are willing to experiment, it can never get monotone. I am a person who easily gets bored and distracted, so I usually get a period when I wish to do only watercolors, or paint with acrylics, or just draw and doodle…and then when I think I had enough of it all, I challenge myself and make a full fabric project. All this can help you develop a sense for beauty, improve your skill and imagination. Never be scared to try something new and search inspiration wherever you go.

Renata 💜

Thursday, 1 June 2023

NEW PaperArtsy Products: Lynne Perrella Minis (MAY 2023}


A note from Leandra:
There are a few different styles that Lynne Perrella offers. These 6 brand new minis are what she calls her  'modern style', and this is the first time she has designed specifically for the MINI stamp size; they are super quirky.

I have had the pleasure of playing with these for a few weeks now, and oh my, what a lot of fun I have had!!! The more you play, the more you discover, especially when you add colour, you find all kinds of things hidden. Lynne's stamps are collaged elements put together in such a playful way, so I took that idea and decided to create collaged layers in the backgrounds with some gel-printed backgrounds. Once I had the stamped images in position, the touches of colour certainly bring each design to life. It feels like you are literally breathing life into each design when their faces light up.
 
I will be LIVE with Lynne's new minis over in our Facebook Group, PaperArtsy People shortly after this post publishes. I really hope you can drop by or catch the replay. I have so much to show you!
 
For the next 3 months, these stamps are only available EXCLUSIVELY from our approved stockists. Please check the list at the foot of this post of from the home page tab of the blog.


Price: RRP €4.90 +VAT    Size: approx credit card size
All stamps are individually trimmed onto cling foam, with a laminated storage/index sheet.
  
Lynne Perrella Mini 09 (LPM09)

 Race Day
This quirky girl looks ready for a day at the races with her flowery head-wear. Blinged up in a gold surround, her Hot Pink and Orange accents are a crowd pleaser for sure!
 

I love how the fine detail book-page words can just be seen through the Heavy Cream wash on the paper. The gold is a Kuretake watercolour metallic. I used it repeatedly to stamp with, and for subtle splashes of gold across this series of samples.


The Sister
Missy pink and Orange has a twin sister who opted for the lime green and blue colour combo, I think they might cause a bit of a stir together on their day out!


Happy
I really like how when the background is coloured the caricature person pops out to say a cheery 'Hello'. This card is mostly using scrappy bits of papers left over from the gel printing that kicked off the session.


Just a few pops of colour here and there, I quite liked leaving some white space on this one.


Lynne Perrella Mini 10 (LPM10)

 Green Witch
She could be out to trick or treat, I think I might have to soften her impact and edit parts of her face so she doesn't quite look too witchy-poo. Certainly she gives a 'don't mess with me vibe'!


Demure
It's hard to think this is the same stamp as the sample above. The feel of this piece is so serene and calm, but the sample above had a far more assertive personality. Isn't it wonderful how colour can make such a difference.

 
A 'Stabilo All' pencil, once water activated, has deep black colour impact. I had sealed all the pages with matte gel medium, so there was tooth, but also the option to remove the pencil if it travelled too far. It offers some interesting variation of depth emphasising the layers.


Lynne Perrella Mini 03 (LPM03)


 China Doll
If you are an avid Lynne Perrella fan like me, then you might remember the Japanese series she did a couple of decades ago under her own Acey Deucey line of wood mounted stamps. This very much reminds me of that series, but with a modern twist. This one went into a mini book and I just love how she looks with a bit of colour.
 

On Display
This is 1 of 3 canvas boards, they are only 3.5" x 6" (10x15cm), and I enjoyed creating the 3 pieces together (photo of all 3 at the foot of the post).
 

A close up of the sample above. I find it is when you add colour under the eyes that suddenly the person quickly comes to life.


Divine
You probably know I am not a purple fan - however, in the past 3 months it has become a staple for me (can you believe it!!). I still have to have some blue somewhere though! It has been so relaxing pulling these scrappy cards together from all the leftover bits and bobs on my desk.


Gotta admit, that bright blue looks fabulous with that purple and ochre! (Split complementary colour combo!)


Lynne Perrella Mini 12 (LPM12)

Washing Up
She's all glammed up to do the dishes ... am I right??? Love her skirt of blooms and matching blooms on her wrists.
 

She's also in the mini book with tissue paper layers, staples,  and some gold was rolled about the torn edges too.
 

Charm
Happy accident with this little lady (not mentioning the arm amputations -we'll just assume they are by her side), but her head got a bit of a wobble. I was rough with the paint brush, broke her neck (this sample is sounding like a house of horrors!)
 

But now just look at her wonderful peaceful expression. She has gone from frustrated to charmed. And the sun shines on her too. We'll call that a happy ending/ beginning!


Lynne Perrella Mini 13 (LPM13)

Hands Up

It's girls day out and they are having loads of fun. All dressed up with the party hats on. Look how different the stamp looks when you cut the figure out of the frame ...it's totally different - then you have the with/without arms thing again. Oops. She's wearing a cape...OK!!
 

Reach
Every time I see that word that 'S Club 7' song comes to mind (probably only a song UK people will know). I don't normally arrange things on the wonk totally to one side, but I just loved that printed paper so much I could not cover it up!
 
 
She's having a super-good time and I'm really loving the orange background she pops off too!


Lynne Perrella Mini 14 (LPM14)

 Happy Home
This is quite a versatile little stamp - you can cut up all the main elements, the word, house, cat and bird - I think you already know how handy I am with a pair of scissors!


There are the friends just hanging out together...
 
 
And here's the little house on the prairie .... or cottage by the sea ... or maybe little red riding hood is in there ....


Framed

This would be on the wall in that little cottage - the family photo.


You might notice I snuck in a few elements from the new Hot Picks stamped on tissue and used to build up the collage a bit more (hint: it's the ruler and the script)


Last piece of the Puzzle
Here is the final 3 of 3 from the triptych I made. This one was stamped onto tissue, then stuck onto the layers, wish I had done that with all of them as the result is outstanding. I have a few tricks how to get a good result which I will reveal in the Live over in PaperArtsy People!


They look so happy together.


Triptych
You can see how they sit quite nicely with each other .... still can't decide which one to put in the centre ..or where to put them!


Thanks for joining me today. I hope you too will find some joy in these wonderful little stamps, they really are so playful and bring a smile.

They are in stock with stores, find one near you listed below.

Best wishes to you all

Leandra (and the PA team)

 PaperArtsy Stockist List

Our stockists are your go-to  source for all PaperArtsy products, and we suggest that you also use the PaperArtsy People Facebook group to source a retailer in your country. Many are members of our FB group and will happily share links to their online stores.

Australia
Bev's Cross Crafts, Spreyton, Tasmania https://www.bevscrosscrafts.com.au/
Crafters Cupboard, Berwick, Victoria www.crafterscupboard.com.au
Memories on the Murray, Murray Bridge, SA  https://www.memoriesonthemurray.net/
Natalie May Scrapbooking, Dover Gardens, SA https://nataliemay.com.au/
Scrapbook Superstore & More, South Penrith, NSW https://www.scrapbooksuperstore.com.au/
The Scrapbooker's Confetti Box, Swansea, NSW https://thescrapbookersconfettibox.com/
The Scrapbook Store, North Perth,WA http://thescrapbookstore.com.au/ 
Time To Create, www.timetocreate.com.au

Belgium
Cart N Scrap Art, Antwerp, www.cartnscrapart.be
Créatelier Caracolle, Liège, www.createliercaracolle.be

Canada
Clipper Street Scrapbook Company, Langley, BC. www.clipperstreet.com
Paper Art Creations Inc, Leduc, Alberta, www.paperartcreations.com/
Scrapbook Centrale, Dollard Des Ormeaux, Quebec www.scrapbookcentrale.ca
Scrap Addicts, Edmonton, Alberta www.scrapaddicts.ca/
Scrap and Bean, Edmonton, Alberta scrapandbean.com/ 
Scrapbooking Fairies, Drayton Valley, Alberta www.scrapbookingfairies.com/
The Paper & ink Boutique, Calgary, Alberta www.paperandinkboutique.com/
The Scrap Yard, Calgary, Alberta, www.thescrapyardcalgary.com/ 

Denmark
Hobbyboden Scrapworld Samso www.hobbyboden.dk

France
Eirl Bancon Cartoscrap, Midi Pyrenees, www.cartoscrap.com
Fée Du Scrap, Saint Sébastien-Sur-Loire, www.feeduscrap.fr/
Horizon Créatif, Ste Jalle www.horizon-creatif.fr
Instant Créatif, La Possession, La Réunion, www.icreatif.re
Katzelkraft, Ingwiller www.katzelkraft.fr/en/
Kerudoc Creation, St Yvi www.kerudoccreation.com
Le Grenier des filles, Pierre Benite
Page de scrap, Saint Pavace, www.pagedescrap.fr/
Scrap Déco Home, Goutrens, www.scrapdecohome.fr/
Toutencolle, Dun sur Avon www.toutencolle.fr

Finland
Heidin Korttipaja, Istunmaki, www.korttipaja.fi/fi
Piia Paper, Kittilä, www.piiapaper.com/fi

Germany
Stempelbar, Berlin, www.stempelbar.de
Stempeloase Munich, Munich www.stempeloase.de
Stempelfee Shop, Hilden www.stempelfee-shop.de
Stempellaedle, Stuttgart, www.stempellaedle.de/shop

Greece
Scraps N Pieces, Kallithea www.scrapsnpieces.gr

Italy
Immagine SAS di Rapaccini, Rome, www.immaginelab.com
Il Negozio Della Mamma Di Cle, Torino, www.ilnegoziodellamammadicle.com
Marte Savona, Savona, www.martesavona.it
Pezze E Colori, Lissone, www.pezzeecolori.it/ 
Piccole Passioni, Siena, www.piccolepassioni.it

Japan
La Wadao, Odawara, Kanagawa, www.lawadao.com
Tiny Dots, Funabashi-shi, Chiba www.tinydots.shop-pro.jp

Netherlands
De Hobbystudio, Genemuiden, www.dehobbystudio.nl/
Doe@ding,Spijkenisse doeading.nl/
Hobbycompleet de Duif, Leeuwarden www.hobbycompleet.nl
Stampingcorner, Capelle Aan Den Ijssel www.stampingcorner.nl

Norway
Hobbygarasjen, Kopervik, www.Hobbygarasjen.no

Spain
Cien por Cien Manualidades, Barcelona,  www.100x100manualidades.es
Ideas 10 Manualidades Y Scrapbook, Bilbao ideas10manualidades.com/
Marakiscrap, Tarragona, www.marakiscrap.com
Scrap & Papers Experiences, Barcelona, www.scrappapersexperiences.com
The Paradise Corner, Barcelona, www.theparadisecorner.com

Sweden
Butik Elva, Staffanstorp, www.butikelva.se

Taiwan
Mandy's Cards, Taipei www.facebook.com/mandy.card.77

United Kingdom
Amelia's Creative Crafts, Studley, Warwickshire  www.ameliascreativecrafts.co.uk
Art from the Heart, Harrogate, Yorkshire www.afth.co.uk
Crafts at The Malthouse, Herstmonceux,  East Sussex, www.themalthouse.co.uk/
Loobi Crafts, Leighton Buzzard, Bedfordshire, www.loobicrafts.co.uk
Papermaze, Ipswich, Suffolk www.papermaze.co.uk/ 
Stampers Grove, Springbank, Lilliesleaf, Melrose,Scotland www.stampersgrove.co.uk
The Artistic Stamper Craft Store, Faversham, Kent www.theartisticstamper.com
The Forget me not Kraft Kabin, Rochford, Essex, www.TheForgetMeNotKraftKabin.co.uk

USA
Artistic Artifacts, Alexandria, VA www.artisticartifacts.com/
Artistic Studio Creations, Fayetteville, Georgia www.facebook.com/ASCbyCrystal
Craftiness, Chatsworth, CA, www.craftinessonline.com/
Ephemera Paducah, Paducah, Kentucky www.ephemerapaducah.com
Everything Scrapbook & Stamps, Lake Worth, Florida https://everythingmixedmedia.com/
Frantic Stamper, Oregon www.franticstamper.com
Free Heart LLC, Denver, Colarado, www.freeheartllc.com/
Joggles, Coventry, Rhode Island, www.joggles.com
PaperCraft Clubhouse, Westbrook, Connecticut, papercraftclubhouse.com/
Qingquing's Stamp Shop, Portland, Oregon
Runaway, Art & Craft Studio, NE Salem, Oregon www.runawayart.com/
Simon Says Stamp, Columbus, Ohio www. simonsaysstamp.com
Topflight Stamps, Irmo, South Carolina topflightstamps.com/

Our brand is only available from established stockists who are VAT/ GST/ sales tax registered and for whom product education is a core principle. If you would like to apply to be a stockist, you can find our more about our supply criteria here.

PaperArtsy Links
Facebook Group PaperArtsy People
Facebook Page PaperArtsy