Hi everyone
Etsuko here with you today.
It may be a little late, but it's still January, so I hope everyone has a happy and wonderful year in 2023.
The first topic of the PaperArtsy blog is 'Shrine'. Japanese shrines enshrine natural objects, phenomena, and mythological deities-what we call 'Yaoyorozu no Kami' (all things have a spirit). Therefore there are no idols like Buddha statues in the shrine, and it is almost empty. That's like a white paper that we first get in hand, and on which people draw each image in their minds. At New Year's and seasonal festivals they pray for the good health and peace of their families and friends at the shrine.
And the current theme for the first quarter is 'Tracks'.
I likened the footprints of the wonderful designer Lin Brown works and the introduction from the door to the inside as the theme Tracks. This is my project that fused the topic and the theme.
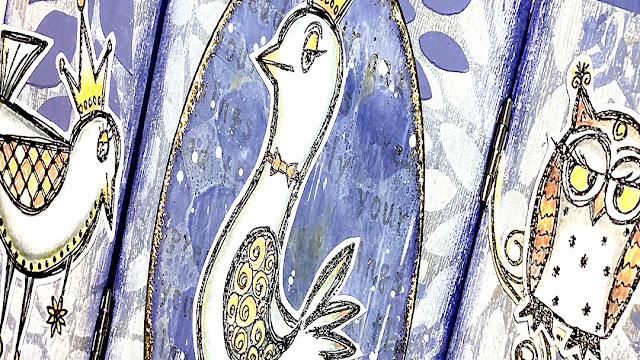
The triptych with spread material I made here was one of the first goods I ordered from PaperArtsy through a friend's introduction about ten years ago. At the time Lin Brown used her stamps, stencils and dies to showcase her great techniques and art. These footprints are revived every time when I use her creations. This time I wanted to make a shrine that looks like a spirit dwelling in it that I used her stamps and stencils to begin by decorating the gate with flowers and placing to the shrine the birds which commonly found in the gardens of Japanese shrine.
Before I started this project, I worked out ideas about how to represent the shrine, whether it was a physical shadowbox, a matchbox, a tin can with a lid, or an abstract flat surface. Afterwards some searching in my stash, I found this wooden triptych that had been lying in a cardboard box for years, and the problem was quickly solved. Since the container was decided I chose the products for creation. Stamps are: Lin Brown stamp set 17 and 26 (ELB17 and ELB26). Stencils are: PaperArtsy Stencil by Lin Brown (PS005) and PaperArtsy Stencil by Sara Naumann (PS092). The colours used are PaperArtsy Fresco Finish Chalk Acrylic - Purple Raine (FF105), Prawn (FF98), Bubble Gum (FF116) and Snowflake (FF15). I often used orange-based pink and green, so this time I used blue-based purple and pink. Snowflake was added to increase the brightness.
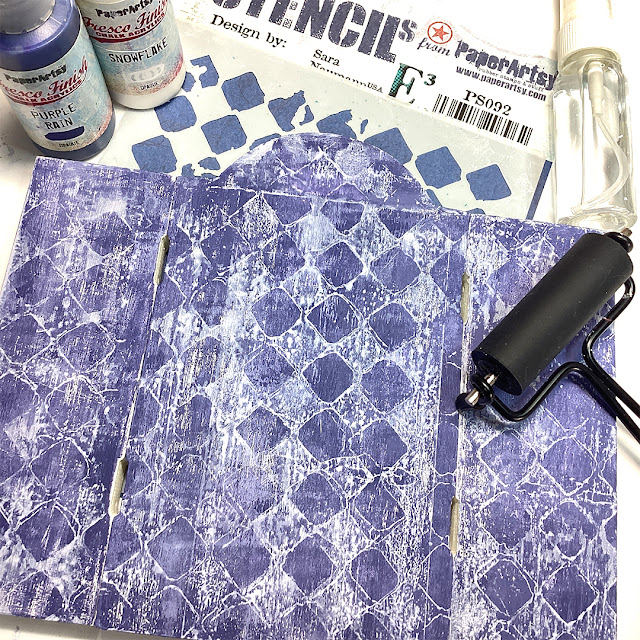
The triptych with spread I used for this topic was a good size as shown in the picture and the thickness of the board is 1.5 cm (0.6 inch).
First I applied two coats of gesso to prepare the base so that the work could proceed smoothly.
I realized halfway through that I had to remove the hinges first.
I printed using my gel plate on the shrine interior, using PaperArtsy Fresco Finish Chalk Acrylic - Caramel (FF75), Purple Raine (105) and Snowflake (FF15). Unlike when painting with a brush, the wood grain appeared clearly in the mono-print.
I put the stencil (PS005) on the shrine's each panel and applied the mixture of the PaperArtsy Grunge Paste and Purple Raine using painting knife.
First Purple Rain and Caramel were spread on my gel plate then PaperArtsy Stencil by Sara Naumann (PS092) was applied with Snowflake to the reverse-stenciling technique Sara introduced and I lifted a print it on a A4 paper.
Reverse-stenciling; simply brayer paint onto the stencil, mist with water and press it onto your surface using a stencil from PaperArtsy Blog by Sara Naumann.
The gate and back were also finished in the same shade using Sara's reverse-stenciling technique, in this case using brayer to the shrine to apply the colours (I mixed Purple Rain and Snowflake ) directly onto the surface and brayered Snowflake paint onto the stencil, mist with water and press it onto the surface.
Once the surface is dry I stamped the Lin Brown Stamp set 26 (ELB26) sentiment with Tsukineko - Clair (Nocturne) all over and push the layer back.
The colour still stood out too much so I washed with Snowflake and splattered with some Snowflake.
I cut the daisies in half and arranged them. How does it look?
And it would be nice to have something like a doorknob, so I decided to make the same daisy with clay and paint it.
It's been a bit long road, but the spirits are finally entering the interior. First of all Lin Brown Stamp set 17 (ELB17) was printed on A4 paper using Tsukineko - (Nocturne) and Ranger Industries - Clear embossing powder. I coloured these birds using coloured pencils.
Apply masking tape to all edges before attaching the hinges to prevent smudging of the panel's surface and paint each side.
There were some glass balls that were just right for the final finish, so I decorated them.
I just closed the door of the daisies and this is the view.
My project at the beginning of the year was done using all the tools I had on hand without any difficult techniques. Therefore, I was able to concentrate on the production and fully enjoyed the fun of making it. At first, I wasn't sure how much I could develop with two sets of stamps and two stencil sheets, but when I started making them I realized that there were plenty of possibilities, and think I could create many different designs depending on my ideas. Why don't you all make a work with a goal such as this topic and theme?
Thank you so much for stopping by.
Etsuko xxx


2 comments:
What a great project Etsuko!
Etsuko, I really love the colors you used for this amazing project. Those glass beads are the perfect accompaniment, along with the WONDERFUL clay flower you made! Really fabulous creativity on display here and I love seeing a throwback to these older stamp lines. They are still just as good and you've proven so! xx
Post a Comment