

A note from Leandra:
If anyone knows how to squeeze the maximum real estate out of a stamp plate, then Raquel does! Between you and me the elves are a wee bit tetchy here at HQ about all the trimming involved with these stamps, but my oh my are they jam packed with wonderful elements that offer you so much variety! It's nice to see a masculine touch to these designs, a request we often get!
If anyone knows how to squeeze the maximum real estate out of a stamp plate, then Raquel does! Between you and me the elves are a wee bit tetchy here at HQ about all the trimming involved with these stamps, but my oh my are they jam packed with wonderful elements that offer you so much variety! It's nice to see a masculine touch to these designs, a request we often get!
Raquel will be along to share with you LIVE her new products and ideas over in our facebook Group, PaperArtsy People shortly after this post publishes. I hope you can drop by for the live, or try to catch the replay. it's nice to hear direct from the designer about the new release and put the face to the name!
For the next few months, these stamps are only available EXCLUSIVELY from our approved stockists. Please check the list at the foot of this post to find a retailer online or geographically near you, it makes sense to order within your country where possible.
Hi everyone, Raquel here from scrapcosy
As always, I'm really excited to share with you my newest release for PaperArtsy: 3 stamp sets and 3 new stencils.
As always, I'm really excited to share with you my newest release for PaperArtsy: 3 stamp sets and 3 new stencils.
For quite some time I have wanted to create a clocks stamp set and, since the previous release, I've been obsessed with frames. I love butterflies, flowers and ephemera and I thought it was also time to add a more masculine set to my collection. Although these things seem to not be related at all, they are all features of this release and I have found that all 3 stamp sets work really well together.
The release was inspired by my visits to the London Zoo and my walks in London in springtime. I always have my phone ready to capture the creatures, things or flowers I encounter on my way so that I can draw them later. By combining my drawings and compositions with snippets of vintage ephemera we get this release with my usual vintage vibe.
 Price: RRP €21.92 +VAT Size:5" x 6" (13 x16.5cm)
All stamps are individually trimmed onto cling foam, presented in a clear hanging bag
with a laminated storage/index sheet.
with a laminated storage/index sheet.
Eclectica³ Scrapcosy Set 33 (ESC33)

In the London Zoo, you can go inside a huge caterpillar and it transports you to a really humid and hot environment. This large tunnel with lots of daylight is home to hundreds of living butterflies that fly and dance around you. It's a must for me to visit them every time we go to the zoo. I loooove that place and as you can see in the stamp set, some of those fragile creatures made it into my stamps. Their final metamorphosis has happened and they'll now survive the pass of time in the form of a stamp set! I've paired them with a very flexible frame. It can be cut into smaller pieces so you can build many frames of different shapes and sizes.
Another big stamp on this set is the band with its oval frame. This band is inspired by the shape of some cigar bands, I hate cigars but I love their bands! The band is empty so you can decorate the ribbon on each side with any of the 3 patterns (4, actually, as you can also use a section of the big frame). I've added 3 quotes, that all fit the oval frame. You can also fill it with the flowers, which I drew from a bouquet I bought at Columbia Road Flower Market in London for my birthday. The other elements can be used to decorate any of your projects and the ribbon at the bottom is pretty flexible, so you can stamp it in a waved shape if you want.
Let your ART come true

This frame looks fantastic simply stamped on a 1 layered card, however I love to cut a window inside and place my elements at different heights using foam adhesive. I love how this one turned out. You can swap the blue colours for pink colours in the background, pink flowers in the frame and a pink butterfly and you'll get a completely different look. And instead of pink, why not orange or violet? You can also add some glossy accents on the entire oval to make the sentiment more precious and add glossy accents also on the flowers so other elements of the card shine too.

You could also easily turn this card into a shaker card, just add a piece of acetate on top of the background, mounted on a hidden frame of foam adhesive and in the inside you could create your own confetti by fussy cutting some flowers of the frame or some of the dots that I stamped at each side of the oval. Even the small butterflies could be added among the confetti if you wished!

I used distress Oxide Ink in Speckled Egg and Distress Ink in Vintage Photo for the background and I coloured the rest with Infusions Golden Sands and Infusions Sleight Blue. Some parts I painted with a mix of Infusions and water while the frame is painted with a mix of Infusions and Fresco Finish Satin Glaze. Everything is stamped with Versafine Clair Pinecone Ink, which is waterproof and a pretty dark brown.
Eclectica³ Scrapcosy Set 34 (ESC34)

This stamp set is so playful! When I decided I wanted a man to appear on this stamp set, I wanted to be able to tweak him for the occasion. I like the idea of playing with dolls and dressing them, so I decided to add some interchangeable hats for him. I added some quotes so you can create cards for all the men in your lives and for many different purposes. The frame at the bottom comes again from the London Zoo (yes, they also have frames there) and it's distressed so the PaperArtsy elves can do their magic and separate the frame from the quotes, so you can stamp all of them independently. And please feel free to cut the sentiments apart, just take some scissors and do some stamp surgery :). I also wanted some ephemera and a clock that could decorate your projects and I added an even more distressed frame on the top with many possibilities, as in the previous stamp set. The small circle is a bigger version of the stripe of dots on ESC34.
One of a kind man

I enjoyed creating this sample a lot. I love him as a focal, you don't need much more, but I wanted him surrounded of all that ephemera and I gave him my favourite sentiment and hat of the lot. For the background I first stamped the frame and embossed it with my WOW embossing powder Luxurious Chocolate from the 'It's cold outside' TRIO. I painted the frame with a mix of Golden Sands Infusion and Fresco Finish Satin Glaze so I could protect that part of the paper. I then dabbed Speckled Egg Distress Oxide on the entire surface and while wet I was able to clean my frame and remove the blue from it. After all was dried, I added some Vintage Photo Distress Ink on the edges with a dauber.
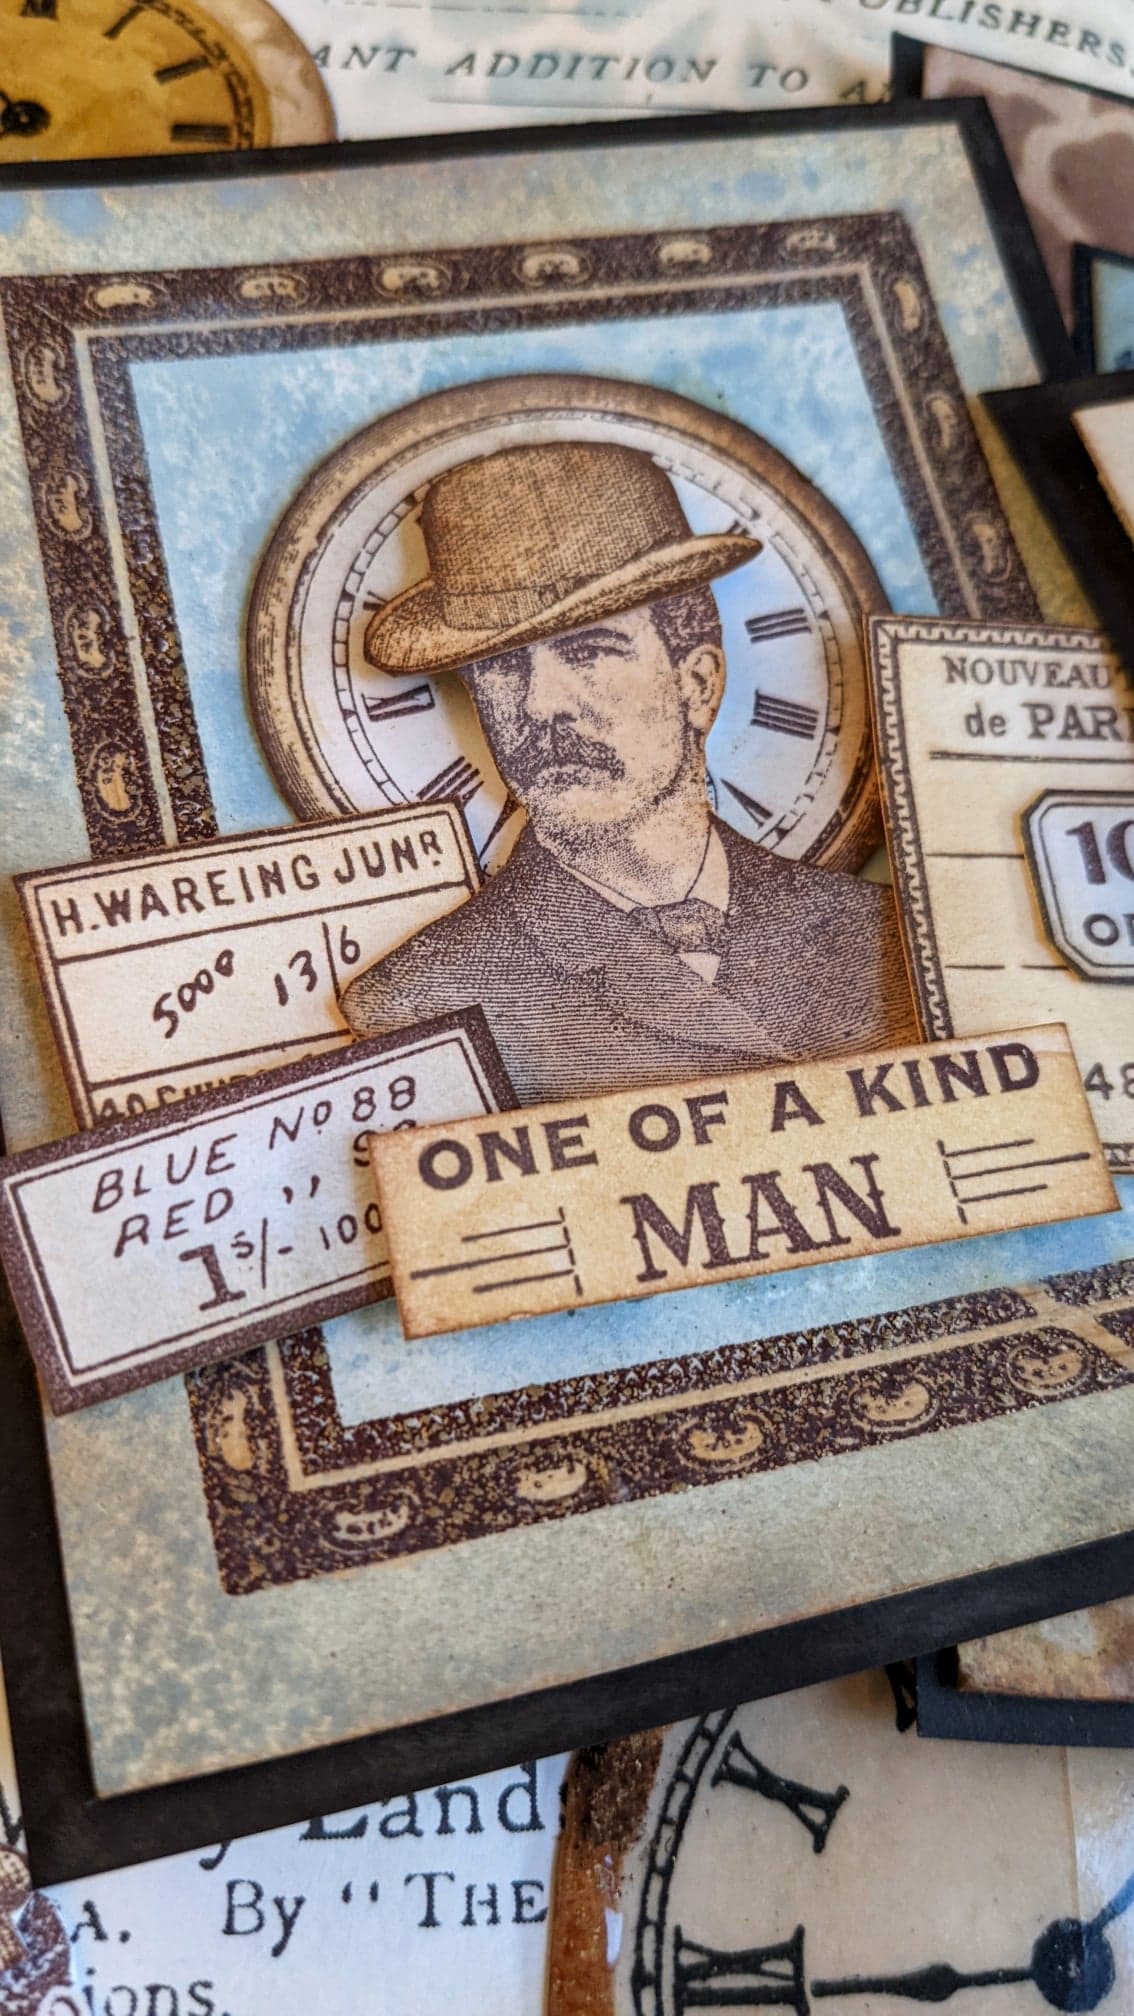
All that was left to do was playing around with the cut ephemera, the clock and dressing up my man so it stood out. Since I'm using a frame, this card can also be transformed into a shaker card. Just cut the inside of the frame, place a piece of acetate just behind the frame and place all on op of a slightly larger background with a hidden frame of foam adhesive. Your shake bits can be those small circles or even some hats cut out.
Eclectica³ Scrapcosy Set 35 (ESC35)

Here's the stamp set that has been on my mind for quite some time now! I wanted a pretty big clock and I wanted to be able to frame it with flowers. The first sample I did with illustrates exactly what I had in my mind. I love flowers and I love fussy cutting them but I like to be fast on my projects too, if I can, so I made it easy for me (well, for all of us) to cut these flowers. I drew the easiest flowers to fussy cut, with 4/5 petals. I also chose simple leaves, some super easy shapes, some more intricate but still achievable to cut.
I added an extra flower, so you can create a smaller project if you want to. You can also coordinate this single flower with the bouquet of 3 for an art journal spread or a larger project where you may want more elements on different pages. In the same idea, I also added a smaller version of the clock this one with no set clock hands. Those are in a separate stamp, the 4 clock hands (for 2 sizes of the clock). They are arranged nicely, so you can either cut them away and use them on both clocks or put them back into the existing composition and use them for a background. The 2 sentiments in the set let you create projects at different scales.
Live the moment, enjoy the time

This is the type of project I had in mind when I created this stamp set. Decorating a big clock with fussy cut flowers. I added some clear embossing powder (UTE, actually) on the clock face and also on the sentiment which I split in 2 because I didn't want to commit to one of the corners and cover the stenciled background made with PS344, which I loved. By cutting it in 2, the background is less covered and I think everything looks more balanced.

I stamped my flowers first on the background. If I wanted to repeat this project I would avoid that first step and not stamp them at all, so I could have more freedom on the final composition using just the fussy cut flowers. Looking at the card I would have preferred now that all the flowers were covering the edges of the clock a bit more.
It's time to dream BIG


For this other card I did cover more the clock and I like it better. It's a smaller card, you can see it compared to the first one, which is behind. I liked the idea of stamping the sentiment so it exceeds the boundaries of the clock. It emphasizes the message, to dream big, even bigger than you think you should!

I used the clock hands for the background, they are very subtle but they add texture. I highlighted the word BIG with some black pen to make it stand out even more and I added UTE to the clock face again. The brads are not brads, they are drops of melted embossing powder. You can check how to make these in this video I made or learn it from the actual artist I learned it from, Marion Emberson from WOW in this other video (she's awesome!).

Large Size: 6.25" x 9.5" (16 x 24cm) Price: RRP €6.28 +VAT
PaperArtsy Stencil 344 (PS344)
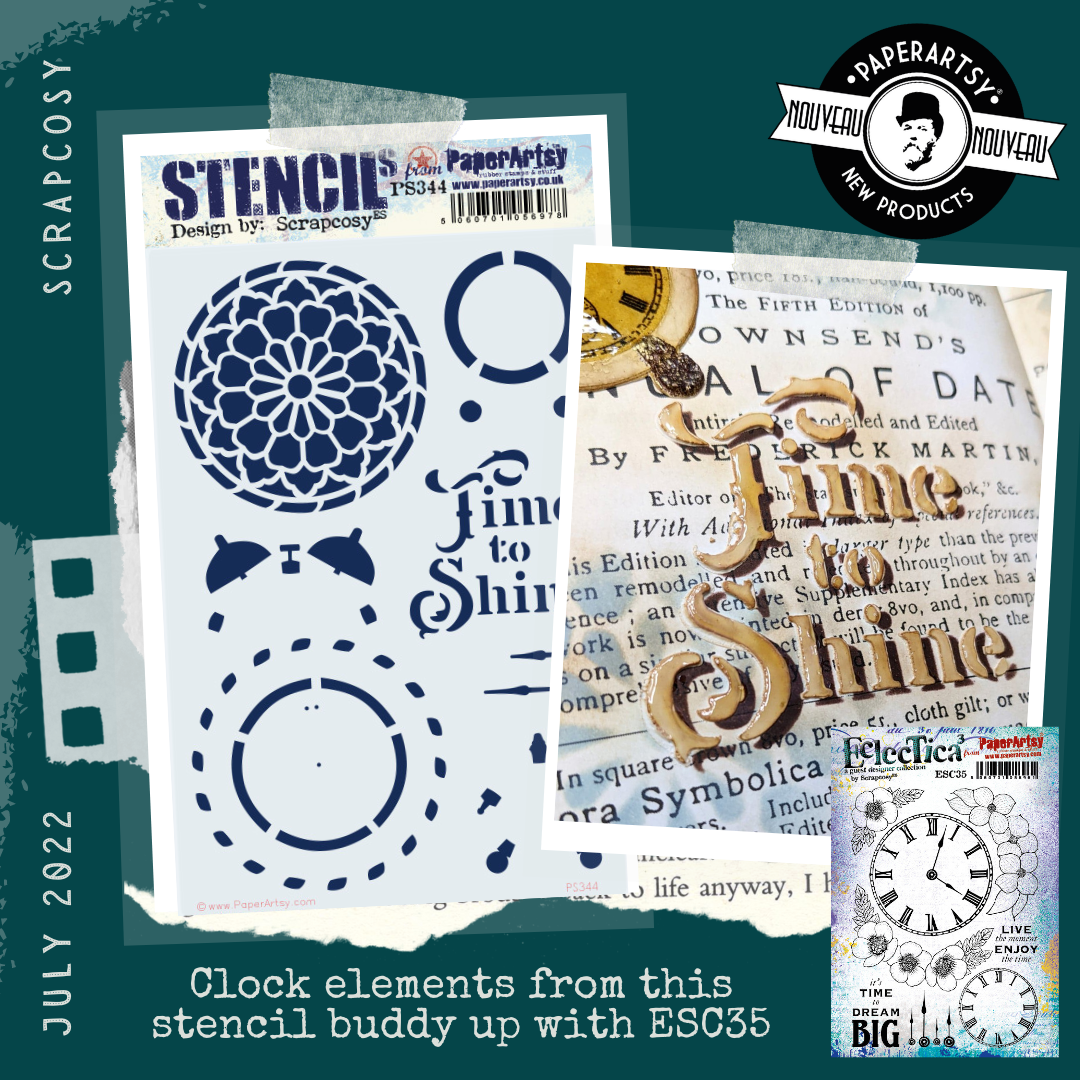
This stencil matches the 3 clocks in this release, not only the ones in ESC35, but also the one in ESC34. You can create some edges for the big clock using any of the 2 big circles on their own or combined. You can add some pattern in the clock face or in the background with the rosette, and the sentiment 'Time to Shine' can be stenciled inside the big clock face too. Then for the middle size clock you can create an alarm clock with bells and pointy legs. And finally for the smallest clock in ESC34, you can add a frame and some circle legs. I've also added a couple of clock hands in case you wanted to add some.
Time to Shine

Here I just wanted to play with the stencil to show you some of the options you have. I took my book Art Journal Vol1 (available at Amazon and at Stampers Grove) and I first created a background just using Speckled Egg Distress Oxide ink with a sponge dauber through the rosette directly on the page. I added some Distress Vintage Photo as well to age the pages a bit more. I then worked on the clocks on different pieces of paper which I cut and glued later on.

On the left page top you can see how the small clock on ESC34 is transformed into a table clock. I used grunge paste for the frame and embossing powder Luxurious Chocolate on top of the embellishments (top and feet). I covered the clock face with glossy accents. Then on the middle and directly onto the page I did a bumped stencil technique where I apply a dark ink through the sentiment to add a shadow, then I shift the stencil and apply grunge paste on top. This time as a last step I added glossy accents on top of the letters to add some shine and reinforce the message.

Finally at the bottom you can see the alarm clock that you can create with the small clock on ESC35. I've used 2 different colours of embossing powder (Luxurious Chocolate and Pumpkin Latte). On top of it I added some UTE too.

For the right page I just added the big clock with the edge made of Grunge Paste using the 2 big circles of the stencil. I added some Vintage Photo Distress ink on the Grunge Paste to highlight the different heights I achieved.
PaperArtsy Stencil 345 (PS345)

I love layering stencils. This one is very playful: you can use all 4 layers together, or combine just some of them, or just use them independently. You can also shift them in between layers to get many interesting patterns.
100% Original

For this one I used a very simple technique, I just added one layer after the next using different Distress Oxide inks, which are opaque, so one covers the others. I added some clear embossing powder on top and I just added the man with that simple label so I wouldn't cover that nice background too much. This is just using inks, but check out my final project down below, to see how gorgeous it looks if you use Grunge Paste for all the layers. You could also combine flat inked layers with some GP layers to get an even more interesting look.
PaperArtsy Stencil 346 (PS346)

I love this stencil! I've seen many people embroidering flowers on Instagram lately so I had in my mind to create a stencil that could be use for that purpose as well. But if you're not into embroidery, of course you can use this stencil to create super easy backgrounds. It is what I did for my first project below. I used Grunge Paste over all the design but you could use different colours to stencil each part of the flower, either with paints or with inks. The different shapes of flowers and leaves in the stencil let you decorate corners, stripes and entire backgrounds.
Just for you
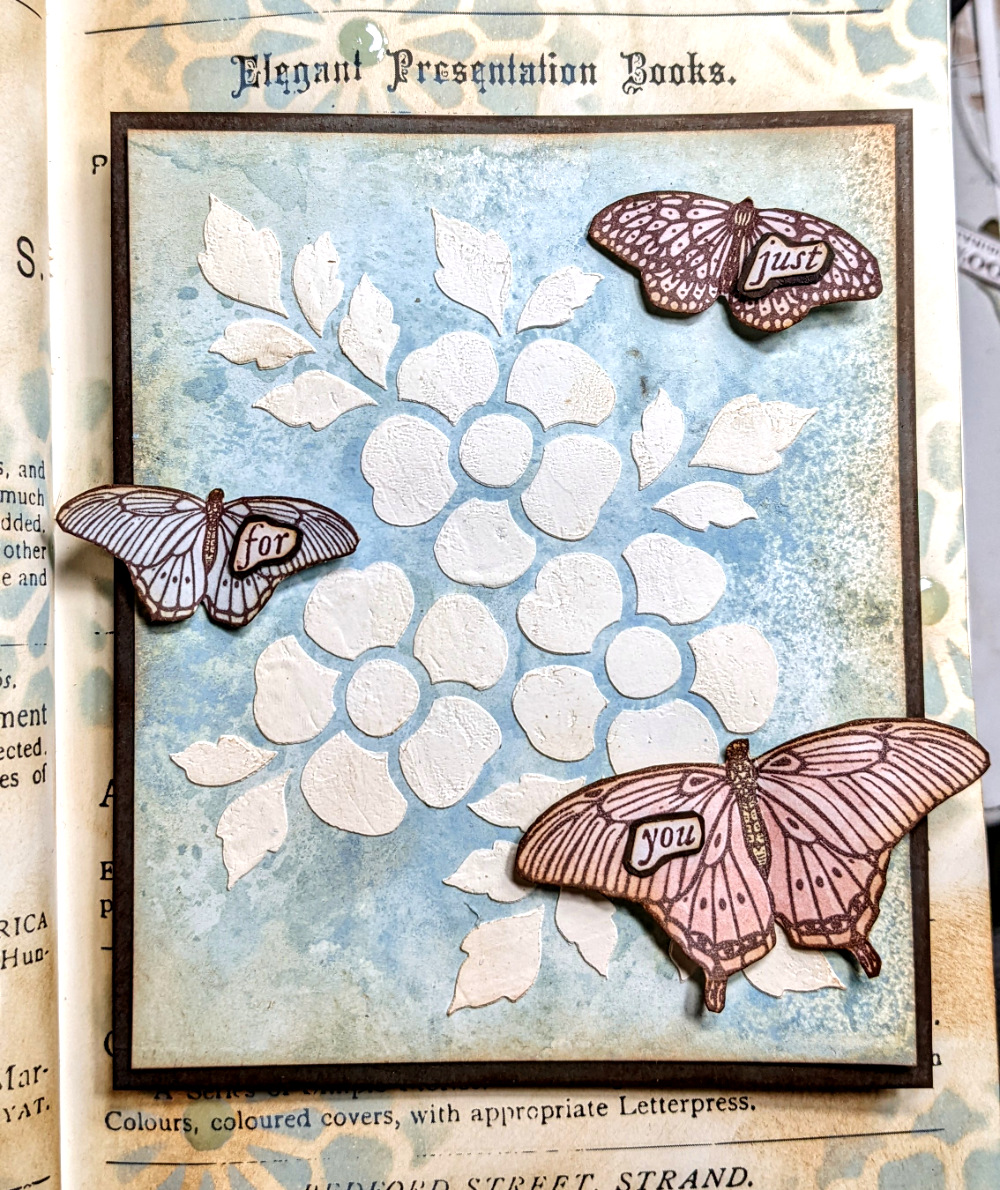
I loved how the background turned out with the Distress Oxide distressed layer and the Grunge Pate stenciled bouquet. I didn't want to cover any of it! So I went for a very minimalist card.

I just picked the 3 butterflies from ESC33 and added one word on each of them so between them all you can read the sentiment and they seem to be flying through the flowers.
Embroidered flower

I was chuffed when I finished embroidering this! I'm a newbie on embroidery. Well, I did some when I was around 10 years old... then some cross stitching at 15, so I had some rusty knowledge on the matter. I hadn't embroidered or cross-stitched again until the pandemic started, in 2020, when I tried embroidering a couple of small flowers following an Instagram live. I didn't finish that project but it introduced me to the French knot which I used from memory in the centre of the flower (I'm sure it can be done neater).
Step 1: marking

I chose a Frixion pen (which ink can be removed by applying heat with the heat tool, for example) to trace the flower and leaves through the stencil. I found that doing a dotted line was easier and faster than trying to follow all the edges of the stencil with the pen.

After that I tried embroidering the petals and I loved how bulky they look! So I continued later on with the rest.
Project: Traveller of the year

For this card I decided to use all 3 sets in one and I love the result! I added a pair of wings to the man, so he can fly through the world and be the Traveller of the year. Isn't it the perfect hat for a globe trotter? The background was created with PS345 adding 4 layers of Grunge paste and Golden Sands Infusions on top once it was dry. I love the grungy look!
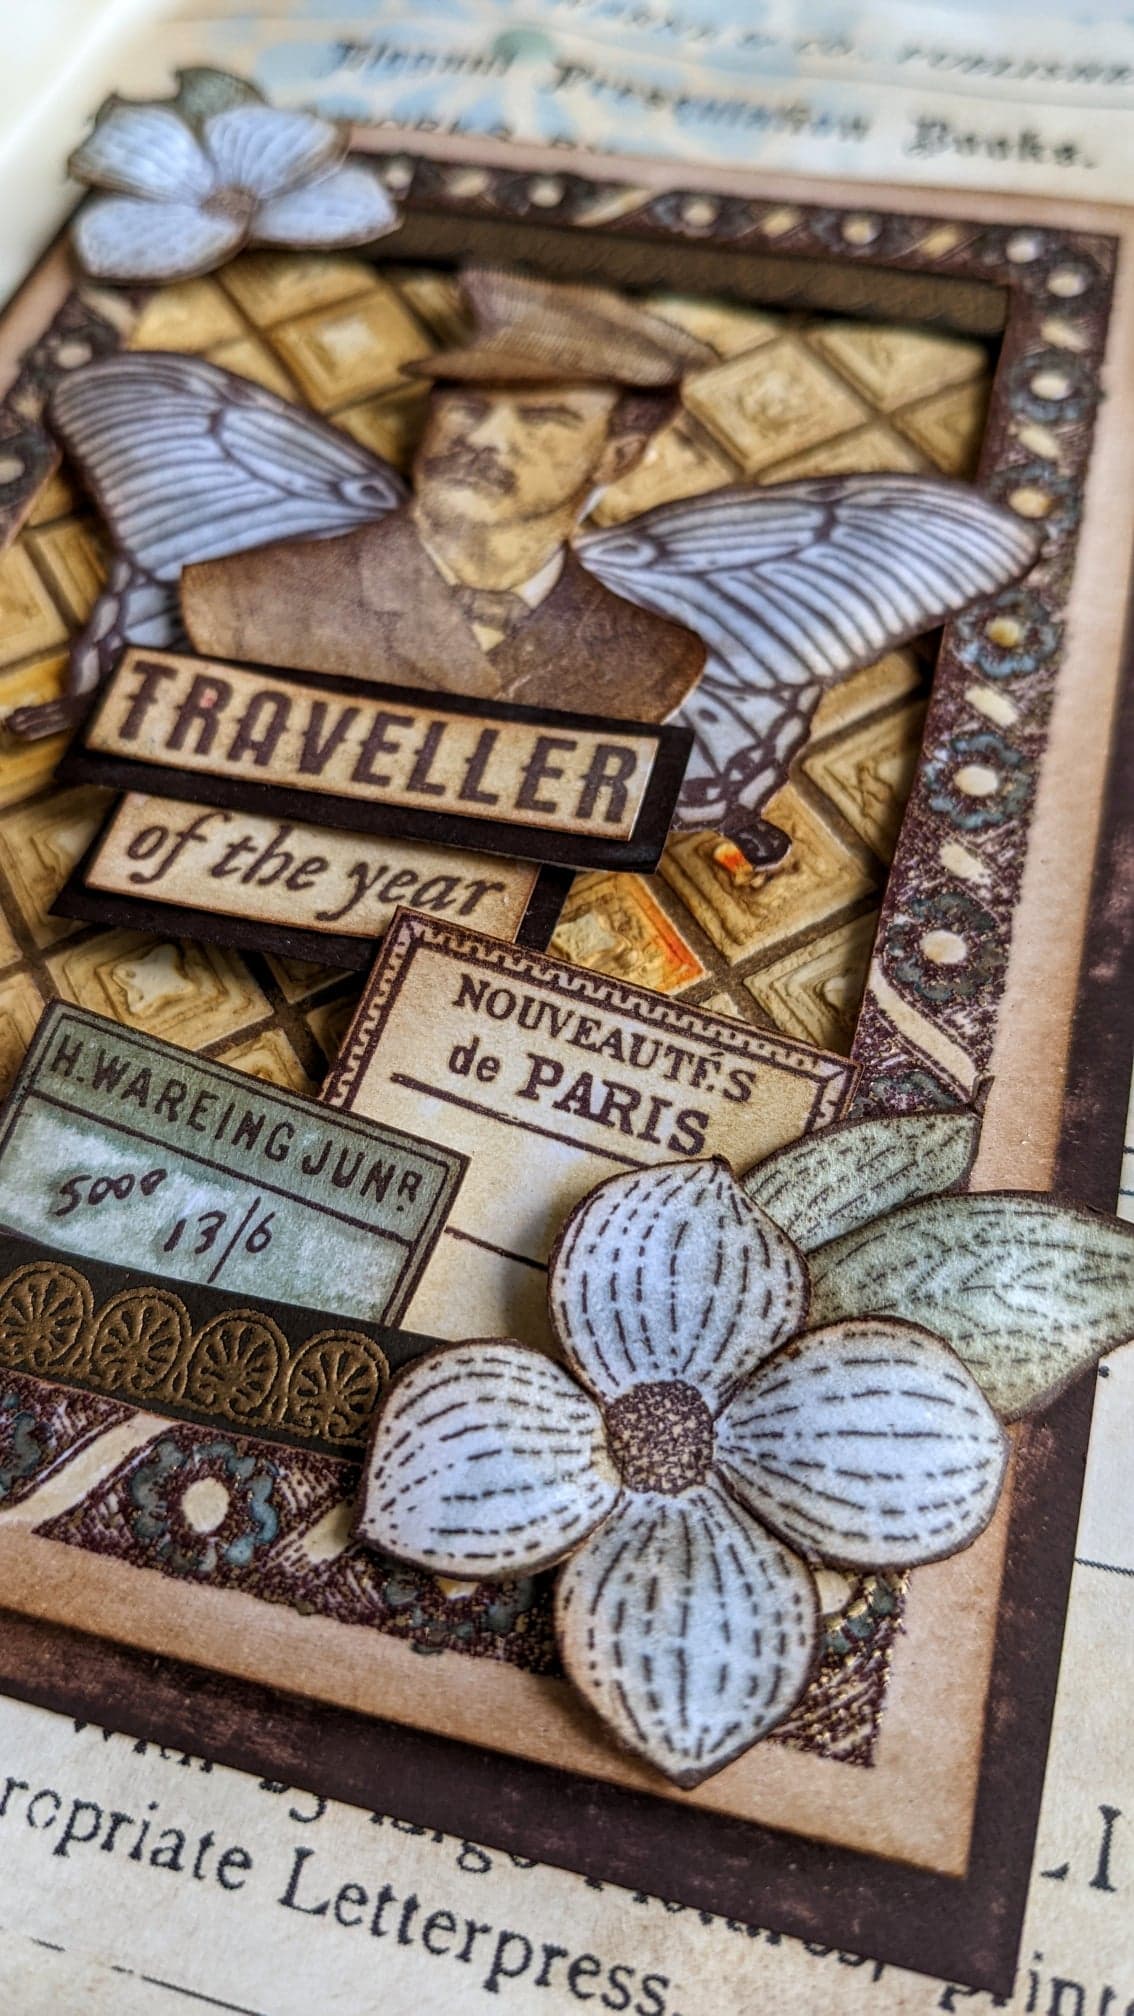
Flowers from ESC35 decorate both corners, combined with ephemera from ESC34. Everything was watercoloured with some of my go-to Infusions colours : Golden Sands, Sleight Blue and Olive tree, then aged with Vintage Photo Distress ink. The frame and the top and bottom lines are from ESC33 and I've embossed them in Gold and in Luxurious Chocolate WOW embossing powder.

I just love how he seems to float in the air, casting those shadows since I mounted all pieces using foam adhesive.
That was all for today in the blog, I hope you liked the release. I certainly love it! Please join me and the PaperArtsy team and stockists on the PaperArtsy people Facebook page, I'll be going live shortly and I may show you a couple more samples I've made.
Socials
YouTube: scrapcosy - https://www.youtube.com/c/scrapcosy
Instagram: scrapcosy - https://instagram.com/scrapcosy/
Blog: https://scrapcosy.com
Facebook:
- This is my profile: Raquel Burillo Perez - https://www.facebook.com/raquel.burilloperez
- This is my Scrapcosy's crafty party Facebook Group, for everything scrapcosy. Come and join me! Share all your creations with everyone in the group! - https://www.facebook.com/groups/scrapcosygroup/
Teaching Schedule:
This time I’m not teaching any classes, but you can watch any of these 2 classes available on replay:
- if you want to learn about infusions techniques, you can join the class I taught at Stampers Grove on February 2021
- if you want to start with bullet journaling in a vintage style you can join this class at Loobi Crafts
Our stockists are your go-to source for all PaperArtsy products, and we suggest that you also use the PaperArtsy People Facebook group to source a retailer in your country. Many are members of our FB group and will happily share links to their online stores.
Australia
Bev's Cross Crafts, Spreyton, Tasmania https://www.bevscrosscrafts.com.au/
Crafters Cupboard, Berwick, Victoria www.crafterscupboard.com.au
Memories on the Murray, Murray Bridge, SA https://www.memoriesonthemurray.net/
Natalie May Scrapbooking, Dover Gardens, SA https://nataliemay.com.au/
Scrapbook Superstore & More, South Penrith, NSW https://www.scrapbooksuperstore.com.au/
The Scrapbooker's Confetti Box, Swansea, NSW https://thescrapbookersconfettibox.com/
The Scrapbook Store, North Perth,WA http://thescrapbookstore.com.au/
Time To Create, www.timetocreate.com.au
Time To Create, www.timetocreate.com.au
Belgium
Cart N Scrap Art, Antwerp, www.cartnscrapart.be
Créatelier Caracolle, Liège, www.createliercaracolle.be
Canada
Clipper Street Scrapbook Company, Langley, BC. www.clipperstreet.com
Paper Art Creations Inc, Leduc, Alberta, www.paperartcreations.com/
Scrapbook Centrale, Dollard Des Ormeaux, Quebec www.scrapbookcentrale.ca
Scrapbook Centrale, Dollard Des Ormeaux, Quebec www.scrapbookcentrale.ca
Scrap Addicts, Edmonton, Alberta www.scrapaddicts.ca/
Scrap and Bean, Edmonton, Alberta scrapandbean.com/
Scrapbooking Fairies, Drayton Valley, Alberta www.scrapbookingfairies.com/
The Paper & ink Boutique, Calgary, Alberta www.paperandinkboutique.com/
The Scrap Yard, Calgary, Alberta, www.thescrapyardcalgary.com/
The Scrap Yard, Calgary, Alberta, www.thescrapyardcalgary.com/
Denmark
Hobbyboden Scrapworld Samso www.hobbyboden.dk
France
Eirl Bancon Cartoscrap, Midi Pyrenees, www.cartoscrap.com
Fée Du Scrap, Saint Sébastien-Sur-Loire, www.feeduscrap.fr/
Horizon Créatif, Ste Jalle www.horizon-creatif.fr
Instant Créatif, La Possession, La Réunion, www.icreatif.re
Katzelkraft, Ingwiller www.katzelkraft.fr/en/
Kerudoc Creation, St Yvi www.kerudoccreation.com
Le Grenier des filles, Pierre Benite
Page de scrap, Saint Pavace, www.pagedescrap.fr/
Scrap Déco Home, Goutrens, www.scrapdecohome.fr/
Toutencolle, Dun sur Avon www.toutencolle.fr
Finland
Heidin Korttipaja, Istunmaki, www.korttipaja.fi/fi
Piia Paper, Kittilä, www.piiapaper.com/fi
Germany
Stempelbar, Berlin, www.stempelbar.de
Stempeloase Munich, Munich www.stempeloase.de
Stempelfee Shop, Hilden www.stempelfee-shop.de
Stempellaedle, Stuttgart, www.stempellaedle.de/shop
Greece
Scraps N Pieces, Kallithea www.scrapsnpieces.gr
Italy
Immagine SAS di Rapaccini, Rome, www.immaginelab.com
Il Negozio Della Mamma Di Cle, Torino, www.ilnegoziodellamammadicle.com
Marte Savona, Savona, www.martesavona.it
Pezze E Colori, Lissone, www.pezzeecolori.it/
Piccole Passioni, Siena, www.piccolepassioni.it
Piccole Passioni, Siena, www.piccolepassioni.it
Japan
La Wadao, Odawara, Kanagawa, www.lawadao.com
Tiny Dots, Funabashi-shi, Chiba www.tinydots.shop-pro.jp
Netherlands
De Hobbystudio, Genemuiden, www.dehobbystudio.nl/
Doe@ding,Spijkenisse doeading.nl/
Hobbycompleet de Duif, Leeuwarden www.hobbycompleet.nl
Stampingcorner, Capelle Aan Den Ijssel www.stampingcorner.nl
Norway
Hobbygarasjen, Kopervik, www.Hobbygarasjen.no
Spain
Cien por Cien Manualidades, Barcelona, www.100x100manualidades.es
Ideas 10 Manualidades Y Scrapbook, Bilbao ideas10manualidades.com/
Marakiscrap, Tarragona, www.marakiscrap.com
Scrap & Papers Experiences, Barcelona, www.scrappapersexperiences.com
The Paradise Corner, Barcelona, www.theparadisecorner.com
Sweden
Butik Elva, Staffanstorp, www.butikelva.se
Taiwan
Mandy's Cards, Taipei www.facebook.com/mandy.card.77
United Kingdom
Amelia's Creative Crafts, Studley, Warwickshire www.ameliascreativecrafts.co.uk
Art from the Heart, Harrogate, Yorkshire www.afth.co.uk
Crafts at The Malthouse, Herstmonceux, East Sussex, www.themalthouse.co.uk/
Fave Rave, Stourbridge, West Midlands www.shabbychicstencils.co.uk
Loobi Crafts, Leighton Buzzard, Bedfordshire, www.loobicrafts.co.uk
Papermaze, Ipswich, Suffolk www.papermaze.co.uk/
Stampers Grove, Springbank, Lilliesleaf, Melrose,Scotland www.stampersgrove.co.uk
The Artistic Stamper Craft Store, Faversham, Kent www.theartisticstamper.com
The Forget me not Kraft Kabin, Rochford, Essex, www.TheForgetMeNotKraftKabin.co.uk
USA
Artistic Artifacts, Alexandria, VA www.artisticartifacts.com/
Artistic Studio Creations, Fayetteville, Georgia www.facebook.com/ASCbyCrystal
Craftiness, Chatsworth, CA, www.craftinessonline.com/
Ephemera Paducah, Paducah, Kentucky www.ephemerapaducah.com
Everything Scrapbook & Stamps, Lake Worth, Florida https://everythingmixedmedia.com/
Frantic Stamper, Oregon www.franticstamper.com
Free Heart LLC, Denver, Colarado, www.freeheartllc.com/
Joggles, West Warwick, Rhode Island, www.joggles.com
PaperCraft Clubhouse, Westbrook, Connecticut, papercraftclubhouse.com/
Qingquing's Stamp Shop, Portland, Oregon
Runaway, Art & Craft Studio, NE Salem, Oregon www.runawayart.com/
Simon Says Stamp, Columbus, Ohio www. simonsaysstamp.com
Topflight Stamps, Irmo, South Carolina topflightstamps.com/
Our brand is only available from established stockists who are VAT/ GST/ sales tax registered and for whom product education is a core principle. We would rather supply a few hand selected stockists, than the greater masses. If you would like to apply to be a stockist, you can find our more about our supply criteria here.
PaperArtsy Links
Facebook Group PaperArtsy People
Facebook Page PaperArtsy
Twitter twitter.com/paperartsy
Instagram instagram.com/paperartsy
Pinterest uk.pinterest.com/paperartsyhq
YouTube youtube.com/user/PaperArtsy


4 comments:
Love it! - Congratulations Raquel!
Congratulations Raquel. They are gorgeous
Thank you!
Congratulations Raquel! New releases are absolutely beautiful, love them. xx
Post a Comment