
Eclectica³ Kay Carley Collection
September 2021 New Product Announcement
September 2021 New Product Announcement

A note from Leandra:
I
think this is Kay's best Christmas release ever! I love all the fun you
can have with the elements. Of course they also work with what she has
done in previous years, or you could invest in one of these new stamp-stencil combos and do so many variations within that too! Those stencils are the icing
(or Christmas frosting on top!) helping you add colour, add layers
...check out how the trees fit within a bauble 'shadow' ...As ever with
Kay, there is lots to explore here so buckle up and look closely at the
creative options!
Don't
forget Kay will be along to share with you LIVE her new products and
ideas over in our Facebook Group, PaperArtsy People shortly after this
post publishes. I hope you can drop by for the live, or try to catch the
replay. It's super lovely to see the designer and hear direct about the
new release and understand first hand the possibilities!!
For
the next 4 months, these stamps are only available EXCLUSIVELY from our
approved stockists. Please check the list at the foot of this post to
find a retailer online or geographically near you, it makes sense to
order within your country wherever possible for both speed and to save
on postage costs.
Hi everyone, Kay here
I'm super excited to share with you my newest release for PaperArtsy consisting of 4 stamps and coordinating stencils.
I'm super excited to share with you my newest release for PaperArtsy consisting of 4 stamps and coordinating stencils.
These
designs are my Christmas release for this year and each set is quite
different - there is a complete wreath as well as elements to make your
own wreath, stylised holly trees, a BIG bauble and lastly some
snowdrops. Each of these stamp sets has been designed to give maximum
versatility and of course my collection wouldn't be complete without
some matching stencils! I will explain a bit more about them as we go
along so off we go...
New Stamps
Price: RRP €21.92 +VAT
Size:5" x 6" (13 x16.5cm)
All stamps are individually trimmed onto cling foam, presented in a clear hanging bag
with a laminated storage/index sheet.
Size:5" x 6" (13 x16.5cm)
All stamps are individually trimmed onto cling foam, presented in a clear hanging bag
with a laminated storage/index sheet.
Eclectica³ Kay Carley Set 50 (EKC50)

The
idea behind this stamp set was to be able to make Christmas cards
quickly and easily hence a 'complete wreath'.... this can be inked up,
stamped out and coloured quickly (thanks to the matching stencil which
we will look at later. I also incorporated a selection of Christmas
wording sized to fit within the wreath and then I added smaller
individual stamps to enable you to create any size of wreath you want.

For this sample I kept the background very simple and added my pop of colour just to the flowers and holly.

You
can see that I kept the flower and holly shapes quite simple to make
them easy to cut out and position onto the wreath to add dimension. This
could be layered up further too for anyone who enjoys decoupage.

Eclectica³ Kay Carley Set 51 (EKC51)

With
this stamp set we have two sizes of holly trees - both of which are a
good size to be used as 'stand alone' stamps but they have been sized so
that they will look good when used together as well.

Quick
'clean and simple' Christmas cards are a breeze with this set but for
anyone who likes decoupage they would look AMAZING layered up!

Once again these trees can be painted quickly and easily thanks to the matching stencil ;)

Eclectica³ Kay Carley Set 52 (EKC52)

Now
we are onto my BIG bauble stamp set.... I had in mind that it would
practically fill a 6"x 6" card with little effort although it will work
on other sizes of cards too as I didn't make it 'too big'! This was
purposely designed to be 'plain' so that it can then be decorated using
stamps, stencils patterned papers etc... thus making it really versatile
to have lots of different looking baubles!

As
a 'starting point' for the 'bauble decoration' I designed the trees and
the wording contained on this sheet to fit within the bauble but I am
sure you will already have lots of stamps that you can utilise and with
some simple masking you can use bigger stamps to decorate the bauble
too.

I
did include a hanging bough on this set for the bauble to dangle from
but for this sample I chose to keep the whole card quite minimalist and
just doodled in some lines and squiggles as well as the little
snowflake/asterisk things between the 'Season's Greetings' wording.

You
may be wondering why there are 'two little trees' on this set rather
than just 'one little tree'...originally I had planned for the three
trees contained on this set to be all 'one stamp' but there just wasn't
room to keep them together so when I decided to split them up I thought
it would be beneficial to keep all 'three trees' to make it easier to
line them up within the bauble. (I do this within a stamping platform
and test it out first on a Post-it Note positioned over the stamped
bauble. When I am happy with the positioning I remove the sticky note,
re-ink my stamp and stamp into the bauble.)

These trees were then embossed with WOW! Twinkling Lights embossing powder.

Eclectica³ Kay Carley 53 (EKC53)

This
is my final stamp set for this release. The three separate leaves have
been designed and sized to fit with both flower clumps. Although the
wording on this set is very much Christmas based the flowers themselves
would work really well for winter birthdays as well as for Christmas.

Yes......of course we have a matching stencil for this stamp set ;)!

You
can see how easy it is to stamp your own arrangement of snowdrops by
using those different elements contained on this stamp set.

New Stencils
Large Size: 6.25" x 9.5" (16 x 24cm) Price: RRP €6.28 +VAT
PaperArtsy Stencil 282 (PS282)

Here
is that matching stencil for the poinsettia/holly wreath. I have also
added the single poinsettia flowers to the stencil too. There isn't one
for the single holly stamp but you will find that you will be able to
pick and use one from the wreath itself :)

The trick to using this stencil is to use the bottom wreath first which corresponds with the poinsettias and holly berries and then use the top wreath for the holly leaves and poinsettia centres.

As
always I tend to use different shades of colour when applying the paint
through the stencil to give the imagery interest as you can see from
the stencil itself. The photo above shows how the images looked before
it was re-stamped.

The
stencil doesn't include imagery for the 'frond'y bits' so I tend to
either stamp the wreath in green and leave the 'fronds' unadulterated or
add colour to them using pencils or markers rather than paint.

PaperArtsy Stencil 283 (PS283)

Here
is the matching stencil for the two trees contained on EKC51. The
images in the bottom left and top left of the stencil correspond with
the smaller tree and the other two match the larger tree.

You can of course use the stencil without the matching stamps if you want to create some extra trees.

The
photo below shows how the large tree looked after I'd applied Frescos
through the stencil (before I re-stamped the image) so of course this is
a breeze to add shading to those holly branches and it looks good
without the detail of the stamp being re-stamped so the choice is yours
;)

I
tend to colour the berries and tree trunk as my first step and then
turn my attention to the star and holly branches but you could equally
do it the other way around too.

PaperArtsy Stencil 284 (PS284)

This
stencil was about trying to give you a few 'easy' options of decorating
the matching bauble stamp. The 'snowflake bauble mask' pops out of the
aperture (by cutting the little tags with scissors to release it) thus
giving you the aperture bauble too which is then used as your 'base
layer' to colour the whole bauble. Then you can simply add the mask back
into the aperture and stencil the snowflake to have a 'snowflake
bauble' or you can have a vertically striped bauble or add a different
colour top/base, or have a couple of horizontal stripes.... Lastly the
'triangles' match the stylised trees on the stamp set and can be used to
create a triangle background/shadow for the trees which of course also
fit into the bauble so there are a few options there to have a play
around with!

For this bauble I used the main bauble aperture and two of the other elements. These two elements were designed to fit perfectly around the wording contained on the stamp set.

I
used the 'stencil bauble aperture' first to colour my bauble with the
minty colour then I lined up the parts that correspond with the top and
bottom of the bauble and applied my red paint then the white stripes
were added by lining up the next element on top of the red parts. This
then creates the perfect space to stamp the wording into the middle part
of the bauble.

To
line up the wording perfectly I used the same 'Post-It Note' trick that
I employed when stamping the trees into my bauble (earlier in this
post).

Extra shading was used to give the bauble dimension using colouring pencils but you can do this with paint too.

PaperArtsy Stencil 285 (PS285)

It
took me a little while to come up with a concept that would work easily
for this matching combo. The images on the left of the stencil
correspond with the smaller snowdrop stamp and the images on the right
match the larger snowdrops but for both of these the stencil needs to be
moved around a little to colour the entire image.

The
background snowdrops were created here just by using the stencil on its
own and then I used the stencil again to colour my stamped snowdrops.

The
best way to create stencilled snowdrops (without using the stamp as a
guide) is to stencil the actual flowers first and then line up the stems
to the flowers. You will find with both lots of stems that one of the
stems is separate from the other two - this had to be done to keep the
stencil stable - so you will line up two of the flower stems and then
line up the remaining flower stem afterwards or vice versa.

Layering
the flowers up by using the stencil on it's own and then with the
corresponding stamp is a quick way of creating background and foreground
snowdrops. You can see how combining the stencil with the stamp
immediately stands out those foreground snowdrops.

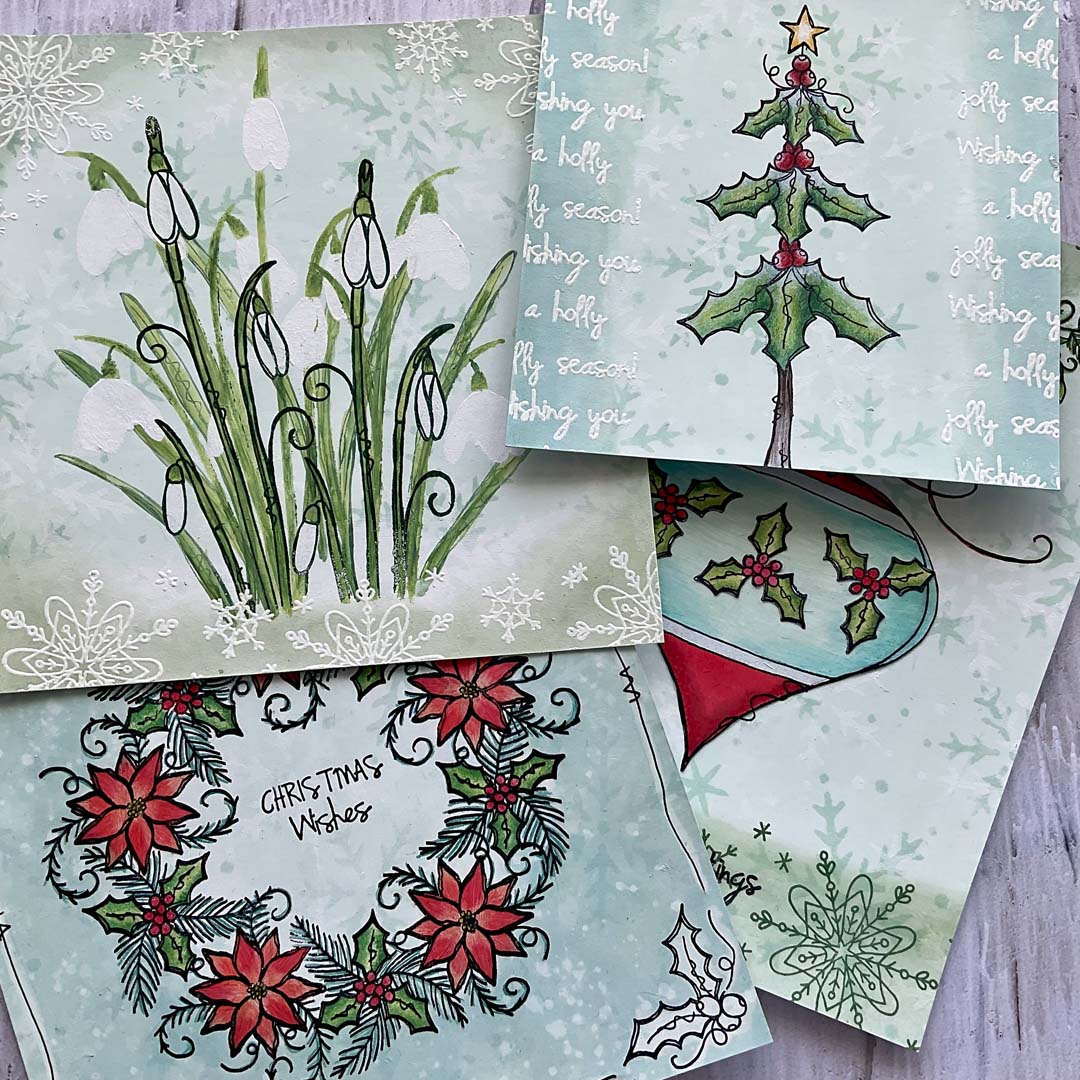
Project: Christmas Card Ideas

For my project I thought I would make a set of Christmas cards using the same backgrounds as a 'starting point'.

To create this background I used the snowflakes from one of my older stencils (PS118).
My
next step was to cut all the panels to my desired card size and then
decorate them using stamps and stencils from this entire collection.

For
the snowdrop panel I created a large group of snowflakes using both the
stamp set and stencil to do this. Then the snowflakes were stamped and
embossed before sponging Bundled Sage Distress Ink around the base and
top corners of the panel.

For
this smaller square panel I used the smaller tree contained on EKC51
which was coloured easily with Frescos thanks to the matching stencil.
The words were stamped and embossed and then Evergreen Bough and Bundled
Sage Distress Inks were used up the sides of the panel.

Once
again I used the stamp/stencil combo to create this relatively quick
card. The holly stamp used in the corners was taken from EKC51. Both
Evergreen Bough and Bundled Sage Distress Ink were sponged all around
the outside of the wreath then flicked with water to create the snow
effect. A damp paintbrush was used to remove colour from the holly and
squiggled, drawn lines.

With
this panel I began by using my bauble stamp/stencil combo but I also
took the holly stamp from the wreath stamp set (EKC50) to decorate my
bauble with and the snowflake stamp from the snowdrop stamp set (EKC53)
to frame the panel. Bundled Sage Distress Ink was used over the top of
the stamped snowflakes to further enhance the framing.

The
picture above shows the finished tree card - the words were taken from
the snowdrop stamp set (EKC53). Crystal glitter glue was added for
sparkle!

The
completed snowdrop card - crystal glitter glue was applied to the
stamped snowdrops and to the wording panel. These words are from the
snowdrop set.

You
can't really tell from this photo but the wreath has been given the
glitter treatment too as well as the doodled lines and holly corners.

Once again glitter glue was applied to the main imagery and the Season's Greetings wording was added to complete the card.
I
hope that these samples have given you a few ideas of what can be
achieved when using my latest products and that you will have as much
fun using them as I have done.
Love Kay x
Blog: Kays Crafty Corner
Facebook: Kay Carley
Blog: Kays Crafty Corner
Facebook: Kay Carley
Facebook Group: Crafting with Kay Carley
Twitter: @carleycards
Instagram: kay.carley
Pinterest: Kay Carley
Twitter: @carleycards
Instagram: kay.carley
Pinterest: Kay Carley
At this current time, all of my teaching is being done online. You can find details of all of my past and current online workshops over on my Crafting with Kay Carley Facebook Group.
PaperArtsy Stockist List
Our stockists are your go-to source for all PaperArtsy products, and we suggest that you also use the PaperArtsy People Facebook group to source a retailer in your country. Many are members of our FB group and will happily share links to their online stores.
Australia
Bev's Cross Crafts, Spreyton, Tasmania https://www.bevscrosscrafts.com.au/
Crafters Cupboard, Berwick, Victoria www.crafterscupboard.com.au
Memories on the Murray, Murray Bridge, SA https://www.memoriesonthemurray.net/
Natalie May Scrapbooking, Dover Gardens, SA https://nataliemay.com.au/
Scrapbook Superstore & More South Penrith, NSW https://www.scrapbooksuperstore.com.au/
The Scrapbooker's Confetti Box, Swansea,NSW https://thescrapbookersconfettibox.com/
The Thread Studio, 6 Smith Street, Perth http://www.thethreadstudio.com/
The Thread Studio, 6 Smith Street, Perth http://www.thethreadstudio.com/
The Scrapbook Store, North Perth,WA http://thescrapbookstore.com.au/
Time To Create, www.timetocreate.com.au
Time To Create, www.timetocreate.com.au
Belgium
Cart N Scrap Art, Antwerp, www.cartnscrapart.be
Créatelier Caracolle, Liège, www.createliercaracolle.be
Canada
Clipper Street Scrapbook Company, Langley, BC. www.clipperstreet.com
Paper Art Creations Inc, Leduc, Alberta, http://www.paperartcreations.com/
Scrapbook Centrale, Dollard Des Ormeaux, Quebec www.scrapbookcentrale.ca
Scrapbook Centrale, Dollard Des Ormeaux, Quebec www.scrapbookcentrale.ca
Scrap Addicts, Edmonton, Alberta https://www.scrapaddicts.ca/
Scrap and Bean, Edmonton, Alberta http://scrapandbean.com/
Scrapbooking Fairies, Drayton Valley, Alberta https://www.scrapbookingfairies.com/
The Paper & ink Boutique, Calgary, Alberta https://www.paperandinkboutique.com/
The Scrap Yard, Calgary, Alberta, https://www.thescrapyardcalgary.com/
The Scrap Yard, Calgary, Alberta, https://www.thescrapyardcalgary.com/
Denmark
Hobbyboden Scrapworld Samso www.hobbyboden.dk
France
Eirl Bancon Cartoscrap, Midi Pyrenees, www.cartoscrap.com
Fee Du Scrap, Saint Sébastien-Sur-Loire, https://www.feeduscrap.fr/
Horizon Créatif, Ste Jalle www.horizon-creatif.fr
Instant Créatif, La Possession, La Réunion, www.icreatif.re
Katzelkraft, Ingwiller http://www.katzelkraft.fr/en/
Kerudoc Creation, St Yvi www.kerudoccreation.com
Toutencolle, Dun sur Avon www.toutencolle.fr
Finland
Heidin Korttipaja, Istunmaki, www.korttipaja.fi/fi
Germany
Stempelbar, Berlin, www.stempelbar.de
Stempeloase Munich, Munich www.stempeloase.de
Stempelfee Shop, Hilden www.stempelfee-shop.de
Stempellaedle, Stuttgart, www.stempellaedle.de/shop
Greece
Scraps N Pieces, Kallithea www.scrapsnpieces.gr
Italy
Immagine SAS di Rapaccini, Rome, www.immaginelab.com
Il Negozio Della Mamma Di Cle, Torino, www.ilnegoziodellamammadicle.com
Marte Savona, Savona, www.martesavona.it
Pezze E Colori, Lissone, http://www.pezzeecolori.it/
Piccole Passioni, Siena, www.piccolepassioni.it
Piccole Passioni, Siena, www.piccolepassioni.it
Japan
La Wadao, Odawara, Kanagawa, www.lawadao.com
Tiny Dots, Funabashi-shi, Chiba www.tinydots.shop-pro.jp
Netherlands
Doe@ding,Spijkenisse https://doeading.nl/
Hobbycompleet de Duif, Leeuwarden www.hobbycompleet.nl
Stampingcorner, Capelle Aan Den Ijssel www.stampingcorner.nl
Norway
Hobbygarasjen, Kopervik, www.Hobbygarasjen.no
Spain
Cien por Cien Manualidades, S.L., Bizkaia, Catalunya, www.100x100manualidades.es
Ideas 10 Manualidades Y Scrapbook, Bilbao https://ideas10manualidades.com/
Marakiscrap, Tarragona, www.marakiscrap.com
Scrap & Papers Experiences, Barcelona, www.scrappapersexperiences.com
The Paradise Corner, Barcelona, www.theparadisecorner.com
Taiwan
Mandy's Cards, Taipei https://www.facebook.com/mandy.card.77
United Kingdom
Amelia's Creative Crafts, Studley, Warwickshire www.ameliascreativecrafts.co.uk
Art from the Heart, Harrogate, Yorkshire www.afth.co.uk
Blade Rubber Stamps, London www.bladerubberstamps.co.uk
Crafts at The Malthouse, Herstmonceux, East Sussex, http://www.themalthouse.co.uk/
Fave Rave, Stourbridge, West Midlands www.shabbychicstencils.co.uk
Loobi Crafts, Leighton Buzzard, Bedfordshire, www.loobicrafts.co.uk
Papermaze, Ipswich, Suffolk https://www.papermaze.co.uk/
Stampers Grove, Springbank, Lilliesleaf, Melrose,Scotland www.stampersgrove.co.uk
That's Crafty, Romford, essex www.thatscrafty.co.uk
That's Crafty, Romford, essex www.thatscrafty.co.uk
The Artistic Stamper Craft Store, Faversham, Kent www.theartisticstamper.com
The Forget me not Kraft Kabin www.TheForgetMeNotKraftKabin.co.uk
USA
Artistic Artifacts, Alexandria, VA https://www.artisticartifacts.com/
Artistic Studio Creations, Fayetteville, Georgia www.facebook.com/ASCbyCrystal
Craftiness, Chatsworth, CA, https://www.craftinessonline.com/
Ephemera Paducah, Paducah, Kentucky www.ephemerapaducah.com
Everything Scrapbook & Stamps, Lake Worth, Florida www.everythingscrapbook.com
Frantic Stamper, Oregon www.franticstamper.com
Free Heart LLC, Denver, Colarado, http://www.freeheartllc.com/
Joggles, West Warwick, Rhode Island, www.joggles.com
PaperCraft Clubhouse, Westbrook, Connecticut, http://papercraftclubhouse.com/
Qingquing's Stamp Shop, Portland, Oregon
Runaway, Art & Craft Studio, NE Salem, Oregon http://www.runawayart.com/
Simon Says Stamp, Columbus, Ohio www. simonsaysstamp.com
The Ink Pad, New York, www.theinkpadnyc.com
Topflight Stamps, Irmo, South Carolina https://topflightstamps.com/
Our
brand is only available from established stockists who are VAT/ GST/
sales tax registered and for whom product education is a core principle.
We would rather supply a few hand selected stockists, than the greater
masses. If you would like to apply to be a stockist, you can find our
more about our supply criteria here.
Please note we are not accepting new stockists until we are relocated
into our new building here in France. Covid restrictions have slowed our
progress somewhat, so we hope to be in by the latter part of 2021.
PaperArtsy Links
Facebook Group PaperArtsy People
Facebook Page PaperArtsy
Twitter twitter.com/paperartsy
Instagram instagram.com/paperartsy
Pinterest uk.pinterest.com/paperartsyhq
YouTube youtube.com/user/PaperArtsy


4 comments:
Congratulations Kay on a wonderful festive collection of stamps and coordinating stencils. Loving the samples.
great release - I love the snowdrops!
Such wonderful samples as ever Kay!! Another wonderful Christmas release, this is going to be perfect with prior releases too!
These are all so gorgeous Kay! I love the aqua and lipstick red color combo for Christmas too! Such inspiring stamps and samples, thank you! xx, Autumn
Post a Comment