2021 Topic 11: Twinkle Twinkle
Sparkly
meets twinkly today with Kay waving her magic over some painted and
stencilled panels. It's easy to forget about humble products- but the
embossing ink pen has been used to such great effect. With her signature
touch of sparkle, Kay has brought tone-on-tone cards to life.
~ Keren.
Hi everyone, it's Kay with you today, and I'm here to share with you a set of Christmas cards using stamps from (EKC23).
I
love to use white embossing when making Christmas cards especially if
there are snowflakes involved. The layers involved to create these cards
are very simple but a few finishing touches make all the difference to
the final result!...
To
begin I cut up some Smoothy card into the size of panels that I wanted
my finished cards to be (or you could create a 'masterboard' and cut
into panels afterwards). I then painted each of the panels using Fresco
Chalk Acrylic (Caribbean Sea) with a thin layer of (Mermaid) over the top. I use a sponge wedge to apply my paint as I find it easier to really pull that paint out.
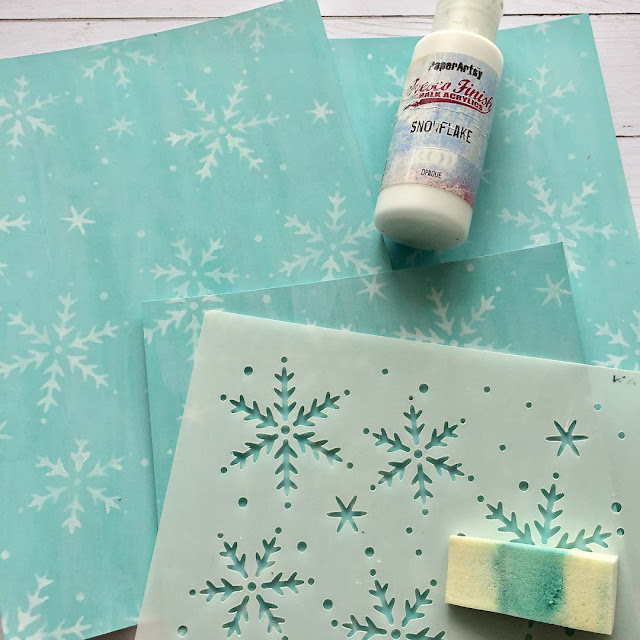
My next step was to begin adding some interest to my panels by stencilling snowflakes from my stencil (PS118) using Fresco Chalk Acrylic in (Snowflake).
I
didn't want the stencilled snowflakes to be really defined so I used
the square end of my sponge wedge to sponge Fresco Chalk Acrylic (Snowflake)
through, picking up just small amounts of paint each time and tapping
off the excess paint before applying it through the stencil.
With
my white snowflakes I simply moved the stencil and repeated the
snowflakes in the pattern of the stencil but for my next layer of
snowflakes I used a different stencil (PS119)
which has more 'open style' snowflakes and stencilled each of them
separately, choosing which size of snowflake I wanted where.
These
'positioned' snowflakes were softly stencilled using a stencil brush
(this time) to give me more control of the precision stencilling.
You can see how even though I mainly positioned my second layer of Fresco Chalk Acrylic (Forest)
snowflakes into the gaps from the first layer, I still overlapped those
white snowflakes here and there to give some depth to the background. I
purposely kept the snowflakes soft and 'patchy' looking so that they
wouldn't 'overtake' my main imagery. This is achieved by only picking up
small amounts of paint and really working it into the brush before
applying it through the stencil.
(Firstly
sorry about the fact that these next few pictures make the panels look
as if I've used blue paint...I haven't......it is still the same
background colours as before.....not sure why these photographed
differently!) My next step was to decide what sort of layout and design I
wanted to create for each of the panels, so I spent a little bit of
time seeing what layout I thought would suit each panel. Once I'd
decided on the layouts it was then a simple matter of stamping and
embossing my imagery into place using a clear embossing inkpad and WOW!
Sparkling Snow Embossing Glitter.
Next I used a clear embossing pen to add embossed hanging chains for some of the snowflakes to dangle from.
The
'chains' were embossed using the same WOW! Sparkling Snow embossing
glitter. (Before I embarked on all of my embossing I dusted each of the
panels first using an anti-static bag.)
After
stamping and embossing all my imagery it was then a matter of deciding
how to colour them. For me, the easiest and quickest way of achieving
this was by using some dye based pens so I reached for my Distress
markers.
The
colours of markers I chose to use were Broken China, Peacock Feathers
and Pine Needles to keep the whole look of these cards 'tone-on-tone'.
As
well as colouring some of the snowflakes etc. I used the lightest
marker (Broken China) to outline some of the bigger imagery such as the
large snowflakes above. This is relatively quick to do and it makes a
world of difference to your white embossed imagery standing out from the
background.
Once
all my colouring was finished I added a lot more 'twinkle' to the
panels by adding Crystal glitter glue into some of the imagery!
If
you are short on time and don't want to outline the main imagery simply
choose a different colour of embossing powder.....a gold twinkly
embossing powder with this colour scheme looks fabulous and doesn't
require any 'outlining'.
Another option if you are short on time is to omit the stencilling and go with a stamped background instead.
At
this current time, all of my teaching is being done online. You can
find details of all of my past and current online workshops over on my Crafting with Kay Carley Facebook Group.


No comments:
Post a Comment