2021 Topic 6: Mandala Mix
Jo
has given us a window into exactly how to create your own step by step
mandalas . She's created some mesmerising ones with the smallest of
stamped images and some easy geometry. With 3 projects including some
kraft based ones, you'll be amazed at how much dimension she's created
with pencil and pens.
~ Keren
~ Keren
Hi everyone, it's Jo with you today, to share with you some mandalas I've created using JOFY stamps. I enjoyed creating these projects so much!!
I looked through my back catalogue of designs and picked out a few of the smaller designs. I wanted my mandalas to be one layer of stamping (not dimensional), detailed (almost dainty), with bits and pieces that could be coloured in.
Its nice to use these little stamps as 'features' rather than incidentals - bringing them to centre stage.
What
I learned from making these mandalas is that they really are very
relaxing and slightly addictive! Once I'd made one I wanted to make
another, and another... and maybe... oh, go on then... just one more...
(for now).
Project 1
When I started this mandala I just started...with no plan; I was just seeing what happened with the stamps I'd selected.
Oh my goodness! Creating mandalas like this is a little bit addictive!
Oh my goodness! Creating mandalas like this is a little bit addictive!
It was a bit of a 'lightbulb' moment.
So many designs and variations can be created using a limited amount of stamps. The possibilities seem endless! This mandala and the one in the following project (created on kraft cardstock) were created using the same stamps (with a couple of substitutions). It was interesting to see how different they were.
So many designs and variations can be created using a limited amount of stamps. The possibilities seem endless! This mandala and the one in the following project (created on kraft cardstock) were created using the same stamps (with a couple of substitutions). It was interesting to see how different they were.
The stamps sets I used were JOFY14 (3 spots), JOFY15 (leaves, and fuzzbuds cluster) and 3 minis: JM58, JM63 and JM64.
I
really like having the open space in this mandala - I think it makes
the pattern pop and allows you to see the pattern design. I toyed with
the idea of having more colour in the background but decided against it -
I'll save that idea for another mandala.
The
first and second mandalas in the blog post were created on 12x12
substrates and coloured with Faber Castell Polychromos pencils. It
really is very calming and almost meditative to work on these. It
really appeals to me; you get into a rhythm when stamping the images:
ink-up stamp, stamp image, rotate page, ink-up stamp, stamp image,
rotate page and
repeat until 360 degrees of the design is completed. Seeing all the
different stamps start working with each other and building to the
finished design...its like magic, the pattern just appears and grows!
Project 2
There
is something striking about black and white patterns on kraft cardstock
that really appeals to me. Its one of my favourite substrates to
create with.
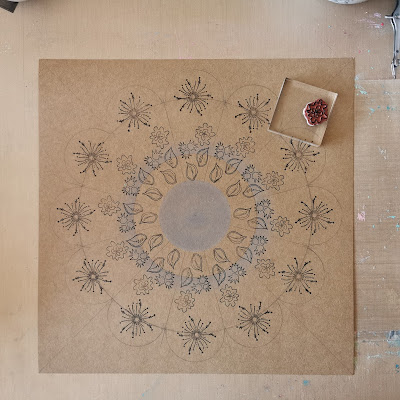
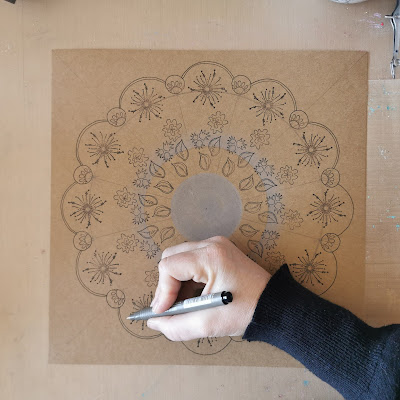
I used the same stamps on this design as on the first mandala - with the addition of 1 stamp from JOFY71 (flower centre) & JOFY98 (shown in next project) but instead of the designs flowing around the circle they flow from the centre outwards.
I used the same stamps on this design as on the first mandala - with the addition of 1 stamp from JOFY71 (flower centre) & JOFY98 (shown in next project) but instead of the designs flowing around the circle they flow from the centre outwards.
I really like the initial laying out of the mandala - the geometry element - even as a child I liked drawing with a compass.
I
drew out the basic lines I planned to work on and use as guides, and
added colour to one of the rings - planning on keeping to quite a
simple, but striking colour scheme - black, white and grey.
Here are the steps, adding one stamp at a time starting with the biggest design...
Once the main stamping was complete it was fun to start adding bits of doodling and colour around the mandala.
I
added gems and stickles for final details. I thought about adding more
doodled details to the stamped designs but decided against - but tucked
the idea away to use on future mandalas.
Project 3
This
mandala was created using more geometric stamp designs - the 'squashed
diamonds' from JOFY98 and to soften the design and echo the circle of
the mandala I selected a flower centre from JOFY71.
As I mentioned at the beginning of this blog post creating stamped mandalas is slightly addictive - consider yourselves warned, lol.
Hopefully I've inspired you to give mandalas a try yourselves!
Hopefully I've inspired you to give mandalas a try yourselves!
Why not challenge yourself to see how many mandala designs you can build from one group of stamps!
I hope my mandalas have inspired you - I'd love to see what you create!
Take care,
Jo.
Blog: www.jofy.co.uk
Facebook: https://www.facebook.com/JoFY.JoFirthYoung & JoFY Jamboree!! group
Twitter: @jofyjo
Instagram: @jofyjo
Pinterest: @jofyjo
Blog: www.jofy.co.uk
Facebook: https://www.facebook.com/JoFY.JoFirthYoung & JoFY Jamboree!! group
Twitter: @jofyjo
Instagram: @jofyjo
Pinterest: @jofyjo


10 comments:
Stunning, Jo!!
Thanks Helen
Love how these have come together. Can see the addictive pull for sure!!
They are amazing,how big were the circles you drew with the compass, have loads of your stamps so can’t wait to have a go
What a wonderful post Jo! Will definitely be giving this a go with some of your stamps ~ Stef
Wonderful blog post. Sounds like you had lots of fun with this. The step by step instructions I'm sure will encourage some to give it a go too!
Fantastic results, love the tutorial photos and instructions, lovely!
Beautiful Mandalas Jo!! lovely creation with your fabulous stamp images. xx
WOW, these are amazing! love how you used older stamps from your stash. Beautiful!!
I certainly don't have this kind of patience, but wow Jo! You achieved mastery with your engineering spirit and artist's hand. Brilliant inspiration! Hugs, Autumn
Post a Comment