
2019 Topic 18: Shaving Foam

For
our first foray into marbling with shaving foam, Dounia has thrown
herself into experimenting with Infusions and created some amazing
marbled effects with superb stitching too.
Hello everybody, it's Dounia from
France with you today, sharing my experiments with shaving foam and
Infusions.
I love paper marbling and with shaving
foam in particular; a relatively new technique for an ancestral art. I have
seen it done with paint and all sorts of inks and wondered if I could
make it work with Infusions. They are inks after all ! Here are my findings...

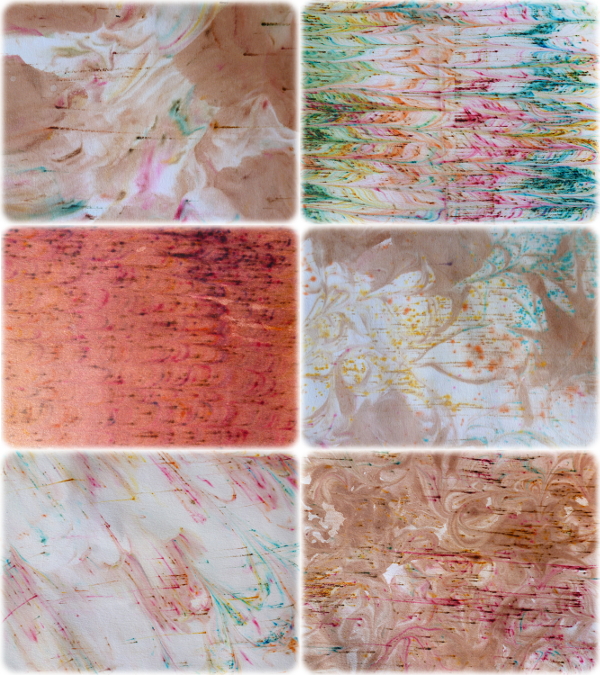
The technique is quite similar to marbling with other media and starts with a nice layer of foam in a plastic tray. I
then sprinkled a selection of Infusions on the foam.

During my
experiments I learnt that the different colours do not react at the same speed
or with the same vibrancy. As I wanted pretty bold colours, I worked
with Are You Cerise, Orange County, Golden Sands, Emerald Isle and A Bit Jaded.

As the Infusions are activated by water, I sprayed some on the foam with a fine mister. I then used a ruler to spread the colours. Each clump of powder makes a line, creating the perfect base to add a design with a stick. I often prefer classical marbling patterns and do a lot of feathers or non pareil but more spontaneous and random patterns also work well.

The amount of water you add impacts the pattern. More water creates diffusion and therefore less defined lines. The Infusions
contain both powdered colours, (which react first) and walnut stain
(which is slower to develop), so the more water you add and the more you
work the foam, the more prominent the brown walnut stain will be.


As the Infusions are activated by water, I sprayed some on the foam with a fine mister. I then used a ruler to spread the colours. Each clump of powder makes a line, creating the perfect base to add a design with a stick. I often prefer classical marbling patterns and do a lot of feathers or non pareil but more spontaneous and random patterns also work well.

Once
happy with the pattern, I carefully placed the paper on the foam and
"massaged" it to ensure contact. I then lifted it off the foam and
carefully scraped it off. This reveals the pattern but also drags the
undissolved Infusions, creating extra lines.
 Most
of the left over colour accumulates on the end of the squidgy so you
need to clean it well and frequently or it will leave marks like here
where I stopped in the middle to take the picture!
Most
of the left over colour accumulates on the end of the squidgy so you
need to clean it well and frequently or it will leave marks like here
where I stopped in the middle to take the picture!
I like to reuse the foam again and again. With the walnut stain of the Infusions, it gradually turns a lovely brown shade that can be used to contrast with the white of new foam, as seen in some of these examples.
My next idea was to add stamping to the marbling. I had my heart set on this great plate by Courtney Franich, ECF06, as I like somewhat strange and abstract images and I thought the thin and detailed stamps would contrast nicely with the marbling patterns.

I thought the stamps would not really be visible over the marbling however so I made masks in the shape of
the leaves and placed then between the foam and the final paper.

The indents left in the foam are really fun, but you cannot really keep them that white because of the dragging effect of the Infusions.

The
white spaces left are enough to make the stamping pop whilst looking
integrated. The stamping would have been a lot easier with a stamping
platform though!

I
was hesitating between black and brown ink for the stamps and tried a
combo here but finally settled on brown as I though the back was too
harsh.


One book uses the masked and stamped leaves paper. I really like how the marbling and stamping work together.

For
the other book, I used a more randomly patterned paper where I used the
brown "recycled" foam. To make the brown spots more interesting, I
added the "bubbles" stamp from ECF06.

As they are also papered inside, these books were a good way to put a dent into my marbled papers pile!

I also have all the masking leaves, now marbled, that I have to find a use for!

Paper
marbling using shaving foam is a fun and engaging craft and doing it
with Infusions creates unique looks easily. Here I used only Infusions
but I'm sure they can be mixed with paints or other inks for even more
variations and textures for all type of uses. I hope you give it a try!
Stay creative!
Dounia


8 comments:
This is gorgeous Dounia. Love it!
That is quite extraordinary and incredible, Douania, well done!
Lucy x
Fantastic ! Love it !
Corrie x
Beautiful these book covering Dounia, great technique and lovely resulted. xx
Beautiful effects!
Loved reading about your infusions/ Shaving foam findings and viewing the results . Adore the books you have created. Super Creativity . x
What an exciting technique, love the thread work on the book too!
Wonderful post Dounia and your use of the colours is so elegant, I love the feathering effect particularly!
Post a Comment