2018 Topic 12: Transfers
Helen
kicks off this new topic with a product that allows you to easily
transfer onto pretty much any non-porous surface. Watch her put it
through the paces to see how it stacks up!
~ Leandra
Hi everyone, it's Helen with you today, and I'd like to share with you a project using the Pentart Express Transfer Solution.
I never used to bother with transferring images (seemed too much of a
faff) until I found this stuff which produces almost instant results.
You can print out any image on a laser printer and transfer it to all
sorts of surfaces. Don't worry if you don't have a laser printer at
home, just print off on your Inkjet and then photocopy the images on a
commercial photocopier - at a printers or the library - as these tend to
use laser technology.
As you can see from the following photos, I've tried it out on tons of different surfaces - the only criteria is that it must be porous, so no glass, metal or glossy card. It also doesn't seem to like gesso or paint very much - don't know if it's something to do with the oil in the solution.
As you can see from the following photos, I've tried it out on tons of different surfaces - the only criteria is that it must be porous, so no glass, metal or glossy card. It also doesn't seem to like gesso or paint very much - don't know if it's something to do with the oil in the solution.
I've made a book of tags showing different transfers, including ones that didn't work so well, and then written notes on the back.
The stamps and stencils I used on some of them were by Scrapcosy and JOFY.
Eclectica³ Scrapcosy Set 03 (ESC03)
PaperArtsy Stencil {JoFY} 086 (PS086)
Print out the image and roughly cut out leaving space around it.
Flip over and stick to card. Worth remembering that the image will be reversed, so reverse all text before printing out.
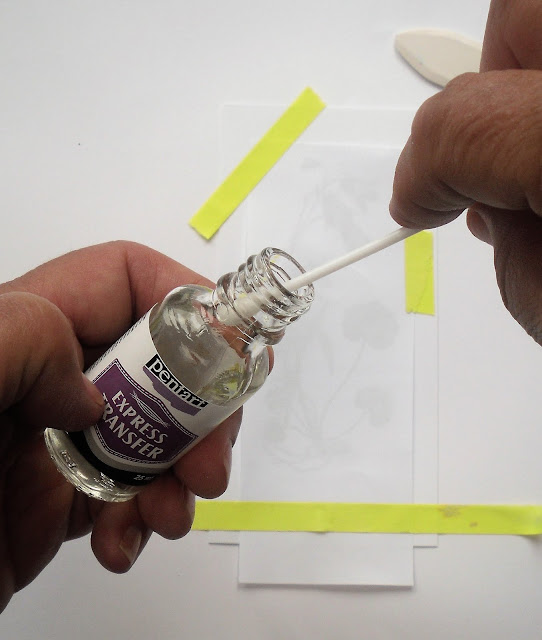
Dip cotton bud in solution,
blot off excess,
rub over back of image,
and burnish fairly hard with a bone folder.
Pull up edge to see if it's working.
And hey presto, there you go! Told you it was quick! You get quite a vintage effect.
Here are some other surfaces. Love the way the beehive seems to take on the stamped background.
You
can transfer images one on top of the other and over various
backgrounds. I had trouble with the paint background though - it slipped
and slided. Not sure if the oil in the solution reacted with the paint.
Was
amazed at the clearness of the transfer on wood. The bisque, canvas and
fabric were all more subdued but the those surfaces have more texture.
Here are some of the pages from my book. These both have stamped backgrounds but the one on the right is much softer.
These
are all done on patterned paper but with very different types of
images. Don't forget you can colour in the transferred image as with
the lightbulb.
Here I've used colored card - Oxides on Kraft. I chose a black outline image so it would show up.
The strong backgrounds here - Brushos and Infusions - also needed strong black images or they'd be lost.
See
what I mean about losing the image? The lily on the right is not quite
dark enough. The middle flowers were fairly pale as well.
One
of the main things I learnt with this technique is that you need to
choose your images carefully. If the colours are too light they won't
show up over a background. Also you start to notice that some images
have black outlines which also helps.
I use The Graphics Fairy as my image source (wonderful site) and then edit them in PicMonkey.
For
me the whole point of image transfer is so that you can transfer onto
surfaces that you can't directly print onto and this Express Solution
certainly enables that and is both quick and easy to use. Also imagine
being able to add any text you like in whatever font you like without
having to have the right stamps.
I love being able to incorporate transferred images into stamping, adding another layer to your mixed media projects. I hope you feel inspired to have a go.
To join our challenge and win a new Zinski apron:
Simply make
something arty relevant to the topic, and link your creation from any
social URL (eg. Instagram, Pinterest, Blog Post etc) sharing your
original make to this challenge page.
The current topic link Topic 12: Transfers will close 17:00 (London Time) Sunday, 22nd July 2018, and the winner will be announced 2 hours later at 19:00.
NB you have 3 weeks for this challenge due to New Products being announced
All links go in the draw to win a PaperArtsy creative apron. Please make sure we can contact you as a prize winner - it helps if you share your contact info from the platform you opt to use.
Good Luck! If you have any questions, don't hesitate to ask!


8 comments:
what a great experiment, Helen!
Stunning project to start the topic - I love your experiments Helen.
What a fantastic post, Helen I love all the examples and ideas you have given!
Lucy x
What a great product. Your results are incredible and so inspiring. Hugs, Autumn
Love all your samples Helen and the tag book is beautiful! x
Wow! these are great technique and beautiful results Helen. xx
This is great technique and beautiful results Helen. xx
Does it have to be a laser printer is there any way I can just use my regular printer and this would still work
Post a Comment