
2015 Theme 10: Bottles
Hi everyone Lauren here, joining you this evening with a post about faux glass painting and embossing on glass. We have all seen how Fresco Paints can be used to create a gorgeous opaque finish on glass with amazing results and I wanted to show you that you can easily achieve a beautiful translucent finish too. I love this technique; it's much easier than it looks and it's a great way to re-purpose items for the home or make a special gift for someone. With summer just around the corner, this project seemed just perfect.
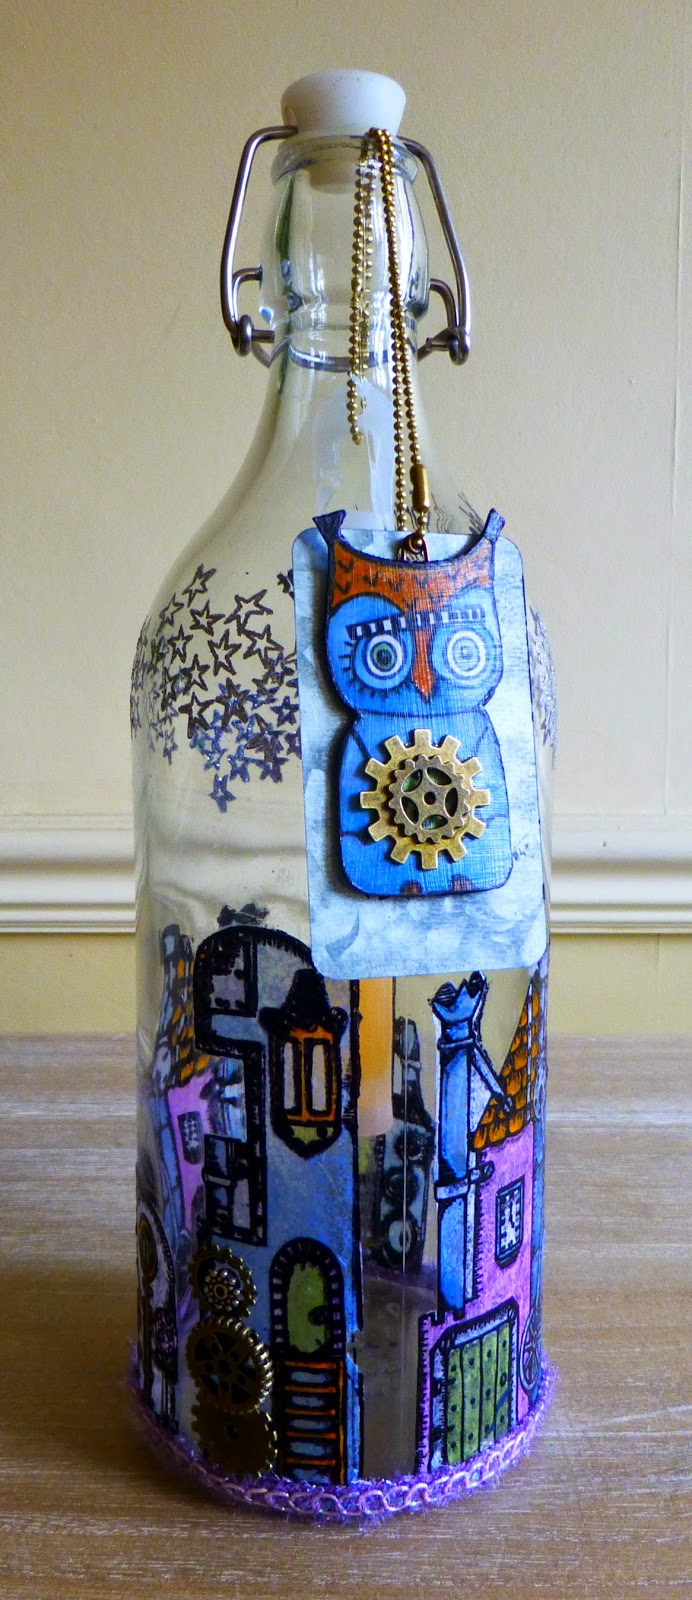
I wanted to use Darcy's fabulous EDY08 plate of stamps

and her recently released Owl Mini for my luminary. They stamp beautifully and are an absolute joy to colour. I love them.

The owl chipboard will act as an anchor for the light stick. This will help the light stick to hang midway in the bottle rather than just lie in the bottom and makes it much easier to retrieve it when you want to replace it.
I stamped and coloured the owl using Fresco paints in Inky Pool, Autumn Fire and Tinned Peas before sticking him to a couple of layers of heavyweight card. Once dry, I cut out the "owl sandwich" and coated everything with a layer of Outdoor Mod Podge being careful to seal the edges. I've added a metal tag and some cogs for extra weight.

Just a quick word about light sticks if you've never come across them. You can get them in all kinds of shapes, sizes and colours. I buy mine in bulk from Amazon or ebay, whichever works out the most cost effective at the time. They last all night and will still be glowing faintly in the morning. To light them, you just bend them in the middle until the little capsule inside snaps and the chemicals mix. Give them a shake and they will glow fairly strongly for about eight to twelve hours. They don't get hot and they don't blow out so they're perfect for the garden PLUS it means people can handle your makes without burning themselves. The one I've shown here will fit inside a standard wine bottle.

Now for the fun bit! There's no need to worry about embossing on glass. Your only MUST HAVE item is an anti-static pad which you want to pounce on the bottle rather than swiping it so you've got a liberal dusting. If you skip this stage all your embossing powder will stick to the glass and you'll be brushing it off for hours. I like to steady the bottle between two acrylic blocks to stop it moving about while I'm stamping. {Tip: if you don't have an anti-static bag, you can use talc as an alternative to the chalk-filled anti static bag}

As it's a curved surface you'll need to hold the stamps in your hand rather than mounting them on an acrylic block but you can see they stamp nice and cleanly.

It's a good idea to stamp and emboss as you go as you're less likely to smudge anything, but do remember that the glass gets pretty HOT. I thoroughly recommend you use goggles and something heatproof like leather gardening gloves if you have them, just to be on the safe side (just call me Mrs Health and Safety :oD). You can see on the picture below that the stars have embossed beautifully. Wait a little while before you polish the bottle as the embossing will smudge if you do it while it's still warm.

I embossed the writing and the stars directly onto the bottle as they will not be coloured in. I used a black Archival ink with black embossing powder for the writing and a sparkly silver embossing powder for the stars. I tend to use WOW embossing powder but any brand will do the job.

For the coloured images I stamped the outline onto tissue paper, embossed with clear or black embossing powder and then coloured the tissue paper using Fresco Finish Chalk Acrylics in Inky Pool, Autumn Fire, Tinned Peas and Orchid, watering them down to a slightly thinner consistency. I dried the tissue with my heat gun after each new addition of colour just to keep the tissue as dry as possible. You can use whichever colouring medium you like as long as you don't get the tissue paper too wet.

When you've coloured your images and cut them out (keeping as close to the embossed line as you can) you need to glue them to the bottle. Again, I used Outdoor Mod Podge. It's much easier if you paint the sealant onto the bottle and then apply the the dry tissue paper over the top, smoothing gently as you go. Clean carefully around the outside of the images with a damp cloth to remove any remaining sealant and then leave to dry thoroughly.

Here is how the bottle looks with all the embossing and colouring done. All you need to do then is seal the images to keep them weatherproof. Once again, I used Outdoor Mod Podge for a good weatherproof seal. You get a nice glazed finish which makes the images look like they're painted directly on the bottle. If you compare this picture with the one below, the images are wet where I've just sealed them but you can see that once they were dry the colour has gone translucent and is nice and strong, just like glass painting.

And finally, here is a picture of the lit bottle hanging in my olive tree in the garden. I think I need to make more...

So, there you have it, a quick and easy way to transform a plain glass bottle into a pretty lantern for your house or garden without any fuss. These are a lovely way to light a pathway for a party, barbecue or wedding and a great way to decorate storage bottles as you can still see what's inside. When you want to change it (or, heaven forfend, IF you should make a mistake!?) you just scrub it all off with plenty of washing up liquid and a scouring pad and you're good to go again. Why stop at bottles? You can decorate vases, jars, windows, picture frames. The possibilities are endless. Easy and, pretty much stress free fun. Just enjoy.
Wow, Lauren! Thankyou for such a brilliant project. I have never used these light sticks before so seeing them used like this is so inspiring. You have totally transformed this bottle, it truly does look like glass painting. (something I always loved the look of but could never so well) Your embossing of the text and stars is brilliant, the whole thing is such a stunning effect, but I do love the stars best.
We would love you to join in with challenge #10: Bottles If you are inspired by any of our guests who blog with us over the fortnight, then please join in and link up your creativity HERE.
All links go in the draw to win a voucher to spend on products of your choice from the PaperArtsy online store. The Bottles link will close 17:00 (London Time) Sunday, June 7th, winner will be announced 2 hours later at 19:00.


18 comments:
Fantastic bottle, Lauren!! love the embossed stars and all the decorations
FAB project Lauren, thanks for the info regarding the glow sticks too
Kathyk
Wow! Lauren this is absolutely gorgeous! What a wonderful idea to use the light stick! Your photo of the lighted bottle is beautiful. The embossing and the coloured images are stunning! This is a project I shall look back at again and again! xxx
This is brilliant thanks for sharing it really looks like stained glass x
Think these turned out brilliantly, and they are perfect for this warmer summer BBQ weather too!! Evenings in the garden! Thanks Lauren! ~Leandra
Fab!
What a terrific project and some brilliant tips along the way!
Lucy x
awesome bottle - love this xx
Wonderful bottle Lauren and I just love pretty lit up bottles & jars hanging in the garden especially for summer bbqs so this is right up my street as a must try.
Hugs
Lesley Xx
This is absolutely brilliant Lauren, such a fabulous idea - thank you for sharing the process with us.
Pauline
x
Fabulous Project & Stunnig result !! Thank you Lauren for sharing. I have painted glass several times creatin Nightlight
Holders over the years, using Glass Paint & other Mediums to add Texture so I will look forwad to Stampin &Embossing my First Bottle Project very soon. I have a Sneaky idea up my sleeve & hopefully is all works out I'll be back to Share it with you all. Mary x
This is fantastic, such a gorgeous resuult! Using the light stick was a really great idea & I love the little tag you made for it.
What an awesome project Lauren, thanks for such a comprehensive 'how to' must give this a try. I love the stamp set you used too, think it's time to invest in some new PaperArtsy stamps to add to my small stash ! Also need some light sticks. I'm fed up with the solar lights not lighting up after dark as they haven't had enough sunlight to charge them up in the great British Summer days ;0(
hugs
Wynneth
X
It feels like the country of wonders, I love the decor and the night ca must be magic! Bravo Lauren
Fantastic project, will put this on my never ending list of thngs to try.
x
just the inspiration I needed for the bottle that sat on my desk all week - thanks for the detailed instructions - the use of a light stick is a fab idea xx
Enchanting!!!
Brilliant, Lauren - I love both the direct-to-bottle stamping and embossing and the tissue images - wonderful altered bottle!
Alison x
Post a Comment