
"Hi everyone, Liz here
again with my second set of three projects for this month. I’m starting with a
little round clock that was inspired by Darcy’s lovely stamps".

The clock is in two
parts: a solid back piece and a ring front.
Paint the front of
the clock with a blue paint (I mixed Space Cadet and Lilac together). Using the
JOFY 007 Stencil and some Grunge Paste, add some raised areas randomly around
the clock. When dry, paint over the Grunge Paste with the blue paint.

Mix some white paint
with the blue paint you mixed earlier to make a pale blue colour and mix this
with some Magic Mix (Jo Sonja) and paint over the whole of the front ring.

Crumple up some cling
film and press it onto the paint and then lift it off to create a mottle
effect. Dry thoroughly.

If you don’t have any
Jo Sonja Magic Mix, it is possible to get a similar effect by crumpling up
cling film and dipping it into the pale blue paint and dabbing this onto the
surface of the clock.
These pictures show
the effect after the paint has been dried. It looks slightly frosty.


Using the text stamp
from HP1303 and Blue Violet Range Archival Ink stamp some text randomly over the
surface of the clock.


Stamp frosty flowers
from EDY09 randomly over the clock face and emboss with glittery white powder.


Use a piece of white
tissue paper that will sit behind the aperture of the clock and stamp the leaves
from EDY10 with black ink. I stamped on both side of the tissue so that the
leaves went in alternate directions.

Stamp the small birds
(also from EDY10) towards the top of the tissue paper.
Using turquoise and
blue paint, colour the leaves.
Paint the back of the
clock with a pale blue paint and then paint and blend together strips of dark
blue (Space Cadet), turquoise (Beach Hut) and purple (Lilac) across the centre
of the back piece of the clock.

Attach the tissue paper
(with the leaves and birds on it) onto the back piece of the clock so that the
stamping will show through the aperture in the front piece. The easiest way to
do this is to use Matte Glaze and paint a layer of this onto the base, smooth
the tissue paper over the top and paint another layer of Matte Glaze over the
tissue paper.
The colours on the
base of the clock will show through the tissue paper a little.
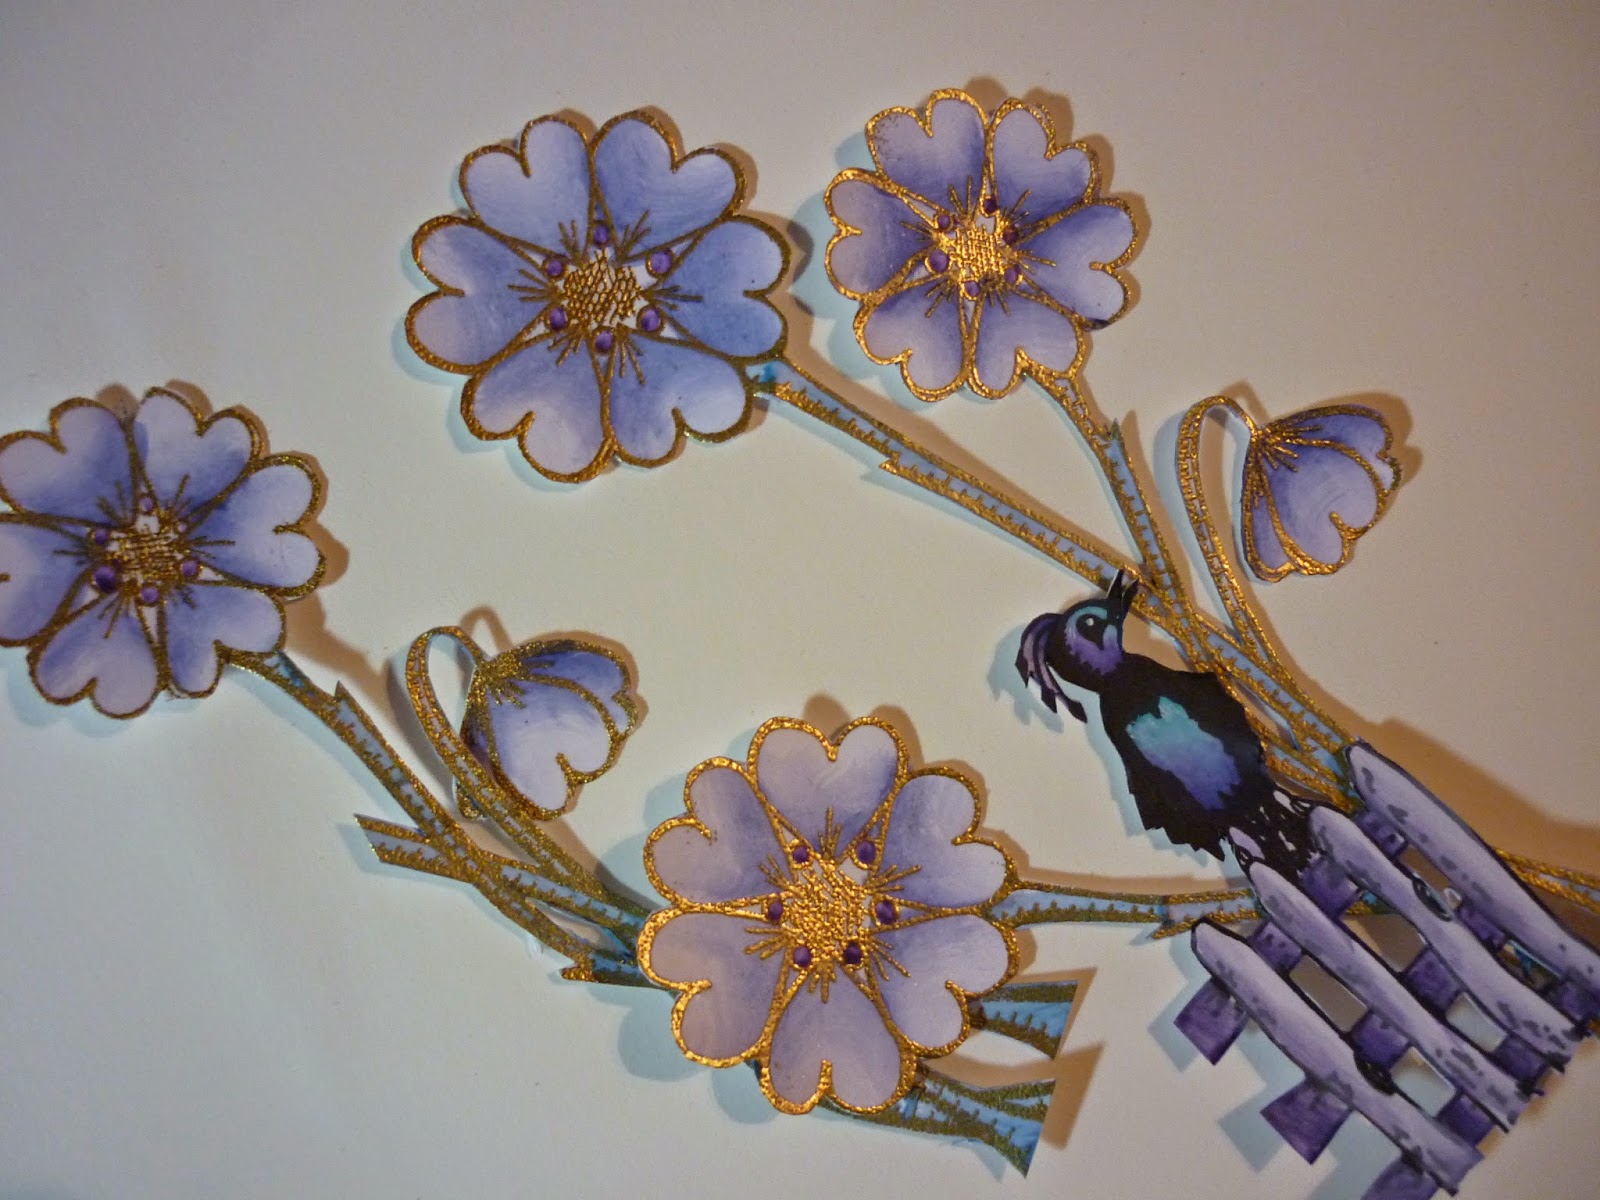
Stamp the flowers
from EDY10 onto some white stamping card and emboss with gold embossing powder.
Wash some blue / violet paint onto the petals (a mix of Space Cadet and
Eggplant) and cut the flowers out. Also, stamp the bird on the fence from EDY09
twice onto stamping card using black ink. Colour and cut out.
The house from EDY10
is also stamped twice, coloured and cut out.

Rub Sapphire and Gold
Treasure Gold on to the stencilled areas of the front of the clock to highlight
the raised areas of Grunge Paste.

I painted a wash of
dark blue onto the back piece of the clock just inside the inner edge of the
aperture. Then it is possible to stick some of the cut out flowers down just
inside the aperture.

You will have two
birdhouses cut out. Taking just one of the birdhouses, cut the house from its
base and use the base to elongate the base of the remaining birdhouse. The
house is then decoupaged onto the main birdhouse to create some depth. Then
stick this to the front of the clock.

The bird on the fence
is stuck to the other side of the front of the clock and an extra bit of fence
from the second stamped image is stuck down as shown.
Finally, cut apart
the stamped images of the flowers and stick in place.

I hope you enjoyed tonights project and do hope you will join me again tomorrow evening.
~Liz~
A huge thanks Liz from all at PA HQ for a beautiful and elegant project. The custom colour tones are exquisite as is the graduation of blue tones. The different textures and attention to detail is a delight to the eye and the perfect finishing touch from Treasure Gold.
We would love you to join in with our monthly challenge. If
you are inspired by any off this month's guests who have blogged between Nov 1st
2014 and Nov 30th 2014 then join in and link up your creativity
HERE. You will go in the draw to win a £50 voucher to spend on products of your
choice from the PaperArtsy online store. You need to add your link by 19:00
(London time) Nov 30th 2014.


12 comments:
WOW!! this is stunning, Liz. I love the flowers on the front, they look like porcelain!
Wonderful, gorgeous frosty effect!
Lucy x
This is just Amazing!! Everything works so beautifully together, you must be thrilled with the end product x
That's beautiful!
Simply gorgeous Liz, thankyou for making something so stunning with my stamps. x
Delightful! The colours are great, the images wonderful and all the fussy cutting is worth it!
Wow!!! What a fabulous project, totally amazing for the texture part, and also so cute using these Darcy's lovely stamps!! Fab colours too!! I adore this project, thank you! Coco xx
Exquisite! What a wonderful use of Darcy's lovely images! Helen is right, it really does look like porcelain! What a wonderful make! xx
This is gorgeous, Liz!!!!
Absolutely Stunning
What a great project!!! I love it!!
Greetings
Maria
WOW WOW WOW WOW WOW absolutely gorgeous, stunning, fabulous, amazing clock. Really awesome techniques, I am completely in love. Happy Creating :-) Kezzy xxx
Post a Comment