
2016 Topic 4: Image Transfers
Hi everyone, It's Pam Thorburn from Waltzing Through Life here.
I'd like to share with you this evening a post about Tape Transfers.
I love using image transfers in my work. My favourite technique is a gel medium transfer, but for this project I thought I'd try a tape transfer for two reasons: Firstly they are easy, but more importantly a tape transfer suited my vision for a still life with window. A tape transfer has a shiny glass-like finish, so I thought it would be perfect for making a window view.
Lately
I have found myself very attracted to indoor still life scenes,
particularly those done in a naive style. If you check out my pinterest board you will see what I'm attracted to, and where my inspiration for this piece of wall art comes from.
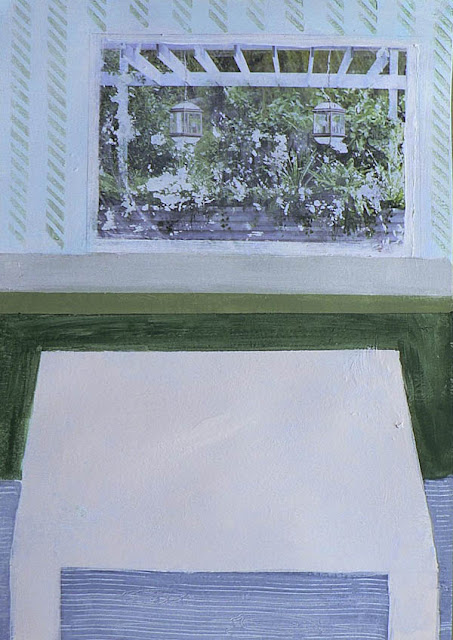
So this is my finished piece:

Step One: The
first thing I did was my tape transfer. To make a tape transfer you
can use clear cellotape, the wider the better, or you can use sticky
back clear plastic, which is what I used. Select the image you want to
use. Mine came from a Marks and Spencer catalogue and is quite a large
picture. Using sticky back plastic rather than cellotape for my transfer
allowed me to use a large picture. If you want to use a large picture,
but only have cellotape, that's fine. You will need to cover your
picture with overlapping pieces of cellotape. Your transfer will have
fine lines where the tape is overlapping, but that can add some interest
to your transfer.
All you do is to cover the front of your image with tape or clear plastic, turn it over, and burnish hard on the rear, ensuring that every part of your image is firmly adhered to the tape. I used an old plastic card to burnish, but you can use the back of a spoon. Then place the tape into water and let it soak. After a few minutes your image will be wet through and you simply start rubbing the back part of the paper away, leaving the image adhered to the tape. If you rub too hard you will rub the actual image away, so proceed with caution. If you look at mine you can see white spaces where I rubbed too hard. However I was quite happy with that as I didn't need a really clear image, since it is a view through a window. I adhered the tape to the substrate with some matt medium.
If you are wondering about my substrate, it is heavy duty watercolour paper. When I am painting with acrylics I always have a spare piece of paper onto which I clean my brushes and wipe excess paint. I then use those papers to paint on later.

Step Two: Having applied my transfer I worked on the basic composition of the picture. The walls are painted in Mermaid I used stamps from EEV03 and for the piece. The wallpaper is her diagonal line stamp using Sage The floor was painted with China and then given a wash of Nougat to knock
back the colour a bit. While the paint was still wet I dragged a comb
through to create a wood grain effect. The lower half of the wall was
painted in Tinned Peas and Hey Pesto and for the tableI used Nougat.

Step Three: Next I needed to make some collage elements. I stamped onto scrapbook paper using EEV03 and 04. The curtains were made from paper stamped with the triangle lined stamps.

My favourite collage piece is the table mat. This is a simple Gelli print Smurf paint rolled onto the plate, then paint removed with the thick circle stamp from the EEV03 set. I just love it!
Notice here I have painted over the green on the wall behind the table the lighter Antarctic The darker green just wasn't doing it for me!


EEV03


EEV04
Notice here I have painted over the green on the wall behind the table the lighter Antarctic The darker green just wasn't doing it for me!

The
other collage elements were the flowers. I stamped a range of flowers
and leaves onto scrapbook paper. The flowers and leaves are all made
from EEV04 with the flower centres coming from EEV03.

Step Four: The
kraft coloured vase was stencilled with a Tim Holtz line stencil in
Nougat, then over stamped with Ellen Vargo's lined diamond stamp from EEV03 using black ink. The fruit bowl is scrapbook paper stamped with the line stamp from the same set. I
arranged (and rearranged) the collage pieces until I was happy with the
composition and adhered them with gel medium. I thought at that stage I
was finished, but when I stepped back to assess my work it all seemed a
bit bland.

Step Five: I decided that the piece needed some pencil
detail to make the various elements stand out more. So
using water-colour pencils I outlined parts to add some shadow detail
and add a little dimension.
Here's a close up of the outlining and the shadows.

If
you like still life art in a naive style and you're not confident with
drawing and painting, then why not give collage a go? There are lots of
PaperArtsy flower stamps which would be perfect for creating a vase
of flowers. The other parts of the collage are basically just simple cut out shapes. And a tape transfer makes a great window in the background!
Pam x
Blog: Waltzing Through Life
Pam x
Blog: Waltzing Through Life
Thank you Pam for allowing us to revisit this image transfer technique ... there are so many out there and it's not always the easiest technique to perfect. I love how the white spaces from the over rubbing add an interest to this beautiful image. The whole composition lends itself to the still life scene. Great use of the EEV stamps to create all the other fab elements ... so creative. ~Gillian
We would love to see how you interpret this Image Transfers topic by linking what you make to our 2016 Challenge #4: Image Transfers, on this page HERE.
We would love to see how you interpret this Image Transfers topic by linking what you make to our 2016 Challenge #4: Image Transfers, on this page HERE.
All of our bloggers love to see your twist on their ideas, particularly if you were inspired directly by their post.
All
links go in the draw to win a £50 voucher to spend on products of your
choice from the PaperArtsy online store. The Image Transfers link will
close 17:00 (London Time) Sunday, March 6th. The winner will be
announced 2 hours later at 19:00.


10 comments:
Great project!!
This is lovely Pam.... I love how you have done the transfer.... and built everything up around it!.. It works a treat!
Thanks Pam! I like the simplicity of the composition. Contrasting with the detail of the transfer. ! ~Leandra
This is really clever Pam. I love the contrast of reality through the window against the 'imaginary' inside the room and your use of Ellen's stamps is unique!
Hugs
Lesley Xx
I really love this Pam. It's fabulous. Lx
A wonderful piece of art Pam....I love the naive still life and the window idea is really cool! Brilliant how you have used EV stamps too! Love it! I tried the sticky tape method last night and the whole thing peeled back off the tape! X
Lovely project! All these image transfer techniques are fascinating.
Fabulous project Pam. Wonderful bright scene of the room and great you use Ellen's images, clours so beautiful. It's a fine art. xx
What a great idea! Love the idea of using a scene for your own scene. I'd seen this technique but didn't realise it could be so successful! x
I love the retro feel of this still life.
Post a Comment