
Hi everyone, Lin Brown here to introduce my newest stamps under the Eclectica Designer Series. Leandra and Mark have shot a video to show all my new products. Here it is below...but there is also a bit of a story about how these stamps came about, so you might like to read the blog post first, and then come back and watch the video at the end. Whatever you do, I hope you've got a drink and nibbles handy!! ...Perhaps a cocktail suits the theme tonight, a colourful one !!
Tonight I'm going to show you a few samples I have made with the new stamps, paints and stencils. I have a couple of other people who have joined me to show you their ideas too, but more about that later.
All of my new lines are totally inspired by the holiday I took in Tobago last year. It was the best and most relaxing holiday I have ever experienced and I was completely blown away by this tiny island.

My new release of stamps are very different from my usual style but the quirky island of Tobago led me to come up with some fun and quirky designs as well as some zingy new paint colours.
The island is very hilly, and if you stand at the bottom of the hill and look up, you will see loads of tiny, colourful little houses. Many of them are no more than a shed and every one is different in design and construction, hence these two plates of houses ELB13 and ELB14.
 |
| ELB13 |
 |
| ELB14 |

I took hundreds of photographs of flowers on our journey around the island. The colours, the shapes, the leaves were stunningly beautiful and I knew then that flowers would be included in the next release of stamps, so I am excited to present ELB15 and EMB16.
 |
| ELB15 |
 |
| ELB16 |
 |
| ELB17 |
 |
| ELB18 |
The stencils are designed to work in conjunction with the flower and bird stamps or completely on their own for you to use in your own way. Here is a brief step out for you to understand the concept that I had in my head.You will notice that there are a couple of images on the stencils that do not have corresponding stamps, there will be more stamps later in the year......this was just a little bit of forward planning at PA HQ.
How to use the stencils and stamps together...
1. Shade two colours through the stencil.


 |
| PS013 |
 |
| PS014 |
1. Shade two colours through the stencil.
2. Stamp co-ordinating image over the top using a good quality dye based ink.
3. Stamp and paint a stem for the flower. Extra paint highlights can be added to the flower head with a small paintbrush.
The new set of Limited Edition Paints are my favourite set of Limited Edition paints so far. Caribbean Sea is the colour of the water in the bay where my hotel was located. Bougainvillea plants grew all over the island and put on a stunning display. Banana and Tangerine Twist are included because I saw so many bananas and oranges growing on the island.

I am delighted to be able to share three projects with you this evening. The first one uses the flower stamps on ELB15 and ELB16, stencil image from PS013 and a variety of Ellen Vargo stamps.
Step One: First create a background. I blended Caribbean Sea and Guacamole on a tag and then used Snowflake to stamp a selection of Ellen Vargo stamps. I also used Snowflake to stencil the head of the flower.This is because the new Banana and Tangerine Twist paints are not opaque and I needed a white base for those colours. It's a good tip to remember: put white under a translucent, and the bright colour will pop perfectly off the background.


Step One: My first step was to cover a piece of grey board with some printed tissue paper. Using Snowflake Fresco Finish paint, I stencilled some leaves from PS002 and flower heads from PS005. When dry, I watered down some Caribbean Sea to wash over those images to tint them and also blended in some Honeydew to make a more interesting background. I then stencilled an owl and flower head from PS014 and stamped the stem from ELB16 using Black Archival ink.

Step Two: I stamped the legs and flower from the bird with the crown on ELB17, I used masking tape to mask off the rest of the bird as I thought it would be cool to make a fabric bird and I could adjust the angle of the body slightly if need be when placing the bird on the project. I also stamped a little garden across the bottom and painted in all the stamped images with watered down Frescos. I used a stencil brush to blend Banana, Tangerine Twist and Bougainvillea over the white stencilled images.

Step Three: Now you need to stamp the images over the stencilled areas. You will notice that I used the dandelion head for the flower image. I designed these as a matching pair, as I realised that drawing a dandelion stencil was way too complicated so I came up with this design instead, but it's quite cool because you can use the stencil on it's own to make a completely different shape flower. I stamped my bird and a wing on a piece on Egyptian cotton Fabric. This needs to be heat set before painting in with watered down Fresco Finish paints. I sandwiched a piece of wadding between the bird and a backing piece of fabric and using the stamped image as guidelines, stitched all the layers together before carefully trimming away the surplus fabric. I then painted the raw edges and added some beads for embellishment.

Step Four: And finally, I found a twig from my garden to hang a little birdcage that I made out of wire. I also used the bird's wing to make a little border across of the top of the project.

Step One: I used an 8" x 8" white/grey board as my substrate and base coated this with a mix of Tangerine Twist and Bougainvillea Fresco Finish Paint, blending the colours together. As you can see, it created some fabulous shades of orange. I painted a Tando chipboard, grid that looks like a brick wall with Chocolate Pudding. I removed most of the bricks but left a few behind to add interest and stuck this to the base board with Matt Medium.

Step Two: I sponged some Caribbean Sea on to the shadow stamp of the large house and placed some sequin waste on it and gently rubbed over the back with my finger so ensure good contact with the rubber.

Step Three: I carefully peeled the sequin waste off the stamp and placed it paint side down on a piece of Smoothy White Stamping Card. I used a clean brayer to press the sequin waste on to the card for a good impression. This was when I realised my mistake. Having flipped the sequin waste, the image was now in reverse, note the door is now on the right side of the printed image instead of the left.


Project 1: Flower Tag
Step One: First create a background. I blended Caribbean Sea and Guacamole on a tag and then used Snowflake to stamp a selection of Ellen Vargo stamps. I also used Snowflake to stencil the head of the flower.This is because the new Banana and Tangerine Twist paints are not opaque and I needed a white base for those colours. It's a good tip to remember: put white under a translucent, and the bright colour will pop perfectly off the background.
Step Two: Sponge or stipple Banana through the stencil followed by some Tangerine Twist, graduating the bolder Tangerine colour at the flower tips.
Step Three: Now add the focal images. I over stamped the stencilled flower head with the matching stamp. It doesn't matter if you don't line it up perfectly, it all adds to the charm. I like to use Rangers Jet Black Archival Ink for this, it always gives me great results. Just remember to heat set before painting in the designs.
Step Four: Finally, after painting in all the images, I made an extra flower head on some Smoothy White Stamping Card to create a more dimensional flower.
Project Two: Naughty Owl
Step One: My first step was to cover a piece of grey board with some printed tissue paper. Using Snowflake Fresco Finish paint, I stencilled some leaves from PS002 and flower heads from PS005. When dry, I watered down some Caribbean Sea to wash over those images to tint them and also blended in some Honeydew to make a more interesting background. I then stencilled an owl and flower head from PS014 and stamped the stem from ELB16 using Black Archival ink.
{Leandra says: can't believe she put the poor wee fella in Jail!!! What's he done, bless him, look at his sad face!}
Project Three: Funky Little House
Step One: I used an 8" x 8" white/grey board as my substrate and base coated this with a mix of Tangerine Twist and Bougainvillea Fresco Finish Paint, blending the colours together. As you can see, it created some fabulous shades of orange. I painted a Tando chipboard, grid that looks like a brick wall with Chocolate Pudding. I removed most of the bricks but left a few behind to add interest and stuck this to the base board with Matt Medium.
Step four: I could have used the paint left on the rubber stamp but I wanted to create more of a contrast to a solid paint shadow image. I figured I had nothing to lose by trying to stamp the detail image over the top as I only need the roof part and am pleased to say, it worked a treat!
You can see from the finished house that by stamping an extra house and cutting out the windows, you would never know that there had been an issue.
Step five: I created some coloured bricks for the wall using one of the chipboard bricks as a template.
Step six: I used the same sequin waste to add detail to the large flower and finished the project by gluing some embellishments and message to the project.

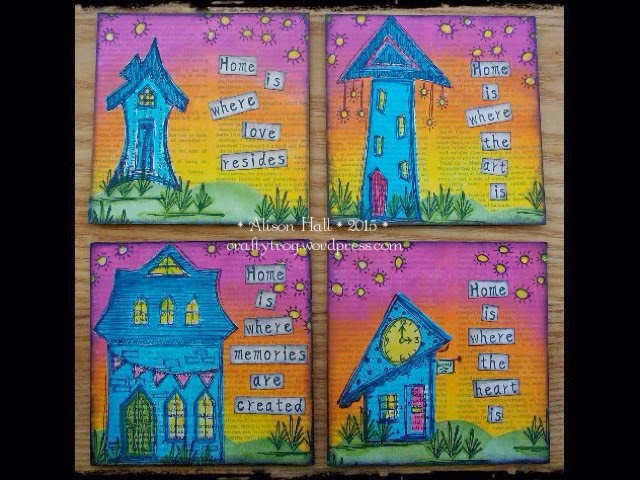
And here are some more great ideas. First up is Alison Hall (Craftytrog)
who made four little coasters that are photographed here together, but as you can see, they would make a great piece if they were all mounted together.
who made four little coasters that are photographed here together, but as you can see, they would make a great piece if they were all mounted together.
Alison says: I have made a series of four coasters using a 4x4 inch Grey-White Board which were covered with dictionary paper before blending Lin's new Fresco paints. I added some hills with Guacamole and HeyPesto and stamped the little house silhouettes with Caribbean Sea onto dictionary paper, cut them out and glued it to the coaster before over-stamping the detail houses with black ink, then painting in the detail.
Next, I'd like to introduce Wanda Hentges (Art by Wanda)
Sample One: The background is Grunge Paste through a stencil and dried, the paint colours are mixed with satin glaze (about equal amounts) and painted in bands then the Silver Treasure Gold is applied lightly and background stamping is with Snowflake paint. Flowers are stamped (and heat embossed) onto painted and stamped tissue paper which was glued to Smoothy White Stamping Card and white dots and detail added with a white paint marker.

Sample Two: I love these flowers and just had to make a "garden" to go with the quote. The flowers each have 3 layers - the whole flower, the front petals, and the green area, the base is heavy Smoothy cardstock and measure 8" x 8".

My third guest artist is Julie Ann Lee (Magpieheaven)

Sample one: I used ELB17 for this greetings card, stamping with Black Archival on stencilled ‘Smoothy Card’. The Crackle Glazed flower on the right forms a pocket and you can lift out the little card, which reads ‘Spread your wings and fly’.
Sample two: ELB18 features this very elegant bird, which I highlighted with white pen and framed with Lin Brown stencils.

My fourth guest is Penny Nuttall (Cutting My Coat......to suit my cloth)
Sample one: This mini tote-bag is stamped with images from ELB13. I sponged the hill first through a paper stencil, and stamped the solid base houses in paint before stamping the detail houses in Archival ink and adding in the words.

Sample two: A simple zip purse is sponged with Guacamole Fresco and stamped with the ditsy flowers before adding the free hanging, stitched, mini houses and a label sentiment.

And last but not least Sue Carrington (Stamping Sue Style)
Sample one: I stamped the main house shadow with Caribbean Sea, I used Tangerine for the other house shadow, these were over stamped with Jet Black Archival and mounted onto a background that had been toned down with a wash of Snowflake Fresco Finish. I stamped extra doors, windows, the message and hand drew some larger bunting on onto a piece of Smoothy card, painted with Tangerine Fresco Finish, cut out and stuck to the project. The little grassy clumps have been stamped once with black Archival Ink and then again over the top with Hey Pesto Fresco Finish, cut out and layered in between the houses.

Sample two: I stuck some book paper onto some Smoothy card and stamped the tall, thin house shadow using Tangerine Fresco Finish and the little house using Caribbean Sea. The large house shadow is stamped with Bougainvillea, the door and bunting have been stamped onto Tangerine painted card and then cut out and stuck to the house. I stamped the text from ELB13 onto a piece of brayered card and added some faux stitching and mounted everything to a stencilled background.

If you would like to catch me teaching a class or demonstrating, I am booked at:
Sample one: I stamped the main house shadow with Caribbean Sea, I used Tangerine for the other house shadow, these were over stamped with Jet Black Archival and mounted onto a background that had been toned down with a wash of Snowflake Fresco Finish. I stamped extra doors, windows, the message and hand drew some larger bunting on onto a piece of Smoothy card, painted with Tangerine Fresco Finish, cut out and stuck to the project. The little grassy clumps have been stamped once with black Archival Ink and then again over the top with Hey Pesto Fresco Finish, cut out and layered in between the houses.
Sample two: I stuck some book paper onto some Smoothy card and stamped the tall, thin house shadow using Tangerine Fresco Finish and the little house using Caribbean Sea. The large house shadow is stamped with Bougainvillea, the door and bunting have been stamped onto Tangerine painted card and then cut out and stuck to the house. I stamped the text from ELB13 onto a piece of brayered card and added some faux stitching and mounted everything to a stencilled background.
If you would like to catch me teaching a class or demonstrating, I am booked at:
1st Mar 2015 Stamperama, Stevenage Leisure Centre (demo)
7th Mar 2015 Colemans Craft Warehouse, Rushden (demo)
8th Mar 2015 Crafting Time, Shepreth (class)
22nd Mar 2015 The Stamp Attic, Wantage (class)
10th-12th Apr 2015 Version Scrap, Paris (demo)
9th May 2015 Artist Trading Post, Wirksworth (class)
6th Jun 2015 Daisy's Jewels & Crafts, Coventry (class)
Otherwise, my blog is Yours Artfully / twitter @yoursartfully
Thanks for sticking with me to the end of this mammoth blog post, you deserve a well earned cuppa now. I really hope you are going to enjoy using these new products and that I and my guest designers have inspired you to want to try one of these projects yourself.
Lin
Don't forget, the Topic 2: Shiny Stuff challenge is open for an extra week while the new product announcements take place this week. You have until Sunday, Feb 8th 5pm London time, to link your art. Perhaps Lin has inspired you to do some metal work tonight? It's a perfect fit with the Shiny Stuff Topic!!!


38 comments:
so very lovely! Congratulations Lin on these gorgeous designs and new FABULOUS paint colours.
x
Wow, wow, wow! Words escape me! Stunning collection. Bright and vibrant especially welcome in the middle of a cold winter!
Elaine
These stamps were and will continue to be a joy t work with! Thank you for giving me the opportunity to join in with this launch. Lovely samples from the Designers and fantastic step by steps from Lin! Beautiful post! xx
I fell in love with the paints last night and ordered them immediately, of course now I've seen the stamps being used in such fabulous ways by Lin and her GD's I want them too... wonder if I can wait as long as Stevenage... going back to watch the video now. Well done, Lin - love them!!
I love your new products. . And the artwork is stunning
I love the new stamps and the stencils are perfect for me! I STILL need to go shopping! Xxx.
The samples are gorgeous too:)xxx.
Congratulations Lin! I loved working with your fabulous funky houses. Gorgeous artwork from everyone!
Alison xx
These are gorgeous Lin...love the stencils to match the flowers. I now want to go to Tobago too!!
Wonderful new stamps and truly fabulous samples from everyone! So, so impressed by your travel inspired releases! Love them!
Another evening of fabulous inspiration. Congrats on a great release, Lin - here comes summer!
Alison xx
Congrats, Lin!!! Love the new colors and your stamps. Thanks for taking me along on this ride!!! Your samples are fabulous.... totally love the metal samples in the video!!! Fabulous artwork from everyone else also!!!!
Love al these layers in blue and white and those popping sherbet colours. Beautiful flowers and houses
Congrats Lin!! xxx
Love al these layers in blue and white and those popping sherbet colours. Beautiful flowers and houses
Congrats Lin!! xxx
Oh Wow, Lin I love them all! The samples from your GDs are stunning and your own are absolutely fantastic. So much inspiration in all of them AND .....I noticed you are teaching at ATP right near my birthday. I'm wondering if I can talk my family into buying me a place on the workshop ;-)
Well done on a fabulous release Lin & PaperArtsy.
Hugs
Lesley Xx
Wow wow wow just read this but need another read through to take or all in. Love these little houses and zingy paint colours. Look forward to seeing you demo at Stevenage xx
Had to come back after watching the video presentation to say lots more stunning artwork to see on there.
Hugs
Lesley Xx
some stunning stamps bought to life by your brilliant demo's . . congrats x
These are my favourite stamps yet Lin and your paint colours are right up my street. Love your samples too
FANTASTIC post. Bougainvillea is my new Favorite color! Soooo beautiful.
~Linda
Loving the new stamps looks like fun xx
Totally blown away by your new range Lin and everyone's gorgeous samples! I want it all! My favourites are the paints and everything flowers as always! Can't wait to get my hands on some of the new products and have a play. Lovely to see how the colours arose from your holiday,
Lucy x
I love, love this collection and the new paints are fabulous. Can't wait to see more.
Fantastic designs from Lin as always and some lovely paint colours too, huge congrats :-) xxx
Every single one of these are fantastic. Great examples too.
Beautiful stamps, Lin, love them!!
And I love all the projects done by designers, they are stunning, thanks Leandra for sharing video!!
Je suis en admiration devant ces nouveaux timbres Lin qui sont du incroyables beauté. Les nouvelles couleurs sont vraiment fabuleuses et éclatantes. Je les adorent toutes et je vais m'offrir toutes la collection de timbres, dur,dur d'y résister!!!
The whole range is amazing Lin, I really like the colours and the samples from everyone are absolutely stunning. Definite must haves for me and I am terrible at choosing so may well just have to have the lot ;-). Thank you for designing such an inspiring range.
Wow! My list is getting longer! Brilliant stamps and samples! Chris:-)
Simply AMAZING!
Gorgeous samples and amazing stamps! Congratulations! x
Loving your new stamp designs Lin! :)
Just revisited Lin's launch! Such exciting colours and images. Well done all the artists who submitted samples. Fabulous! Xx
Fantastic and various projects by everyone with this new set of great stamps, stencils and yummy paints by Lin! Congratulations Lin!! Coco x
Love the birds and the new stencils. The house with the brick wall is gorgeous. Hugz
Gorgeous colours fabulous stamps
love them all!!
MaggieH
Wow I am loving the new releases, I have bought both the flower ones, both houses and one set of birds. They are really fun to play with and the possibilites are endless. Kezzy :-) xxx
Post a Comment