
"Hi, It's Julie Ann here
back with my second project. Once again I've created one project that
extends over three posts, but if you don't feel you want to create one
big project, I'd love for you to feel free to play along by just taking
ideas from any of the posts and winging off in your own direction"!
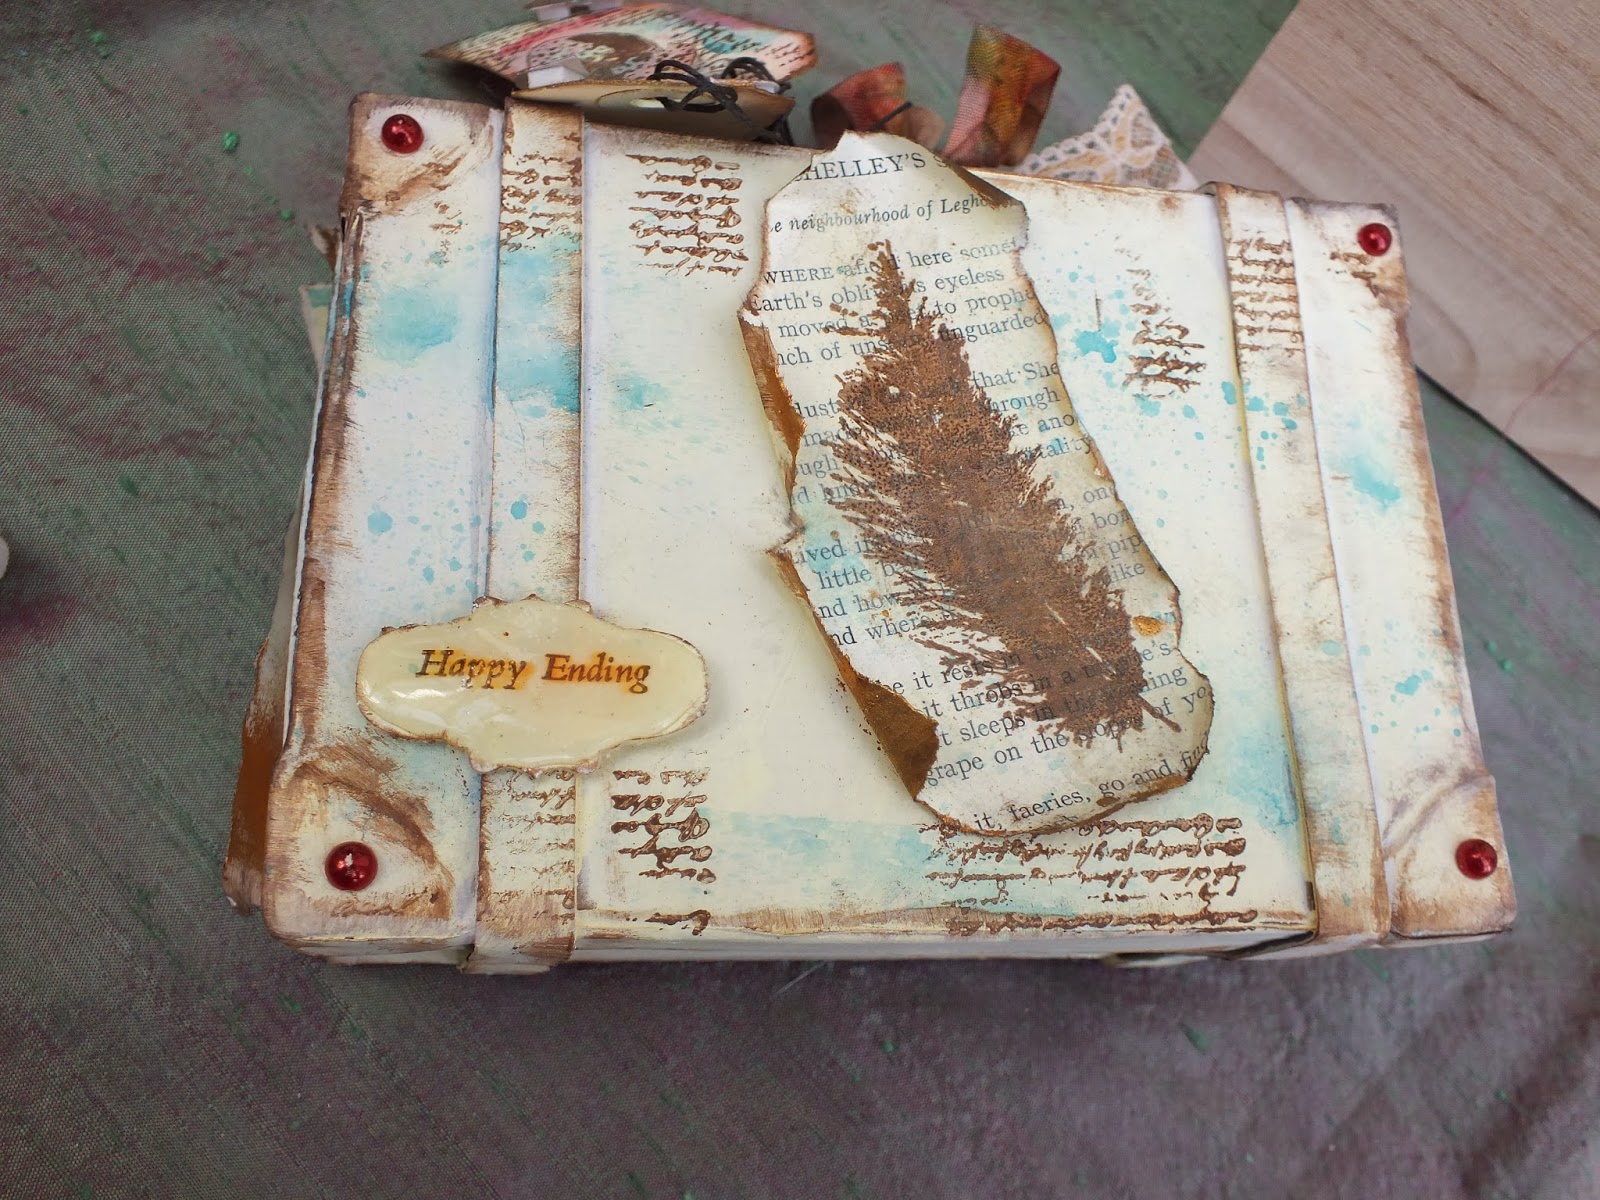
For this post we'll be looking at how I decorated the outside of a little papier mache suitcase. As soon as I saw it, I was reminded of one of my favourite songs by the folk singer Emily Portman - 'Bones and Feathers' on her album 'The Glamoury'. Although my suitcase has no bones in it, I wanted to suggest the idea of a shabby suitcase that opens up to reveal a world of living, breathing Flora and Fauna inside - just like a mysterious, old lady creates from inside her suitcase in the song! This suggested a colour scheme of neutrals and browns to me with some hints of eggshell and then some contrasting blues and greens inside.
For this project, I used the following Mini stamps MN75, MN 98, MN99; Urban Snapshots Nature USNT3 USNT4. For my text I used the beautiful brand new Lin Brown sentiment from ELB06 and the words 'Happy Ending' from Sara Nauman's fabulous Eclectica plate ESN08.
ELB06

Tomorrow
we'll see what the suitcase hides, but for tonight we're thinking
'shabby chic' as I show you how I went about altering the Papier Mache Substrate.

This
is where it begins! I wasn't expecting another mini-suitcase inside
and, as I planned to create my own world-in-a-suitcase, I've put the
second one aside for another project.

I began by giving the whole case a good couple of coats of opaques: Nougat on the outside and Antarctic inside.
Now, I learned my lesson from last time! I decorated the inside of my
box first and then worked on the outside. But because I like to have a
sense of mystery, and that is another post for another day, I am not
going to show you exactly what I did next! I'm going to move on with the
outside of the case.

I used Nougat first
on the outside of the case, using a brush to get into all those awkward
places. These cases can be a bit fiddly to paint with all the nooks and
crannies and you do have to check that you've covered every part.

The next step was so much fun .... making the suitcase look battered and shabby. I used Cheesecake over
the Nougat to give a creamy, ivory look - the song that inspired me
talks about 'ivory and leather'. I then used a piece of Cut N Dry foam to 'dry brush' the edges with a tiny smidge of Chocolate Pudding and then French Roast. Now the case was really beginning to look worn. To add more interest I decided to stamp some script using MN75 and Autumn Fire.
 I used the stamp without a block, something I learned from France Papillon when I first started blogging and she was Guest Designing for
PaperArtsy, as I wanted to create an uneven worn look. I've found that
applying the paint to the stamp carefully with the Cut N Dry really
helps to avoid a 'too blobby' outcome!
I used the stamp without a block, something I learned from France Papillon when I first started blogging and she was Guest Designing for
PaperArtsy, as I wanted to create an uneven worn look. I've found that
applying the paint to the stamp carefully with the Cut N Dry really
helps to avoid a 'too blobby' outcome!

Things
were looking nice and shabby, but I wanted more detail, so I delved
into my supply of Polyshrink plastic. I painted a sheet with some washy
Cheesecake, then die-cut a shape from a Spell binder set I have. I
stamped 'Happy Ending' from ESN08 in Wendy Vecchi Potting Soil Archival,
shrinking it with my heat-gun and then giving it a glaze of Glossy
Accents. This takes about 24hours to dry properly and - of course - you
can't help it along with your heat gun, so you have to be patient and
wait before attaching!

I
used a page from a Thomas Hardy collection of poems to create a
tattered label with my Lin Brown sentiment on it. This was stamped over
Hardy's 'The Darkling Thrush', which had been washed with Nougat and
then sprayed with diluted translucents: Blood Orange, Inky Pool and a very watered down opaque - Guacamole in
little mister bottles. You can't really see the text of the poem on
this one, but it is more apparent on the curled paper I used on the
other side, as you will see in a moment.

I edged this with some Florentine Treasure Gold.

I had sprayed two #1 tags with Inky Pool, Blood Orange and Guacamole.
My
'Happy Ending' tag ended up on the reverse side to my Sentiment I
wanted it to suggest both a brand name for the old suitcase, a
destination and the glorious ending of the song when the old woman
releases a dawn chorus of birds into the skies. You may notice that the
script on this side was stamped in Chocolate Pudding. I added little red
pearl studs and stamped MN75 on
another Hardy poem - one about Shelley's Skylark this time, so feathers
and birds were really coming into their own as a theme! I liked the
effect of spray painting, which I had been doing on some card I intended
to stamp onto. What about creating this mottled look on my shabby
suitcase so that it would take on the appearance of eggshell? I took a
deep breath and gave it a spray! Now it looked battered and a bit like
an eggshell, so I was pleased!

Here is the clasp of my suitcase: two little eggs from USNT3 stamped onto Smoothy Card in
Potting Soil and then cut out and edged with a little melted UTEE Gold.
I added some Tea-stained lace and some dyed seam-binding along with my
labels attached with brown hemp. Here is a closer look at my labels.

I
first stamped my egg onto the tag and then made an identical mask for
it on some scrap paper, which I placed over while I stamped some of the
script from MN75. I also cut out more stamped eggs from card and
snipped them to look broken before edging them with Florentine Treasure Gold and attaching them with little dimensional foam pads so that they
stood out a little and looked more 3D.
Tomorrow
I'll be showing you how I decorated the sides of my case and we'll be
taking a peek inside to see if any magic is taking place there yet?
Thank you so much for joining me and I do hope you've found some
inspiration or ideas for playing along this week.
Leandra Says: The soft colours along with the touches of gold enhance the shabby feel to this project Julie Ann. The Urban Snapshot collection are the perfect collection for this look don't you think. Looking forward to tomorrow evening's reveal.
Gillian Says: Oh J'adore ... you have certainly captured the "shabby chic" feel. The distressed layers and beautiful soft colour palette is wonderful. Look forward to part 2.
If you would like to join in this week's challenge and play along with Julie Ann's techniques, then do link up your creativity here, and go in the draw to win some PA stamps of your choice! You need to link your entry by 17:00, Sunday February 16th 2014.


18 comments:
I love these little suitcases, I have one that I (badly) decorated ages ago, but not used the second, so I hope to be able to play along this week... LOVE how you've "attacked" yours!
Oh Julie Ann what a fab case love how you have aged it it looks great cannot wait to see the secret inside xxx
Gorgeous shabby chic look... the battered case looks beautiful with the text running across it, and I love the dimension created by the ripped and curled papers. The added tags are a delight - love those cracked eggs! Looking forward to the inside...
Alison xx
Wonderful project so full of shabby chic details... Looks like a lot of work went into it and I am looking forward to part2 and 3!
gorgeous Julie Ann..love love love the shabby chic!! Can't wait to see the rest xx
Beautiful suitcase Julie Ann, great to see feathers aggain. I enjoy not mounting stamps so you get a slightly shaded or part image onto your substrate.
Lovely shabby colours, great Tags. Looking forward to the sekrit reveal tomorrow:-) xxx
I think you definitely achieved your goal, your gorgeous suitcase looks well-loved & as if it could tell plenty of stories of its adventures.
Ooh! This is gorgeous Julie Ann! I can't wait to see what's inside.
Alison xxx
So, so beautiful! Love the way you made the eggshell look and the super addition of the paper and tags! Come back tomorrow? - of course! Chrisx
Gorgeous case Julie Ann... the colours & stamping is fantastic... Love it...Hugs May x x x
Beautiful shabby chic suitcase Julie Ann and I love the stories you weave into your posts & projects. The tags are super too with their broken eggs. Looking forward to seeing what's inside!
Hugs
Lesley Xx
Fabulous! Lovely colour combos. Can't wait to see the inside... xxx
such an imaginative and innovative project Julie-Ann. fab!
Positively adore the concept behind the alteration of the suitcases.
The most imaginative alteration of the suitcases I have seen to date.
Wishes
Lynne
Wow wow wow absolutely gorgeous shabby chic suitcase, I really love the neutral colours with the hint of the blues and reds and gold. The tags are stunning. I really love the egg image and your cracked egg. Can't wait to see the inside. Hugs :-) Kezzy xxxxx
Really adorable suitcase!!! Coco x
Oh boy I knew you were going to be BRILLIANT when they let you loose with all their fabulous stuff, oh man I looooooooove old suitcases, your story is fabulous creating so much inspirations shesh,you had me looking all over you tube for that song,it songs grrrreat, love the script in that color of paint, oh my I have to get some :O).. The paper your create is just gorgeous all trimmed in gold, my eyes are all googly. Your seam binding is gorgeous, love the feather and eggs, tags are flipping fabulous, can't wait to see it all my wings are flapping everywhere, your post was wonderful, like we were right there watching you create your magic.. Have a wonderful day, ((( BIG HUGS))) Cuz...
Beautiful, julie Ann!
Lucy x
Post a Comment