Saturday, 24 October 2015

2015 #19 Mystical Girl {by Clare Lloyd, PA.Signature Designer}

 2015 Topic 19: Faces

Evening everyone, Clare Lloyd here with a card simply using one face to create both a background and focal point.


Step One: I began with a nice crisp dark stamp of my girlie image from ECL07 ...


... and covered her with a paper mask. Then inking up my stamp I stamped firstly onto scrap then used 2nd, 3rd, etc generation ink to create my background. I did this process 3 times to cover the whole piece of Smoothy card stock using Black Archival Ink


Step Two: I then coloured that first stamped image using pencil crayons and decided to add just a hint of colour to the eyes/lips of the faded background images. 


Step Three: I trimmed the card down to size ready for my card blank but decided to mask off the main image once again and repeat the same process but this time with the little stars from ECL07.


And finally I created a background using the stars onto a small piece of card and added my sentiment mounted onto black card stock.


Although my new stamp design does have a Halloween vibe I wanted to show that she doesn't have to be a witch! I think with the stars surrounding her she does have a mystical air about her and not to get too deep into concepts but the many faces in the background seem to match the sentiment showing that we all have many things going on in our lives but we all need time to shine. I thought this card would be a perfect pick me up for someone feeling a bit down and of course, every girl needs a little neon pink in their lives...hence the hair!

Find me HERE on my blog and HERE on Instagram.

This is fab Clare! So many people have commented to us how they love the versatility of your face stamps, and it's the embellishments on this stamp set that make her potentially 'witchy', not the face itself - lucky you didn't give her a hooked nose with a wart on it! ~Leandra

We would love you to join in with Challenge #19: Faces. If you are inspired by any of our guests who blog with us over the fortnight, then please join in and link up your creativity HERE

All links go in the draw to win a voucher to spend on products of your choice from the PaperArtsy online store. The Faces link will close 17:00 (London Time) Sunday, Oct 25th winner will be announced 2 hours later at 19:00.

Friday, 23 October 2015

2015 #19 Take Flight Art Doll {by Tracy Easson}

2015 Topic 19: Faces


Hi everyone Tracy here, joining you this evening with a post about creating a face using air dry clay. 

For someone addicted to doodling, painting faces imagine my joy at being asked to take part with the challenge theme " Faces ". I`ve had a hankering for a while to create an art doll so without further ado out came the clay and into my imagination I went, inspired by Eclectica (Sara Naumann) stamps ESN15.


Step One: Start by poking a hole in a polystyrene egg with a stick, wet the egg slightly with water, soften the clay in your hands, add a little to the egg at a time working it in until smooth.


Step Two: Create your very own facial features from clay before adding them to the egg, use a little water to fix them in place. ( I think I need more practice on the lips, lol )


Step Three: Take a Garlic Press, soften a little clay and push it through to create long and short strands of hair . . . Go wild!


Step Four: Time to add colour with Fresco Chalk Acrylic Paint in Blush, Vanilla, Smurf and Haystack to her hair and face.


Step Five: By this time my girlie was telling me who she was and what she wanted! What did she want . . . she wanted wings, yes wings and thought the cute bird stamp along with the text stamp from ESN15 would work a treat.


Step Six: By this point I knew that she wanted to be called " Gertie ", have her own set of wings and wild hair . . . but she also needed to tell her story, so out came another sweet stamp from ESN15, stamped onto paper, snipped out and fixed in place with a little matte medium to her top.


I wanted to tie in Gertie with the words from ESN15 " Take Flight ", out came the clay to create a few little birds to nestle in her hair.


Gertie was so much fun to create, although not perfect I fell in love with her along the way. I hope she inspired you to take a lump of clay, get messy, paint and let your imagination run wild! You could create so many faces and add little details as I did with the birds or how about a keeper of the home with little houses atop her head or a boat to signify a journey . . . yikes off I go lol . . I can get carried away. Please just have fun and thank you for having me. Big hugs Tracy xoxo

You can find me at my blog here, Instagram here, YouTube here

Oh Tracy this is such fun, thankyou for joining us this evening and bringing Gertie to life. The wings made from the bird body are just inspired, as are the added words, very fitting. She looks  abit like me first thing on a morning! ~Darcy

We would love you to join in with challenge #19: Faces If you are inspired by any of our guests who have blogged on this topic over the fortnight, then please join in and link up your creativity HERE. 

All links go in the draw to win a voucher to spend on products of your choice from the PaperArtsy online store. This link will close 19:00 (London Time) Oct 25th 2015.

Wednesday, 21 October 2015

2015 #19 Thinking Outside... {by Penny Nuttall}

 2015 Topic 19: Faces

Hi everyone Penny here, joining you this evening not with a new technique... you have seen this way of using stamps for rock art in some of my previous posts... but more about going out, away from the desk, and taking inspiration from the landscape. 

I am always out and about with my boys (dogs) and it is really good thinking time. This week I decided to put rock art back on the rocks.


Look carefully and see what's hiding there! The 'faces' I chose to create for this topic just don't happen to have skin on them.


I stamped on tissue, selecting the parts of the images from Hot Picks HPHW05...


... which gives good clear skulls for cutting out, and then looked back through my other PA stamp sets for something bone like. It's great to mix and match and look beyond the obvious. The spine is from Eclectica ELB04....


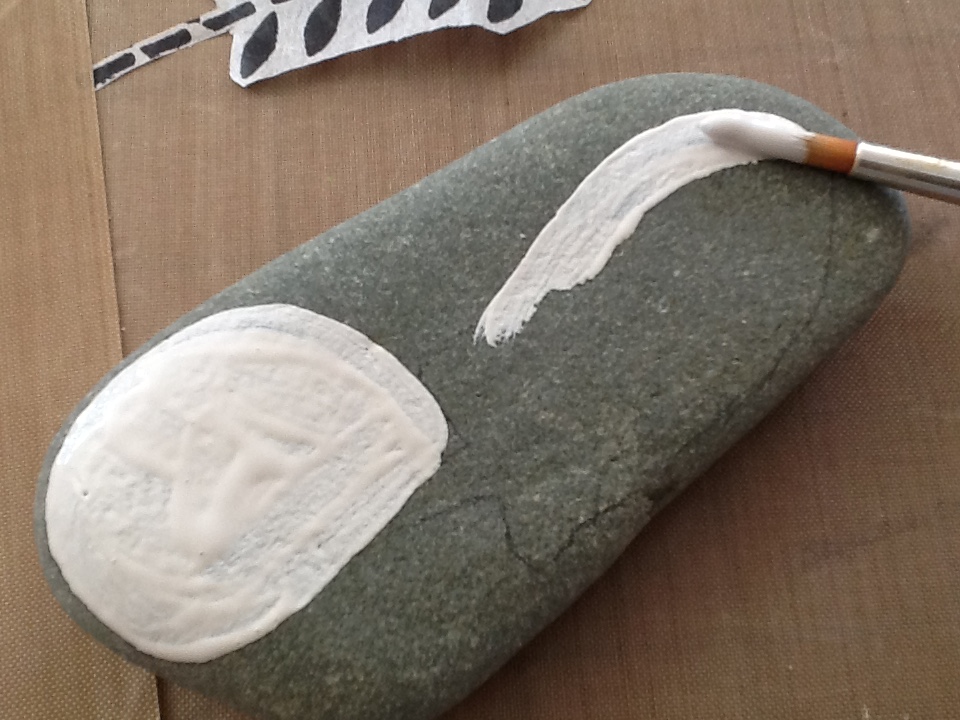
I selected a group of stones to transform, and placed the cut out shapes, drawing loosely round them, as a guide for painting with opaque colours of Fresco Finish Acrylic Paints.


(I used Chalk, Vintage Lace, Teresa Green and Concrete) and then applied the shapes using gloss medium.


They needed eyes...


...with a little bit of glazed Cherry Red Fresco (discontinued JOFY colour), try London Bus instead. Instantly alive. And of course a few grisly grave goods (I like a bit of textile and glitz).


Then it was time to take them out to their tomb in the rocks (fortunately no one was around during the photo session so I didn't have to explain my oddness)...


...and these guys looked great in the landscape.


I hope you feel inspired to leave your desk and take some thinking time in the great outdoors (before the winter sets in!).

Bye for now, Penny.
Blog: Cutting My Coat

Goodness Penny, you never cease to amaze with the hi-jinx you get up to! It could well have been a bit odd if you were spotted for this photo shoot! Loving the play on 'skeleton' leaves too! Thanks for a wonderful post. ~Leandra

We would love you to join in with challenge #19: Faces If you are inspired by any of our guests who blog with us over the fortnight, then please join in and link up your creativity HERE

All links go in the draw to win a voucher to spend on products of your choice from the PaperArtsy online store. The Faces link will close 17:00 (London Time) Sunday, Oct 25th winner will be announced 2 hours later at 19:00.

Monday, 19 October 2015

2015 #19 Angel Face Painting {by Pam Thorburn}

 2015 Topic 19: Faces

Hi everyone Pam Thorburn here, joining you this evening with a post on the theme of faces. I jumped at the chance to do a project on this theme as I have been experimenting with how to paint faces for sometime now, and I know that Fresco chalk paints are beautiful for painting lovely smooth skin. I have chosen to paint an angel for my project, since Christmas is approaching, and also I fell in love with Sarah Naumann's new stamp collection, ESN18. This set has a winter/Christmas theme.

So here is my Angel painting:


Step One: I began by sponging on and blending in some Fresco paint for some background colour and roughly sketching in some guidelines for my face. The paint colours I used were Haystack, Sherbert, Candy Floss, Orchid, Spanish Mulberry and Snowflake.


Step Two: This is the ugly part of the painting, adding some shadows and highlights, and some hair colour. The colours used in this step are not that important as they will be covered up. You just need a mid tone for most of the skin, a dark tone for shadows,  and a light tone for highlights.


Step Three: I began layering paint onto the Angel's face. The skin is built up with lots of layers of thinned paint, ensuring each layer is dry before adding the next. The main colours used were Blush and Stone. I also worked on the hair and the facial features. The hair is a painted with a number of Fresco colours to create the streaked effect. I used Snowflake, Haystack, Toffee and Claret. The line detail is added with some watercolour pencils. I also used watercolour pencils for the eyes and the lips, (as well as some fine black marker pen). The halo effect is done with a dry brush technique, brushing Snowflake, and some Zesty Zing away from her head.


Step Four: Now for the wings. I wanted some lovely textured wings so I decided to use Grunge Paste through  stencils. First I used  the Mini Peacock stencil, but I only wanted a semicircle of this design, so I masked off where I wanted the first application of Grunge Paste to go. I finished the wings with a Mini Onion skin stencil.


Step Five: I began adding some stencilling background detail. I used interlocking flowers in Spanish Mulberry, and Mini Roman Letters in Haystack. I also began my stamping by embossing the twig from ESN18 using gold embossing powder.


Step Six: I continued stamping: The dress is collage tissue paper onto which I had stamped the music score image. The necklace is a chipboard star, painted and stamped, and the chain is dots of gold Stickles.


Stamping has been added to the background. The sentiments from the stamp set are stamped using Fresco Paint. The bird stamp has been added to the angel's 'halo'. 


Finally, the wings were painted  first with Snowflake paint, and then with Metallic Glaze as I wanted the wings to simmer and shine. And they do! here is a close up, and I think you can see a little of how they glimmer.


I really hope you like my painting. I have to confess that she really hasn't emerged the way I had envisaged. My original idea was to take my inspiration from the 'Winter Chill' stamp in the set. My background was going to be in cool blues, and my Angel was to be pale and white, with a silver halo. I'm not sure what happened. When I went to collect my paints the opposite colours seemed to jump into my hands instead. Has that ever happened to you?

I'm really looking forward to seeing everyone's faces. You can see  more of my work over on my blog Waltzing Through Life.

Pam, your Angel face is absolutely delightful from the choice of colour palette you opted for to the built up stamped/stencilled layers. The Angel wings are exquisite as is the use of the gold embossed twig halo. Thank you for sharing your step by step creativity with this theme. ~Gillian

We would love you to join in with challenge #19: Faces If you are inspired by any of our guests who blog with us over the fortnight, then please join in and link up your creativity HERE

All links go in the draw to win a voucher to spend on products of your choice from the PaperArtsy online store. The Faces link will close 17:00 (London Time) Sunday, 
Oct 25th winner will be announced 2 hours later at 19:00.

Sunday, 18 October 2015

2015 #19 Clock Face {by Darcy Wilkinson PA.Signature Designer}

2015 Topic 19: Faces

Hi everyone, Darcy here with a 'face' project. When I sat down to work out what I might do, I decided right off to combine a face with a clock face... With so many faces appearing over this fortnight it was a challenge to come up with something that wasn't being done by anyone else.. so I chose to do a skull.

I think this can be a tricky theme for some people, it's not everyone's cup of tea so please don't worry about doing a perfect, 'real' face. I certainly haven't.  Just have a go, these are challenges after all, there to encourage you out of your comfort zone. Interpret the theme any way you want to, what is the worst that can happen? It is only paint and paper. Have fun with it. x 


This is an MDF clock from Rob, the MDF man.

Step 1: Seal the clock, back, front and sides with watered down PVA glue, sand and repeat. Next I painted the whole thing with 2 coats of black gesso. once dry I rubbed this back in patches to bring back the buff colour of the MDF. I then brayered on a little Chalk, and finished this stage by stamping with a number stamp from ESN07 and Toffee Fresco paint.


Step 2: Using Chalk I painted out the area that would become the skull. I then added the darker shadows with Little Black Dress. Working from dark to light I used the following paints: French Roast, Squid Ink, London Night,Toad Hall, Mushroom, Glass Blue, Honey Dew.


Step 3: When the skull was partly done I added the butterfly wing and eye. For the butterfly I used Eggplant, Lavender, Glass Blue . For the eye I used Hey Pesto, Hyde Park, Caramel, Glass Blue. 


Step 4: I refined the shape of the skull, adding more shading. Once I was happy with the shadows and highlights I was able to add the cracks with a very fine paintbrush. 


At this point I also added the veins to the butterfly using a black prisma pencil. To make the eye glassy, I added a dome of glossy accents. 


Step 5: After waiting eleventy-seven weeks for the glossy accents to dry, I was able to carry on working. I masked off the side of the skull and then stamped these fabulous gates from Urban Snapshots: Wrought Iron (Plate) 2USWI2. This is an A6 size stamp.


Step 6: Now to add some flowers. I blanked out the area using Chalk. At the same time I also stamped the scrolling border from EDY07

EDY07

I began blocking in the flowers using several shades of purple and also bringing in the Glass Blue from earlier. The scrolls were done with shades of grey. I wasn't too worried about staying within the stamped lines. I wanted them to have more of a painted look, rather than stamped, so the outlines were just a guide. 


Step 7. I wanted the gates to stand out a little more, have  a little dimension. However I had to be careful and not add too much dimension, otherwise the clock hands would not be able to move around. I decided to go over all the stamped lines of the gates with Liquid Pearls in Onyx Pearl. 


Step 8: Now to add some more butterflies and moths. This one is from Urban Snaphots: Nature (Plate 4) USNT4


Again I didn't want it to look stamped, but the stamped outlines are brilliant as a guide. I stamped in black archival and then built up my colours and shading. Don't forget to add shadows underneath something like this. 


This butterfly is from HP1301. it has a very busy collaged background, so to get just the butterfly I stamped it out onto painted tissue paper. This butterfly will have its wings closed, one behind the other. So the same wing is stamped onto light paint and also onto darker paint. 

HP1301.

Here he is in place, the darker wing behind.. also a shadow of the wings. Don't forget his little legs need shadows too. 


Step 9: To finish off the flowers I added shaping and contouring using Pitt pens. I then added droplets of glossy accents.  As this is right on the outer edge I was able to add a '3D' butterfly. This one is from HP1506. It was stamped in a light grey paint onto black card, then I turned this over and blended some blues and purples onto the card and then stamped again. This means the wings can stand up and there will be detail on the underside as well as the top. 

HP1506


This is my favourite section. The shading all came together nicely, I like the moth and butterfly and the shadows of the butterfly's lil legs just makes me smile. 


All that was left to do was add the clock mechanism and hands and set the time. I love this clock and the combination of skull, flowers and butterflies. The MDF is a great surface to work on, beautifully smooth, and at 15 inches across this is a really big clock . Some things I feel confident in drawing, others I don't, but having the stamps there as a guide is a fantastic way to get the correct shapes into place before painting. 

Try painting over your stamped images, even the outlines, you will end up with a very different, more painterly effect. 

Hope you enjoyed that, just in time for Halloween!

Darcy x


We would love you to join in with challenge #19: Faces If you are inspired by any of our guests who blog with us over the fortnight, then please join in and link up your creativity HERE. 

All links go in the draw to win a voucher to spend on products of your choice from the PaperArtsy online store. The Faces link will close 17:00 (London Time) Sunday, Oct 25th winner will be announced 2 hours later at 19:00.